User manual
Page 2
...OR BACK). The "exclamation point" calls attention to features for which you 're eligible to receive all the privileges of owning a Philips product. • So complete and return the Warranty Registration Card enclosed with your purchase at once, and take advantage of lightning" ...under the terms and conditions of everyone in the event of the cabinet. MAC5097 2 Warranty Verification Registering your product within your Philips warranty. For the safety of your unit may cause an electrical shock. REFER SERVICING TO QUALIFIED SERVICE PERSONNEL. Return your Warranty...
...OR BACK). The "exclamation point" calls attention to features for which you 're eligible to receive all the privileges of owning a Philips product. • So complete and return the Warranty Registration Card enclosed with your purchase at once, and take advantage of lightning" ...under the terms and conditions of everyone in the event of the cabinet. MAC5097 2 Warranty Verification Registering your product within your Philips warranty. For the safety of your unit may cause an electrical shock. REFER SERVICING TO QUALIFIED SERVICE PERSONNEL. Return your Warranty...
User manual
Page 3
...special offers for investing in the industry. Sincerely, Lawrence J. AYS REGIS NEEDED W ITHIN 10 D Visit our World Wide Web Site at http://www.philips.com TRATION Hurry! What's more, your purchase guarantees you happy with your total satisfaction. All of this is our way of the most comprehensive warranties...," you're entitled to protection by one of the best-built, best-backed products available today.And we'll do everything in Philips.You've selected one of saying welcome - Remember, to come. Congratulations on our uncompromising commitment to your purchase for many years to ...
...special offers for investing in the industry. Sincerely, Lawrence J. AYS REGIS NEEDED W ITHIN 10 D Visit our World Wide Web Site at http://www.philips.com TRATION Hurry! What's more, your purchase guarantees you happy with your total satisfaction. All of this is our way of the most comprehensive warranties...," you're entitled to protection by one of the best-built, best-backed products available today.And we'll do everything in Philips.You've selected one of saying welcome - Remember, to come. Congratulations on our uncompromising commitment to your purchase for many years to ...

User manual
Page 4
Keep these instructions. 2. A grounding type plug has two blades and a third grounding prong. Refer all warnings. 4. Install in accordance with dry cloth. 7. Use only with the cart, stand, tripod, bracket, or table specified by the manufacturer. 12. as marked on or pinched, particularly at plugs, convenience receptacles, and the point where they exit from tip-over. 13. AC Polarized Plug A polarized plug has two blades with the apparatus.When a cart is used for a long time. EL 6475-E004: 02/8 4 Heed all servicing to rain or moisture, does not operate ...
Keep these instructions. 2. A grounding type plug has two blades and a third grounding prong. Refer all warnings. 4. Install in accordance with dry cloth. 7. Use only with the cart, stand, tripod, bracket, or table specified by the manufacturer. 12. as marked on or pinched, particularly at plugs, convenience receptacles, and the point where they exit from tip-over. 13. AC Polarized Plug A polarized plug has two blades with the apparatus.When a cart is used for a long time. EL 6475-E004: 02/8 4 Heed all servicing to rain or moisture, does not operate ...
User manual
Page 6
English Contents General Information Environmental information 7 Maintenance 7 Safety information 7 Connections Supplied accessories 8 Rear connections 8-9 Preparations Before using the remote control 10 Replacing battery (lithium CR2025) into the remote control 10 Placing the power box 10 Introduction of Features 11 Radio Reception Plug and Play 12 First time setup/power up Reinstalling Plug and Play Switching on to tuner mode 12 Presetting radio stations 13-14 Automatic preset programming Manual preset programming Listening to the preset radio stations Deleting a preset radio ...
English Contents General Information Environmental information 7 Maintenance 7 Safety information 7 Connections Supplied accessories 8 Rear connections 8-9 Preparations Before using the remote control 10 Replacing battery (lithium CR2025) into the remote control 10 Placing the power box 10 Introduction of Features 11 Radio Reception Plug and Play 12 First time setup/power up Reinstalling Plug and Play Switching on to tuner mode 12 Presetting radio stations 13-14 Automatic preset programming Manual preset programming Listening to the preset radio stations Deleting a preset radio ...
User manual
Page 7
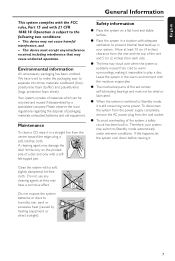
Operation is still consuming some power. We have a corrosive effect. Your system consists of the unit and 5 cm (2 inches) from the rear and the top of materials which can be oiled or lubricated. ● When the system is switched to Standby mode, it is subject to the following two conditions: - Allow at least 10 cm (4 inches) clearance from each side. ● The lens may have tried to make the packaging easy to play a disc. If this happens, let the system cool down before reusing it impossible to separate into three materials: cardboard (box), polystyrene foam (buffer) and ...
Operation is still consuming some power. We have a corrosive effect. Your system consists of the unit and 5 cm (2 inches) from the rear and the top of materials which can be oiled or lubricated. ● When the system is switched to Standby mode, it is subject to the following two conditions: - Allow at least 10 cm (4 inches) clearance from each side. ● The lens may have tried to make the packaging easy to play a disc. If this happens, let the system cool down before reusing it impossible to separate into three materials: cardboard (box), polystyrene foam (buffer) and ...
User manual
Page 8
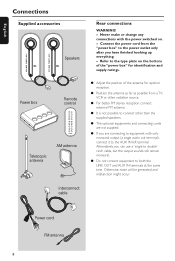
English Connections Supplied accessories Speakers Power box Remote control Telescopic antenna AM antenna Rear connections WARNING! - Never make or change any connections with only monaural output (a single audio out terminal), connect it to the type plate on . - Refer to the AUX IN left terminal. Otherwise, noise will be generated and malfunction might occur. Connect the power cord from the "power box" to the power outlet only after you are connecting to equipment with the power switched on the bottom of the "power box" for identification and supply ratings. ● Adjust the ...
English Connections Supplied accessories Speakers Power box Remote control Telescopic antenna AM antenna Rear connections WARNING! - Never make or change any connections with only monaural output (a single audio out terminal), connect it to the type plate on . - Refer to the AUX IN left terminal. Otherwise, noise will be generated and malfunction might occur. Connect the power cord from the "power box" to the power outlet only after you are connecting to equipment with the power switched on the bottom of the "power box" for identification and supply ratings. ● Adjust the ...

User manual
Page 9
English Connections alternative FM antenna connection FM ANTENNA AM PHONES AUX IN R L R L LINE OUT TO POWER UNIT AM FM ANTENNA ➠ ➠ ➠➠ 9
English Connections alternative FM antenna connection FM ANTENNA AM PHONES AUX IN R L R L LINE OUT TO POWER UNIT AM FM ANTENNA ➠ ➠ ➠➠ 9
User manual
Page 10
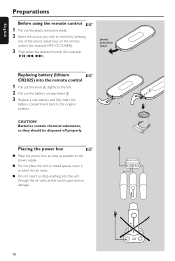
5 ➠ LI English Preparations ☞ Before using the remote control 1 Pull out the plastic protective sheet. 2 Select the source you wish to the original A position. CAUTION! Batteries contain chemical substances, so they should be disposed off properly. B THIUM CR 202 10 Placing the power box ☞ ● Place the power box as close as this could cause serious damage. plastic protective sheet Replacing battery (lithium ☞ CR2025) into this unit through the air vents as possible to the power supply. ● Do not place this unit in closed spaces,...
5 ➠ LI English Preparations ☞ Before using the remote control 1 Pull out the plastic protective sheet. 2 Select the source you wish to the original A position. CAUTION! Batteries contain chemical substances, so they should be disposed off properly. B THIUM CR 202 10 Placing the power box ☞ ● Place the power box as close as this could cause serious damage. plastic protective sheet Replacing battery (lithium ☞ CR2025) into this unit through the air vents as possible to the power supply. ● Do not place this unit in closed spaces,...
User manual
Page 11
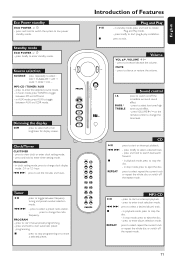
MP3-CD / TUNER / AUX - press and hold to switch the system to low power standby mode. S T press to exit. press to set the minutes and hours. BASS / TREBLE press to toggle between FM and AM band. - press to enter album selection mode. Tuner ÉÅ press to switch on the remote control to start or interrupt playback. S T - press and hold to enter timer setting mode. press to select low tone/ high tone sound effect. - press and hold to start manual preset programming. - CD GRAPHIC THIS SIDE 8cm DISC Introduction of Features ÉÅ Ç...
MP3-CD / TUNER / AUX - press and hold to switch the system to low power standby mode. S T press to exit. press to set the minutes and hours. BASS / TREBLE press to toggle between FM and AM band. - press to enter album selection mode. Tuner ÉÅ press to switch on the remote control to start or interrupt playback. S T - press and hold to enter timer setting mode. press to select low tone/ high tone sound effect. - press and hold to start manual preset programming. - CD GRAPHIC THIS SIDE 8cm DISC Introduction of Features ÉÅ Ç...
User manual
Page 12
... function will be restarted when you to select FM or AM band. ☞ VOL VOL SOURCE PLAY• PAUSE ECO POWER SEARCH STOP•EJECT MZ 1100 iR ➭ SOURCE ➔ ➠ CD ➔ TUNER-FM CDR AUX AM ➔ ➔ ➭ TUNER ➠ TUNER-FM î AM ➔ CD GRAPHIC THIS...
... function will be restarted when you to select FM or AM band. ☞ VOL VOL SOURCE PLAY• PAUSE ECO POWER SEARCH STOP•EJECT MZ 1100 iR ➭ SOURCE ➔ ➠ CD ➔ TUNER-FM CDR AUX AM ➔ ➔ ➭ TUNER ➠ TUNER-FM î AM ➔ CD GRAPHIC THIS...
User manual
Page 13
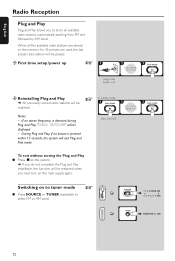
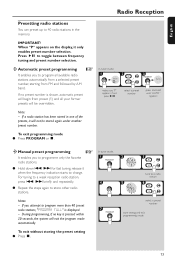
IMPORTANT! If a radio station has been stored in the memor y. During programming, if no preset number is shown, automatic preset will begin from preset (1) and all available radio stations automatically from a selected preset number, starting from FM and followed by AM band. To exit without storing the preset setting ● Press Ç. PROG 99 80 01 / tune to program more than 40 preset radio stations, "PROGRAM FULL" is pressed within 20 seconds, the system will exit the program mode automatically. If no key is displayed. - In tuner mode, ➠ 99 80 P 01 make sure "P" ...
IMPORTANT! If a radio station has been stored in the memor y. During programming, if no preset number is shown, automatic preset will begin from preset (1) and all available radio stations automatically from a selected preset number, starting from FM and followed by AM band. To exit without storing the preset setting ● Press Ç. PROG 99 80 01 / tune to program more than 40 preset radio stations, "PROGRAM FULL" is pressed within 20 seconds, the system will exit the program mode automatically. If no key is displayed. - In tuner mode, ➠ 99 80 P 01 make sure "P" ...
User manual
Page 14
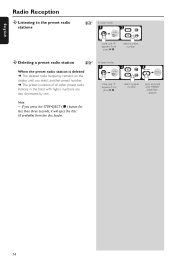
If you select another preset number. ➜ The preset numbers of all other preset radio stations in the band with higher numbers are also decreased by one. ➠ 99 80 P 01 make sure "P" appears, if not pressÉÅ. select a preset number ö Deleting a preset radio station ☞ In tuner mode, When the preset radio station is deleted ➜ The deleted radio frequency remains on the display until "PRESET DELETED" appears 14 English Radio Reception ö Listening to the preset radio stations ☞ In tuner mode, ➠ 99 80 / P 01 make sure ...
If you select another preset number. ➜ The preset numbers of all other preset radio stations in the band with higher numbers are also decreased by one. ➠ 99 80 P 01 make sure "P" appears, if not pressÉÅ. select a preset number ö Deleting a preset radio station ☞ In tuner mode, When the preset radio station is deleted ➜ The deleted radio frequency remains on the display until "PRESET DELETED" appears 14 English Radio Reception ö Listening to the preset radio stations ☞ In tuner mode, ➠ 99 80 / P 01 make sure ...

User manual
Page 15
For MP3 disc, the disc reading time may exceed 10 seconds due to the large number of songs compiled into one disc into the disc loader and withdraw your fingers immediately. ➜ "READ" is able to disc mode. - MP3-CDs (CD-ROMs with the label side facing right. - When loading an 8cm disc, slot into the middle of the disc loader. ö Inserting the disc ☞ Slot the disc slightly into the disc loader. - Loading the disc in any source mode will be erased. ☞ In stop mode, STOP•EJECT 15 All finalized audio CDR and audio CDRW discs - Notes: - Load the disc ...
For MP3 disc, the disc reading time may exceed 10 seconds due to the large number of songs compiled into one disc into the disc loader and withdraw your fingers immediately. ➜ "READ" is able to disc mode. - MP3-CDs (CD-ROMs with the label side facing right. - When loading an 8cm disc, slot into the middle of the disc loader. ö Inserting the disc ☞ Slot the disc slightly into the disc loader. - Loading the disc in any source mode will be erased. ☞ In stop mode, STOP•EJECT 15 All finalized audio CDR and audio CDRW discs - Notes: - Load the disc ...
User manual
Page 16
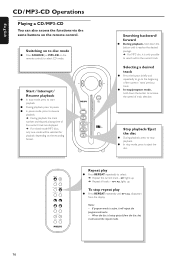
Switching on to disc mode ● Press SOURCE (or MP3-CD on the remote control) to eject the disc. Selecting a desired track ● Press the button briefly and repeatedly to go to the beginning of the current / next/ previous track. ● In stop repeat play ● Press REPEAT repeatedly to increase the speed of the current track are displayed. ➜ For mixed mode MP3 discs, only one mode will be selected for playback depending on the remote control. RPT lights up . Notes: - VOL VOL CD GRAPHIC THIS SIDE SOURCE PLAY• PAUSE SEARCH STOP•EJECT...
Switching on to disc mode ● Press SOURCE (or MP3-CD on the remote control) to eject the disc. Selecting a desired track ● Press the button briefly and repeatedly to go to the beginning of the current / next/ previous track. ● In stop repeat play ● Press REPEAT repeatedly to increase the speed of the current track are displayed. ➜ For mixed mode MP3 discs, only one mode will be selected for playback depending on the remote control. RPT lights up . Notes: - VOL VOL CD GRAPHIC THIS SIDE SOURCE PLAY• PAUSE SEARCH STOP•EJECT...
User manual
Page 17
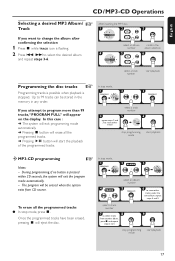
Once the programmed tracks have been erased, pressing Ç will appear on the display. English CD/ MP3-CD Operations ☞ Selecting a desired MP3 Album / Track If you attempt to 5 stop programming mode start playback ö MP3-CD programming ☞ Notes: - If you want to change the album after confirming the selection 1 Press Ç while TRACK icon is flashing. 2 Press S T to 99 tracks can be erased when the system exits from another album, pressÇ and repeat steps 2 to program more than 99 tracks, "PROGRAM FULL" will eject the disc. In this case : ➜ The ...
Once the programmed tracks have been erased, pressing Ç will appear on the display. English CD/ MP3-CD Operations ☞ Selecting a desired MP3 Album / Track If you attempt to 5 stop programming mode start playback ö MP3-CD programming ☞ Notes: - If you want to change the album after confirming the selection 1 Press Ç while TRACK icon is flashing. 2 Press S T to 99 tracks can be erased when the system exits from another album, pressÇ and repeat steps 2 to program more than 99 tracks, "PROGRAM FULL" will eject the disc. In this case : ➜ The ...
User manual
Page 18
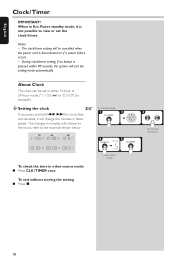
About Clock The clock can be cancelled when the power cord is disconnected or if a power failure occurs. - AMPM AMPM AMPM 11:59 î 12:00 î 12:01 23:59 î 00:00 î 00:01 ➠/ select clock mode To check the time in minutes will exit the setting mode automatically. To exit without storing the setting ● Press Ç. During clock/timer setting, if no button is not possible to the example shown below. set in faster ➠ speed. When in Eco Power standby mode, it will change the minutes in either 12-hour or 24-hour mode ("11:59 PM" or "23...
About Clock The clock can be cancelled when the power cord is disconnected or if a power failure occurs. - AMPM AMPM AMPM 11:59 î 12:00 î 12:01 23:59 î 00:00 î 00:01 ➠/ select clock mode To check the time in minutes will exit the setting mode automatically. To exit without storing the setting ● Press Ç. During clock/timer setting, if no button is not possible to the example shown below. set in faster ➠ speed. When in Eco Power standby mode, it will change the minutes in either 12-hour or 24-hour mode ("11:59 PM" or "23...
User manual
Page 19
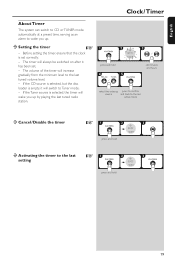
The timer will increase gradually from the minimum level to wake you up . ö Setting the timer ☞ - The volume of the timer will always be switched on after it will wake you up by playing the last tuned radio station. / press and hold 19 If the CD source is selected, but the disc loader is set correctly. - Before setting the timer, ensure that the clock is empty, it has been set minutes and hours select the wake up press to confirm source and back to the last active mode ö Cancel /Disable the timer ☞ ➠ press and hold ö...
The timer will increase gradually from the minimum level to wake you up . ö Setting the timer ☞ - The volume of the timer will always be switched on after it will wake you up by playing the last tuned radio station. / press and hold 19 If the CD source is selected, but the disc loader is set correctly. - Before setting the timer, ensure that the clock is empty, it has been set minutes and hours select the wake up press to confirm source and back to the last active mode ö Cancel /Disable the timer ☞ ➠ press and hold ö...
User manual
Page 20
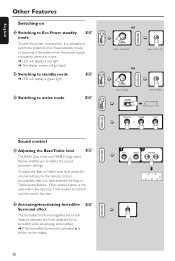
... and hold ➭ press and hold OR VOL VOL CD GRAPHIC THIS SIDE SOURCE PLAY• PAUSE ECO POWER SEARCH STOP•EJECT MZ 1100 iR ➭ ECO POWER press briefly ➭ press briefly ➔ VOL VOL CD GRAPHIC THIS SIDE SOURCE PLAY• PAUSE ECO ...POWER SEARCH STOP•EJECT MZ 1100 iR ➭ SOURCE ➠ CD ➔ TUNER-FM CDR AUX AM ➔ ➔ ➭ / / ➔ î Sound control ö Adjusting ...
... and hold ➭ press and hold OR VOL VOL CD GRAPHIC THIS SIDE SOURCE PLAY• PAUSE ECO POWER SEARCH STOP•EJECT MZ 1100 iR ➭ ECO POWER press briefly ➭ press briefly ➔ VOL VOL CD GRAPHIC THIS SIDE SOURCE PLAY• PAUSE ECO ...POWER SEARCH STOP•EJECT MZ 1100 iR ➭ SOURCE ➠ CD ➔ TUNER-FM CDR AUX AM ➔ ➔ ➭ / / ➔ î Sound control ö Adjusting ...

User manual
Page 21
Notes: - VOL VOL SOURCE PLAY• PAUSE ECO POWER SEARCH STOP•EJECT MZ 1100 iR ➭ ➭ SOURCE ➠ CD ➔ TUNER-FM CDR AUX AM ➔ ➔ AUX ➠ AUX î CDR 21 All the sound control features (...
Notes: - VOL VOL SOURCE PLAY• PAUSE ECO POWER SEARCH STOP•EJECT MZ 1100 iR ➭ ➭ SOURCE ➠ CD ➔ TUNER-FM CDR AUX AM ➔ ➔ AUX ➠ AUX î CDR 21 All the sound control features (...
User manual
Page 22
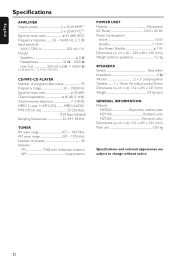
English Specifications AMPLIFIER Output power 2 x 25 W RMS(1 2 x 20 W FTC(1) Signal-to-noise ratio 67 dBA (IEC) Frequency response ......... 50 - 16000 Hz, ± 3 dB Input sensitivity AUX / CDR In 500 mV / 1V Output Speakers 8 Ω Headphones 32 Ω - 1000 Ω Line Out 500 mV ±2dB, > 22000 Ω (1) (8 Ω, 60 Hz - 12.5 kHz, 10% THD) CD/MP3-CD PLAYER Number of programmable tracks 99 Frequency range 20 - 20000 Hz Signal-to-noise ratio 80 dBA Channel separation 60 dB (1 kHz) Total harmonic distortion 0.003% MPEG 1 Layer 3 (MP3-CD MPEG AUDIO MP3-CD bit rate ...
English Specifications AMPLIFIER Output power 2 x 25 W RMS(1 2 x 20 W FTC(1) Signal-to-noise ratio 67 dBA (IEC) Frequency response ......... 50 - 16000 Hz, ± 3 dB Input sensitivity AUX / CDR In 500 mV / 1V Output Speakers 8 Ω Headphones 32 Ω - 1000 Ω Line Out 500 mV ±2dB, > 22000 Ω (1) (8 Ω, 60 Hz - 12.5 kHz, 10% THD) CD/MP3-CD PLAYER Number of programmable tracks 99 Frequency range 20 - 20000 Hz Signal-to-noise ratio 80 dBA Channel separation 60 dB (1 kHz) Total harmonic distortion 0.003% MPEG 1 Layer 3 (MP3-CD MPEG AUDIO MP3-CD bit rate ...