User Manual
Page 3
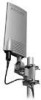
... 4:38 PM Page 3 Safety Instructions EN Philips MANT940 Indoor /Outdoor UHF/ VHF Television antenna Antenna grounding and safety warning 1. Antenna dicharge units (or Lightning Arrestors) should be connected with an approved lighting arresting device. IMPORTANT READ BEFORE INSTALLATION The installation or dismantling of the conductors to the building. Do not place an antenna where it could potentially fall on...
... 4:38 PM Page 3 Safety Instructions EN Philips MANT940 Indoor /Outdoor UHF/ VHF Television antenna Antenna grounding and safety warning 1. Antenna dicharge units (or Lightning Arrestors) should be connected with an approved lighting arresting device. IMPORTANT READ BEFORE INSTALLATION The installation or dismantling of the conductors to the building. Do not place an antenna where it could potentially fall on...
User Manual
Page 4
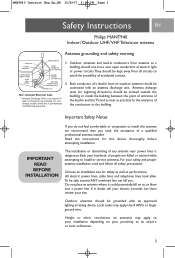
... that there are all assembly work on the ground. Call your installation procedure. If he has stopped breathing, immediately administer cardiopulmonary resuscitation (CPR) and stay with a power line . . . Do not install antenna wire(s) over or under utility lines. Important Information Important installation information The MANT940 uses a power injection module to plan your local power company...
... that there are all assembly work on the ground. Call your installation procedure. If he has stopped breathing, immediately administer cardiopulmonary resuscitation (CPR) and stay with a power line . . . Do not install antenna wire(s) over or under utility lines. Important Information Important installation information The MANT940 uses a power injection module to plan your local power company...
User Manual
Page 5
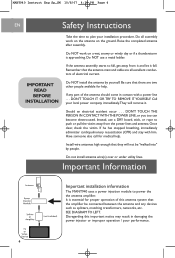
...not fully tighten the screw to allow for the antenna to have an unobstructed path to 6VDC 1 3. If possible locate a stud to the L - MANT940 Instruct Eng Sp_SM 10/8/07 4:38 PM Page 5 Parts Included EN Parts included: 1. MANT940 Antenna 1 2. Nuts 2 5. Weather Boot 1 11.... Before Installation determine the best location for the four 2" wood screws. For best results the antenna should be facing the transmitter location. If a stud is important for later adjustment (fig. 1). 2. Power Injector 1 12. For indoor wall mount installation: NOTE: Do all antenna assembly ...
...not fully tighten the screw to allow for the antenna to have an unobstructed path to 6VDC 1 3. If possible locate a stud to the L - MANT940 Instruct Eng Sp_SM 10/8/07 4:38 PM Page 5 Parts Included EN Parts included: 1. MANT940 Antenna 1 2. Nuts 2 5. Weather Boot 1 11.... Before Installation determine the best location for the four 2" wood screws. For best results the antenna should be facing the transmitter location. If a stud is important for later adjustment (fig. 1). 2. Power Injector 1 12. For indoor wall mount installation: NOTE: Do all antenna assembly ...
User Manual
Page 6
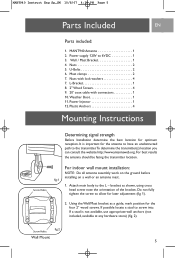
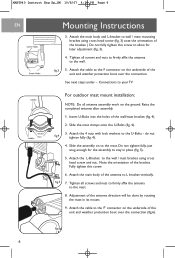
...assembly on the ground. Fully tighten this screw to the 'F' connector on the underside of the wall/mast bracket (fig. 4). 2. Tighten all antenna assembly work on to the wall. See next steps under - Insert U-Bolts into the holes of the unit and weather protection boot over the ... the 4 nuts with lock washers to the mast. 8. Connections to your TV For outdoor mast mount installation: NOTE: Do all screws and nuts to firmly affix the antenna to the U-Bolts - do not tighten fully (fig. 4). 4. MANT940 Instruct Eng Sp_SM 10/8/07 4:38 PM Page 6 EN Mounting Instructions 3.
...assembly on the ground. Fully tighten this screw to the 'F' connector on the underside of the wall/mast bracket (fig. 4). 2. Tighten all antenna assembly work on to the wall. See next steps under - Insert U-Bolts into the holes of the unit and weather protection boot over the ... the 4 nuts with lock washers to the mast. 8. Connections to your TV For outdoor mast mount installation: NOTE: Do all screws and nuts to firmly affix the antenna to the U-Bolts - do not tighten fully (fig. 4). 4. MANT940 Instruct Eng Sp_SM 10/8/07 4:38 PM Page 6 EN Mounting Instructions 3.


