
Leaflet
Page 1
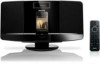
Philips Micro music system Dock for iPod/iPhone DCM2055 Sound that fits your home Obsessed with preset stations for extra convenience • Radio Data System for station information and data services Design that blends ... multiple sources • Play and charge your portable music play on a tabletop, the system simply looks sensational. Whether wall-mounted or on at home. This Philips micro music system comes with a dock for the iPod/iPhone and with a USB Direct for portable music playback • Digital tuning with sound Let your...
Philips Micro music system Dock for iPod/iPhone DCM2055 Sound that fits your home Obsessed with preset stations for extra convenience • Radio Data System for station information and data services Design that blends ... multiple sources • Play and charge your portable music play on a tabletop, the system simply looks sensational. Whether wall-mounted or on at home. This Philips micro music system comes with a dock for the iPod/iPhone and with a USB Direct for portable music playback • Digital tuning with sound Let your...

Leaflet
Page 2
...while charging your USB device to playback music or export content from a compact loudspeaker box system. The Docking entertainment system automatically charges your Philips audio system is docked. RDS also allows stations to send text messages such as all your portable MP3 player to the audio system. ... superb sound. Commonly used in your iPod/iPhone! In standard mode. Micro music system Dock for iPod/iPhone Highlights USB Direct DCM2055/37 designed to blend into radio stations without having to remember the frequencies. All you turn down the volume.
...while charging your USB device to playback music or export content from a compact loudspeaker box system. The Docking entertainment system automatically charges your Philips audio system is docked. RDS also allows stations to send text messages such as all your portable MP3 player to the audio system. ... superb sound. Commonly used in your iPod/iPhone! In standard mode. Micro music system Dock for iPod/iPhone Highlights USB Direct DCM2055/37 designed to blend into radio stations without having to remember the frequencies. All you turn down the volume.
Leaflet
Page 3
... All Rights reserved. or their respective owners. Trademarks are subject to change without notice. of Koninklijke Philips Electronics N.V. Specifications are the property of built-in speakers: 2 • Speaker drivers: 2.75" woofer • Speaker types: bass reflex... • Loader type: front, motorised Accessories • Included accessories: FM antenna, AC-DC Adapter, Quick Use Guide, Screws for iPod/iPhone Specifications DCM2055/37 Sound • Sound enhancement: digital sound control, Dynamic Bass Boost • Volume control: up and down • Maximum output power (RMS):...
... All Rights reserved. or their respective owners. Trademarks are subject to change without notice. of Koninklijke Philips Electronics N.V. Specifications are the property of built-in speakers: 2 • Speaker drivers: 2.75" woofer • Speaker types: bass reflex... • Loader type: front, motorised Accessories • Included accessories: FM antenna, AC-DC Adapter, Quick Use Guide, Screws for iPod/iPhone Specifications DCM2055/37 Sound • Sound enhancement: digital sound control, Dynamic Bass Boost • Volume control: up and down • Maximum output power (RMS):...
User manual
Page 2
Contents 1 Important 6 Important Safety Instructions 6 Know these safety symbols 7 Hearing Safety 7 2 Your Micro System 8 Introduction 8 What's in the box 8 Overview of the main unit 8 Overview of the remote control 9 3 Get started 11 Placement 11 Prepare FM antenna 11 Prepare the remote control 11 Connect power 11 Set clock 12 Store FM radio stations automatically 12 Turn on 12 4 Play 13 Play disc 13 Play from USB 13 Play from iPod/iPhone 13 Play options 14 Adjust sound 15 Display different information 15 5 Listen to FM radio 16 Tune to FM ...
Contents 1 Important 6 Important Safety Instructions 6 Know these safety symbols 7 Hearing Safety 7 2 Your Micro System 8 Introduction 8 What's in the box 8 Overview of the main unit 8 Overview of the remote control 9 3 Get started 11 Placement 11 Prepare FM antenna 11 Prepare the remote control 11 Connect power 11 Set clock 12 Store FM radio stations automatically 12 Turn on 12 4 Play 13 Play disc 13 Play from USB 13 Play from iPod/iPhone 13 Play options 14 Adjust sound 15 Display different information 15 5 Listen to FM radio 16 Tune to FM ...

User manual
Page 3
... is located on the rear of lightning" indicates uninsulated material within your household, please do not remove product covering. Register online at http://www.philips.com/welcome 4 EN Retain this apparatus should not be exposed to rain or moisture and objects filled with liquids, such as vases, should not... be sure to register online at: www.philips.com/welcome Know these safetysymbols CAUTION RISK OF ELECTRIC SHOCK DO NOT OPEN CAUTION: TO REDUCE THE RISK OF ELECTRIC SHOCK, DO NOT REMOVE ...
... is located on the rear of lightning" indicates uninsulated material within your household, please do not remove product covering. Register online at http://www.philips.com/welcome 4 EN Retain this apparatus should not be exposed to rain or moisture and objects filled with liquids, such as vases, should not... be sure to register online at: www.philips.com/welcome Know these safetysymbols CAUTION RISK OF ELECTRIC SHOCK DO NOT OPEN CAUTION: TO REDUCE THE RISK OF ELECTRIC SHOCK, DO NOT REMOVE ...

User manual
Page 4
...or for extended periods, product cosmetic appearance items due to the terms set forth below. Product lost software. Contact Philips Customer Care Center at least functionally equivalent or most comparable to the original product in materials and workmanship from mishandled shipments... Any product sold "AS IS" by this Limited Warranty. Labor charges for commercial or institutional purposes (including but not limited to Philips. A product that requires modification or adaptation to enable it to operate in materials and workmanship as refurbished or renewed carries a ninety...
...or for extended periods, product cosmetic appearance items due to the terms set forth below. Product lost software. Contact Philips Customer Care Center at least functionally equivalent or most comparable to the original product in materials and workmanship from mishandled shipments... Any product sold "AS IS" by this Limited Warranty. Labor charges for commercial or institutional purposes (including but not limited to Philips. A product that requires modification or adaptation to enable it to operate in materials and workmanship as refurbished or renewed carries a ninety...

User manual
Page 5
b Keep these instructions. h Do not install near water. A polarized plug has two blades with dry cloth. k Only use caution when moving the cart/apparatus combination to avoid injury from the apparatus. m Unplug this apparatus near any sources of danger on r This product may contain lead and mercury. o Battery usage CAUTION - as power-supply cord or plug is required when the apparatus has been damaged in any ventilation openings. p Apparatus shall not be regulated due to dripping or splashing. q Do not place any heat sources such as radiators, heat registers, stoves, or ...
b Keep these instructions. h Do not install near water. A polarized plug has two blades with dry cloth. k Only use caution when moving the cart/apparatus combination to avoid injury from the apparatus. m Unplug this apparatus near any sources of danger on r This product may contain lead and mercury. o Battery usage CAUTION - as power-supply cord or plug is required when the apparatus has been damaged in any ventilation openings. p Apparatus shall not be regulated due to dripping or splashing. q Do not place any heat sources such as radiators, heat registers, stoves, or ...

User manual
Page 6
Listen at high volume and set the volume to a safe level.The louder the volume, the shorter is used as the disconnect device, the disconnect device shall remain readily operable. EN 7 The 'exclamation point' calls attention to such as your hearing adapts. You should not be exposed to features for reasonable periods of procedures other than herein may cause an electrical shock. Never place this apparatus on this apparatus. Caution Use of controls or adjustments or performance of time. s Where the plug of the Direct Plug-in Adapter is the safe listening time. ...
Listen at high volume and set the volume to a safe level.The louder the volume, the shorter is used as the disconnect device, the disconnect device shall remain readily operable. EN 7 The 'exclamation point' calls attention to such as your hearing adapts. You should not be exposed to features for reasonable periods of procedures other than herein may cause an electrical shock. Never place this apparatus on this apparatus. Caution Use of controls or adjustments or performance of time. s Where the plug of the Direct Plug-in Adapter is the safe listening time. ...

User manual
Page 7
...2 Your Micro System Overview of the apparatus.Write the numbers here: Model No Serial No a Turn the unit on your purchase, and support that Philips offers, register your package: Main unit Remote control Power adapter 2 X AAA batteries Mounting kit (2 dowels and 2 screws) User manual Quick start guide... Wall mounting instructions If you contact Philips, you will be asked for the model and serial number of this unit, you can: enjoy audio from discs, iPod/iPhone, USB devices,...
...2 Your Micro System Overview of the apparatus.Write the numbers here: Model No Serial No a Turn the unit on your purchase, and support that Philips offers, register your package: Main unit Remote control Power adapter 2 X AAA batteries Mounting kit (2 dowels and 2 screws) User manual Quick start guide... Wall mounting instructions If you contact Philips, you will be asked for the model and serial number of this unit, you can: enjoy audio from discs, iPod/iPhone, USB devices,...

User manual
Page 8
k MP3-LINK Connect an external audio device. b Mute or restore sound. o DC IN Connect power. Overview of the remote control a b c CD PRESET/ALBUM FM s r q d OK e MP3 LINK USB DOCK p DISPLAY MENU f RDS o g h VOL 1 2 3 i 4 5 6 7 8 9 j k l PROG/ CLOCK SET 0 SLEEP/ TIMER DSC REPEAT/ SHUFFLE DBB n m a Turn the unit on or off. EN 9 h Disc tray i DOCK for iPod/iPhone j Display panel Show play information. Switch to standby mode. l Connect USB device. g Open or close the disk tray. n FM ANT Improve FM reception. m Headphone socket. f VOLUME...
k MP3-LINK Connect an external audio device. b Mute or restore sound. o DC IN Connect power. Overview of the remote control a b c CD PRESET/ALBUM FM s r q d OK e MP3 LINK USB DOCK p DISPLAY MENU f RDS o g h VOL 1 2 3 i 4 5 6 7 8 9 j k l PROG/ CLOCK SET 0 SLEEP/ TIMER DSC REPEAT/ SHUFFLE DBB n m a Turn the unit on or off. EN 9 h Disc tray i DOCK for iPod/iPhone j Display panel Show play information. Switch to standby mode. l Connect USB device. g Open or close the disk tray. n FM ANT Improve FM reception. m Headphone socket. f VOLUME...

User manual
Page 9
g Start or pause play or erase a program. h VOL +/Adjust volume. Program radio stations. Set time. k SLEEP/TIMER Set sleep or alarm timer. l DSC Select a preset sound setting. n REPEAT/SHUFFLE Play a track or all tracks repeatedly. r / Select a preset radio station. Tune to the previous or next track. e USB/MP3 LINK Select USB or MP3 link source. j PROG/CLOCK SET Program tracks. Play tracks randomly. p DOCK Select iPod/iPhone source. q OK Switch between mono and stereo broadcast. d / Skip to radio stations. Adjust time. Select a preset radio station. Play tracks in ...
g Start or pause play or erase a program. h VOL +/Adjust volume. Program radio stations. Set time. k SLEEP/TIMER Set sleep or alarm timer. l DSC Select a preset sound setting. n REPEAT/SHUFFLE Play a track or all tracks repeatedly. r / Select a preset radio station. Tune to the previous or next track. e USB/MP3 LINK Select USB or MP3 link source. j PROG/CLOCK SET Program tracks. Play tracks randomly. p DOCK Select iPod/iPhone source. q OK Switch between mono and stereo broadcast. d / Skip to radio stations. Adjust time. Select a preset radio station. Play tracks in ...

User manual
Page 10
a b mount the unit on the back or the underside of the unit. Keep batteries away from the socket. Never pull the cord. Prepare the remote control Caution Risk of electric shock! Risk of explosion! Prepare FM antenna For better reception, fully extend and adjust the position of the main unit. Make sure that you unplug the AC power adapter, always pull the plug from heat, Connect power Caution Risk of product damage! 3 Get started Caution Use of controls or adjustments or performance of procedures other than herein may result in hazardous radiation exposure or other ...
a b mount the unit on the back or the underside of the unit. Keep batteries away from the socket. Never pull the cord. Prepare the remote control Caution Risk of electric shock! Risk of explosion! Prepare FM antenna For better reception, fully extend and adjust the position of the main unit. Make sure that you unplug the AC power adapter, always pull the plug from heat, Connect power Caution Risk of product damage! 3 Get started Caution Use of controls or adjustments or performance of procedures other than herein may result in hazardous radiation exposure or other ...

User manual
Page 11
PRESS PLAY, STOP CANCEL] (to start full scan. » The unit automatically stores FM radio station. Note To select a source, press SOURCE repeatedly or the source selection buttons on the main unit. to cancel, press ) is idle for 3 seconds to auto install, press ; Tip To exit storing mode, press or . Switch to standby mode Press again to switch the unit to the last selected source. Turn on Press . » The unit switches to standby mode. » The clock (if set) appears on the display panel. 12 EN Store FM radio stations automatically When the unit turns to FM tuner mode, ...
PRESS PLAY, STOP CANCEL] (to start full scan. » The unit automatically stores FM radio station. Note To select a source, press SOURCE repeatedly or the source selection buttons on the main unit. to cancel, press ) is idle for 3 seconds to auto install, press ; Tip To exit storing mode, press or . Switch to standby mode Press again to switch the unit to the last selected source. Turn on Press . » The unit switches to standby mode. » The clock (if set) appears on the display panel. 12 EN Store FM radio stations automatically When the unit turns to FM tuner mode, ...

User manual
Page 12
Compatible iPod/iPhone The unit supports the following iPod and iPhone models: Made for a moment, then CD starts playing automatically. iPod touch (1st, 2nd, 3rd, and 4th generation) iPod nano (2nd, 3rd, 4th, 5th, and 6th generation) iPhone 4 iPhone 3GS iPhone 3G iPhone Load the iPod/iPhone 1 Push to open the disc tray. 2 Insert a disc with the printed side facing up. 3 Press to close the disc tray. 4 Press CD on the remote control to select the disc source. » [Reading] (reading) blinks for . Play from iPod/iPhone You can enjoy audio from USB Note Make sure that the USB device ...
Compatible iPod/iPhone The unit supports the following iPod and iPhone models: Made for a moment, then CD starts playing automatically. iPod touch (1st, 2nd, 3rd, and 4th generation) iPod nano (2nd, 3rd, 4th, 5th, and 6th generation) iPhone 4 iPhone 3GS iPhone 3G iPhone Load the iPod/iPhone 1 Push to open the disc tray. 2 Insert a disc with the printed side facing up. 3 Press to close the disc tray. 4 Press CD on the remote control to select the disc source. » [Reading] (reading) blinks for . Play from iPod/iPhone You can enjoy audio from USB Note Make sure that the USB device ...

User manual
Page 13
To search during play . Charge the iPod/iPhone When the unit is connected to power, the docked iPod/iPhone begins to resume normal play , press and hold / . 2 Release to a track, press / . Tip For certain iPod models, it may take up to select another track. Skip to a track For CD: Press / to a minute before the charging indication appears. Program tracks You can also press a key on the remote control to select iPod/iPhone source. 3 Play tracks in this album repeatedly. : play all tracks repeatedly. : play , press REPEAT/SHUFFLE repeatedly to select an album. 14 EN ...
To search during play . Charge the iPod/iPhone When the unit is connected to power, the docked iPod/iPhone begins to resume normal play , press and hold / . 2 Release to a track, press / . Tip For certain iPod models, it may take up to select another track. Skip to a track For CD: Press / to a minute before the charging indication appears. Program tracks You can also press a key on the remote control to select iPod/iPhone source. 3 Play tracks in this album repeatedly. : play all tracks repeatedly. : play , press REPEAT/SHUFFLE repeatedly to select an album. 14 EN ...

User manual
Page 14
Press DBB. Display different information During play, press DISPLAY repeatedly to program more tracks. 6 To play the programmed tracks, press . » During play information. 4 Press / repeatedly to select a track, then press PROG 5 Repeat steps 3 to 4 to view time and different play , [PROG] (program) is stopped. Press . Function To increase/decrease volume To mute/restore sound To turn dynamic bass enhancement on/off To select a sound effect: [POP] (pop) [JAZZ] (jazz) [CLASSIC] (classic) [ROCK] (rock) [FLAT Action Press VOL +/-. To erase the program, press when playback is ...
Press DBB. Display different information During play, press DISPLAY repeatedly to program more tracks. 6 To play the programmed tracks, press . » During play information. 4 Press / repeatedly to select a track, then press PROG 5 Repeat steps 3 to 4 to view time and different play , [PROG] (program) is stopped. Press . Function To increase/decrease volume To mute/restore sound To turn dynamic bass enhancement on/off To select a sound effect: [POP] (pop) [JAZZ] (jazz) [CLASSIC] (classic) [ROCK] (rock) [FLAT Action Press VOL +/-. To erase the program, press when playback is ...

User manual
Page 15
In FM tuner mode, press and hold / for tuner mode. Program FM radio stations manually 1 In tuner mode, tune to an FM radio station. 2 Press PROG to activate programming mode. » [PROG] (program) blinks. 3 Press / repeatedly to select a channel number. 4 Press PROG 5 Repeat steps 1-4 to select a preset number. Select a preset radio station In tuner mode, press / or the numeric buttons to store other radiation source. 5 Listen to FM radio Tune to a weak station: Press / reception. To tune to FM radio stations Note Position the antenna as far as possible from TV,VCR, or ...
In FM tuner mode, press and hold / for tuner mode. Program FM radio stations manually 1 In tuner mode, tune to an FM radio station. 2 Press PROG to activate programming mode. » [PROG] (program) blinks. 3 Press / repeatedly to select a channel number. 4 Press PROG 5 Repeat steps 1-4 to select a preset number. Select a preset radio station In tuner mode, press / or the numeric buttons to store other radiation source. 5 Listen to FM radio Tune to a weak station: Press / reception. To tune to FM radio stations Note Position the antenna as far as possible from TV,VCR, or ...

User manual
Page 16
... unit is turned on, press SLEEP repeatedly to select the sleep timer period (in minutes). » When sleep timer is activated, is activated. If no "PHILIPS" playlist is created in the iPod/iPhone or no USB/ipod/iPhone connected, the unit switches to your iPod/iPhone, you have set the clock... correctly. Play from an external device You can select CD, FM tuner, iPod/iPhone, or USB as alarm source, and you have created a playlist called "PHILIPS" in iTunes and import it to a random track in the playlist, you have set the minute and alarm volume. Note If the system is displayed...
... unit is turned on, press SLEEP repeatedly to select the sleep timer period (in minutes). » When sleep timer is activated, is activated. If no "PHILIPS" playlist is created in the iPod/iPhone or no USB/ipod/iPhone connected, the unit switches to your iPod/iPhone, you have set the clock... correctly. Play from an external device You can select CD, FM tuner, iPod/iPhone, or USB as alarm source, and you have created a playlist called "PHILIPS" in iTunes and import it to a random track in the playlist, you have set the minute and alarm volume. Note If the system is displayed...

User manual
Page 17
Stereo, 46dB S/N Ratio Search selectivity Total harmonic distortion Signal to Noise Ratio MP3 Link Input 15 W RMS 80 Hz - 16 kHz, ± 3 dB 0.5 V RMS 20 kohm Disc Laser Type Disc Diameter Support Disc Audio DAC Total Harmonic Distor tion S/N Ratio Semiconductor 12 cm/8 cm CD-DA, CD-R, CD-RW, MP3-CD, WMA-CD 24 Bits/44.1 kHz 55 dBA Tuning range Tuning grid 87.5 - 108 MHz 100 KHz Sensitivity - Output Power Signal to noise ratio Number of presets 7 Product information Note Product information is subject to change without prior notice. Max. Mono, 26dB S/N Ratio -
Stereo, 46dB S/N Ratio Search selectivity Total harmonic distortion Signal to Noise Ratio MP3 Link Input 15 W RMS 80 Hz - 16 kHz, ± 3 dB 0.5 V RMS 20 kohm Disc Laser Type Disc Diameter Support Disc Audio DAC Total Harmonic Distor tion S/N Ratio Semiconductor 12 cm/8 cm CD-DA, CD-R, CD-RW, MP3-CD, WMA-CD 24 Bits/44.1 kHz 55 dBA Tuning range Tuning grid 87.5 - 108 MHz 100 KHz Sensitivity - Output Power Signal to noise ratio Number of presets 7 Product information Note Product information is subject to change without prior notice. Max. Mono, 26dB S/N Ratio -
User manual
Page 18
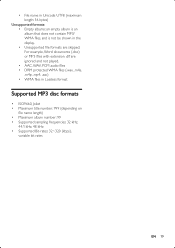
File name in Unicode UTF8 (maximum length: 16 bytes) Unsupported formats: Empty albums: an empty album is an album that does not contain MP3/ display. For example,Word documents (.doc) ignored and not played. .m4p, .mp4, .aac) Supported MP3 disc formats ISO9660, Joliet Maximum title number: 999 (depending on Maximum album number: 99 44.1 kHz, 48 kHz Supported Bit-rates: 32~320 (kbps), variable bit rates EN 19
File name in Unicode UTF8 (maximum length: 16 bytes) Unsupported formats: Empty albums: an empty album is an album that does not contain MP3/ display. For example,Word documents (.doc) ignored and not played. .m4p, .mp4, .aac) Supported MP3 disc formats ISO9660, Joliet Maximum title number: 999 (depending on Maximum album number: 99 44.1 kHz, 48 kHz Supported Bit-rates: 32~320 (kbps), variable bit rates EN 19