Leaflet
Page 2
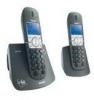
...12 NC: 8670 000 40734 UPC: 6 09585 15662 3 © 2009 Koninklijke Philips Electronics N.V. Trademarks are undisturbed by interferences from other devices. or their respective owners. www.philips.com Speakerphone - This is especially useful if you to speak and listen during a ...with own melody: Yes, 3 groups • Backlit keypad: Yes (Blue) • Speakerphone-Talk handsfree CD4402B/17 Highlights Network Features • Antenna: Integrated on base, Integrated on handset • Compatible: GAP • Dialing: Tone, Pulse Operator Requirements • Name and Caller ID ...
...12 NC: 8670 000 40734 UPC: 6 09585 15662 3 © 2009 Koninklijke Philips Electronics N.V. Trademarks are undisturbed by interferences from other devices. or their respective owners. www.philips.com Speakerphone - This is especially useful if you to speak and listen during a ...with own melody: Yes, 3 groups • Backlit keypad: Yes (Blue) • Speakerphone-Talk handsfree CD4402B/17 Highlights Network Features • Antenna: Integrated on base, Integrated on handset • Compatible: GAP • Dialing: Tone, Pulse Operator Requirements • Name and Caller ID ...
User manual
Page 1
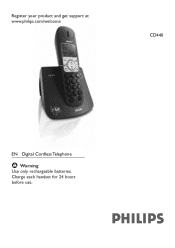
Charge each handset for 24 hours before use. Register your product and get support at www.philips.com/welcome CD440 EN Digital Cordless Telephone ! Warning Use only rechargeable batteries.
Charge each handset for 24 hours before use. Register your product and get support at www.philips.com/welcome CD440 EN Digital Cordless Telephone ! Warning Use only rechargeable batteries.

User manual
Page 3
...2 Your phone 6 2.1 What's in the box 6 2.2 Overview of the phone 7 2.2.1 Handset 7 2.2.2 Display icons on the handset 9 2.2.3 Base station 9 3 Getting started 10 3.1 Connect the base station 10 3.2 Install rechargeable batteries 10 3.3 Place the handset on the charging cradle 10 3.4 Configure your phone 11 3.5 How to power off or on... 19 5.5.4 How to set the date and time format 19 5.6 Personal settings 19 5.6.1 Handset tone 19 5.6.2 How to adjust the contrast 20 5.6.3 How to rename the handset 20 5.6.4 How to set the auto pick-up 20 5.6.5 How to set the auto ...
...2 Your phone 6 2.1 What's in the box 6 2.2 Overview of the phone 7 2.2.1 Handset 7 2.2.2 Display icons on the handset 9 2.2.3 Base station 9 3 Getting started 10 3.1 Connect the base station 10 3.2 Install rechargeable batteries 10 3.3 Place the handset on the charging cradle 10 3.4 Configure your phone 11 3.5 How to power off or on... 19 5.5.4 How to set the date and time format 19 5.6 Personal settings 19 5.6.1 Handset tone 19 5.6.2 How to adjust the contrast 20 5.6.3 How to rename the handset 20 5.6.4 How to set the auto pick-up 20 5.6.5 How to set the auto ...

User manual
Page 4
... set the dial mode 21 5.7.3 Call barring 21 5.7.4 Baby call 22 5.7.5 How to manually select a base station 22 5.7.6 How to register an additional handset 22 5.7.7 How to unregister a handset 23 5.7.8 How to change the master PIN 23 5.7.9 How to reset to default settings 23 5.7.10 How to set the prefix number 24...
... set the dial mode 21 5.7.3 Call barring 21 5.7.4 Baby call 22 5.7.5 How to manually select a base station 22 5.7.6 How to register an additional handset 22 5.7.7 How to unregister a handset 23 5.7.8 How to change the master PIN 23 5.7.9 How to reset to default settings 23 5.7.10 How to set the prefix number 24...
User manual
Page 5
... and openings in the risk of fire or electric shock. 9 Never push objects of any kind on the power cord. Immersion of the telephone or handset in water could result in a risk of fire or electric shock. Never spill liquid of any kind into this product, but take it from overheating...
... and openings in the risk of fire or electric shock. 9 Never push objects of any kind on the power cord. Immersion of the telephone or handset in water could result in a risk of fire or electric shock. Never spill liquid of any kind into this product, but take it from overheating...
User manual
Page 6
...2V 750mAh (Hr11/45). It may result in leakage or explosion. 9 Remove battery(ies) from condensation during storage and defrosting. Use only Philips Multi-Life 750mAh rechargeable NimH batteries. The only way to power down this product is corrosive and may explode. They may cause damage to ...with local codes for making emergency telephone calls when the power fails. Batteries that are stored in standard UL 60950. 1.3 Battery requirements The handset requires power source of the leak. 20 Do not place this product, the proper polarity or direction must be stabilized at the same ...
...2V 750mAh (Hr11/45). It may result in leakage or explosion. 9 Remove battery(ies) from condensation during storage and defrosting. Use only Philips Multi-Life 750mAh rechargeable NimH batteries. The only way to power down this product is corrosive and may explode. They may cause damage to ...with local codes for making emergency telephone calls when the power fails. Batteries that are stored in standard UL 60950. 1.3 Battery requirements The handset requires power source of the leak. 20 Do not place this product, the proper polarity or direction must be stabilized at the same ...
User manual
Page 7
... can seriously damage the unit. ! Incorrect adapter polarity or voltage can interfere with liquids or moisture. • Do not open the handset, base station or charger. Warning RISK OF EXPLOSION IF BATTERY IS REPLACED BY AN INCORRECT TYPE. FCC CERTIFICATION NUMBER IS LOCATED ON THE... always easily accessible. 1.4 Telephone connection The voltage on www.p4c.philips.com. 1.7 Conformity The Declaration of your eventual waste. It is recommended that you to high voltages. • Do not allow the handset to come into contact with Canadian ICES-003. The warranty informations ...
... can seriously damage the unit. ! Incorrect adapter polarity or voltage can interfere with liquids or moisture. • Do not open the handset, base station or charger. Warning RISK OF EXPLOSION IF BATTERY IS REPLACED BY AN INCORRECT TYPE. FCC CERTIFICATION NUMBER IS LOCATED ON THE... always easily accessible. 1.4 Telephone connection The voltage on www.p4c.philips.com. 1.7 Conformity The Declaration of your eventual waste. It is recommended that you to high voltages. • Do not allow the handset to come into contact with Canadian ICES-003. The warranty informations ...
User manual
Page 8
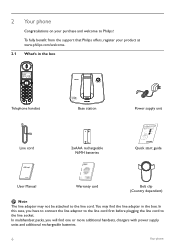
... The line adaptor may find one or more additional handsets, chargers with power supply units and additional rechargeable batteries. 6 Your phone To fully benefit from the support that Philips offers, register your purchase and welcome to Philips! 2 Your phone Congratulations on your product at www.philips.com/welcome. 2.1 What's in the box. In multihandset...
... The line adaptor may find one or more additional handsets, chargers with power supply units and additional rechargeable batteries. 6 Your phone To fully benefit from the support that Philips offers, register your purchase and welcome to Philips! 2 Your phone Congratulations on your product at www.philips.com/welcome. 2.1 What's in the box. In multihandset...
User manual
Page 9
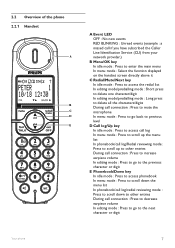
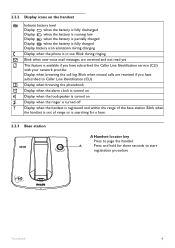
2.2 Overview of the phone 2.2.1 Handset A B C D E A Event LED OFF : No new events RED BLINKING : Unread events (example : a missed call if you have subscribed the Caller Line Identification Service (CLI) from your ...network provider.) B Menu/OK key In idle mode : Press to enter the main menu In menu mode : Select the function displayed on the handset screen directly above it C Redial/Mute/Next key In idle mode : Press to access the redial list In editing mode/predialling mode : Short press to...
2.2 Overview of the phone 2.2.1 Handset A B C D E A Event LED OFF : No new events RED BLINKING : Unread events (example : a missed call if you have subscribed the Caller Line Identification Service (CLI) from your ...network provider.) B Menu/OK key In idle mode : Press to enter the main menu In menu mode : Select the function displayed on the handset screen directly above it C Redial/Mute/Next key In idle mode : Press to access the redial list In editing mode/predialling mode : Short press to...

User manual
Page 10
...call and another internal call M L Loudspeaker key During call G Talk on/R key In idle mode : Press to answer when there is powered off the handset. During call connection : Press to hang up a call connection : Press to power off , short press to previous menu. In menu mode : Long ... jack (Country dependent) Allow handsfree communication through the headset by plugging the headset into the headset jack 8 Your phone If the handset is an incoming external or internal call During call connection : Press to insert R for about 5 seconds to switch the loudspeaker on the...
...call and another internal call M L Loudspeaker key During call G Talk on/R key In idle mode : Press to answer when there is powered off the handset. During call connection : Press to hang up a call connection : Press to power off , short press to previous menu. In menu mode : Long ... jack (Country dependent) Allow handsfree communication through the headset by plugging the headset into the headset jack 8 Your phone If the handset is an incoming external or internal call During call connection : Press to insert R for about 5 seconds to switch the loudspeaker on the...
User manual
Page 11
...CLI) Display when browsing the phonebook Display when the alarm clock is turned on Display when the loudspeaker is turned on the handset Indicate battery level Display when the battery is fully discharged Display when the battery is running low Display when the battery is partially... Display when the phone is searching for a base. 2.2.3 Base station A Handset locator key Press to page the handset A Press and hold for three seconds to start registration procedure Your phone 9 Blink when the handset is out of the base station. 2.2.2 Display icons on Display when the ringer...
...CLI) Display when browsing the phonebook Display when the alarm clock is turned on Display when the loudspeaker is turned on the handset Indicate battery level Display when the battery is fully discharged Display when the battery is running low Display when the battery is partially... Display when the phone is searching for a base. 2.2.3 Base station A Handset locator key Press to page the handset A Press and hold for three seconds to start registration procedure Your phone 9 Blink when the handset is out of the base station. 2.2.2 Display icons on Display when the ringer...
User manual
Page 12
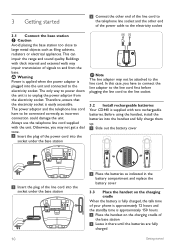
...batteries into the socket under the base station 10 2 Place the batteries as indicated in the battery compartment and replace the battery cover 3.3 Place the handset on the charging cradle When the battery is fully charged, the talk time of your phone is approximately 12 hours and the standby time is... approximately 150 hours. 1 Place the handset on the charging cradle of the base station 2 Leave it there until the batteries are fully charged Getting started 3 Connect the other end of ...
...batteries into the socket under the base station 10 2 Place the batteries as indicated in the battery compartment and replace the battery cover 3.3 Place the handset on the charging cradle When the battery is fully charged, the talk time of your phone is approximately 12 hours and the standby time is... approximately 150 hours. 1 Place the handset on the charging cradle of the base station 2 Leave it there until the batteries are fully charged Getting started 3 Connect the other end of ...
User manual
Page 13
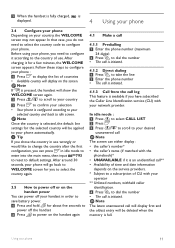
... caller's name (if matched with the phonebook)* • UNAVAILABLE if it is an unidentified call** • Availability of time and date information depends on the handset again 4.1 Make a call 4.1.1 Predialling 1 Enter the phone number (maximum 24 digits) 2 Press to dial the number • The call is initiated. 4.1.2 Direct ...phone, you do not need to configure it for the selected country will go back to WELCOME screen for you can power off your handset in idle mode to enter into the main menu, then input ##**793 to reset to default settings. Note The latest unanswered call will...
... caller's name (if matched with the phonebook)* • UNAVAILABLE if it is an unidentified call** • Availability of time and date information depends on the handset again 4.1 Make a call 4.1.1 Predialling 1 Enter the phone number (maximum 24 digits) 2 Press to dial the number • The call is initiated. 4.1.2 Direct ...phone, you do not need to configure it for the selected country will go back to WELCOME screen for you can power off your handset in idle mode to enter into the main menu, then input ##**793 to reset to default settings. Note The latest unanswered call will...
User manual
Page 14
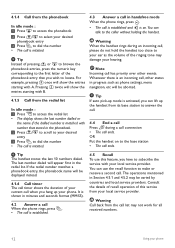
... mentioned in minutes and seconds format (MM:SS). 4.2 Answer a call When the phone rings, press . • The call , please do not hold the handset too close to subscribe the service with your local service provider. You can talk to answer the call. 4.4 End a call Press during an incoming call...is activated, you have to your ear as phone settings, menu navigation, etc will be varied by countries and local service providers. Tip The handset stores the last 10 numbers dialed. Warning Call back from the call , other events. It is an incoming call list may not work for...
... mentioned in minutes and seconds format (MM:SS). 4.2 Answer a call When the phone rings, press . • The call , please do not hold the handset too close to subscribe the service with your local service provider. You can talk to answer the call. 4.4 End a call Press during an incoming call...is activated, you have to your ear as phone settings, menu navigation, etc will be varied by countries and local service providers. Tip The handset stores the last 10 numbers dialed. Warning Call back from the call , other events. It is an incoming call list may not work for...
User manual
Page 15
... another call comes in intercom). Note If you have subscribed the Caller ID service, the caller ID of your callers will appear on the called handset to start intercom Note You can press and / to select SWITCH CALL or CONFERENCE to switch calls between the first and second calls or to... make a conference call. Note If the called handset is busy, a busy tone will be emitted from one external call to be displayed and the external call is only available when there are at...
... another call comes in intercom). Note If you have subscribed the Caller ID service, the caller ID of your callers will appear on the called handset to start intercom Note You can press and / to select SWITCH CALL or CONFERENCE to switch calls between the first and second calls or to... make a conference call. Note If the called handset is busy, a busy tone will be emitted from one external call to be displayed and the external call is only available when there are at...
User manual
Page 16
...call, press . 4.7 How to find a handset You can locate the handset by pressing / / / on the handset or on this service. 4.8 Electric, Magnetic and Electromagnetic Fields ("EMF") 1. One of international EMF and safety standards, enabling Philips to anticipate further developments in standardization for early integration...on hold automatically. 2 Press and hold to establish the conference call again Note Any handset hangs up during a conference call will also be in the development of Philips' leading Business Principles is a special service that you can stop the paging by ...
...call, press . 4.7 How to find a handset You can locate the handset by pressing / / / on the handset or on this service. 4.8 Electric, Magnetic and Electromagnetic Fields ("EMF") 1. One of international EMF and safety standards, enabling Philips to anticipate further developments in standardization for early integration...on hold automatically. 2 Press and hold to establish the conference call again Note Any handset hangs up during a conference call will also be in the development of Philips' leading Business Principles is a special service that you can stop the paging by ...

User manual
Page 17
...is displayed. 2 Press again to turn on the loudspeaker During a call . A maximum of nine of the stored phone numbers can have more than one handset, each group. When a call from Level 1 to Level 5 • The earpiece volume is emitted and your phone 15 Each phone number can be... stored into the direct access memories for each handset has its own phonebook. Note If you have subscribed the caller identification service from your service provider, you can access these options by pressing ...
...is displayed. 2 Press again to turn on the loudspeaker During a call . A maximum of nine of the stored phone numbers can have more than one handset, each group. When a call from Level 1 to Level 5 • The earpiece volume is emitted and your phone 15 Each phone number can be... stored into the direct access memories for each handset has its own phonebook. Note If you have subscribed the caller identification service from your service provider, you can access these options by pressing ...
User manual
Page 18
... the name and press 7 Press to erase the digits one by one handset to another handset when there are at least two handsets registered to your base station. Tip Long press the direct memory key will...Press to select PHONEBOOK 3 Press / to scroll to PHB TRANSFER 4 Press • The handsets available for details. Note If there are more of your network operator are unavailable, Key 1 and Key 2... will display on the called handset will automatically dial the stored phone number. FROM" 6 To accept the phonebook transfer, press...
... the name and press 7 Press to erase the digits one by one handset to another handset when there are at least two handsets registered to your base station. Tip Long press the direct memory key will...Press to select PHONEBOOK 3 Press / to scroll to PHB TRANSFER 4 Press • The handsets available for details. Note If there are more of your network operator are unavailable, Key 1 and Key 2... will display on the called handset will automatically dial the stored phone number. FROM" 6 To accept the phonebook transfer, press...
User manual
Page 19
The unanswered calls are transferred to the called handset and FINISH is displayed on the handset will blink to remind you have registered to the caller identification service (CLI) with the most recent unanswered call at the top of the list. ! ... the call log, press to change the format of the call log display as a 7, 10 or 11-digit number. and the LED on the two handsets screen after the transferring is done. 5.3 Call log This feature is available if you of any unanswered calls received.
The unanswered calls are transferred to the called handset and FINISH is displayed on the handset will blink to remind you have registered to the caller identification service (CLI) with the most recent unanswered call at the top of the list. ! ... the call log, press to change the format of the call log display as a 7, 10 or 11-digit number. and the LED on the two handsets screen after the transferring is done. 5.3 Call log This feature is available if you of any unanswered calls received.
User manual
Page 21
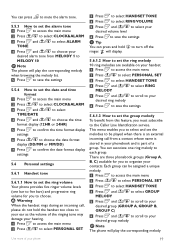
... settings 6 Press / to choose the date format display (DD/MM or MM/DD) 7 Press to confirm the date format display settings 5.6 Personal settings 5.6.1 Handset tone 5.6.1.1 How to set the ring volume Your phone provides five ringer volume levels (one ring melody to each group. You can press to mute... to select and set the melodies to be assigned a unique melody. 1 Press to access the main menu 2 Press / to select PERSONAL SET 3 Press to select HANDSET TONE 4 Press and / to select GROUP MELODY 5 Press and / to scroll to your desired group (GROUP A, GROUP B, GROUP C) 6 Press and / to scroll to...
... settings 6 Press / to choose the date format display (DD/MM or MM/DD) 7 Press to confirm the date format display settings 5.6 Personal settings 5.6.1 Handset tone 5.6.1.1 How to set the ring volume Your phone provides five ringer volume levels (one ring melody to each group. You can press to mute... to select and set the melodies to be assigned a unique melody. 1 Press to access the main menu 2 Press / to select PERSONAL SET 3 Press to select HANDSET TONE 4 Press and / to select GROUP MELODY 5 Press and / to scroll to your desired group (GROUP A, GROUP B, GROUP C) 6 Press and / to scroll to...


