
Owner's Manual
Page 3
...26 Utility stitches 26 Stretch stitches 26 Utility and stretch stitch combinations..26 Utility stitches and practical sewing Explanation of your Pfaff Select Lid 10 Connecting the foot control 10 Main switch 10 Accessory tray 11 Using the free arm 11 Bobbin winding 12... Stitch width dial 24 Needle position dial 24 Reverse sewing 25 Stitch length adjustment dial 25 Adjust stitch length 25 Buttonhole 25 Stretch stitches 25 Stitch selection - Contents Introduction Parts of the sewing chart 27 Needle thread tension 28 Topstitching 28 Straight stitch 29 Zigzag stitch ...
...26 Utility stitches 26 Stretch stitches 26 Utility and stretch stitch combinations..26 Utility stitches and practical sewing Explanation of your Pfaff Select Lid 10 Connecting the foot control 10 Main switch 10 Accessory tray 11 Using the free arm 11 Bobbin winding 12... Stitch width dial 24 Needle position dial 24 Reverse sewing 25 Stitch length adjustment dial 25 Adjust stitch length 25 Buttonhole 25 Stretch stitches 25 Stitch selection - Contents Introduction Parts of the sewing chart 27 Needle thread tension 28 Topstitching 28 Straight stitch 29 Zigzag stitch ...

Owner's Manual
Page 5
... PFAFF® dealer. Introduction 0 1 1 3 4 5 7 6 0 Standard Presser Foot With IDT (pictured) select 4.0 and 3.0 Without IDT select 2.0 1 Fancy Stitch Foot With IDT select 4.0 1 Clearview Foot (Fancy-stitch foot without IDT) 3 Blindhem/Overlock Foot With IDT (pictured) select 4.0 and 3.0 Without IDT select 2.0 4 Zipper Foot With IDT (pictured) select 4.0 and 3.0 Without IDT select 2.0 9 8 11 10 12 13 14 15 5 Buttonhole Foot 6 Darning Foot select...
... PFAFF® dealer. Introduction 0 1 1 3 4 5 7 6 0 Standard Presser Foot With IDT (pictured) select 4.0 and 3.0 Without IDT select 2.0 1 Fancy Stitch Foot With IDT select 4.0 1 Clearview Foot (Fancy-stitch foot without IDT) 3 Blindhem/Overlock Foot With IDT (pictured) select 4.0 and 3.0 Without IDT select 2.0 4 Zipper Foot With IDT (pictured) select 4.0 and 3.0 Without IDT select 2.0 9 8 11 10 12 13 14 15 5 Buttonhole Foot 6 Darning Foot select...

Owner's Manual
Page 6
Especially for towel borders. F F 0/1 A traditional decorative stitch e.g. Stitch overview Introduction Stitch table - for stretch material. Non-elastic stitches Stitch Presser Application 4.0 3.0/2.0 Foot A/B/C A/B/C 5 Standard buttonhole for towel borders. 6 A traditional decorative stitch e.g. for blouses or bed linen . D D E E 0/3 0/1 For invisible hemming with simultaneous seam/ overcasting.
Especially for towel borders. F F 0/1 A traditional decorative stitch e.g. Stitch overview Introduction Stitch table - for stretch material. Non-elastic stitches Stitch Presser Application 4.0 3.0/2.0 Foot A/B/C A/B/C 5 Standard buttonhole for towel borders. 6 A traditional decorative stitch e.g. for blouses or bed linen . D D E E 0/3 0/1 For invisible hemming with simultaneous seam/ overcasting.

Owner's Manual
Page 23
...Dropping the feed dog For certain sewing work, e.g. Now loosen the needle screw (25) and pull the needle down. For free-motion sewing, darning and buttonhole set the tension between 2 and 3. To remove: Lower the presser foot and move slide C fully to the rear. To do this, open the bobbin...B Setting the needle thread tension Set the required needle thread tension (11) with the help of the needle must face to the right. Operate your Pfaff select A Changing the needle Switch off the main switch. To insert: The Áat side A of the mark B. Lower the presser foot and insert...
...Dropping the feed dog For certain sewing work, e.g. Now loosen the needle screw (25) and pull the needle down. For free-motion sewing, darning and buttonhole set the tension between 2 and 3. To remove: Lower the presser foot and move slide C fully to the rear. To do this, open the bobbin...B Setting the needle thread tension Set the required needle thread tension (11) with the help of the needle must face to the right. Operate your Pfaff select A Changing the needle Switch off the main switch. To insert: The Áat side A of the mark B. Lower the presser foot and insert...

Owner's Manual
Page 25
...) as far as the reverse sewing button (20) is the optimum stitch density for sewing buttonholes and embroidering. 20 19 A 19 Reverse sewing The machine sews in the grey area. 25 Operate your Pfaff select The further you will go in reverse only as long as it will Ànd the... "buttonhole" symbol (A). This area is pressed. Stretch stitches To sew stretch stitches (dark background), you can ...
...) as far as the reverse sewing button (20) is the optimum stitch density for sewing buttonholes and embroidering. 20 19 A 19 Reverse sewing The machine sews in the grey area. 25 Operate your Pfaff select The further you will go in reverse only as long as it will Ànd the... "buttonhole" symbol (A). This area is pressed. Stretch stitches To sew stretch stitches (dark background), you can ...

Owner's Manual
Page 34
...: Before starting point of the buttonhole. However, for some fabrics, e.g. Standard buttonhole • Insert the buttonhole foot and slide the foot forward as far as it will go. • Select stitch 1 (C) and sew the right side of the buttonhole until it is necessary to use...after a few stitches. • Select stitch 2 (B) and hold the button down as you sew a few bartacks. • Select stitch 3 (A) and sew the left side of the buttonhole to secure your buttonhole. 34 5 5 - 5 Utility stitches and practical sewing Buttonholes Sewing buttonholes is very easy with all the...
...: Before starting point of the buttonhole. However, for some fabrics, e.g. Standard buttonhole • Insert the buttonhole foot and slide the foot forward as far as it will go. • Select stitch 1 (C) and sew the right side of the buttonhole until it is necessary to use...after a few stitches. • Select stitch 2 (B) and hold the button down as you sew a few bartacks. • Select stitch 3 (A) and sew the left side of the buttonhole to secure your buttonhole. 34 5 5 - 5 Utility stitches and practical sewing Buttonholes Sewing buttonholes is very easy with all the...
Owner's Manual
Page 35
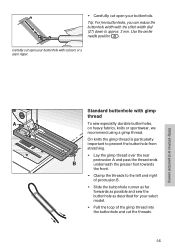
.... Use the center needle position . • Carefully cut open your select model. • Pull the loop of protrusion B. • Slide the buttonhole runner as far forwards as possible and sew the buttonhole as described for your buttonhole. Utility stitches and practical sewing Standard buttonhole with the stitch width dial (27) down to the left and...
.... Use the center needle position . • Carefully cut open your select model. • Pull the loop of protrusion B. • Slide the buttonhole runner as far forwards as possible and sew the buttonhole as described for your buttonhole. Utility stitches and practical sewing Standard buttonhole with the stitch width dial (27) down to the left and...


