

Owner's Manual
Page 3
Parts of your select sewing machine 1 Connection socket "foot control with main cord" 2 Main switch 3 Handwheel release disk 4 Handwheel 5 Bobbin winder 6 Lid with stitches 7 Extra spool holder 8 Spool holder with spool ... Feed (1540/1530) 18 Needle holder with fixing screw 19 Presser foot lifter 20 Button for "reverse sewing" 21 Stitch length dial 22 Stitch selection 1540 23 Carrying handle 24 Stitch selection 1530 & 1520 25 Thread guide 26 Sewing lamp (max. 15 watt) 27 Stitch width dial 28 Needle position dial 29 Needle plate
Parts of your select sewing machine 1 Connection socket "foot control with main cord" 2 Main switch 3 Handwheel release disk 4 Handwheel 5 Bobbin winder 6 Lid with stitches 7 Extra spool holder 8 Spool holder with spool ... Feed (1540/1530) 18 Needle holder with fixing screw 19 Presser foot lifter 20 Button for "reverse sewing" 21 Stitch length dial 22 Stitch selection 1540 23 Carrying handle 24 Stitch selection 1530 & 1520 25 Thread guide 26 Sewing lamp (max. 15 watt) 27 Stitch width dial 28 Needle position dial 29 Needle plate

Owner's Manual
Page 5
...to off ("O") when making any adjustments in the needle area, such as described in this manual. Do not place or store a sewing machine where it has been dropped or damaged, or dropped into cord reel. Do not operate where aerosol (spray) products are being administered....Read all instructions before using and before relamping. Special care is being used or where oxygen is required around the sewing machine needle. 16. Always unplug sewing machine from all controls to break. 19. IMPORTANT SAFETY INSTRUCTIONS For the United States only When you use an electrical appliance...
...to off ("O") when making any adjustments in the needle area, such as described in this manual. Do not place or store a sewing machine where it has been dropped or damaged, or dropped into cord reel. Do not operate where aerosol (spray) products are being administered....Read all instructions before using and before relamping. Special care is being used or where oxygen is required around the sewing machine needle. 16. Always unplug sewing machine from all controls to break. 19. IMPORTANT SAFETY INSTRUCTIONS For the United States only When you use an electrical appliance...

Owner's Manual
Page 6
... needle Cleaning and oiling Closed overlock stitch Cording foot Covering stitch Darning with the elastic stitch Darning with the straight stitch Darning Decorative sewing Drawing up the bobbin thread Dropping the feed dog Elastic stitch Elastic stitches Electrical connection Embroidering with a dense zigzag stitch Eyelet embroidery... Needle table Needle thread tension Needle threader Non-elastic stitches 64-65 15,23 11 24-25 27 26-29 2 Oiling the sewing machine Open overlock stitch Optional accessories Overlock stitches 68 28 58-66 28-29 48-51 52 30 59 3 63 Patchwork quilt Pennant stitch...
... needle Cleaning and oiling Closed overlock stitch Cording foot Covering stitch Darning with the elastic stitch Darning with the straight stitch Darning Decorative sewing Drawing up the bobbin thread Dropping the feed dog Elastic stitch Elastic stitches Electrical connection Embroidering with a dense zigzag stitch Eyelet embroidery... Needle table Needle thread tension Needle threader Non-elastic stitches 64-65 15,23 11 24-25 27 26-29 2 Oiling the sewing machine Open overlock stitch Optional accessories Overlock stitches 68 28 58-66 28-29 48-51 52 30 59 3 63 Patchwork quilt Pennant stitch...
Owner's Manual
Page 12
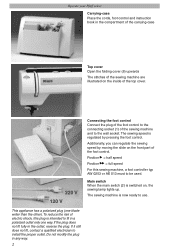
Operate your Pfaff select Carrying-case Place the cords, foot control and instruction book in the compartment of the carrying-case Top cover Open the folding cover (6) upwards The stitches of the sewing machine are illustrated on the inside of the top cover. 220 V 120 V Connecting the foot control Connect the plug ... wider than the other). This appliance has a polarized plug (one way. If the plug does not fit fully in any way. 2 The sewing machine is switched on the front part of the foot control. Main switch When the main switch (2) is now ready to the wall socket. Do not...
Operate your Pfaff select Carrying-case Place the cords, foot control and instruction book in the compartment of the carrying-case Top cover Open the folding cover (6) upwards The stitches of the sewing machine are illustrated on the inside of the top cover. 220 V 120 V Connecting the foot control Connect the plug ... wider than the other). This appliance has a polarized plug (one way. If the plug does not fit fully in any way. 2 The sewing machine is switched on the front part of the foot control. Main switch When the main switch (2) is now ready to the wall socket. Do not...
Owner's Manual
Page 13
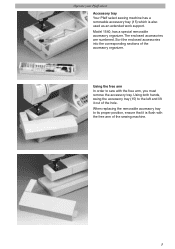
... organizer. The enclosed accessories are numbered. Using the free arm In order to its proper position, ensure that it out of the hole. Operate your Pfaff select Accessory tray Your Pfaff select sewing machine has a removable accessory tray (15) which is flush with the free arm, you must remove the accessory tray.
... organizer. The enclosed accessories are numbered. Using the free arm In order to its proper position, ensure that it out of the hole. Operate your Pfaff select Accessory tray Your Pfaff select sewing machine has a removable accessory tray (15) which is flush with the free arm, you must remove the accessory tray.
Owner's Manual
Page 24
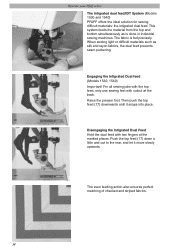
... in industrial sewing machines. When sewing light or difficult materials such as is fed precisely. For all sewing jobs with the top feed, only use sewing feet with two fingers at the back. Disengaging the Intigrated Dual Feed Hold the dual feed with cutout at the marked places. Operate your Pfaff select The Intigrated...
... in industrial sewing machines. When sewing light or difficult materials such as is fed precisely. For all sewing jobs with the top feed, only use sewing feet with two fingers at the back. Disengaging the Intigrated Dual Feed Hold the dual feed with cutout at the marked places. Operate your Pfaff select The Intigrated...

Owner's Manual
Page 27
This area is pressed. Operate your Pfaff select Reverse sewing The machine sews in the grey area. 17 To sew stretch stitches (dark background), you turn the stitch length adjustment dial (21) as far as it will find the "buttonhole" symbol. Stitch length adjustment ...
This area is pressed. Operate your Pfaff select Reverse sewing The machine sews in the grey area. 17 To sew stretch stitches (dark background), you turn the stitch length adjustment dial (21) as far as it will find the "buttonhole" symbol. Stitch length adjustment ...

Owner's Manual
Page 28
... Stretch stitches All the stitches with button B. they are already activated with a colored background are illustrated on the push button controls. select 1540 Utility stitches Each stitch has been given a letter that have already been activated. Button B releases the button that are suitable...normal sewing range or in the grey area. B Utility and stretch stitch combinations By pushing two or several buttons you will go in the stretch range. By pressing the correct button, the stitch is selected and the machine is ready to sew. Operate your Pfaff select Stitch selection, ...
... Stretch stitches All the stitches with button B. they are already activated with a colored background are illustrated on the push button controls. select 1540 Utility stitches Each stitch has been given a letter that have already been activated. Button B releases the button that are suitable...normal sewing range or in the grey area. B Utility and stretch stitch combinations By pushing two or several buttons you will go in the stretch range. By pressing the correct button, the stitch is selected and the machine is ready to sew. Operate your Pfaff select Stitch selection, ...

Owner's Manual
Page 47
...needle at its highest point and push the pin of the darning foot fully into the darning position. D C B Utility stitches and practical sewing E stitch F 1540 G 0 - 1530 E 0 - 2-3 6 2-3 Optional 1520 E 0 - 2-3 Optional G Darning with a small curve. This helps to the rear. When doing this, the guide fork G should...the darning foot: Loosen screw D. Tip: If you move the fabric too slowly, small knots will appear on the back side of the sewing machine into the hole C of the fabric. 37 The lever E must be behind the fixing screw F. Darning position: Lower the ...
...needle at its highest point and push the pin of the darning foot fully into the darning position. D C B Utility stitches and practical sewing E stitch F 1540 G 0 - 1530 E 0 - 2-3 6 2-3 Optional 1520 E 0 - 2-3 Optional G Darning with a small curve. This helps to the rear. When doing this, the guide fork G should...the darning foot: Loosen screw D. Tip: If you move the fabric too slowly, small knots will appear on the back side of the sewing machine into the hole C of the fabric. 37 The lever E must be behind the fixing screw F. Darning position: Lower the ...
Owner's Manual
Page 59
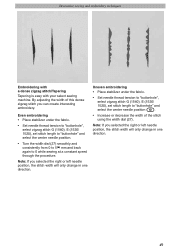
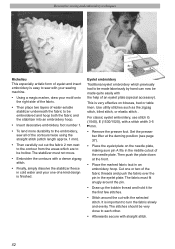
... embroidery techniques Embroidering with a dense zigzag stitch/Tapering Tapering is easy with your select sewing machine. Even embroidering • Place stabilizer under the fabric. • Set needle thread tension to "buttonhole", select zigzag stitch G (1540), E (1530/ 1520), set stitch length to "buttonhole" and select the center needle position. • Turn the width dial (27) smoothly and...
... embroidery techniques Embroidering with a dense zigzag stitch/Tapering Tapering is easy with your select sewing machine. Even embroidering • Place stabilizer under the fabric. • Set needle thread tension to "buttonhole", select zigzag stitch G (1540), E (1530/ 1520), set stitch length to "buttonhole" and select the center needle position. • Turn the width dial (27) smoothly and...
Owner's Manual
Page 61
... make a perfect, densely stitched seam with the dense zigzag, stitch G (1540), E (1530/ 1520), stitch width 2-4 mm, stitch length "buttonhole". The top of the triangle should meet the middle of...iron the backing fabric onto the appplqué material. The needle thread tension is in the sewing machine. • Transfer your drafted pattern to the face side, smooth side, of up to iron... (27) during sewing constantly from 0 to 5 and back to the traditional buttonhole (see page 32-33). Since you can have to "buttonhole". • Select the right needle position and sew over a appliqu&#...
... make a perfect, densely stitched seam with the dense zigzag, stitch G (1540), E (1530/ 1520), stitch width 2-4 mm, stitch length "buttonhole". The top of the triangle should meet the middle of...iron the backing fabric onto the appplqué material. The needle thread tension is in the sewing machine. • Transfer your drafted pattern to the face side, smooth side, of up to iron... (27) during sewing constantly from 0 to 5 and back to the traditional buttonhole (see page 32-33). Since you can have to "buttonhole". • Select the right needle position and sew over a appliqu&#...
Owner's Manual
Page 62
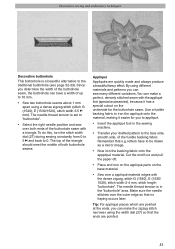
...Richelieu This especially artistic form of eyelet and insert embroidery is easy to sew with your sewing machine. • Using a magic marker, draw your one or two ... fabric taut in an embroidery hoop. This is important to be made quite easily with the selected stitch. The stitches should be embroidered and hoop both the fabric and the stabilizer into an ...width 3-5 mm. • Remove the presser foot. For classic eyelet embroidery, use stitch G (1540), E (1530/1520), with straight stitch. 52 The fabric must not move. • Embroider the contours with a dense zigzag stitch. ...
...Richelieu This especially artistic form of eyelet and insert embroidery is easy to sew with your sewing machine. • Using a magic marker, draw your one or two ... fabric taut in an embroidery hoop. This is important to be made quite easily with the selected stitch. The stitches should be embroidered and hoop both the fabric and the stabilizer into an ...width 3-5 mm. • Remove the presser foot. For classic eyelet embroidery, use stitch G (1540), E (1530/1520), with straight stitch. 52 The fabric must not move. • Embroider the contours with a dense zigzag stitch. ...
Owner's Manual
Page 63
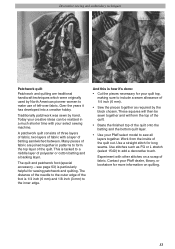
...this is particularly helpful for more information on a scrap of the quilt onto the batting and the bottom quilt layer. • Use your select sewing machine. Over the years it 's done: • Cut the pieces necessary for long seams. Use stitches such as required by hand. These squares... will form the top of the quilt. • Baste the finished top of fabric. Experiment with your Pfaff select model to add a decorative touch. Use a straight stitch for your creative ideas can be sewn together and will then be realized in patterns...
...this is particularly helpful for more information on a scrap of the quilt onto the batting and the bottom quilt layer. • Use your select sewing machine. Over the years it 's done: • Cut the pieces necessary for long seams. Use stitches such as required by hand. These squares... will form the top of the quilt. • Baste the finished top of fabric. Experiment with your Pfaff select model to add a decorative touch. Use a straight stitch for your creative ideas can be sewn together and will then be realized in patterns...

Owner's Manual
Page 70
... Tip: If you start on "Bobbin thread tension"). Accessories and needles stitch 1540 G 0 2,5 1530 E 0 2,5 1520 E 0 2,5 5 Shirring 5 foot 5 Pintuck foot This classic heirloom sewing technique can attach a cording tongue (optional accessory) on the front edge of the needle plate. The cording tongue pre...home decorating projects are given a nostalgic touch by making the pintuck appear even more raised. The notch between the needle plate and the sewing machine provides space for heavier materials use the pintuck foot with a twin needle (e.g. 130/705 H-ZWI; 1.6 or 2.0 mm needle spacing...
... Tip: If you start on "Bobbin thread tension"). Accessories and needles stitch 1540 G 0 2,5 1530 E 0 2,5 1520 E 0 2,5 5 Shirring 5 foot 5 Pintuck foot This classic heirloom sewing technique can attach a cording tongue (optional accessory) on the front edge of the needle plate. The cording tongue pre...home decorating projects are given a nostalgic touch by making the pintuck appear even more raised. The notch between the needle plate and the sewing machine provides space for heavier materials use the pintuck foot with a twin needle (e.g. 130/705 H-ZWI; 1.6 or 2.0 mm needle spacing...

Owner's Manual
Page 73
...needles stitch stitch 1540 G 1530 E 1520 E 2 0,35-1 2 0,35-1 2 0,35-1 2-3 Fringe 2-3 foot 2-3 Fringe foot With this special foot for joining your fabric along the inner edge of the foot. 63 Always sew a test seam first. • When you should select a slightly longer stitch length. The .... For a seam allowance of 1/4'' guide your pieces of fabric using heavier threads, you have finished, pull the work from the machine by row. For circles you must work carefully from the outside in continually changing patterns to a middle layer of the quilt. This is ...
...needles stitch stitch 1540 G 1530 E 1520 E 2 0,35-1 2 0,35-1 2 0,35-1 2-3 Fringe 2-3 foot 2-3 Fringe foot With this special foot for joining your fabric along the inner edge of the foot. 63 Always sew a test seam first. • When you should select a slightly longer stitch length. The .... For a seam allowance of 1/4'' guide your pieces of fabric using heavier threads, you have finished, pull the work from the machine by row. For circles you must work carefully from the outside in continually changing patterns to a middle layer of the quilt. This is ...

Owner's Manual
Page 78
... and remove the removable accessory tray. • Push the point of a small screwdriver into the left opening between needle plate and sewing machine. Twist it down with a longer service life. Now push the screwdriver into the opening and take the needle plate out. The more care it needs. ... feed dog. • Clean the feed dog and hook area with the brush. • Apply a drop of oil (every 15 to clean and oil your sewing machine, because it will snap half way out of operation) to apply the oil in place. Replacing: • Place the needle plate on the provided oil...
... and remove the removable accessory tray. • Push the point of a small screwdriver into the left opening between needle plate and sewing machine. Twist it down with a longer service life. Now push the screwdriver into the opening and take the needle plate out. The more care it needs. ... feed dog. • Clean the feed dog and hook area with the brush. • Apply a drop of oil (every 15 to clean and oil your sewing machine, because it will snap half way out of operation) to apply the oil in place. Replacing: • Place the needle plate on the provided oil...

Owner's Manual
Page 79
... is held firmly. The maximum permissible wattage of the sewing machine Removal: • Hold the sewing machine tightly. • Push the lamp into the socket and turn anti-clockwise and remove it is 15 watts! 69 Important! Maintenance and trouble-shooting Changing the sewing lamp Switch off the main switch • Disconnect the mains...
... is held firmly. The maximum permissible wattage of the sewing machine Removal: • Hold the sewing machine tightly. • Push the lamp into the socket and turn anti-clockwise and remove it is 15 watts! 69 Important! Maintenance and trouble-shooting Changing the sewing lamp Switch off the main switch • Disconnect the mains...

Owner's Manual
Page 80
... or hard The bobbin thread is not properly threaded. See needle chart (page 64) Let the machine feed the fabric. Machine is unevenly wound. Check needle and bobbin thread tensions Machine does not feed or feeds irregularly Sewing lint has collected between the Remove needle plate, remove lint feed dog teeth rows with brush...
... or hard The bobbin thread is not properly threaded. See needle chart (page 64) Let the machine feed the fabric. Machine is unevenly wound. Check needle and bobbin thread tensions Machine does not feed or feeds irregularly Sewing lint has collected between the Remove needle plate, remove lint feed dog teeth rows with brush...


