

Owner's Manual
Page 4
...leaving the machine, during maintenance work or when changing This sewing machine is 15 Watts. The maximum permissible wattage for supervised use only original PFAFF parts. The machine should be put into operation as petrol (gas) or thin chemicals to damage your machine by knocking or dropping it... To remove any damage caused. The tension of the sok ket by its function is not exposed to 80 % .1 I I I mechanical parts or accessories, always disconnect the machine from the mains by pulling out the mains plug. 3. Do not use a dry, clean and soft cloth which the user ...
...leaving the machine, during maintenance work or when changing This sewing machine is 15 Watts. The maximum permissible wattage for supervised use only original PFAFF parts. The machine should be put into operation as petrol (gas) or thin chemicals to damage your machine by knocking or dropping it... To remove any damage caused. The tension of the sok ket by its function is not exposed to 80 % .1 I I I mechanical parts or accessories, always disconnect the machine from the mains by pulling out the mains plug. 3. Do not use a dry, clean and soft cloth which the user ...

Owner's Manual
Page 5
... 19 • Wide 3 thread overlock stitch 19 a Narrow 3 thread overlock stitch 19 14. Free arm sewing 38 24. Optional accessories and attachments 44 28. Setting up 26 • Suggested tension settings for standard rolled hem 27 • Suggested tension settings for the...8226; Applying elastic 34 • How to sew a rolled hem 26 • Machine set up the thread guide holder 7 8. CONTENTS Page 1 Accessories 4 2. Needle information 4 3. Principal parts behind looper cover 6 6. How to remove and replace cylinder cover 9 11. How to remove and ...
... 19 • Wide 3 thread overlock stitch 19 a Narrow 3 thread overlock stitch 19 14. Free arm sewing 38 24. Optional accessories and attachments 44 28. Setting up 26 • Suggested tension settings for standard rolled hem 27 • Suggested tension settings for the...8226; Applying elastic 34 • How to sew a rolled hem 26 • Machine set up the thread guide holder 7 8. CONTENTS Page 1 Accessories 4 2. Needle information 4 3. Principal parts behind looper cover 6 6. How to remove and replace cylinder cover 9 11. How to remove and ...

Owner's Manual
Page 6
1. ACCESSORIES ( ( Needle set Screwdriver (sheet metal) 1 Sciewdiver (small si7e) ® © Tweezers Rolled hemming throat plate © Hex-head wrench 1 I See page 44 for selecting sewing ....ewe)adoRvlveaeaerginel#ua2lbaal0freva5abi4pinrlioacssbisiinlzzeteesanfn11oe4d0er,dislsb1ee2faswu,llri(1nn#4igps2&ho0eik5ndn14t6i-tw.s4n.i2teh)eBdtoflhoetehsr * Refer to the correct needle chart on for your page 39 for optional accessories.
1. ACCESSORIES ( ( Needle set Screwdriver (sheet metal) 1 Sciewdiver (small si7e) ® © Tweezers Rolled hemming throat plate © Hex-head wrench 1 I See page 44 for selecting sewing ....ewe)adoRvlveaeaerginel#ua2lbaal0freva5abi4pinrlioacssbisiinlzzeteesanfn11oe4d0er,dislsb1ee2faswu,llri(1nn#4igps2&ho0eik5ndn14t6i-tw.s4n.i2teh)eBdtoflhoetehsr * Refer to the correct needle chart on for your page 39 for optional accessories.

Owner's Manual
Page 13
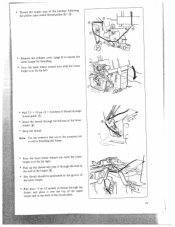
Note: Use the tweezers provided in the accessory set to aid in threading the looper. * Pull about 5 cm (2 inches) of the throat plate. :4 11 - -- .- .- - * Pass thread from back to the front through the ...
Note: Use the tweezers provided in the accessory set to aid in threading the looper. * Pull about 5 cm (2 inches) of the throat plate. :4 11 - -- .- .- - * Pass thread from back to the front through the ...
Owner's Manual
Page 15
.... * Pull about looper and 5 cm (2 inches) place it through the hole in the end of the looper ®. * The thread should be positioned in the accessory set to the back of the machine following color coded thread guides ®®. I * Remove the cylinder cover (page 9) to expose the lower looper for...
.... * Pull about looper and 5 cm (2 inches) place it through the hole in the end of the looper ®. * The thread should be positioned in the accessory set to the back of the machine following color coded thread guides ®®. I * Remove the cylinder cover (page 9) to expose the lower looper for...

Owner's Manual
Page 46
27. OPTIONAL ACCESSORIES AND ATTACHMENTS (1) Sewing with an Overlock * For additional information, the following book is recommended, Sewing with an Overlock-From The Sewing Reference Library, published by Cy Decosse Incorporated. (2) Edge Guide * Attaches to the looper cover to aid in seaming and decorative sewing such as flatlocking and pin tucking. (3) Spool Cap (S) * Adapts a regular thread spool for use on the over lock machine. (4) Anti-spill Net (S) * For use with threads that easily spill off the cone. 44 set screw I
27. OPTIONAL ACCESSORIES AND ATTACHMENTS (1) Sewing with an Overlock * For additional information, the following book is recommended, Sewing with an Overlock-From The Sewing Reference Library, published by Cy Decosse Incorporated. (2) Edge Guide * Attaches to the looper cover to aid in seaming and decorative sewing such as flatlocking and pin tucking. (3) Spool Cap (S) * Adapts a regular thread spool for use on the over lock machine. (4) Anti-spill Net (S) * For use with threads that easily spill off the cone. 44 set screw I


