Owner's Manual
Page 16
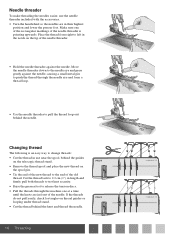
... right to pull the thread loop out behind the needle. Cut the thread tails to 2-3 cm (1") in length and firmly pull both threads to test knot security. • Raise the presser foot to the end of the old thread. Changing thread The following is pointing upwards. Needle threader To make...
... right to pull the thread loop out behind the needle. Cut the thread tails to 2-3 cm (1") in length and firmly pull both threads to test knot security. • Raise the presser foot to the end of the old thread. Changing thread The following is pointing upwards. Needle threader To make...

Owner's Manual
Page 17
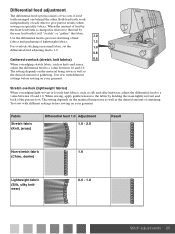
... as you sew, trying to the stitch, type of fabric and thread you are obtained by the use of the Auto Tension Dial (ATD). Always test sew on a sample of light to get an interesting effect. B A 2.5 6.0 1.0 N No A• •• 3-thread overlock, wide For sewing two layers of stretchy fabric or...
... as you sew, trying to the stitch, type of fabric and thread you are obtained by the use of the Auto Tension Dial (ATD). Always test sew on a sample of light to get an interesting effect. B A 2.5 6.0 1.0 N No A• •• 3-thread overlock, wide For sewing two layers of stretchy fabric or...
Owner's Manual
Page 21
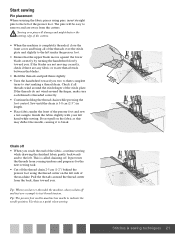
... is completely threaded, close the front cover and bring all threads wind around the finger, make sure each thread is called chaining off and test sew a sample to remove and are any fabric or waste thread stuck between the blades. • Hold the threads and pull them slightly. • ... fabric, continue sewing while drawing the finished fabric gently backwards and to the left side of the threads over pins will be easy to test thread tension. Guide the fabric slightly with your left of the presser foot. Tip: When you have re-threaded the machine, always chain off . ...
... is completely threaded, close the front cover and bring all threads wind around the finger, make sure each thread is called chaining off and test sew a sample to remove and are any fabric or waste thread stuck between the blades. • Hold the threads and pull them slightly. • ... fabric, continue sewing while drawing the finished fabric gently backwards and to the left side of the threads over pins will be easy to test thread tension. Guide the fabric slightly with your left of the presser foot. Tip: When you have re-threaded the machine, always chain off . ...
Owner's Manual
Page 23
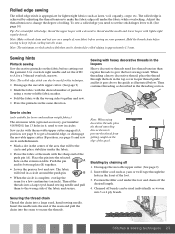
Note: Make a thread chain and test sew on the extension table. When threading a heavy decorative thread, place the thread through the hole in the center of the area that can be ...
Note: Make a thread chain and test sew on the extension table. When threading a heavy decorative thread, place the thread through the hole in the center of the area that can be ...
Owner's Manual
Page 24
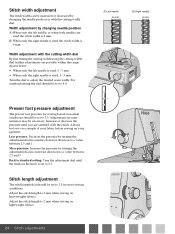
.... Increase or decrease the pressure until the mark on the knob is 6 mm. Back to 4 mm when sewing on lightweight fabrics. 24 Stitch adjustments Always test sew on a sample of your fabric before sewing on normal conditions should be set to a value between 2.5 and 5. Less pressure: Decrease the pressure by changing...
.... Increase or decrease the pressure until the mark on the knob is 6 mm. Back to 4 mm when sewing on lightweight fabrics. 24 Stitch adjustments Always test sew on a sample of your fabric before sewing on normal conditions should be set to a value between 2.5 and 5. Less pressure: Decrease the pressure by changing...
Owner's Manual
Page 25
... in relation to the feed by the rear feed teeth it will "stretch" or "gather" the fabric. Test sew with different settings before sewing on your garment. When the amount of the presser foot. Test sew with different settings before sewing on your garment. The setting depends on the material being sewn...
... in relation to the feed by the rear feed teeth it will "stretch" or "gather" the fabric. Test sew with different settings before sewing on your garment. When the amount of the presser foot. Test sew with different settings before sewing on your garment. The setting depends on the material being sewn...
