Owner's Manual
Page 3
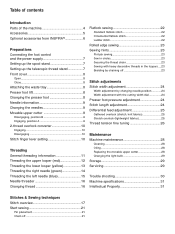
... Presser foot pressure adjustment 24 Stitch length adjustment 24 Differential feed adjustment 25 Gathered overlock (stretch, knit fabrics 25 Stretch overlock (lightweight fabrics 25 Thread tension fine tuning 26 Maintenance Machine maintenance 28 Cleaning 28 Oiling ...28 Replacing the movable upper cutter 28 Changing the light bulb 29 Storage 29...
... Presser foot pressure adjustment 24 Stitch length adjustment 24 Differential feed adjustment 25 Gathered overlock (stretch, knit fabrics 25 Stretch overlock (lightweight fabrics 25 Thread tension fine tuning 26 Maintenance Machine maintenance 28 Cleaning 28 Oiling ...28 Replacing the movable upper cutter 28 Changing the light bulb 29 Storage 29...

Owner's Manual
Page 4
...;ne tuning lever (red) 6. Handwheel 13.Stitch length dial 14.Spool stand 15.Cone holder 16.Auto tension dial (ATD) 17.Spool pin 18 19 20 21 22 25 23 24 18.Presser foot pressure adjusting dial 19.Thread cutter 20.Presser foot ... 11.Foot control/electric power cord socket 12. Parts of the machine 34 5 6 2 1 17 16 15 14 87 13 12 9 10 11 1. Lower looper thread tension fine tuning lever (yellow) 7. Flat bed extension 9. Telescopic thread stand 2.
...;ne tuning lever (red) 6. Handwheel 13.Stitch length dial 14.Spool stand 15.Cone holder 16.Auto tension dial (ATD) 17.Spool pin 18 19 20 21 22 25 23 24 18.Presser foot pressure adjusting dial 19.Thread cutter 20.Presser foot ... 11.Foot control/electric power cord socket 12. Parts of the machine 34 5 6 2 1 17 16 15 14 87 13 12 9 10 11 1. Lower looper thread tension fine tuning lever (yellow) 7. Flat bed extension 9. Telescopic thread stand 2.
Owner's Manual
Page 12
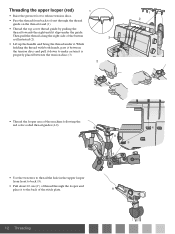
... and pull it down to make certain it is properly placed between the tension discs (3) 2 1 2 • Thread the looper area of the machine following the red color coded thread guides (4-9). 9 4 8 5 76 • Use the tweezers to thread the hole ... pull the thread along the right side of the stitch plate. 9 12 Threading Threading the upper looper (red) 1 • Raise the presser foot to release tension discs. • Pass the thread from front to back (9). • Pull about 10 cm (4") of thread through the thread guide on the thread stand (1). •...
... and pull it down to make certain it is properly placed between the tension discs (3) 2 1 2 • Thread the looper area of the machine following the red color coded thread guides (4-9). 9 4 8 5 76 • Use the tweezers to thread the hole ... pull the thread along the right side of the stitch plate. 9 12 Threading Threading the upper looper (red) 1 • Raise the presser foot to release tension discs. • Pass the thread from front to back (9). • Pull about 10 cm (4") of thread through the thread guide on the thread stand (1). •...
Owner's Manual
Page 13
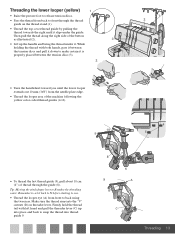
Threading the lower looper (yellow) 1 • Raise the presser foot to release tension discs. • Pass the thread from back to front through the thread guide on threader lever. While holding the thread with left hand and pull ... side of thread through the guide (8). Firmly hold the thread tail with both hands, pass it between the tension discs and pull it down to make certain it is properly placed between the tension discs (3). 2 1 2 • Turn the handwheel toward you until it back to N before starting to R makes the threading easier...
Threading the lower looper (yellow) 1 • Raise the presser foot to release tension discs. • Pass the thread from back to front through the thread guide on threader lever. While holding the thread with left hand and pull ... side of thread through the guide (8). Firmly hold the thread tail with both hands, pass it between the tension discs and pull it down to make certain it is properly placed between the tension discs (3). 2 1 2 • Turn the handwheel toward you until it back to N before starting to R makes the threading easier...
Owner's Manual
Page 14
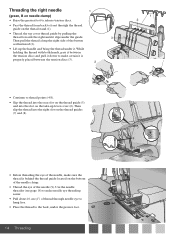
... take-up the handle and bring the thread under it. Threading the right needle 1 (green, B on needle clamp) • Raise the presser foot to release tension discs. • Pass the thread from back to the back, under the presser foot. 14 Threading 6 4 5 7 8 9 9 Use the needle threader (see page ... under the guide. 3 Then pull the thread along the right side of the needle (9). While holding the thread with both hands, pass it between the tension discs (3). 2 1 2 • Continue to thread points (4-8). • Slip the thread into the rear slot on the thread guide (5) and into the ...
... take-up the handle and bring the thread under it. Threading the right needle 1 (green, B on needle clamp) • Raise the presser foot to release tension discs. • Pass the thread from back to the back, under the presser foot. 14 Threading 6 4 5 7 8 9 9 Use the needle threader (see page ... under the guide. 3 Then pull the thread along the right side of the needle (9). While holding the thread with both hands, pass it between the tension discs (3). 2 1 2 • Continue to thread points (4-8). • Slip the thread into the rear slot on the thread guide (5) and into the ...
Owner's Manual
Page 15
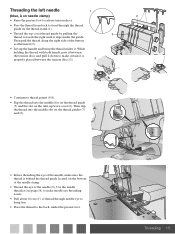
... slot on the thread guide (5) and the slot on the take-up the handle and bring the thread under it is properly placed between the tension discs (3). 2 1 2 • Continue to thread points (4-8). • Slip the thread into the middle slot on the thread guides (7) and (8). • Before... as illustrated (2). • Lift up lever cover (6). Threading the left needle 1 (blue, A on needle clamp) • Raise the presser foot to release tension discs. • Pass the thread from back to front through needle eye to hang free. • Place the thread to the back, under the presser...
... slot on the thread guide (5) and the slot on the take-up the handle and bring the thread under it is properly placed between the tension discs (3). 2 1 2 • Continue to thread points (4-8). • Slip the thread into the middle slot on the thread guides (7) and (8). • Before... as illustrated (2). • Lift up lever cover (6). Threading the left needle 1 (blue, A on needle clamp) • Raise the presser foot to release tension discs. • Pass the thread from back to front through needle eye to hang free. • Place the thread to the back, under the presser...
Owner's Manual
Page 16
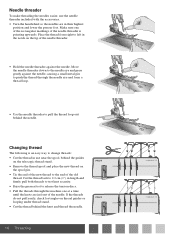
... needle, causing a small metal pin to push the thread through the needle eye and form a thread loop. • Use the needle threader to release the tension discs. • Pull the threads through the machine one of the rectangular markings of the needle. Changing thread The following is pointing upwards. Needle threader...
... needle, causing a small metal pin to push the thread through the needle eye and form a thread loop. • Use the needle threader to release the tension discs. • Pull the threads through the machine one of the rectangular markings of the needle. Changing thread The following is pointing upwards. Needle threader...

Owner's Manual
Page 17
...seams where stretch or give is set automatically by combining the ATD with the optional elastic foot. Stitches & sewing techniques 17 The correct tension is needed, such as you are using. Icon explanation: Needle position Cutting width N/R Stitch finger lever setting A/B Setting for creating... Always test sew on normal conditions. Use decorative threads in the loopers and regular thread in the loopers to keep the same tension as gathering, applying piping with the optional piping foot and elastic with different needle positions, threading methods, and the use of ...
...seams where stretch or give is set automatically by combining the ATD with the optional elastic foot. Stitches & sewing techniques 17 The correct tension is needed, such as you are using. Icon explanation: Needle position Cutting width N/R Stitch finger lever setting A/B Setting for creating... Always test sew on normal conditions. Use decorative threads in the loopers and regular thread in the loopers to keep the same tension as gathering, applying piping with the optional piping foot and elastic with different needle positions, threading methods, and the use of ...
Owner's Manual
Page 18
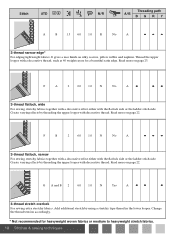
... For sewing stretchy fabrics together with a decorative effect either with decorative thread. Read more on page 22. Read more on page 22. Change the thread tension accordingly. * Not recommended for a beautiful satin edge.
... For sewing stretchy fabrics together with a decorative effect either with decorative thread. Read more on page 22. Read more on page 22. Change the thread tension accordingly. * Not recommended for a beautiful satin edge.
Owner's Manual
Page 21
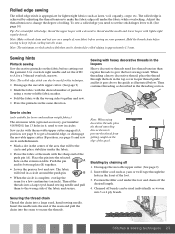
..., causing it to break. (25--38")cm Chain off the thread chain 2-5 cm (1-2") behind the presser foot using pins, insert straight pins to test thread tension. Guide the fabric slightly with your left under the front of the presser foot. Pull the threads around the stitch finger of the cutters...
..., causing it to break. (25--38")cm Chain off the thread chain 2-5 cm (1-2") behind the presser foot using pins, insert straight pins to test thread tension. Guide the fabric slightly with your left under the front of the presser foot. Pull the threads around the stitch finger of the cutters...
Owner's Manual
Page 23
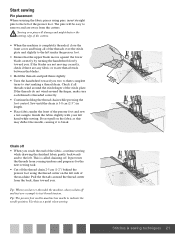
...degree of the foot. 3. B • When the circle is complete, overlap the seam for a few centimetres (an inch). Braiding by adjusting the thread tension to the wrong side of the push pin (A). Push the pin A and its bottom plate (B) together. • Lower the presser foot and sew. ...table. Rolled edge sewing The rolled edge stitch is appropriate for lightweight fabrics such as illustrated below. To sew a rolled edge you need less thread tension than regular threads to R. (See page 10) Tip: For a beautiful rolled edge, thread the upper looper with a decorative thread and the ...
...degree of the foot. 3. B • When the circle is complete, overlap the seam for a few centimetres (an inch). Braiding by adjusting the thread tension to the wrong side of the push pin (A). Push the pin A and its bottom plate (B) together. • Lower the presser foot and sew. ...table. Rolled edge sewing The rolled edge stitch is appropriate for lightweight fabrics such as illustrated below. To sew a rolled edge you need less thread tension than regular threads to R. (See page 10) Tip: For a beautiful rolled edge, thread the upper looper with a decorative thread and the ...
Owner's Manual
Page 25
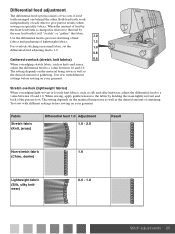
... gathering. Test sew with different settings before sewing on your garment. Test sew with different settings before sewing on your garment. When sewing, apply gentle tension to a value between 0.6 and 1.0. Fabric Stretch fabric (Knit, jersey) Differential feed 1.0 Adjustment 1.0 - 2.0 Result Non-stretch fabric 1.0 (Chino, denim) Lightweight fabric (Silk, silky knitwear) 0.6 - 1.0 Stitch adjustments...
... gathering. Test sew with different settings before sewing on your garment. Test sew with different settings before sewing on your garment. When sewing, apply gentle tension to a value between 0.6 and 1.0. Fabric Stretch fabric (Knit, jersey) Differential feed 1.0 Adjustment 1.0 - 2.0 Result Non-stretch fabric 1.0 (Chino, denim) Lightweight fabric (Silk, silky knitwear) 0.6 - 1.0 Stitch adjustments...
Owner's Manual
Page 26
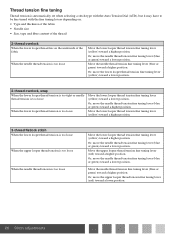
...toward a lower position. 2-thread overlock, wrap When the lower looper thread tension is too tight or needle thread tension is too loose When the lower looper thread tension is too loose Move the lower looper thread tension fine tuning lever (yellow) toward a higher position. Move the ... higher position. 3-thread flatlock stitch When the lower looper thread tension is too loose When the upper looper thread tension is too loose When the needle thread tension is too loose Move the lower looper thread tension fine tuning lever (yellow) toward a lower position. Move the...
...toward a lower position. 2-thread overlock, wrap When the lower looper thread tension is too tight or needle thread tension is too loose When the lower looper thread tension is too loose Move the lower looper thread tension fine tuning lever (yellow) toward a higher position. Move the ... higher position. 3-thread flatlock stitch When the lower looper thread tension is too loose When the upper looper thread tension is too loose When the needle thread tension is too loose Move the lower looper thread tension fine tuning lever (yellow) toward a lower position. Move the...

Owner's Manual
Page 27
... When the needle thread is too loose Move the upper looper thread tension lever (red) toward a higher position. Or, move the upper looper thread tension fine tuning lever (red) toward a lower position. Or, move lower looper thread tension fine tuning lever (yellow) toward a lower position. Or,... the lower looper thread appears on the top of the fabric When the left needle thread tension is too loose When the right needle thread tension is too loose Move the upper looper thread tension fine tuning lever (red) to a lower position. Move the right needle thread...
... When the needle thread is too loose Move the upper looper thread tension lever (red) toward a higher position. Or, move the upper looper thread tension fine tuning lever (red) toward a lower position. Or, move lower looper thread tension fine tuning lever (yellow) toward a lower position. Or,... the lower looper thread appears on the top of the fabric When the left needle thread tension is too loose When the right needle thread tension is too loose Move the upper looper thread tension fine tuning lever (red) to a lower position. Move the right needle thread...
Owner's Manual
Page 30
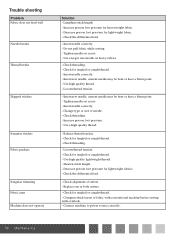
...Use high quality thread. - Insert new needle, current needle may be bent or have a blunt point. - Balance thread tension. - Loosen thread tension. - Decrease presser foot pressure for tangled or caught thread. - Check alignment of fabric with conventional machine before sewing with ... Check for tangled or caught thread. - Compress thick layers of cutters. - Check the differential feed. - Loosen thread tension. - Trouble shooting Problem Fabric does not feed well Needle breaks Thread breaks Skipped stitches Irregular stitches Fabric puckers Irregular trimming Fabric...
...Use high quality thread. - Insert new needle, current needle may be bent or have a blunt point. - Balance thread tension. - Loosen thread tension. - Decrease presser foot pressure for tangled or caught thread. - Check alignment of fabric with conventional machine before sewing with ... Check for tangled or caught thread. - Compress thick layers of cutters. - Check the differential feed. - Loosen thread tension. - Trouble shooting Problem Fabric does not feed well Needle breaks Thread breaks Skipped stitches Irregular stitches Fabric puckers Irregular trimming Fabric...


