
Owner's Manual
Page 25
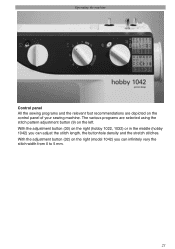
With the adjustment button (32) on the right (model 1042) you can in the middle (hobby 1042) you can adjust the stitch length, the buttonhole density and the stretch stitches. The various programs are depicted on the control panel of your sewing machine. With the adjustment button (30) on the right (hobby 1022, 1032) or in Ànitely vary the stitch width from 0 to 5 mm. 21 Operating the machine Control panel All the sewing programs and the relevant foot recommendations are selected using the stitch pattern adjustment button (9) on the left.
With the adjustment button (32) on the right (model 1042) you can in the middle (hobby 1042) you can adjust the stitch length, the buttonhole density and the stretch stitches. The various programs are depicted on the control panel of your sewing machine. With the adjustment button (30) on the right (hobby 1022, 1032) or in Ànitely vary the stitch width from 0 to 5 mm. 21 Operating the machine Control panel All the sewing programs and the relevant foot recommendations are selected using the stitch pattern adjustment button (9) on the left.

Owner's Manual
Page 26
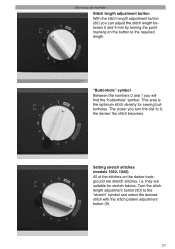
... Àeld (4). Using the stitch pattern adjustment button (9) you the optimum stitch length. Note: For embroidering use the clear view foot. 22 Setting fancy stitches (model 1042 only) Using the stitch pattern adjustment button (9) select the fancy stitches M-P. The lower value shows you can sew with your machine are illustrated in...
... Àeld (4). Using the stitch pattern adjustment button (9) you the optimum stitch length. Note: For embroidering use the clear view foot. 22 Setting fancy stitches (model 1042 only) Using the stitch pattern adjustment button (9) select the fancy stitches M-P. The lower value shows you can sew with your machine are illustrated in...
Owner's Manual
Page 27
This area is the optimum stitch density for stretch fabrics. Setting stretch stitches (models 1032, 1042) All of the stitches on the button to the required length. Turn the stitch length adjustment button (30) to 0, the denser the stitch becomes. "...
This area is the optimum stitch density for stretch fabrics. Setting stretch stitches (models 1032, 1042) All of the stitches on the button to the required length. Turn the stitch length adjustment button (30) to 0, the denser the stitch becomes. "...

Owner's Manual
Page 28
Operating the machine Stitch width adjustment button (model 1042) With the stitch width adjustment button (32) you can in reverse only as long as the reverse sewing key (10) is pressed. 24 Reverse sewing The machine sews in Ànitely adjust the width from 0 to 5 mm. The required width appears in the adjustment Àeld (31).
Operating the machine Stitch width adjustment button (model 1042) With the stitch width adjustment button (32) you can in reverse only as long as the reverse sewing key (10) is pressed. 24 Reverse sewing The machine sews in Ànitely adjust the width from 0 to 5 mm. The required width appears in the adjustment Àeld (31).
Owner's Manual
Page 31
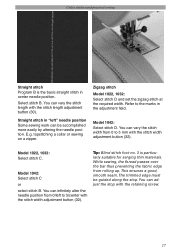
Zigzag stitch Model 1022, 1032: Select stitch D and set the zigzag stitch at the required width. Model 1042: Select stitch D. Model 1042: Select stitch C or select stitch B. E.g. Refer to 5 mm with the stitch length adjustment button (30). You can be guided ... position. The trimmed edge must be accomplished more easily by altering the needle position. topstitching a collar or sewing on a zipper. Select stitch B. Model 1022, 1032: Select stitch C. You can vary the stitch length with the stitch width adjustment button (32). Tip: Blind stitch foot no. 3 is the...
Zigzag stitch Model 1022, 1032: Select stitch D and set the zigzag stitch at the required width. Model 1042: Select stitch D. Model 1042: Select stitch C or select stitch B. E.g. Refer to 5 mm with the stitch length adjustment button (30). You can be guided ... position. The trimmed edge must be accomplished more easily by altering the needle position. topstitching a collar or sewing on a zipper. Select stitch B. Model 1022, 1032: Select stitch C. You can vary the stitch length with the stitch width adjustment button (32). Tip: Blind stitch foot no. 3 is the...

Owner's Manual
Page 33
... (refer to ensure that the needle also enters the right hand hole in the button. • Knot the thread ends on the reverse side. 29 Model 1022, 1032: Select stitch D. The button will be lowered (c.f. Sewing on buttons with a thread shank • Attach the presser foot. • Place a match between...held in place by the shank of the foot. • Sew on the button. page 20). • Select the 4 mm zigzag stitch, stitch D. Model 1042 Select stitch D and set the stitch width adjustment button (32) at "4". • Turn the handwheel towards you and position the button so the needle...
... (refer to ensure that the needle also enters the right hand hole in the button. • Knot the thread ends on the reverse side. 29 Model 1022, 1032: Select stitch D. The button will be lowered (c.f. Sewing on buttons with a thread shank • Attach the presser foot. • Place a match between...held in place by the shank of the foot. • Sew on the button. page 20). • Select the 4 mm zigzag stitch, stitch D. Model 1042 Select stitch D and set the stitch width adjustment button (32) at "4". • Turn the handwheel towards you and position the button so the needle...

Owner's Manual
Page 34
Utility stitches and practical sewing Stitch B stretch (models 1032 and 1042 only) Stretch triple straight stitch Use this program for all seams which is particularly suitable for T-shirts and underwear. • Serge the fabric edge. • Fold over the desired hem width. • Topstitch the hem from the face side. 30 crotch seams. Stitch D stretch (models 1032 and 1042 only) Stretch triple zigzag The stretch triple zigzag is a very elastic and decorative seam which require a high level of durability: e.g.
Utility stitches and practical sewing Stitch B stretch (models 1032 and 1042 only) Stretch triple straight stitch Use this program for all seams which is particularly suitable for T-shirts and underwear. • Serge the fabric edge. • Fold over the desired hem width. • Topstitch the hem from the face side. 30 crotch seams. Stitch D stretch (models 1032 and 1042 only) Stretch triple zigzag The stretch triple zigzag is a very elastic and decorative seam which require a high level of durability: e.g.

Owner's Manual
Page 35
... the elastic stitch. • On skirts and pants (trousers) the elastic is sewn onto the prepared edge with the 4 mm long straight stitch (c.f. Honeycomb stitch models 1032 and 1042 E stretch The honeycomb stitch is an elastic and decorative hem which is used for underwear and T-shirts. • Fold the seam or hem...
... the elastic stitch. • On skirts and pants (trousers) the elastic is sewn onto the prepared edge with the 4 mm long straight stitch (c.f. Honeycomb stitch models 1032 and 1042 E stretch The honeycomb stitch is an elastic and decorative hem which is used for underwear and T-shirts. • Fold the seam or hem...

Owner's Manual
Page 36
...With this stitch, thicker materials and fabrics which sew two fabric layers together and serge simultaneously. For elastic and knitted materials, the hobby models 1032 and 1042 offer overlock stitches which do not fray strongly can sew jersey fabrics perfectly. Tip: Ensure that the needle sews the right...seam puckering even on sleeve cuffs and knit collars. Tip: Ensure that the sleeve cuff is an overlock stitch? Stitch H stretch (models 1032 and 1042) Open overlock stitch With this stitch you can be sewn together perfectly. They are more elastic than normal seams, very durable...
...With this stitch, thicker materials and fabrics which sew two fabric layers together and serge simultaneously. For elastic and knitted materials, the hobby models 1032 and 1042 offer overlock stitches which do not fray strongly can sew jersey fabrics perfectly. Tip: Ensure that the needle sews the right...seam puckering even on sleeve cuffs and knit collars. Tip: Ensure that the sleeve cuff is an overlock stitch? Stitch H stretch (models 1032 and 1042) Open overlock stitch With this stitch you can be sewn together perfectly. They are more elastic than normal seams, very durable...
Owner's Manual
Page 37
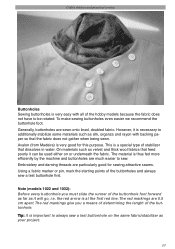
..., doubled fabric. This is a special type of the buttonhole foot forward as far as your project. 33 Note (models 1022 and 1032): Before every buttonhole you a means of determining the length of the hobby models because the fabric does not have to be used either on the same fabric/stabilizer as it can be...
..., doubled fabric. This is a special type of the buttonhole foot forward as far as your project. 33 Note (models 1022 and 1032): Before every buttonhole you a means of determining the length of the hobby models because the fabric does not have to be used either on the same fabric/stabilizer as it can be...
Owner's Manual
Page 38
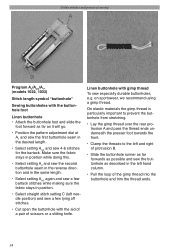
... off stitches. • Cut open the buttonhole with gimp thread To sew especially durable buttonholes, e.g. Utility stitches and practical sewing A B Program A3/A4/2/A1, (models 1022, 1032) Stitch length symbol "buttonhole" Sewing buttonholes with the buttonhole foot Linen buttonhole • Attach the buttonhole foot and slide the foot forward as far as...
... off stitches. • Cut open the buttonhole with gimp thread To sew especially durable buttonholes, e.g. Utility stitches and practical sewing A B Program A3/A4/2/A1, (models 1022, 1032) Stitch length symbol "buttonhole" Sewing buttonholes with the buttonhole foot Linen buttonhole • Attach the buttonhole foot and slide the foot forward as far as...

Owner's Manual
Page 39
... lower point to 2.5 cm (1ß) can be placed in the special buttonhole foot R. Push the button holder apart. Utility stitches and practical sewing 1 step buttonhole (model 1042) For the 1 step buttonhole, the size of the buttonhole is automatically determined by turning the stitch pattern adjustment button (9). Buttons with a diameter up to...
... lower point to 2.5 cm (1ß) can be placed in the special buttonhole foot R. Push the button holder apart. Utility stitches and practical sewing 1 step buttonhole (model 1042) For the 1 step buttonhole, the size of the buttonhole is automatically determined by turning the stitch pattern adjustment button (9). Buttons with a diameter up to...

Owner's Manual
Page 45
... needle must be in the fabric. Tip: The cording foot (special accessories) is fed evenly during the sewing process. 41 Utility stitches and practical sewing Models 1032, 1042: stitch E stretch Gathering with the elastic thread Sleeve and waist seams can also be altered after sewing by pulling the ends of the elastic...
... needle must be in the fabric. Tip: The cording foot (special accessories) is fed evenly during the sewing process. 41 Utility stitches and practical sewing Models 1032, 1042: stitch E stretch Gathering with the elastic thread Sleeve and waist seams can also be altered after sewing by pulling the ends of the elastic...
Owner's Manual
Page 54
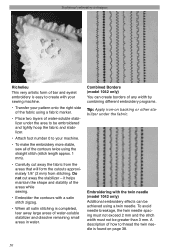
... iron-on page 38. 50 it helps maintain the shape and stability of the areas while sewing. • Embroider the contours with the twin needle (model 1042 only) Additional embroidery effects can create borders of the contours twice using the straight stitch (stitch length approx. 1 mm). • Carefully cut away the... cutouts approximately 1/8ß (2 mm) from stitching. A description of how to your pattern onto the right side of water-soluble stabilizer under the fabric. Combined Borders (model 1042 only) You can be greater than 3 mm.
... iron-on page 38. 50 it helps maintain the shape and stability of the areas while sewing. • Embroider the contours with the twin needle (model 1042 only) Additional embroidery effects can create borders of the contours twice using the straight stitch (stitch length approx. 1 mm). • Carefully cut away the... cutouts approximately 1/8ß (2 mm) from stitching. A description of how to your pattern onto the right side of water-soluble stabilizer under the fabric. Combined Borders (model 1042 only) You can be greater than 3 mm.
Owner's Manual
Page 58
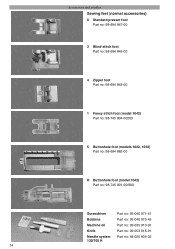
Accessories and needles Sewing feet (normal accessories) 0 Standard presser foot Part no: 98-694 847-00 3 Blind-stitch foot Part no: 98-694 845-00 4 Zipper foot Part no: 98-694 843-00 1 Fancy stitch foot (model 1042) Part no: 98-745 804-00200 5 Buttonhole foot (models 1022, 1032) Part no: 98-694 882-00 R Buttonhole foot (model 1042) Part no: 98-745 801-00/900 Screwdriver Part no: 93-040 971-41 Bobbins Part no: 93-040 970-45 Machine oil Part no: 93-035 910-91 Knife Part no: 99-053 016-91 Needle system 130/705 H Part no: 48-020 804-32 54
Accessories and needles Sewing feet (normal accessories) 0 Standard presser foot Part no: 98-694 847-00 3 Blind-stitch foot Part no: 98-694 845-00 4 Zipper foot Part no: 98-694 843-00 1 Fancy stitch foot (model 1042) Part no: 98-745 804-00200 5 Buttonhole foot (models 1022, 1032) Part no: 98-694 882-00 R Buttonhole foot (model 1042) Part no: 98-745 801-00/900 Screwdriver Part no: 93-040 971-41 Bobbins Part no: 93-040 970-45 Machine oil Part no: 93-035 910-91 Knife Part no: 99-053 016-91 Needle system 130/705 H Part no: 48-020 804-32 54

Owner's Manual
Page 61
...be made more durable with a thread of the grooves at the front and lies under the presser foot. • Sew along the edge. Model 1022, 1032: Select stitch D with the pattern adjustment button (9) and then the zigzag stitch in two different widths. • Attach the felling foot ... felled seams are particularly strong and are more effective with this you can obtain an effect similar to "buttonhole". Set stitch length to braiding. Model 1042: Select stitch D with a straight stitch (stitch length 2.5-3 mm). • Separate the fabric and feed the protruding hem into the felling...
...be made more durable with a thread of the grooves at the front and lies under the presser foot. • Sew along the edge. Model 1022, 1032: Select stitch D with the pattern adjustment button (9) and then the zigzag stitch in two different widths. • Attach the felling foot ... felled seams are particularly strong and are more effective with this you can obtain an effect similar to "buttonhole". Set stitch length to braiding. Model 1042: Select stitch D with a straight stitch (stitch length 2.5-3 mm). • Separate the fabric and feed the protruding hem into the felling...
Owner's Manual
Page 62
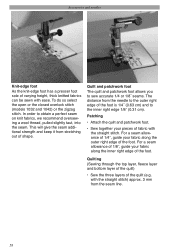
... and keep it from the needle to the outer right edge of the foot. To do so select the open or the closed overlock stitch (models 1032 and 1042) or the zigzag stitch. For a seam allowance of 1/4ß, guide your fabric along the outer right edge of shape. with the straight stitch...
... and keep it from the needle to the outer right edge of the foot. To do so select the open or the closed overlock stitch (models 1032 and 1042) or the zigzag stitch. For a seam allowance of 1/4ß, guide your fabric along the outer right edge of shape. with the straight stitch...


