

Owner's Manual
Page 1
hobby 1022 1032 1042 Instruction manual
hobby 1022 1032 1042 Instruction manual

Owner's Manual
Page 2
Return the sewing machine to break. • Do not use outdoors. • Do not operate where aerosol (spray) products are being used or where oxygen is being administrated. • To disconnect, turn all controls to comply with IEC/EN 60335-2-28 and UL1594 IMPORTANT SAFETY INSTRUCTIONS When using this sewing machine is required around the sewing machine needle. • Always use as a toy. Use only attachments recommended by the manufacturer as contained in the instruction manual. • Never drop or insert any object into water. The wrong plate can cause the needle to...
Return the sewing machine to break. • Do not use outdoors. • Do not operate where aerosol (spray) products are being used or where oxygen is being administrated. • To disconnect, turn all controls to comply with IEC/EN 60335-2-28 and UL1594 IMPORTANT SAFETY INSTRUCTIONS When using this sewing machine is required around the sewing machine needle. • Always use as a toy. Use only attachments recommended by the manufacturer as contained in the instruction manual. • Never drop or insert any object into water. The wrong plate can cause the needle to...

Owner's Manual
Page 3
You have any further questions, just ask your Pfaff dealer, who will make full use of sewing pleasure. Your sewing machine is as simple to operate as this instruction manual is to assist you ... out just what your very own fashion ideas. Before you many enjoyable hours creating your machine can do and make sewing much easier for fun hobby Congratulations! If you have bought a quality product made by Pfaff which will be happy to follow.
You have any further questions, just ask your Pfaff dealer, who will make full use of sewing pleasure. Your sewing machine is as simple to operate as this instruction manual is to assist you ... out just what your very own fashion ideas. Before you many enjoyable hours creating your machine can do and make sewing much easier for fun hobby Congratulations! If you have bought a quality product made by Pfaff which will be happy to follow.
Owner's Manual
Page 5
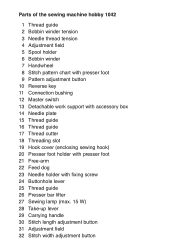
Parts of the sewing machine hobby 1042 1 Thread guide 2 Bobbin winder tension 3 Needle thread tension 4 Adjustment field 5 Spool holder 6 Bobbin winder 7 Handwheel 8 Stitch pattern chart with presser foot 9 Pattern adjustment button ...
Parts of the sewing machine hobby 1042 1 Thread guide 2 Bobbin winder tension 3 Needle thread tension 4 Adjustment field 5 Spool holder 6 Bobbin winder 7 Handwheel 8 Stitch pattern chart with presser foot 9 Pattern adjustment button ...

Owner's Manual
Page 7
Parts of the sewing machine hobby 1022 and 1032 1 Thread guide 2 Bobbin winder tension 3 Needle thread tension 4 Adjustment field 5 Spool holder 6 Bobbin winder 7 Handwheel 8 Stitch pattern chart with presser foot 9 Pattern adjustment ...
Parts of the sewing machine hobby 1022 and 1032 1 Thread guide 2 Bobbin winder tension 3 Needle thread tension 4 Adjustment field 5 Spool holder 6 Bobbin winder 7 Handwheel 8 Stitch pattern chart with presser foot 9 Pattern adjustment ...
Owner's Manual
Page 8
Index A Accessories and needles Accessory compartment B Bias tape binder Blind-stitch foot Bobbin case Borders, embroidering Buttonholes Buttons hobby - Sewing for fun F 53 Fancy stitches 22 11 Feed dog, lowering 20 Felling foot 57 Foot control 10 56 Free arm 11 28 14-15 G ...
Index A Accessories and needles Accessory compartment B Bias tape binder Blind-stitch foot Bobbin case Borders, embroidering Buttonholes Buttons hobby - Sewing for fun F 53 Fancy stitches 22 11 Feed dog, lowering 20 Felling foot 57 Foot control 10 56 Free arm 11 28 14-15 G ...

Owner's Manual
Page 9
... problems and their solutions 64 Shell edging 48 Smocking 39 Special accessories chart 55 Spool placement 12 Stitch chart 6, 7, 8 Z Zigzag stitch Zippers 27 44-45 hobby -
... problems and their solutions 64 Shell edging 48 Smocking 39 Special accessories chart 55 Spool placement 12 Stitch chart 6, 7, 8 Z Zigzag stitch Zippers 27 44-45 hobby -
Owner's Manual
Page 10
... hem attachment H Shell-edging stitch For decorative hems on elastic band, darning tears and patches F Elastic blind stitch For invisible hem attachment and simultaneous serging. hobby - Sewing for fun hobby 1022 -
... hem attachment H Shell-edging stitch For decorative hems on elastic band, darning tears and patches F Elastic blind stitch For invisible hem attachment and simultaneous serging. hobby - Sewing for fun hobby 1022 -

Owner's Manual
Page 11
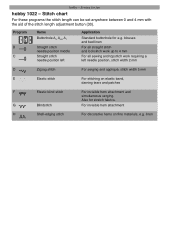
... seams requiring a left needle position stitch, needle position left Zigzag stitch Application Standard buttonhole for e.g. stitch, needle pos. for fun hobby 1032 - Program B C D Name Buttonhole A3 A4/2 A1 Straight stitch needle position middle Straight stitch needle position left D Stretch triple... stretch seams, e.g. crotch seams on Àne materials, e.g. Also for fraying materials linen J Greek stitch A classical decorative stitch e.g. hobby - Stitch chart For these programs the stitch length can be set anywhere between 0 and 4 mm with the aid of the stitch length...
... seams requiring a left needle position stitch, needle position left Zigzag stitch Application Standard buttonhole for e.g. stitch, needle pos. for fun hobby 1032 - Program B C D Name Buttonhole A3 A4/2 A1 Straight stitch needle position middle Straight stitch needle position left D Stretch triple... stretch seams, e.g. crotch seams on Àne materials, e.g. Also for fraying materials linen J Greek stitch A classical decorative stitch e.g. hobby - Stitch chart For these programs the stitch length can be set anywhere between 0 and 4 mm with the aid of the stitch length...

Owner's Manual
Page 12
... width from 0 to 4 mm C Straight stitch, For all straight stitch and lockstitch work requiring a left needle position left needle position stitch, needle pos. Also for hobby 1042 Application: Embroidery, e.g. on elastic threads, overlocking towelling and for decorative hem seams F Edge stitch wide For closing and serging one or more fabric layers... A closing and serging seam for stronger or non-fraying materials J Closed overlock stitch A closing and serging seam for fraying materials Ornamental stitches for stretch fabrics. hobby - middle e.g. Sewing for fun...
... width from 0 to 4 mm C Straight stitch, For all straight stitch and lockstitch work requiring a left needle position left needle position stitch, needle pos. Also for hobby 1042 Application: Embroidery, e.g. on elastic threads, overlocking towelling and for decorative hem seams F Edge stitch wide For closing and serging one or more fabric layers... A closing and serging seam for stronger or non-fraying materials J Closed overlock stitch A closing and serging seam for fraying materials Ornamental stitches for stretch fabrics. hobby - middle e.g. Sewing for fun...

Owner's Manual
Page 13
Operating the machine Bobbin winding Bobbin case Changing the needle Changing the presser foot Control panel Detachable work support Drawing up the bobbin thread Electrical connection Free arm Lowering the feed dog Needle thread tension Presser bar lifter Reverse serging Setting the utility stitches Setting the stretch stitches Threading the needle thread Thread cutter 12-13 14 20 19 21 11 18 10 11 20 20 17 24 22 23 16-17 18 9
Operating the machine Bobbin winding Bobbin case Changing the needle Changing the presser foot Control panel Detachable work support Drawing up the bobbin thread Electrical connection Free arm Lowering the feed dog Needle thread tension Presser bar lifter Reverse serging Setting the utility stitches Setting the stretch stitches Threading the needle thread Thread cutter 12-13 14 20 19 21 11 18 10 11 20 20 17 24 22 23 16-17 18 9

Owner's Manual
Page 14
Make sure the sewing machine symbol on the carrying case is part of the basic equipment, protects your sewing machine from behind. For this sewing machine has to sew. Carrying case The carrying case, which is pointing toward you. 220 V 10 120 V Electrical connection Connect the plug of the sewing machine from dust and damage during transport. The sewing speed is now ready to be used foot controller TJC-211 (220-240V) or TJC-150 (120V). Master switch The sewing lamp lights up the carrying handle of the foot pedal to the connection bushing (11) on the sewing machine and ...
Make sure the sewing machine symbol on the carrying case is part of the basic equipment, protects your sewing machine from behind. For this sewing machine has to sew. Carrying case The carrying case, which is pointing toward you. 220 V 10 120 V Electrical connection Connect the plug of the sewing machine from dust and damage during transport. The sewing speed is now ready to be used foot controller TJC-211 (220-240V) or TJC-150 (120V). Master switch The sewing lamp lights up the carrying handle of the foot pedal to the connection bushing (11) on the sewing machine and ...
Owner's Manual
Page 15
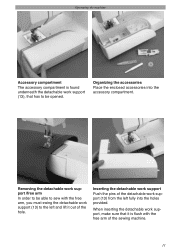
Inserting the detachable work support Push the pins of the detachable work support (13) from the left and lift it is found underneath the detachable work support /free arm In order to be able to be opened. Operating the machine Accessory compartment The accessory compartment is Áush with the free arm, you must swing the detachable work support (13) to the left fully into the accessory compartment. When inserting the detachable work support, make sure that it out of the sewing machine. 11 Organizing the accessories Place the enclosed accessories into the holes provided....
Inserting the detachable work support Push the pins of the detachable work support (13) from the left and lift it is found underneath the detachable work support /free arm In order to be able to be opened. Operating the machine Accessory compartment The accessory compartment is Áush with the free arm, you must swing the detachable work support (13) to the left fully into the accessory compartment. When inserting the detachable work support, make sure that it out of the sewing machine. 11 Organizing the accessories Place the enclosed accessories into the holes provided....
Owner's Manual
Page 16
Push the bobbin to the right. Note: The bobbin can only be stopped automatically. Wind the thread clockwise around the bobbin several times. As soon as possible. Mounting the bobbin Switch off the master switch (12) Place the empty bobbin onto the pin of the thread after a few revolutions. Winding the bobbin Pull the spool holder (5) up and place a spool on and press the foot pedal. Turn the master switch (12) on it. This will be wound if it is winding the bobbin. Press the full bobbin to the right. Let go of the bobbin winding mechanism and press it down as far as the ...
Push the bobbin to the right. Note: The bobbin can only be stopped automatically. Wind the thread clockwise around the bobbin several times. As soon as possible. Mounting the bobbin Switch off the master switch (12) Place the empty bobbin onto the pin of the thread after a few revolutions. Winding the bobbin Pull the spool holder (5) up and place a spool on and press the foot pedal. Turn the master switch (12) on it. This will be wound if it is winding the bobbin. Press the full bobbin to the right. Let go of the bobbin winding mechanism and press it down as far as the ...
Owner's Manual
Page 17
Hold the end of the presser foot with your finger. Pull the thread underneath the presser foot. Don·t forget: After winding a bobbin, press the handwheel (7) back to the left to wind bobbins even when the machine is threaded. Raise the presser bar lifter (26) to the bobbin. Tip: While winding the bobbin, gently push down the front of the thread Àrmly and press the foot pedal. Winding a bobbin through the left-hand threader slot (18). Pull the thread upward through the needle It is possible to right through the bobbin thread tension (2) in a clockwise ...
Hold the end of the presser foot with your finger. Pull the thread underneath the presser foot. Don·t forget: After winding a bobbin, press the handwheel (7) back to the left to wind bobbins even when the machine is threaded. Raise the presser bar lifter (26) to the bobbin. Tip: While winding the bobbin, gently push down the front of the thread Àrmly and press the foot pedal. Winding a bobbin through the left-hand threader slot (18). Pull the thread upward through the needle It is possible to right through the bobbin thread tension (2) in a clockwise ...
Owner's Manual
Page 18
Operating the machine Hook cover Switch off the master switch (12). Thread interlace is visible on the underside of the fabric: • The needle thread tension is not visible on both sides of the fabric. 14 Thread tension In order to achieve a perfect seam appearance and durability make sure the needle tension is correctly adjusted, so that the thread interlace is too loose. • The thread tension must be visible on the top side of the hook cover (19) and open it towards you. Hold the side of the fabric: • The needle thread tension is visible on the underside ...
Operating the machine Hook cover Switch off the master switch (12). Thread interlace is visible on the underside of the fabric: • The needle thread tension is not visible on both sides of the fabric. 14 Thread tension In order to achieve a perfect seam appearance and durability make sure the needle tension is correctly adjusted, so that the thread interlace is too loose. • The thread tension must be visible on the top side of the hook cover (19) and open it towards you. Hold the side of the fabric: • The needle thread tension is visible on the underside ...
Owner's Manual
Page 19
Operating the machine Inserting the bobbin Insert the full bobbin in the opening (see arrow). When doing so, pull the thread sideways through slot A and then under tension spring B so that it rests in the bobbin case. The bobbin case Ànger F must not fall out of the sewing hook. Inserting the bobbin case Lift latch D and push the bobbin case fully onto pin E of the hook. 15 The bobbin case must point into cutout G. Check: Pull the bobbin thread sharply.
Operating the machine Inserting the bobbin Insert the full bobbin in the opening (see arrow). When doing so, pull the thread sideways through slot A and then under tension spring B so that it rests in the bobbin case. The bobbin case Ànger F must not fall out of the sewing hook. Inserting the bobbin case Lift latch D and push the bobbin case fully onto pin E of the hook. 15 The bobbin case must point into cutout G. Check: Pull the bobbin thread sharply.
Owner's Manual
Page 20
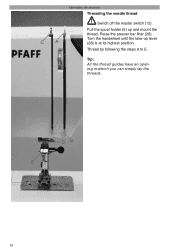
Pull the spool holder (5) up lever (28) is at its highest position. Turn the handwheel until the take-up and mount the thread. Tip: All the thread guides have an opening in which you can simply lay the threads. DB E 16 Raise the presser bar lifter (26). Operating the machine Threading the needle thread CA Switch off the master switch (12). Thread by following the steps A to E.
Pull the spool holder (5) up lever (28) is at its highest position. Turn the handwheel until the take-up and mount the thread. Tip: All the thread guides have an opening in which you can simply lay the threads. DB E 16 Raise the presser bar lifter (26). Operating the machine Threading the needle thread CA Switch off the master switch (12). Thread by following the steps A to E.
Owner's Manual
Page 21
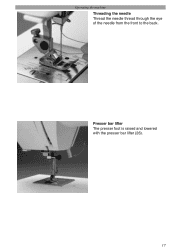
Presser bar lifter The presser foot is raised and lowered with the presser bar lifter (26). 17 Operating the machine Threading the needle Thread the needle thread through the eye of the needle from the front to the back.
Presser bar lifter The presser foot is raised and lowered with the presser bar lifter (26). 17 Operating the machine Threading the needle Thread the needle thread through the eye of the needle from the front to the back.
Owner's Manual
Page 22
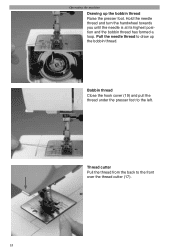
Operating the machine Drawing up the bobbin thread. Thread cutter Pull the thread from the back to the left. Hold the needle thread and turn the handwheel towards you until the needle is at its highest position and the bobbin thread has formed a loop. Pull the needle thread to draw up the bobbin thread Raise the presser foot. Bobbin thread Close the hook cover (19) and pull the thread under the presser foot to the front over the thread cutter (17). 18
Operating the machine Drawing up the bobbin thread. Thread cutter Pull the thread from the back to the left. Hold the needle thread and turn the handwheel towards you until the needle is at its highest position and the bobbin thread has formed a loop. Pull the needle thread to draw up the bobbin thread Raise the presser foot. Bobbin thread Close the hook cover (19) and pull the thread under the presser foot to the front over the thread cutter (17). 18