
Owner's Manual
Page 2
...the needle area, such as threading needle, changing needle threading bobbin, or changing presser foot etc. • Always unplug the sewing machine from the electric outlet immediately after using and before cleaning. • Always unplug before using an electrical appliance, basic safety ... to the off (0") when making any other ). Use only attachments recommended by or near children and infirm persons. • Use this sewing machine only for its intended use outdoors. • Do riot operate where aerosol (spray) products are being administered. • To ji'r,(,onnect...
...the needle area, such as threading needle, changing needle threading bobbin, or changing presser foot etc. • Always unplug the sewing machine from the electric outlet immediately after using and before cleaning. • Always unplug before using an electrical appliance, basic safety ... to the off (0") when making any other ). Use only attachments recommended by or near children and infirm persons. • Use this sewing machine only for its intended use outdoors. • Do riot operate where aerosol (spray) products are being administered. • To ji'r,(,onnect...
Owner's Manual
Page 3
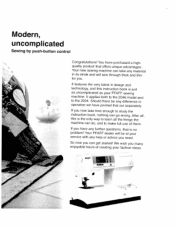
...have pointed that out separately. Your PFAFF dealer will sew through thick and thin for you need. p9. •1 Your new sewing machine can get started! We wish you have any difference in operation we have purchased a highquality product that is no problem! Modern, uncomplicated Sewing by push-button control .ø....with any material in design and technology, and this is just as uncomplicated as your PFAFF sewing machine, It applies both to the 2046 model and to the 2034. After all the things the machine can go wrong. So now you now take any help or advice you . It...
...have pointed that out separately. Your PFAFF dealer will sew through thick and thin for you need. p9. •1 Your new sewing machine can get started! We wish you have any difference in operation we have purchased a highquality product that is no problem! Modern, uncomplicated Sewing by push-button control .ø....with any material in design and technology, and this is just as uncomplicated as your PFAFF sewing machine, It applies both to the 2046 model and to the 2034. After all the things the machine can go wrong. So now you now take any help or advice you . It...
Owner's Manual
Page 5
... thread tension Non-elastic/elastic stitches Non-stick fancy stitch foot for leather 0 Overlock stitches P Parts of the sewing machine (2046) Parts of the sewing machine (2034) Patchwork and quilting "Pattern start' 'Pattern start" within stitch sequence Pattern length/pattern width, changing for...Top feed (integrated dual feed) Twin needle Twin needle, threading U Utility stitches, Quilt Expression 2046 Utility stitches, Expression 2034 V Voltage switch 29 Window, adjusting the contrast z 21 Zippers, sewing in 59 41 1/4 inch quilt and patchwork foot 66 7/9 hole foot 103 Introduction 42...
... thread tension Non-elastic/elastic stitches Non-stick fancy stitch foot for leather 0 Overlock stitches P Parts of the sewing machine (2046) Parts of the sewing machine (2034) Patchwork and quilting "Pattern start' 'Pattern start" within stitch sequence Pattern length/pattern width, changing for...Top feed (integrated dual feed) Twin needle Twin needle, threading U Utility stitches, Quilt Expression 2046 Utility stitches, Expression 2034 V Voltage switch 29 Window, adjusting the contrast z 21 Zippers, sewing in 59 41 1/4 inch quilt and patchwork foot 66 7/9 hole foot 103 Introduction 42...
Owner's Manual
Page 12
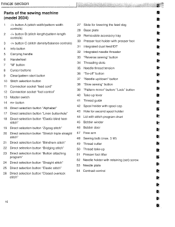
... 4 Info button 31 Integrated dual feed!IDT F 5 Carrying handle 32 Integrated needle threader F 6 Handwheel 7 M" button 8 Cursor buttons 33 'Reverse sewing" button 34 Threading slots F 35 Needle thread tension F 9 Clear/pattern start button 36 "Tie-off" button F 10 Stitch selection button 37 "Needle...up /down" button F 11 Connection socket "lead cord" 12 Connection socket "foot control" 38 "Slow sewing" button 39 "Pattern mirror" button! rinicai section Parts of the sewing machine t (model 2034) t 1 -1+ button A (stitch width/pattern width controls) 27 Slide for second ...
... 4 Info button 31 Integrated dual feed!IDT F 5 Carrying handle 32 Integrated needle threader F 6 Handwheel 7 M" button 8 Cursor buttons 33 'Reverse sewing" button 34 Threading slots F 35 Needle thread tension F 9 Clear/pattern start button 36 "Tie-off" button F 10 Stitch selection button 37 "Needle...up /down" button F 11 Connection socket "lead cord" 12 Connection socket "foot control" 38 "Slow sewing" button 39 "Pattern mirror" button! rinicai section Parts of the sewing machine t (model 2034) t 1 -1+ button A (stitch width/pattern width controls) 27 Slide for second ...
Owner's Manual
Page 14
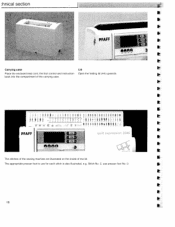
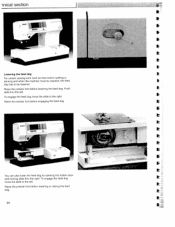
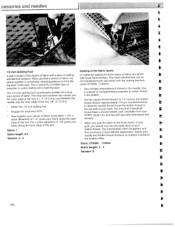
Lid Open the folding lid (44) upwards. The appropriate presser foot to use presser foot No. 0. Stitch No. 2, use for each stitch is also illustrated, e.g. t 18 PFAFF rtH < h+4tIO flflfl UU: __\ '- The stitches of the sewing machine are illustrated on the inside of the carrying case. hnicaI section w Carrying case Place the enclosed lead cord, the foot control and instruction book into the compartment of the lid.
Lid Open the folding lid (44) upwards. The appropriate presser foot to use presser foot No. 0. Stitch No. 2, use for each stitch is also illustrated, e.g. t 18 PFAFF rtH < h+4tIO flflfl UU: __\ '- The stitches of the sewing machine are illustrated on the inside of the carrying case. hnicaI section w Carrying case Place the enclosed lead cord, the foot control and instruction book into the compartment of the lid.
Owner's Manual
Page 15
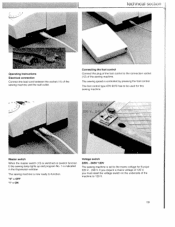
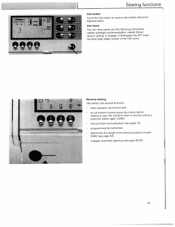
...of 120 V, you must reset the voltage switch on (switch function I " = ON Voltage switch 220V... 240VI12OV The sewing machine is set to function. '0" = OFF "I ) the sewing lamp lights up and program No. 1 is controlled by pressing the foot control. Master switch When the master switch (...13) is switched on the underside of the machine to the connection socket (12) of the sewing machine and the wall outlet. The sewing machine is now ready to the mains voltage for this sewing machine. 120 220V2 / --*- The sewing speed is indicated in the Expression window.
...of 120 V, you must reset the voltage switch on (switch function I " = ON Voltage switch 220V... 240VI12OV The sewing machine is set to function. '0" = OFF "I ) the sewing lamp lights up and program No. 1 is controlled by pressing the foot control. Master switch When the master switch (...13) is switched on the underside of the machine to the connection socket (12) of the sewing machine and the wall outlet. The sewing machine is now ready to the mains voltage for this sewing machine. 120 220V2 / --*- The sewing speed is indicated in the Expression window.
Owner's Manual
Page 17
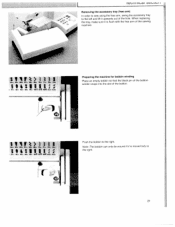
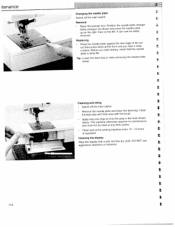
... arm, swing the accessory tray I to the right. Note: The bobbin can only be wound if it is flush with the free arm of the sewing machine. :ae aa ; 843 652 882 872 652 692 702 713 723 732 2 812 822 832 842 652 86 87 88 A'Z2 A-Z Preparing the... machine for bobbin winding Place an empty bobbin so that the black pin of the bobbin winder snaps into the slot of the bobbin. 3 64 85 ...
... arm, swing the accessory tray I to the right. Note: The bobbin can only be wound if it is flush with the free arm of the sewing machine. :ae aa ; 843 652 882 872 652 692 702 713 723 732 2 812 822 832 842 652 86 87 88 A'Z2 A-Z Preparing the... machine for bobbin winding Place an empty bobbin so that the black pin of the bobbin winder snaps into the slot of the bobbin. 3 64 85 ...
Owner's Manual
Page 20
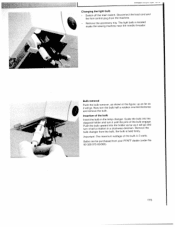
... thread tension is too tight The thread tension must be visible on the underside of the fabric: The needle thread tension is valid for general sewing work; The following is too loose . The thread tension must be corrected. the threads evenly meet between the two fabrit layers. Bobbin thread is visible... of the bobbin case and pull the bobbin case out of the bobbin case. Release the latch and take the empty bobbin out of the machine.
... thread tension is too tight The thread tension must be visible on the underside of the fabric: The needle thread tension is valid for general sewing work; The following is too loose . The thread tension must be corrected. the threads evenly meet between the two fabrit layers. Bobbin thread is visible... of the bobbin case and pull the bobbin case out of the bobbin case. Release the latch and take the empty bobbin out of the machine.

Owner's Manual
Page 28
The even feeding action also ensures perfect matching of the top layers. 32 inical secUon The IDT (Integrated Dual Feed) For sewing any fabric precisely PFAFF provides the ideal solution: the Integrated Dual Feed, IDT system. The IDT keeps all layers of quilt projects aligned to prevent stretching of checked and striped fabrics. On light fabrics such as silk or rayon the dual feed prevents puckering of the seam. As on industrial machines, the IDT feeds the fabric from the top and bottom at the same time The material is fed precisely.
The even feeding action also ensures perfect matching of the top layers. 32 inical secUon The IDT (Integrated Dual Feed) For sewing any fabric precisely PFAFF provides the ideal solution: the Integrated Dual Feed, IDT system. The IDT keeps all layers of quilt projects aligned to prevent stretching of checked and striped fabrics. On light fabrics such as silk or rayon the dual feed prevents puckering of the seam. As on industrial machines, the IDT feeds the fabric from the top and bottom at the same time The material is fed precisely.
Owner's Manual
Page 30
... and moving slide B to be lowered. I . Push slide A to the right. inica section w Lowering the teed dog t For certain sewing work such as tree-motion quilting or darning and when the machine must be cleaned, the feed dog has to the right. Raise the presser foot before lowering the feed dog. To...
... and moving slide B to be lowered. I . Push slide A to the right. inica section w Lowering the teed dog t For certain sewing work such as tree-motion quilting or darning and when the machine must be cleaned, the feed dog has to the right. Raise the presser foot before lowering the feed dog. To...
Owner's Manual
Page 37
... feed dogs, page number of the darning program (model 2046) (see page 62) engages automatic tapering (see page 89-90) I I 41 Reverse sewing This button has several functions: when pressed, will reverse sew 9 • for permanent reverse press this button before starting to sew, the machine sews in reverse until you the following information: needle size...
... feed dogs, page number of the darning program (model 2046) (see page 62) engages automatic tapering (see page 89-90) I I 41 Reverse sewing This button has several functions: when pressed, will reverse sew 9 • for permanent reverse press this button before starting to sew, the machine sews in reverse until you the following information: needle size...
Owner's Manual
Page 38
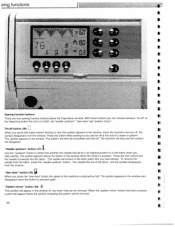
... off at the beginning and/or the end of a seam or pattern. Press the button while sewing so you can choose between 'tie-off , the symbol disappears from the window. The machine will appear below the Expression window. "Needle up /down " button (37)1- To remove the needle from the window. p 42 The symbol...
... off at the beginning and/or the end of a seam or pattern. Press the button while sewing so you can choose between 'tie-off , the symbol disappears from the window. The machine will appear below the Expression window. "Needle up /down " button (37)1- To remove the needle from the window. p 42 The symbol...

Owner's Manual
Page 39
...any unintentional selection of another sewing program or another pattern sequence by means of another sewing program or another pattern sequence. The locking function is now switched off the "lock" button: Press the button (39) until the locking symbol appears in the window. The machine is still possible to 26... appears. Note: You can still be altered. The stitch length / width, pattern length / width and pattern density I balance can be selected. Sewing functions "Lock" button "Pattern mirror" button: (39) 4t You can safeguard your sewing machine against any time.
...any unintentional selection of another sewing program or another pattern sequence by means of another sewing program or another pattern sequence. The locking function is now switched off the "lock" button: Press the button (39) until the locking symbol appears in the window. The machine is still possible to 26... appears. Note: You can still be altered. The stitch length / width, pattern length / width and pattern density I balance can be selected. Sewing functions "Lock" button "Pattern mirror" button: (39) 4t You can safeguard your sewing machine against any time.

Owner's Manual
Page 44
...sequence, the desired position in must be deleted. Once you switch off on completion and the machine stops automatically. After deleting the stitch, the rest of the memory moves up to sew. Tip: In order to sew a stitch sequence once, press the tie-ott button (36) when you have been sewn ...are automatically the machine's memory even stored and remain after you have entered the stitch sequence, can ...
...sequence, the desired position in must be deleted. Once you switch off on completion and the machine stops automatically. After deleting the stitch, the rest of the memory moves up to sew. Tip: In order to sew a stitch sequence once, press the tie-ott button (36) when you have been sewn ...are automatically the machine's memory even stored and remain after you have entered the stitch sequence, can ...

Owner's Manual
Page 47
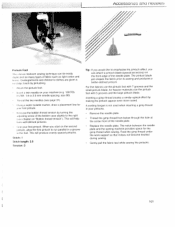
...using the guide marks on . Tip: Light fabrics are given in 13 different needle positions allowing you to sew one stitch at a time. Use stitch 1, stitch length 6 mm. Topstitching The straight stitch can be ...determined by the width of the same thickness as the seam under the presser foot. • Sew one stitch, then move the fabric the required amount to the rear. • Continue to guide the ...garment before trying it . 55 When you press the foot control, the machine will sew one stitch at the beginning of a thick seam, place a piece of fabric of the presser foot.
...using the guide marks on . Tip: Light fabrics are given in 13 different needle positions allowing you to sew one stitch at a time. Use stitch 1, stitch length 6 mm. Topstitching The straight stitch can be ...determined by the width of the same thickness as the seam under the presser foot. • Sew one stitch, then move the fabric the required amount to the rear. • Continue to guide the ...garment before trying it . 55 When you press the foot control, the machine will sew one stitch at the beginning of a thick seam, place a piece of fabric of the presser foot.
Owner's Manual
Page 93
... of the needle plate. • Replace the needle plate. The notch between the needle plate and the sewing machine provides space for the gimp thread while sewing. Feed the gimp thread under the work support so that it does not become knotted during... sewing. • Gently pull the fabric taut while sewing the pintucks. 101 r' cZ&riILh 1tzUft, V Pintuck Foot In' (ldssic heirloom sewing technique can attach a pintuck blade (special accessory) on your machine (e.g. 130/705 I '. f 's C- Undergarments and children...
... of the needle plate. • Replace the needle plate. The notch between the needle plate and the sewing machine provides space for the gimp thread while sewing. Feed the gimp thread under the work support so that it does not become knotted during... sewing. • Gently pull the fabric taut while sewing the pintucks. 101 r' cZ&riILh 1tzUft, V Pintuck Foot In' (ldssic heirloom sewing technique can attach a pintuck blade (special accessory) on your machine (e.g. 130/705 I '. f 's C- Undergarments and children...
Owner's Manual
Page 96
...quilting the three layers of fabric are joined together in the needle. The 114 inch quilting foot is particularly suitable for working with the sewing machine (stitch 27/2046 11/2034). • Use invisible (monofilament) thread in continually changing patterns to form the top layer of the quilt, This is... joined with a layer of batting sandwiched between the needle and the inner edge of your PFAFF dealer) for joining your needle and bobbin thread tensions as needed to produce the desired effect Stitch: 27/2046 11/2034 Stitch length: 3 - 4 Tension: 9 104 You may find it beneficial...
...quilting the three layers of fabric are joined together in the needle. The 114 inch quilting foot is particularly suitable for working with the sewing machine (stitch 27/2046 11/2034). • Use invisible (monofilament) thread in continually changing patterns to form the top layer of the quilt, This is... joined with a layer of batting sandwiched between the needle and the inner edge of your PFAFF dealer) for joining your needle and bobbin thread tensions as needed to produce the desired effect Stitch: 27/2046 11/2034 Stitch length: 3 - 4 Tension: 9 104 You may find it beneficial...
Owner's Manual
Page 106
... is lying flat. Clean the feed dog and hook area with a soft, lint-free dry cloth. DO NOT use aggressive cleansers or solvents! 114 The machine otherwise requires no maintenance and must not be easily removed. Cleaning the display Wipe the display with the brush. • Apply only one drop of... switch. • Remove the needle plate and lower the feed dog. It can now be oiled at any other points. • Clean and oil the sewing machine every 10- 15 hours of oil to make removing the needle plate easier Cleaning and oiling • Switch off the main switch.
... is lying flat. Clean the feed dog and hook area with a soft, lint-free dry cloth. DO NOT use aggressive cleansers or solvents! 114 The machine otherwise requires no maintenance and must not be easily removed. Cleaning the display Wipe the display with the brush. • Apply only one drop of... switch. • Remove the needle plate and lower the feed dog. It can now be oiled at any other points. • Clean and oil the sewing machine every 10- 15 hours of oil to make removing the needle plate easier Cleaning and oiling • Switch off the main switch.
Owner's Manual
Page 107
.... Guide the bulb into the holder as far as it will go . Remove the bulb changer from the bulb, the bulb is located inside the sewing machine near the needle threader. Important: The maximum wattage of the bulb engage. Now turn it will go and turn it half a rotation in a clockwise direction...and remove the bulb. Changing the light bulb • Switch off the main switch. Disconnect the lead cord and the foot control plug from your PFAFF dealer (order No. 92-329 975-05/000). 115 Bulb removal Push the bulb remover, as shown in the lamp changer. Insertion of the bulb...
.... Guide the bulb into the holder as far as it will go . Remove the bulb changer from the bulb, the bulb is located inside the sewing machine near the needle threader. Important: The maximum wattage of the bulb engage. Now turn it will go and turn it half a rotation in a clockwise direction...and remove the bulb. Changing the light bulb • Switch off the main switch. Disconnect the lead cord and the foot control plug from your PFAFF dealer (order No. 92-329 975-05/000). 115 Bulb removal Push the bulb remover, as shown in the lamp changer. Insertion of the bulb...
Owner's Manual
Page 110
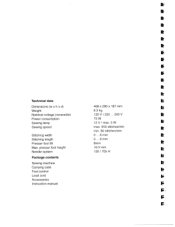
presser foot height Needle system Package contents Sewing machine Carrying case Foot control Lead cord Accessories Instruction manual 408 x 290 x 187 mm 8.3 kg 120 V / 220 ... 240 V 75 W 12 V/max. 5W max. 950 stitches/mm mm. 80 stitches/mm 0 6 mm ... 0. 6 mm 8mm 10.5mm 130 / 705 H F F k F F F F F F F F F F F F Technical data Dimensions (w x h x d) Weight Nominal voltage (reversible) Power consumption Sewing lamp Sewing speed Stitching width Stitching length Presser foot lift Max.
presser foot height Needle system Package contents Sewing machine Carrying case Foot control Lead cord Accessories Instruction manual 408 x 290 x 187 mm 8.3 kg 120 V / 220 ... 240 V 75 W 12 V/max. 5W max. 950 stitches/mm mm. 80 stitches/mm 0 6 mm ... 0. 6 mm 8mm 10.5mm 130 / 705 H F F k F F F F F F F F F F F F Technical data Dimensions (w x h x d) Weight Nominal voltage (reversible) Power consumption Sewing lamp Sewing speed Stitching width Stitching length Presser foot lift Max.


