
Owner's Manual
Page 2
... ('0") position. Do not modify the plug in any adjustment in the needle area, such as contained in this manual. • Never operate this sewing machine if it has a ( amaged cord or plug, if it is being used by pulling on cord To unplug, grasp the plug, not...fire, electric shock, or injury to person: • Do not allow to the off (0") when making any way. 1- Special care is required around the sewing machine needle. • Always use as a toy Close attention is necessary when this manual. DANGER - * IMPORTANT SAFETY INSTRUCTIONS When using an electrical appliance, ...
... ('0") position. Do not modify the plug in any adjustment in the needle area, such as contained in this manual. • Never operate this sewing machine if it has a ( amaged cord or plug, if it is being used by pulling on cord To unplug, grasp the plug, not...fire, electric shock, or injury to person: • Do not allow to the off (0") when making any way. 1- Special care is required around the sewing machine needle. • Always use as a toy Close attention is necessary when this manual. DANGER - * IMPORTANT SAFETY INSTRUCTIONS When using an electrical appliance, ...
Owner's Manual
Page 3
... have any further questions, that is no problem! If you . Your PFAFF dealer will sew through thick and thin for you have purchased a highquality product that out separately. Should there be at your fashion ideas. Your new sewing machine can take time enough to study the instruction book, nothing can go...all the things the machine can get started! If you can do, and to the 2034. It features the very latest in design and technology, and this is just as uncomplicated as your PFAFF sewing machine, It applies both to the 2046 model and to make full use of creating your...
... have any further questions, that is no problem! If you . Your PFAFF dealer will sew through thick and thin for you have purchased a highquality product that out separately. Should there be at your fashion ideas. Your new sewing machine can take time enough to study the instruction book, nothing can go...all the things the machine can get started! If you can do, and to the 2034. It features the very latest in design and technology, and this is just as uncomplicated as your PFAFF sewing machine, It applies both to the 2046 model and to make full use of creating your...
Owner's Manual
Page 4
... the needle Braiding foot Bridging Buttonhole, fully-automatic Buttonholes Buttonholes with gimp thread Buttonhole tips Buttonholes, types Buttons, sewing on C Carrying case Changing a pattern within the stitch sequence Circular embroidery guide Cleaning and oiling Combined borders Combined...102 65 92 D Darning, automatic darning (model 2046) 62 Darning, sewing on patches 59, 62-63 Decorative sewing, general notes 84 Decorative stitches, Quilt Expression 2046 10 Decorative stitches, Expression 2034 11 E Elastic utility stitches Electrical connection Eyelet embroidery Eyelets 56-60, ...
... the needle Braiding foot Bridging Buttonhole, fully-automatic Buttonholes Buttonholes with gimp thread Buttonhole tips Buttonholes, types Buttons, sewing on C Carrying case Changing a pattern within the stitch sequence Circular embroidery guide Cleaning and oiling Combined borders Combined...102 65 92 D Darning, automatic darning (model 2046) 62 Darning, sewing on patches 59, 62-63 Decorative sewing, general notes 84 Decorative stitches, Quilt Expression 2046 10 Decorative stitches, Expression 2034 11 E Elastic utility stitches Electrical connection Eyelet embroidery Eyelets 56-60, ...
Owner's Manual
Page 5
...tension Non-elastic/elastic stitches Non-stick fancy stitch foot for leather 0 Overlock stitches P Parts of the sewing machine (2046) Parts of the sewing machine (2034) Patchwork and quilting "Pattern start' 'Pattern start" within stitch sequence Pattern length/pattern width, changing for ... Top feed (integrated dual feed) Twin needle Twin needle, threading U Utility stitches, Quilt Expression 2046 Utility stitches, Expression 2034 V Voltage switch 29 Window, adjusting the contrast z 21 Zippers, sewing in 59 41 1/4 inch quilt and patchwork foot 66 7/9 hole foot 103 Introduction 42 116...
...tension Non-elastic/elastic stitches Non-stick fancy stitch foot for leather 0 Overlock stitches P Parts of the sewing machine (2046) Parts of the sewing machine (2034) Patchwork and quilting "Pattern start' 'Pattern start" within stitch sequence Pattern length/pattern width, changing for ... Top feed (integrated dual feed) Twin needle Twin needle, threading U Utility stitches, Quilt Expression 2046 Utility stitches, Expression 2034 V Voltage switch 29 Window, adjusting the contrast z 21 Zippers, sewing in 59 41 1/4 inch quilt and patchwork foot 66 7/9 hole foot 103 Introduction 42 116...
Owner's Manual
Page 6
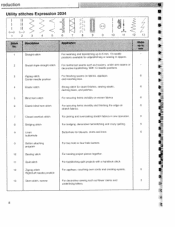
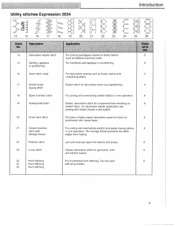
roduction Utility stitches Expression 2034 I Ei
roduction Utility stitches Expression 2034 I Ei
Owner's Manual
Page 7
...and overcast open knit fabrics and jersey. 6 23 Cross stitch Classic decorative stitch for decorative elastic application and sewing with wing needle. 26 Hem stitching 9 I Utility stitches Expression 2034 Il . 4=31 II 14 15 16 17 18 20 21 22 23 24 ách t4o 14 ...Decorative elastic stitch 15 Quilting, applique or pinstitching ; Introduction 25 26 p1o 6 6 16 Stem stitch, wide For decorative sewing such as leathers and terry ...
...and overcast open knit fabrics and jersey. 6 23 Cross stitch Classic decorative stitch for decorative elastic application and sewing with wing needle. 26 Hem stitching 9 I Utility stitches Expression 2034 Il . 4=31 II 14 15 16 17 18 20 21 22 23 24 ách t4o 14 ...Decorative elastic stitch 15 Quilting, applique or pinstitching ; Introduction 25 26 p1o 6 6 16 Stem stitch, wide For decorative sewing such as leathers and terry ...

Owner's Manual
Page 10
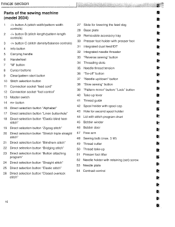
...balance controls) 30 Presser foot holder with presser foot 31 Integrated dual feed/IDT I i ,u ig handle 32 Integrated needle threader Hdndwheel 33 'Reverse sewing" button / "M" button 34 Threading slots 8 Cursor buttons 35 Needle thread tension 9 Clear/pattern start button 36 "Tie-off" button 10 Stitch ... stitch" 23 Direct selection button "Button attaching program" 24 Direct selection button "Straight stitch" 25 Direct selection button "Elastic stitch" 48 Sewing bulb (max. 5 W) 49 Thread cutter 50 Thread take-up 51 Presser foot lifter 52 Needle holder with retaining (set) screw 53...
...balance controls) 30 Presser foot holder with presser foot 31 Integrated dual feed/IDT I i ,u ig handle 32 Integrated needle threader Hdndwheel 33 'Reverse sewing" button / "M" button 34 Threading slots 8 Cursor buttons 35 Needle thread tension 9 Clear/pattern start button 36 "Tie-off" button 10 Stitch ... stitch" 23 Direct selection button "Button attaching program" 24 Direct selection button "Straight stitch" 25 Direct selection button "Elastic stitch" 48 Sewing bulb (max. 5 W) 49 Thread cutter 50 Thread take-up 51 Presser foot lifter 52 Needle holder with retaining (set) screw 53...
Owner's Manual
Page 12
..." 53 Needle plate F 25 Direct selection button "Elastic stitch" 26 Direct selection button "Closed overlock 54 Contrast control F stitch" F F F * rinicai section Parts of the sewing machine t (model 2034) t 1 -1+ button A (stitch width/pattern width controls) 27 Slide for second spool holder 44 Lid with stitch program chart r F stitch" 45 Bobbin winder 19 Direct...
..." 53 Needle plate F 25 Direct selection button "Elastic stitch" 26 Direct selection button "Closed overlock 54 Contrast control F stitch" F F F * rinicai section Parts of the sewing machine t (model 2034) t 1 -1+ button A (stitch width/pattern width controls) 27 Slide for second spool holder 44 Lid with stitch program chart r F stitch" 45 Bobbin winder 19 Direct...
Owner's Manual
Page 14
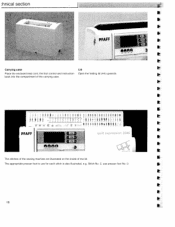
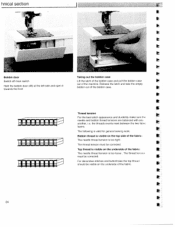
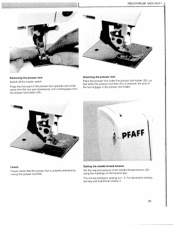
The appropriate presser foot to use presser foot No. 0. t 18 PFAFF rtH < h+4tIO flflfl UU: __\ '- hnicaI section w Carrying case Place the enclosed lead cord, the foot control and instruction book into the compartment of the lid. Lid Open the folding lid (44) upwards. Stitch No. 2, use for each stitch is also illustrated, e.g. The stitches of the sewing machine are illustrated on the inside of the carrying case.
The appropriate presser foot to use presser foot No. 0. t 18 PFAFF rtH < h+4tIO flflfl UU: __\ '- hnicaI section w Carrying case Place the enclosed lead cord, the foot control and instruction book into the compartment of the lid. Lid Open the folding lid (44) upwards. Stitch No. 2, use for each stitch is also illustrated, e.g. The stitches of the sewing machine are illustrated on the inside of the carrying case.
Owner's Manual
Page 15
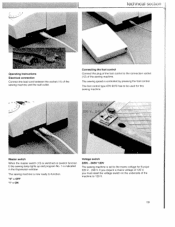
...underside of the machine to the connection socket (12) of 120 V, you require a mains voltage of the sewing machine. The sewing machine is now ready to function. '0" = OFF "I ) the sewing lamp lights up and program No. 1 is controlled by pressing the foot control. Iechnicai seUiün Operating...to 120 V. 19 If you must reset the voltage switch on (switch function I " = ON Voltage switch 220V... 240VI12OV The sewing machine is set to be used for Europe 220 V.. 240 V. The sewing speed is indicated in the Expression window. Connecting the foot control Connect the plug of the...
...underside of the machine to the connection socket (12) of 120 V, you require a mains voltage of the sewing machine. The sewing machine is now ready to function. '0" = OFF "I ) the sewing lamp lights up and program No. 1 is controlled by pressing the foot control. Iechnicai seUiün Operating...to 120 V. 19 If you must reset the voltage switch on (switch function I " = ON Voltage switch 220V... 240VI12OV The sewing machine is set to be used for Europe 220 V.. 240 V. The sewing speed is indicated in the Expression window. Connecting the foot control Connect the plug of the...
Owner's Manual
Page 17
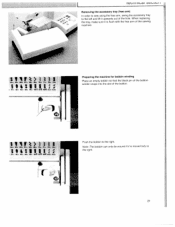
... 86 87 8B A.Zz 422 T Push the bobbin to the right. 21 ItI..,I II IRctI LILR i Removing the accessory tray (free arm) In order to sew using the free arm, swing the accessory tray I to the left and lift it is flush with the free arm of the... sewing machine. :ae aa ; 843 652 882 872 652 692 702 713 723 732 2 812 822 832 842 652 86 87 88 A'Z2 A-Z Preparing the machine ...
... 86 87 8B A.Zz 422 T Push the bobbin to the right. 21 ItI..,I II IRctI LILR i Removing the accessory tray (free arm) In order to sew using the free arm, swing the accessory tray I to the left and lift it is flush with the free arm of the... sewing machine. :ae aa ; 843 652 882 872 652 692 702 713 723 732 2 812 822 832 842 652 86 87 88 A'Z2 A-Z Preparing the machine ...

Owner's Manual
Page 18
... the right size for the thread spool. Push the bobbin to front). Pull tfi' p thread under the thread guide C (from the spool pin Place the sewing thread on the master switch Hold the end of the thread firmly and press the foot coritrul As soon as the bobbin is full, the...
... the right size for the thread spool. Push the bobbin to front). Pull tfi' p thread under the thread guide C (from the spool pin Place the sewing thread on the master switch Hold the end of the thread firmly and press the foot coritrul As soon as the bobbin is full, the...
Owner's Manual
Page 20
... between the two fabrit layers. Release the latch and take the empty bobbin out of the fabric: The needle thread tension is valid for general sewing work; Top thread is visible on the underside of the machine. The following is too loose .
... between the two fabrit layers. Release the latch and take the empty bobbin out of the fabric: The needle thread tension is valid for general sewing work; Top thread is visible on the underside of the machine. The following is too loose .
Owner's Manual
Page 21
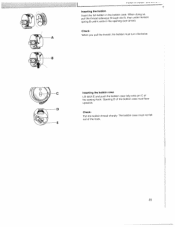
Check: When you pull the thread, the bobbin must face upwards. pull the thread sideways through slot A, When doing so, then under tension spring B until it rests in the bobbin case. Opening D of the bobbin case must turn clockwise. -c Inserting the bobbin case Lift latch E and push the bobbin case fully onto pin C of the hook. The bobbin case must not fall out of the sewing hook. I I II - Check: Pull the bobbin thread sharply. E 25 Inserting the bobbin Insert the full bobbin in the opening (see arrow).
Check: When you pull the thread, the bobbin must face upwards. pull the thread sideways through slot A, When doing so, then under tension spring B until it rests in the bobbin case. Opening D of the bobbin case must turn clockwise. -c Inserting the bobbin case Lift latch E and push the bobbin case fully onto pin C of the hook. The bobbin case must not fall out of the sewing hook. I I II - Check: Pull the bobbin thread sharply. E 25 Inserting the bobbin Insert the full bobbin in the opening (see arrow).
Owner's Manual
Page 25
... part of the needle thread tension (35) using the markings on the tension dial. The normal setting for sewing is properly attached by raising the presser foot lifter. darning and buttonhole sewing 3. 29 For decorative sewing. Attaching the presser foot Place the presser foot under the presser foot holder (30). Setting the needle... foot holder (30). so that when the presser foot lifter (51)is lowered, the pins of the foot engage in the presser foot holder. •pFAFF Check: Please check that the presser toot is 4 - 5.
... part of the needle thread tension (35) using the markings on the tension dial. The normal setting for sewing is properly attached by raising the presser foot lifter. darning and buttonhole sewing 3. 29 For decorative sewing. Attaching the presser foot Place the presser foot under the presser foot holder (30). Setting the needle... foot holder (30). so that when the presser foot lifter (51)is lowered, the pins of the foot engage in the presser foot holder. •pFAFF Check: Please check that the presser toot is 4 - 5.

Owner's Manual
Page 27
..., see "Decorative stitches with the twin needle" p. 85). Loosen the needle screw (52) and pull the needle out downwards. Threading the twin needle: Replace the sewing needle with a twin needle. 31 Pull the threads right and left threading slot (34), make sure that you pass one spool of thread on each...
..., see "Decorative stitches with the twin needle" p. 85). Loosen the needle screw (52) and pull the needle out downwards. Threading the twin needle: Replace the sewing needle with a twin needle. 31 Pull the threads right and left threading slot (34), make sure that you pass one spool of thread on each...

Owner's Manual
Page 28
inical secUon The IDT (Integrated Dual Feed) For sewing any fabric precisely PFAFF provides the ideal solution: the Integrated Dual Feed, IDT system. As on industrial machines, the IDT feeds the fabric from the top and bottom at the same time The material is fed precisely. The IDT keeps all layers of quilt projects aligned to prevent stretching of checked and striped fabrics. The even feeding action also ensures perfect matching of the top layers. 32 On light fabrics such as silk or rayon the dual feed prevents puckering of the seam.
inical secUon The IDT (Integrated Dual Feed) For sewing any fabric precisely PFAFF provides the ideal solution: the Integrated Dual Feed, IDT system. As on industrial machines, the IDT feeds the fabric from the top and bottom at the same time The material is fed precisely. The IDT keeps all layers of quilt projects aligned to prevent stretching of checked and striped fabrics. The even feeding action also ensures perfect matching of the top layers. 32 On light fabrics such as silk or rayon the dual feed prevents puckering of the seam.
Owner's Manual
Page 30
... the slide to the left . To engage the feed dog move the slide to the right. I 34 inica section w Lowering the teed dog t For certain sewing work such as tree-motion quilting or darning and when the machine must be cleaned, the feed dog has to the right.
... the slide to the left . To engage the feed dog move the slide to the right. I 34 inica section w Lowering the teed dog t For certain sewing work such as tree-motion quilting or darning and when the machine must be cleaned, the feed dog has to the right.
Owner's Manual
Page 31
Sewing functions Adjusting the contrast in the Expression window 36 Stitch selection 36 Bobbin thread monitor (model 2046) 37 Altering pattern sizes 37 Altering the stitch width/needle position 38 4ltering the pattern th/stitch length 38, 39 A1ring the pattern tenØVstitch density 39 Sa1ate 40 jnfobutton/reverse sewing button 41 Sewtrgfuction buttons 42 btton 43 :. 44 45
Sewing functions Adjusting the contrast in the Expression window 36 Stitch selection 36 Bobbin thread monitor (model 2046) 37 Altering pattern sizes 37 Altering the stitch width/needle position 38 4ltering the pattern th/stitch length 38, 39 A1ring the pattern tenØVstitch density 39 Sa1ate 40 jnfobutton/reverse sewing button 41 Sewtrgfuction buttons 42 btton 43 :. 44 45

Owner's Manual
Page 33
The symbol disappears after a full bobbin is visible in the window. cha Stitch width Pattern width Needle position for straight stitches Altering stitches Adjust the length, width, balance, density or needle position of stitches by touching the appropriate -1+ buttons to sew again. Each change is inserted and you start to the right ol the window. 9 Sewing functions Bobbin thread monitor (model 2046) If the bobbin is nearing its end [2 ¼ yd (2 m)-3 1/4 yd (3 m)], or there is no thread on the bobbin, the bobbin symbol appears in the window.
The symbol disappears after a full bobbin is visible in the window. cha Stitch width Pattern width Needle position for straight stitches Altering stitches Adjust the length, width, balance, density or needle position of stitches by touching the appropriate -1+ buttons to sew again. Each change is inserted and you start to the right ol the window. 9 Sewing functions Bobbin thread monitor (model 2046) If the bobbin is nearing its end [2 ¼ yd (2 m)-3 1/4 yd (3 m)], or there is no thread on the bobbin, the bobbin symbol appears in the window.


