
Owner's Manual
Page 2
...knowledge of the system, and should be left unattended when plugged in this manual. WARNING - Return the sewing machine to whip when rewinding. • This sewing machine is provided with double insulation. To unplug, grasp the plug, not the cord. • Hold plug when...must be supervised to those parts in this manual. • Never operate this household sewing machine. A double-insulated product is marked with the sewing machine. • Use this sewing machine from the electric outlet immediately after using and before using an electrical appliance, basic safety precautions...
...knowledge of the system, and should be left unattended when plugged in this manual. WARNING - Return the sewing machine to whip when rewinding. • This sewing machine is provided with double insulation. To unplug, grasp the plug, not the cord. • Hold plug when...must be supervised to those parts in this manual. • Never operate this household sewing machine. A double-insulated product is marked with the sewing machine. • Use this sewing machine from the electric outlet immediately after using and before using an electrical appliance, basic safety precautions...
Owner's Manual
Page 3
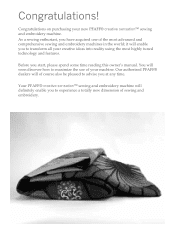
it will soon discover how to transform all your new PFAFF® creative sensation™ sewing and embroidery machine. You will enable you to maximize the use of your machine. Your PFAFF® creative sensation™ sewing and embroidery machine will of course also be pleased to experience a totally new dimension of the most highly tuned technology and features. Congratulations...
it will soon discover how to transform all your new PFAFF® creative sensation™ sewing and embroidery machine. You will enable you to maximize the use of your machine. Your PFAFF® creative sensation™ sewing and embroidery machine will of course also be pleased to experience a totally new dimension of the most highly tuned technology and features. Congratulations...
Owner's Manual
Page 4
... 2:13 Register your 5D™ software 2:13 Install hardware drivers and connect the embroidery machine 2:13 How to launch the programs 2:14 Embroidery Machine Communication module.... 2:14 How to update your machine 2:14 Soft Touch Buttons and indicators 2:15 3 PFAFF® creative™ Color Touch Screen 3:1 Start view 3:2 Main parts 3:2 Task bar 3:2 Option bar 3:3 Common...
... 2:13 Register your 5D™ software 2:13 Install hardware drivers and connect the embroidery machine 2:13 How to launch the programs 2:14 Embroidery Machine Communication module.... 2:14 How to update your machine 2:14 Soft Touch Buttons and indicators 2:15 3 PFAFF® creative™ Color Touch Screen 3:1 Start view 3:2 Main parts 3:2 Task bar 3:2 Option bar 3:3 Common...
Owner's Manual
Page 5
... 5:3 Sequence commands 5:4 Horizontal preview 5:5 Directional stitches 5:5 Zoom to avoid the discoloring. If you suspect that your sewing machine. overview 6:2 Open and exit Stitch Creator 6:3 DeÀnition of excess dye. overview 4:2 Select a stitch 4:3 Sewing recommendations 4:3 Machine settings 4:3 Raise and lower the presser foot 4:3 Stitch settings 4:4 Stitch width 4:4 Stitch positioning 4:4 Stitch length 4:4 Stitch...
... 5:3 Sequence commands 5:4 Horizontal preview 5:5 Directional stitches 5:5 Zoom to avoid the discoloring. If you suspect that your sewing machine. overview 6:2 Open and exit Stitch Creator 6:3 DeÀnition of excess dye. overview 4:2 Select a stitch 4:3 Sewing recommendations 4:3 Machine settings 4:3 Raise and lower the presser foot 4:3 Stitch settings 4:4 Stitch width 4:4 Stitch positioning 4:4 Stitch length 4:4 Stitch...
Owner's Manual
Page 6
...:1 10:2 10:3 10:3 10:5 10:5 10:6 10:7 11 Maintenance Cleaning the machine Non-original parts and accessories Troubleshooting Index Intellectual Property 11:1 11:2 11:2 11:3 11:5 11:10 7 Embroidery preparations 7:1 Embroidery unit overview 7:2 Embroidery hoop overview 7:2 Built-in designs 7:3 creative sensation™ Embroidery collection 7:3 Connect the embroidery unit 7:3 Remove the embroidery unit 7:4 Attaching...
...:1 10:2 10:3 10:3 10:5 10:5 10:6 10:7 11 Maintenance Cleaning the machine Non-original parts and accessories Troubleshooting Index Intellectual Property 11:1 11:2 11:2 11:3 11:5 11:10 7 Embroidery preparations 7:1 Embroidery unit overview 7:2 Embroidery hoop overview 7:2 Built-in designs 7:3 creative sensation™ Embroidery collection 7:3 Connect the embroidery unit 7:3 Remove the embroidery unit 7:4 Attaching...
Owner's Manual
Page 8
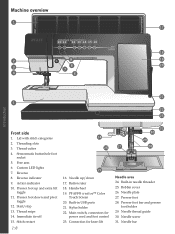
... 27. Presser foot bar and presser foot holder 29. Machine overview 1 17 10 11 12 13 14 15 16 18 2 9 19 3 8 7 20 4 6 Introduction 21 5 22 23 Front side 1. Free arm 6. Presser foot up /down and pivot toggle 12. Button ruler 18. PFAFF® creative™ Color Touch Screen 20. Connection for power cord...
... 27. Presser foot bar and presser foot holder 29. Machine overview 1 17 10 11 12 13 14 15 16 18 2 9 19 3 8 7 20 4 6 Introduction 21 5 22 23 Front side 1. Free arm 6. Presser foot up /down and pivot toggle 12. Button ruler 18. PFAFF® creative™ Color Touch Screen 20. Connection for power cord...
Owner's Manual
Page 10
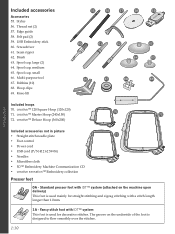
... • Foot control • Power cord • USB cord (P/N:412 62 59-04) • Needles • MicroÀber cloth • 5D™ Embroidery Machine Communication CD • creative sensation™ Embroidery collection Presser feet 0A - Stylus 56. Thread net (2) 57. Edge guide 58. Spool cap, large (2) 64. Bobbins (10) 68. Knee-lift...
... • Foot control • Power cord • USB cord (P/N:412 62 59-04) • Needles • MicroÀber cloth • 5D™ Embroidery Machine Communication CD • creative sensation™ Embroidery collection Presser feet 0A - Stylus 56. Thread net (2) 57. Edge guide 58. Spool cap, large (2) 64. Bobbins (10) 68. Knee-lift...
Owner's Manual
Page 11
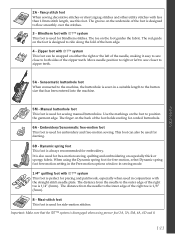
...markings on the foot to zipper teeth. 5A - This foot can be used for darning. 6D - Important: Make sure that has been entered into the machine. 5M - Fancy stitch foot When sewing decorative stitches or short zigzag stitches and other utility stitches with IDT™ system This foot can also be... on the back of the zipper teeth. Move needle position to right or left of the hem edge. 4 - Sensormatic buttonhole foot When connected to the machine, the buttonhole is 1/8" (3mm). 8 - The distance from the needle to ride along the fold of the needle, making it easy to sew close to...
...markings on the foot to zipper teeth. 5A - This foot can be used for darning. 6D - Important: Make sure that has been entered into the machine. 5M - Fancy stitch foot When sewing decorative stitches or short zigzag stitches and other utility stitches with IDT™ system This foot can also be... on the back of the zipper teeth. Move needle position to right or left of the hem edge. 4 - Sensormatic buttonhole foot When connected to the machine, the buttonhole is 1/8" (3mm). 8 - The distance from the needle to ride along the fold of the needle, making it easy to sew close to...
Owner's Manual
Page 24
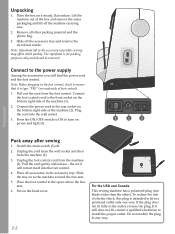
... foot control). 1. Connect the foot control cord to the power supply Among the accessories you will retract itself into the wall socket. 3. Lift the machine out of the machine (1). 2. Note: Styrofoam left in any way. 2:2 Put on a steady, Áat surface. Note: Before plugging in the accessory tray. Remove...qualiÀed electrician to the rear socket on the bottom right side of the box and remove the outer packaging and lift off the machine carrying case. 2. To reduce the risk of electric shock, this plug is for packing purposes only and should be removed. Do not modify...
... foot control). 1. Connect the foot control cord to the power supply Among the accessories you will retract itself into the wall socket. 3. Lift the machine out of the machine (1). 2. Note: Styrofoam left in any way. 2:2 Put on a steady, Áat surface. Note: Before plugging in the accessory tray. Remove...qualiÀed electrician to the rear socket on the bottom right side of the box and remove the outer packaging and lift off the machine carrying case. 2. To reduce the risk of electric shock, this plug is for packing purposes only and should be removed. Do not modify...
Owner's Manual
Page 25
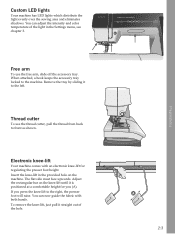
... out of the light in the provided hole on the knee-lift until it is positioned at side must face upwards. Electronic knee-lift Your machine comes with both hands. When attached, a hook keeps the accessory tray locked to the left. Custom LED lights Your... machine has LED lights which distribute the light evenly over the sewing area and eliminates shadows. Thread cutter To use the free arm, slide off the ...
... out of the light in the provided hole on the knee-lift until it is positioned at side must face upwards. Electronic knee-lift Your machine comes with both hands. When attached, a hook keeps the accessory tray locked to the left. Custom LED lights Your... machine has LED lights which distribute the light evenly over the sewing area and eliminates shadows. Thread cutter To use the free arm, slide off the ...
Owner's Manual
Page 26
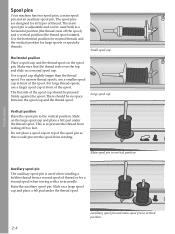
... should be no space between the spool cap and the thread spool. Slide on a second spool cap. Slide on the spool pin. Spool pins Your machine has two spool pins, a main spool pin and an auxiliary spool pin. Make sure that would prevent the spool from reeling off the spool) and...
... should be no space between the spool cap and the thread spool. Slide on a second spool cap. Slide on the spool pin. Spool pins Your machine has two spool pins, a main spool pin and an auxiliary spool pin. Make sure that would prevent the spool from reeling off the spool) and...
Owner's Manual
Page 27
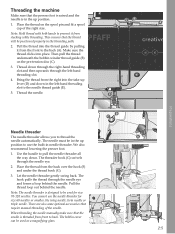
Threading the machine Make sure that the needle is threaded from front to back. Thread down . Thread the needle. The hook pulls the thread through the needle eye ...
Threading the machine Make sure that the needle is threaded from front to back. Thread down . Thread the needle. The hook pulls the thread through the needle eye ...
Owner's Manual
Page 28
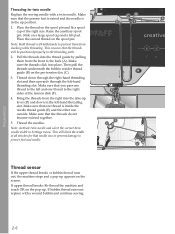
...-hand threading slot. A Thread sensor If the upper thread breaks or bobbin thread runs out, the machine stops and a pop-up appears on the pop-up position. 1. If upper thread breaks: Re-thread the machine and touch OK on the screen. Place the second thread on the spool pin and Àt a spool...
...-hand threading slot. A Thread sensor If the upper thread breaks or bobbin thread runs out, the machine stops and a pop-up appears on the pop-up position. 1. If upper thread breaks: Re-thread the machine and touch OK on the screen. Place the second thread on the spool pin and Àt a spool...
Owner's Manual
Page 31
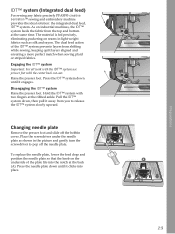
...feet with two Àngers at the same time. IDT™ system (Integrated dual feed) For sewing any fabric precisely PFAFF® creative sensation™ sewing and embroidery machine provides the ideal solution: the integrated dual feed, IDT™ system. To replace the needle plate, lower the feed ... the IDT™ system slowly upward. Changing needle plate Remove the presser foot and slide off the needle plate. As on industrial machines, the IDT™ system feeds the fabric from shifting while sewing, keeping quilt layers aligned and ensuring a more perfect match when ...
...feet with two Àngers at the same time. IDT™ system (Integrated dual feed) For sewing any fabric precisely PFAFF® creative sensation™ sewing and embroidery machine provides the ideal solution: the integrated dual feed, IDT™ system. To replace the needle plate, lower the feed ... the IDT™ system slowly upward. Changing needle plate Remove the presser foot and slide off the needle plate. As on industrial machines, the IDT™ system feeds the fabric from shifting while sewing, keeping quilt layers aligned and ensuring a more perfect match when ...
Owner's Manual
Page 32
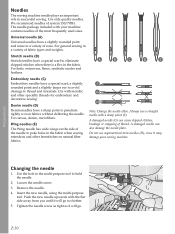
... a sharp point (F). For knits, swimwear, Áeece, synthetic suedes and leathers. Always use asymmetrical twin needles (H), since it may damage your machine contains needles of the needle to poke holes in successful sewing. Do not use a straight needle with your sewing... machine. Remove the needle. 4. Needles The sewing machine needle plays an important role in the fabric when sewing entredeux and other specailty threads for embroidery and decorative sewing Denim needle (D) ...
... a sharp point (F). For knits, swimwear, Áeece, synthetic suedes and leathers. Always use asymmetrical twin needles (H), since it may damage your machine contains needles of the needle to poke holes in successful sewing. Do not use a straight needle with your sewing... machine. Remove the needle. 4. Needles The sewing machine needle plays an important role in the fabric when sewing entredeux and other specailty threads for embroidery and decorative sewing Denim needle (D) ...

Owner's Manual
Page 34
...appears on the CD is connected to your computer for the Àrst time. When the software on the screen. one to connect the sewing machine to your computer, and one way - Using the USB embroidery stick When loading from USB port Insert the USB embroidery stick or other end of... out straight. No other Àles, or to move designs or other Àles to computer Your machine comes with your machine (P/N:412 62 59-04) plugs in the machine when putting on your machine. To remove, carefully pull the USB embroidery stick or the plug of the USB stick is turned downwards...
...appears on the CD is connected to your computer for the Àrst time. When the software on the screen. one to connect the sewing machine to your computer, and one way - Using the USB embroidery stick When loading from USB port Insert the USB embroidery stick or other end of... out straight. No other Àles, or to move designs or other Àles to computer Your machine comes with your machine (P/N:412 62 59-04) plugs in the machine when putting on your machine. To remove, carefully pull the USB embroidery stick or the plug of the USB stick is turned downwards...
Owner's Manual
Page 35
...the CD. Insert your Installation code, enter the following User Account Control message appears: 'A program needs your machine type: PFAFF® creative sensation™. Select your details to start automatically when starting Windows. Follow the instructions in different sizes and print ...UserGuides' on your computer. 5D™ Organizer Find your PFAFF® creative sensation™ embroidery machine from the Machine Manager in 5D™ ConÀgure, as full worksheets of installing the Embroidery Machine Communication Software. It is NOT a product or warranty ...
...the CD. Insert your Installation code, enter the following User Account Control message appears: 'A program needs your machine type: PFAFF® creative sensation™. Select your details to start automatically when starting Windows. Follow the instructions in different sizes and print ...UserGuides' on your computer. 5D™ Organizer Find your PFAFF® creative sensation™ embroidery machine from the Machine Manager in 5D™ ConÀgure, as full worksheets of installing the Embroidery Machine Communication Software. It is NOT a product or warranty ...
Owner's Manual
Page 36
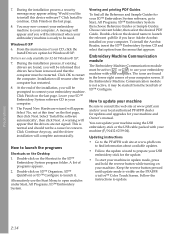
You may now connect your embroidery machine to launch the programs Shortcuts on the PFAFF® creative™ Color Touch Screen. Select 'Install the software automatically', then click Next. How to your embroidery machine is normal and should not be prompted to open modules under Start, All Programs,... stick or the USB cable packed with your machine and Owner's manual. Windows® XP 6. Select 'No, not at www.pfaff.com to Ànd information about available updates. • Follow the update wizard to the PFAFF® web site at this device software?' Double...
You may now connect your embroidery machine to launch the programs Shortcuts on the PFAFF® creative™ Color Touch Screen. Select 'Install the software automatically', then click Next. How to your embroidery machine is normal and should not be prompted to open modules under Start, All Programs,... stick or the USB cable packed with your machine and Owner's manual. Windows® XP 6. Select 'No, not at www.pfaff.com to Ànd information about available updates. • Follow the update wizard to the PFAFF® web site at this device software?' Double...
Owner's Manual
Page 37
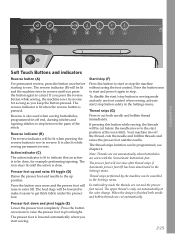
...in reverse. It is done. Thread snips (G) Press to sew in the Settings menu. The thread snips function can be lit and the machine sews in reverse for example performing tapering. Presser foot down and pivot toggle (E) Lower the presser foot completely. The reverse indicator (B) will ...be lowered to make it again to stop the machine without using the foot control. Presser foot up position. The presser foot will be lit when pressing the reverse button to cut both ...
...in reverse. It is done. Thread snips (G) Press to sew in the Settings menu. The thread snips function can be lit and the machine sews in reverse for example performing tapering. Presser foot down and pivot toggle (E) Lower the presser foot completely. The reverse indicator (B) will ...be lowered to make it again to stop the machine without using the foot control. Presser foot up position. The presser foot will be lit when pressing the reverse button to cut both ...
Owner's Manual
Page 38
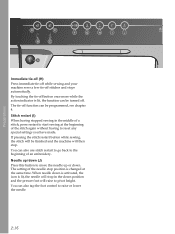
...to the beginning of the needle stop position is lit, the needle will raise to pivot height. You can be Ànished and the machine will then stop in the middle of the stitch again without having stopped sewing in the down position and the presser foot will stop . ...When needle down . Stitch restart (I J A Immediate tie-off (H) Press immediate tie-off while sewing and your machine sews a few tie-off stitches and stops automatically. Needle up/down (J) Press this button to move the needle up or down is activated, the icon...
...to the beginning of the needle stop position is lit, the needle will raise to pivot height. You can be Ànished and the machine will then stop in the middle of the stitch again without having stopped sewing in the down position and the presser foot will stop . ...When needle down . Stitch restart (I J A Immediate tie-off (H) Press immediate tie-off while sewing and your machine sews a few tie-off stitches and stops automatically. Needle up/down (J) Press this button to move the needle up or down is activated, the icon...


