
Owner's Manual
Page 6
...11:10 7 Embroidery preparations 7:1 Embroidery unit overview 7:2 Embroidery hoop overview 7:2 Built-in designs 7:3 creative sensation™ Embroidery collection 7:3 Connect the embroidery unit 7:3 Remove the embroidery unit 7:4 Attaching the Dynamic... design 8:3 Load a font 8:3 Load a stitch 8:4 Zoom 8:4 Select design(s) 8:5 Stitch-out order 8:6 Move design forward/backward 8:6 Adjustments 8:6 Group 8:6 Delete 8:6 Duplicate 8:6 Mirroring 8:7 Move design into hoop 8:7 Undo 8:7 Redo 8:7 Touch functions 8:8 Move 8:8 Rotate 8:8 Scale 8:8 Pan 8:8...
...11:10 7 Embroidery preparations 7:1 Embroidery unit overview 7:2 Embroidery hoop overview 7:2 Built-in designs 7:3 creative sensation™ Embroidery collection 7:3 Connect the embroidery unit 7:3 Remove the embroidery unit 7:4 Attaching the Dynamic... design 8:3 Load a font 8:3 Load a stitch 8:4 Zoom 8:4 Select design(s) 8:5 Stitch-out order 8:6 Move design forward/backward 8:6 Adjustments 8:6 Group 8:6 Delete 8:6 Duplicate 8:6 Mirroring 8:7 Move design into hoop 8:7 Undo 8:7 Redo 8:7 Touch functions 8:8 Move 8:8 Rotate 8:8 Scale 8:8 Pan 8:8...
Owner's Manual
Page 35
...Embroidery System module, and Send Multiple in 5D™ Organizer. 5D™ QuickFont Create font Àles (.vf3) for your PFAFF® creative sensation™ embroidery machine from most TrueType® or OpenType® fonts on the CD. If the following number: 8200. 5. ... print selected groups as described in Step 5. Continue with the CD. Ensure you can Ànd more detailed information about the installation in the 5D™ Embroidery System Getting Started Guide, in the Installation Wizard. Under Send 1 or Send 2 select PFAFF® creative sensation™ ...
...Embroidery System module, and Send Multiple in 5D™ Organizer. 5D™ QuickFont Create font Àles (.vf3) for your PFAFF® creative sensation™ embroidery machine from most TrueType® or OpenType® fonts on the CD. If the following number: 8200. 5. ... print selected groups as described in Step 5. Continue with the CD. Ensure you can Ànd more detailed information about the installation in the 5D™ Embroidery System Getting Started Guide, in the Installation Wizard. Under Send 1 or Send 2 select PFAFF® creative sensation™ ...
Owner's Manual
Page 104
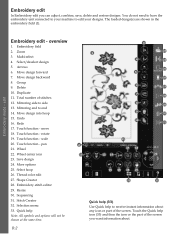
... design 5. Move design into hoop 15. scale 20. Wheel center icon 23. Resize 30. move 18. Touch function - Sequencing 31. Multi-select 4. Move design backward 8. Group 9. You do not need to have the embroidery unit connected to your designs. Touch the Quick help to edit your machine to receive instant information...
... design 5. Move design into hoop 15. scale 20. Wheel center icon 23. Resize 30. move 18. Touch function - Sequencing 31. Multi-select 4. Move design backward 8. Group 9. You do not need to have the embroidery unit connected to your designs. Touch the Quick help to edit your machine to receive instant information...
Owner's Manual
Page 107
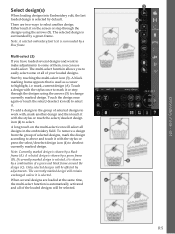
... a blue frame. 3 4 5 Multi-select (3) If you have loaded several designs are two ways to highlight, i.e. To add a design to the group of your loaded designs. The currently marked design will select all designs in the embroidery Àeld. Embroidery mode - edit Select design(s) When loading designs... once again or touch the select/deselect icon (4) to select it with the stylus once to select. To remove a design A from the group of the loaded designs will be selected. 8:5 Either touch it or step through the designs using the arrows (5) to above and touch it ...
... a blue frame. 3 4 5 Multi-select (3) If you have loaded several designs are two ways to highlight, i.e. To add a design to the group of your loaded designs. The currently marked design will select all designs in the embroidery Àeld. Embroidery mode - edit Select design(s) When loading designs... once again or touch the select/deselect icon (4) to select it with the stylus once to select. To remove a design A from the group of the loaded designs will be selected. 8:5 Either touch it or step through the designs using the arrows (5) to above and touch it ...
Owner's Manual
Page 108
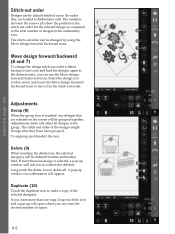
...touch the delete icon to move and touch the Move design forward/ backward icons to delete all designs in the order they have been grouped. Adjustments Group (8) When the group icon is selected, a pop-up 9 window for the selected design as compared to make a copy of designs in the stitch-out ...order. A pop-up window will open where you can be grouped together. The stitch-out order can use the Move design forward/backward icons. The numbers between the arrows (A) show the position in the ...
...touch the delete icon to move and touch the Move design forward/ backward icons to delete all designs in the order they have been grouped. Adjustments Group (8) When the group icon is selected, a pop-up 9 window for the selected design as compared to make a copy of designs in the stitch-out ...order. A pop-up window will open where you can be grouped together. The stitch-out order can use the Move design forward/backward icons. The numbers between the arrows (A) show the position in the ...
Owner's Manual
Page 110
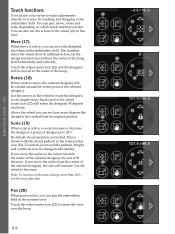
Move (17) When move is active, you can increase or decrease the design or a group of the selected design(s), the size will be changed individually. Rotate (18) When rotate is active. Scale (19) When scale is active, you can move ...
Move (17) When move is active, you can increase or decrease the design or a group of the selected design(s), the size will be changed individually. Rotate (18) When rotate is active. Scale (19) When scale is active, you can move ...
Owner's Manual
Page 114
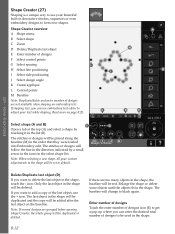
... designs will be duplicated or deleted. 8:12 If there are not available when shaping an embroidery text. Note: If several designs are grouped before opening Shape Creator, the whole group will change to default. The baseline will be set to black again. H I Select side positioning J Select design angle K Create appliqué L Control...
... designs will be duplicated or deleted. 8:12 If there are not available when shaping an embroidery text. Note: If several designs are grouped before opening Shape Creator, the whole group will change to default. The baseline will be set to black again. H I Select side positioning J Select design angle K Create appliqué L Control...
Owner's Manual
Page 130
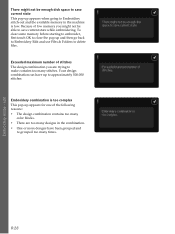
... save current state This pop-up to Embroidery stitch-out and the available memory in the combination. • One or more designs have been grouped and re-grouped too many stitches. Embroidery mode - To clear some memory before starting to embroider, Àrst touch OK to close the pop-up appears for...
... save current state This pop-up to Embroidery stitch-out and the available memory in the combination. • One or more designs have been grouped and re-grouped too many stitches. Embroidery mode - To clear some memory before starting to embroider, Àrst touch OK to close the pop-up appears for...
Owner's Manual
Page 158
...folder 10:6 Delete a letter 8:25 Delete a stitch or letter 5:3 Delete/Duplicate last object 8:12 Delete selected stitch point 6:4 Denim needle 2:10 Design adjustments Delete 8:6 Duplicate 8:6 Group 8:6 Mirroring 8:7 Move design into hoop 8:7 Redo 8:7 Undo 8:7 Design angle, select 8:14 Design, load 8:3 Designs, built-in 7:3 Design, select 3:6 Directional stitches 5:5 Duplicate ... 1:10, 2:2, 4:3 Four direction sewing 4:21 Free arm 1:8, 2:3 Free-motion options 4:8 Free-motion stippling 4:20 Full screen 9:6 G Go to stitch 9:4 Grid 8:10 Group 8:6 Gütermann Sulky 3:9
...folder 10:6 Delete a letter 8:25 Delete a stitch or letter 5:3 Delete/Duplicate last object 8:12 Delete selected stitch point 6:4 Denim needle 2:10 Design adjustments Delete 8:6 Duplicate 8:6 Group 8:6 Mirroring 8:7 Move design into hoop 8:7 Redo 8:7 Undo 8:7 Design angle, select 8:14 Design, load 8:3 Designs, built-in 7:3 Design, select 3:6 Directional stitches 5:5 Duplicate ... 1:10, 2:2, 4:3 Four direction sewing 4:21 Free arm 1:8, 2:3 Free-motion options 4:8 Free-motion stippling 4:20 Full screen 9:6 G Go to stitch 9:4 Grid 8:10 Group 8:6 Gütermann Sulky 3:9