

Owner's Manual
Page 6
...suppi Please quality product that your fashion ideas. Your PFAFF dealer is at the touch of its stride and will find that offers unique advant ages. So now you many enjoyable hours creating your PFAFF sewing machine is just as simple to operate as this instruction ...book is no problem! Sewing L must Congratulations! I L I I L L L L Saf Forth' L The le The w L As thE L codin The...
...suppi Please quality product that your fashion ideas. Your PFAFF dealer is at the touch of its stride and will find that offers unique advant ages. So now you many enjoyable hours creating your PFAFF sewing machine is just as simple to operate as this instruction ...book is no problem! Sewing L must Congratulations! I L I I L L L L Saf Forth' L The le The w L As thE L codin The...
Owner's Manual
Page 7
... FJ1 I Notes on safety for domestic sewing machines in the home. it is to 80%. Treatment Always protect the machine against damage which the user can repair. The user must exercise adequate caution with condensation. 8. There are no parts inside the machine which could be caused by a Pfaff mechanic. 5.The machine is wet, e.g. Cleaning Housing and...
... FJ1 I Notes on safety for domestic sewing machines in the home. it is to 80%. Treatment Always protect the machine against damage which the user can repair. The user must exercise adequate caution with condensation. 8. There are no parts inside the machine which could be caused by a Pfaff mechanic. 5.The machine is wet, e.g. Cleaning Housing and...

Owner's Manual
Page 22
flsusul1 1. E Programs Electrical connection The programs of the sewing machine are illustrat Connect the mains cord between the connection ed on ...Creative Designer, the instruction manual and the programming sheets in ía a I m us PFAFF creatve7o 0- -4 - Menu - utility stitches Gr. 1 - buttonholes Gr. 7 - leaves/flowers Gr. 3 - stretch stitches A-z - decorative stitches [ Gr. 5 - socket. alphabets 18 L overlock stitches Gr. 6 - hem stitches Gr. 2 - edges Gr. 4 - L ii L PFAFF creative 7530 1 H in the compartment of the sewing machine...
flsusul1 1. E Programs Electrical connection The programs of the sewing machine are illustrat Connect the mains cord between the connection ed on ...Creative Designer, the instruction manual and the programming sheets in ía a I m us PFAFF creatve7o 0- -4 - Menu - utility stitches Gr. 1 - buttonholes Gr. 7 - leaves/flowers Gr. 3 - stretch stitches A-z - decorative stitches [ Gr. 5 - socket. alphabets 18 L overlock stitches Gr. 6 - hem stitches Gr. 2 - edges Gr. 4 - L ii L PFAFF creative 7530 1 H in the compartment of the sewing machine...

Owner's Manual
Page 23
The sewing machine is switched on /off switch (25) is now ready to use. 19 On/off switch When the on , the sewing lamp lights up. Connecting the foot control Connect the plug of the foot control with the connection socket of the foot control. Pt C 1 Foot control cord Pull the foot control cord out of the sewing machine (46). I -- -- -- -- -- The foot control has an automatic cord rewind reel.
The sewing machine is switched on /off switch (25) is now ready to use. 19 On/off switch When the on , the sewing lamp lights up. Connecting the foot control Connect the plug of the foot control with the connection socket of the foot control. Pt C 1 Foot control cord Pull the foot control cord out of the sewing machine (46). I -- -- -- -- -- The foot control has an automatic cord rewind reel.
Owner's Manual
Page 24
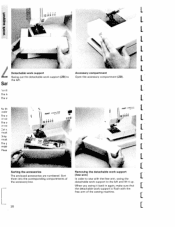
Sort them into the corresponding compartments of the sewing machine. [ [ When you swing it up. ii Sorting the accessories The enclosed accessories are numbered. Open the accessory compartment (29). 1 Sal I Detachable work support Accessory compartment ... work support is flush with the free-arm of the accessory box. 20 pFAF I 10 I I Removing the detachable work support (free-arm) In order to sew with the free-arm, swing the detachable work support to the left and lift it back in again, make sure that I the detachable work support...
Sort them into the corresponding compartments of the sewing machine. [ [ When you swing it up. ii Sorting the accessories The enclosed accessories are numbered. Open the accessory compartment (29). 1 Sal I Detachable work support Accessory compartment ... work support is flush with the free-arm of the accessory box. 20 pFAF I 10 I I Removing the detachable work support (free-arm) In order to sew with the free-arm, swing the detachable work support to the left and lift it back in again, make sure that I the detachable work support...
Owner's Manual
Page 34
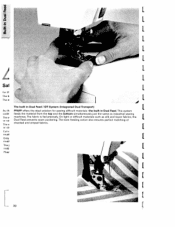
This system feeds the material from the top and the bottom simultaneously just the same as silk and rayon fabrics, the Dual Feed prevents seam puckering. The even feeding action also ensures perfect matching of checked and striped fabrics. [ I I I 30 L The fabric is fed precisely. On light or difficult materials such as industrial sewing machines. if Sal II The built in Dual Feed/lDTSystem (Integrated DualTransport) [ PFAFF offers the ideal solution for sewing difficult materials: the built in Dual Feed.
This system feeds the material from the top and the bottom simultaneously just the same as silk and rayon fabrics, the Dual Feed prevents seam puckering. The even feeding action also ensures perfect matching of checked and striped fabrics. [ I I I 30 L The fabric is fed precisely. On light or difficult materials such as industrial sewing machines. if Sal II The built in Dual Feed/lDTSystem (Integrated DualTransport) [ PFAFF offers the ideal solution for sewing difficult materials: the built in Dual Feed.

Owner's Manual
Page 43
I i;i IAJ "3 cii A V By pressing the "display" key, the next four languages are displayed. Select the number of four languages appears in the selected language. A choice of your desired language using keys "1-0" From now on the sewing machine. You have the choice of the following languages: German, English, French, Spanish, Italian, Swedish, Dutch and Danish. ___ = H>i cii Language selection Press and hold key "1" and switch on any description in the display will be shown in the display. iiI. 39
I i;i IAJ "3 cii A V By pressing the "display" key, the next four languages are displayed. Select the number of four languages appears in the selected language. A choice of your desired language using keys "1-0" From now on the sewing machine. You have the choice of the following languages: German, English, French, Spanish, Italian, Swedish, Dutch and Danish. ___ = H>i cii Language selection Press and hold key "1" and switch on any description in the display will be shown in the display. iiI. 39

Owner's Manual
Page 55
The sewing machine switches to "+". The numbers will not be displayed, the "*" simply changes to Prog. E I I 50 I Enter your code. No. 00 (straight stitch, center needle-position) and is switched on, the message appears: "please enter your code number" **** ii 'I 1. [ L I Every time the machine is ready to sew. ru i nmns aw 2 3 4 6 6 7 el sl 01 info ;;j If the correct code has been entered, the message appears: continue "esc" = delete "info" = change code I nit 8 * U lila 8aJo w) 7jf7 1 I I Confirm your entry by pressing the "o.k." key. I .
The sewing machine switches to "+". The numbers will not be displayed, the "*" simply changes to Prog. E I I 50 I Enter your code. No. 00 (straight stitch, center needle-position) and is switched on, the message appears: "please enter your code number" **** ii 'I 1. [ L I Every time the machine is ready to sew. ru i nmns aw 2 3 4 6 6 7 el sl 01 info ;;j If the correct code has been entered, the message appears: continue "esc" = delete "info" = change code I nit 8 * U lila 8aJo w) 7jf7 1 I I Confirm your entry by pressing the "o.k." key. I .

Owner's Manual
Page 56
... 2, the message appears: "please enter your code number" * * * * You can now enter your code number" **** I again. If, however, you press the "o.k" key, the sewing machine switches to pattern 00 and is ready to sew. spIay fdea' 0 ö'q m 1 2 3 4 5 6 7 $ 9IO3 (;;jj As soon as you press the program key 1, the code will be deleted.The...
... 2, the message appears: "please enter your code number" * * * * You can now enter your code number" **** I again. If, however, you press the "o.k" key, the sewing machine switches to pattern 00 and is ready to sew. spIay fdea' 0 ö'q m 1 2 3 4 5 6 7 $ 9IO3 (;;jj As soon as you press the program key 1, the code will be deleted.The...
Owner's Manual
Page 69
... a stitch width of the Creative 7530} and enables you to design your disposal, from PO-P15. I memories are full batteries in the Creative Designer and transferred into the sewing machines computer stitch by stitch with the adjustable magnifier. 16 program- The desired motif is inserted in the machine. When switching off the sewing machine, the stored programs will...
... a stitch width of the Creative 7530} and enables you to design your disposal, from PO-P15. I memories are full batteries in the Creative Designer and transferred into the sewing machines computer stitch by stitch with the adjustable magnifier. 16 program- The desired motif is inserted in the machine. When switching off the sewing machine, the stored programs will...

Owner's Manual
Page 74
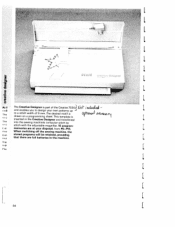
The display shows straight stitch 00 with center needle position. Lift cover 2 to recognize the Creative Designer. I H •0 = JJ I ' ii69 ii H I Take connecting plug from retainer 3 and insert it Switch on at the on , this is the only way for the sewing machine to open. "p S •. Important The Creative Designer must be connected before the sewing machine is switched on /off switch (25). PFAF 7530 - into socket (10) of the machine.
The display shows straight stitch 00 with center needle position. Lift cover 2 to recognize the Creative Designer. I H •0 = JJ I ' ii69 ii H I Take connecting plug from retainer 3 and insert it Switch on at the on , this is the only way for the sewing machine to open. "p S •. Important The Creative Designer must be connected before the sewing machine is switched on /off switch (25). PFAF 7530 - into socket (10) of the machine.

Owner's Manual
Page 79
... selected P-memory L L L [j [ckear 01 0 0 lB i :0 :9 W 1 21 13 4151 61 I7 8 9 0 The width, length and balance can still be saved if the P1 9,0 3,0 0 sewing machine is longer than 6 mm. 74 The sewing machine adds stitches automatically if the distance between two stitches is switched off during or after In the top line on the left...
... selected P-memory L L L [j [ckear 01 0 0 lB i :0 :9 W 1 21 13 4151 61 I7 8 9 0 The width, length and balance can still be saved if the P1 9,0 3,0 0 sewing machine is longer than 6 mm. 74 The sewing machine adds stitches automatically if the distance between two stitches is switched off during or after In the top line on the left...

Owner's Manual
Page 81
Tape two or more than one direction (in our example from top to sew in our example Ensure that the sewing machine only has to bottom>. [ 4) together and draw your design on the grid. cD LI : tt: . *•-• i: • •.I.I each individual programming sheet. I •• 1-I -4 1Lii: :IL 11!Hil1 iHiHI :1 [I Joined patterns in two or more P-memories It is possible to design wider patterns by using more programming sheets (in one P-memory for I • T. - Decide upon and mark a pattern start "A" for the design. L 76
Tape two or more than one direction (in our example from top to sew in our example Ensure that the sewing machine only has to bottom>. [ 4) together and draw your design on the grid. cD LI : tt: . *•-• i: • •.I.I each individual programming sheet. I •• 1-I -4 1Lii: :IL 11!Hil1 iHiHI :1 [I Joined patterns in two or more P-memories It is possible to design wider patterns by using more programming sheets (in one P-memory for I • T. - Decide upon and mark a pattern start "A" for the design. L 76

Owner's Manual
Page 93
Oq Vq 71! J4 Slide the program card to the edge of the cutout of the Creative Designer. The following message appears in the display: MO aa 7,0 0 As soon as you move the magnifier slide, the message appears in such a way that ... -CDPROG 88 Then slide the right clamp-slide 7 up to the back to the programming screen. Select your desired M-memory (see p. 69) and turn the sewing machine on. Then press key "A-z". Press "editI f" to go to clamp in the program card. 1 1 a 1 H display cIear j r0 , 08I 1 2 3)4 5 6 7 8 9 fo [edit Connect the...
Oq Vq 71! J4 Slide the program card to the edge of the cutout of the Creative Designer. The following message appears in the display: MO aa 7,0 0 As soon as you move the magnifier slide, the message appears in such a way that ... -CDPROG 88 Then slide the right clamp-slide 7 up to the back to the programming screen. Select your desired M-memory (see p. 69) and turn the sewing machine on. Then press key "A-z". Press "editI f" to go to clamp in the program card. 1 1 a 1 H display cIear j r0 , 08I 1 2 3)4 5 6 7 8 9 fo [edit Connect the...

Owner's Manual
Page 95
... this procedure for example, pattern number 177. When entering programs 20 to 19, you can sew the pattern sequence once by engaging the single pattern key. Creating a pattern sequence with the Creative Designer d Example: Pfaff Position the magnifier cross-hairs over the 7 and press "mem +" twice. Position the magnifier...with the "clear" key. H El r : lo lI Ij 1 121 31 4 5 61 7 8 [editj Combining the card programs with those of the sewing machine The programs 00-179 are entered with the vertical numbered row on the left hand side of the pro gramming fields 1-3. "key.
... this procedure for example, pattern number 177. When entering programs 20 to 19, you can sew the pattern sequence once by engaging the single pattern key. Creating a pattern sequence with the Creative Designer d Example: Pfaff Position the magnifier cross-hairs over the 7 and press "mem +" twice. Position the magnifier...with the "clear" key. H El r : lo lI Ij 1 121 31 4 5 61 7 8 [editj Combining the card programs with those of the sewing machine The programs 00-179 are entered with the vertical numbered row on the left hand side of the pro gramming fields 1-3. "key.

Owner's Manual
Page 117
...I - htkWbhoeueylitetsthbop3unkrtheoatyoognlnrdNeahomo4p.lrsey(o.1og9pur)raocymgaonrsua. buttonhole guide 10 and hteeaaslntierdcceatadrntdhwbeibetuhbvtutnaotrutniomehndobhlefoerrloeewmdpitkrh7oe.0gyarsmale7mmnagn3ttohd5.4s8Te4.htTimsahtemis1w4tahidsemthm bgtchuauentidtoneanulshamonobdlbeee.trhevedarbkieuedyttsofrn5ohmaonled2.f56o.omUt msaentdtohse5e.wb5umtthtomenhwoilteh The sewing machine automatically in the ties off at the end. mccIanalnl3th5ude.piWrdeailcislttphlfyluatrshyteheyleeonrcuutbmwtuhibtlelteorsenede a) 0 -C 1 Hu1H Ii 3L 3tandard buttonhole No. 35 :ully automatic...
...I - htkWbhoeueylitetsthbop3unkrtheoatyoognlnrdNeahomo4p.lrsey(o.1og9pur)raocymgaonrsua. buttonhole guide 10 and hteeaaslntierdcceatadrntdhwbeibetuhbvtutnaotrutniomehndobhlefoerrloeewmdpitkrh7oe.0gyarsmale7mmnagn3ttohd5.4s8Te4.htTimsahtemis1w4tahidsemthm bgtchuauentidtoneanulshamonobdlbeee.trhevedarbkieuedyttsofrn5ohmaonled2.f56o.omUt msaentdtohse5e.wb5umtthtomenhwoilteh The sewing machine automatically in the ties off at the end. mccIanalnl3th5ude.piWrdeailcislttphlfyluatrshyteheyleeonrcuutbmwtuhibtlelteorsenede a) 0 -C 1 Hu1H Ii 3L 3tandard buttonhole No. 35 :ully automatic...

Owner's Manual
Page 126
...the guide rule 8. The thread interlace must be between 3 and 5. 1. 1 [ L I Needle thread tension To achieve the optimum results from your sewing machine, the needle thread tension and the bobbin thread tension must be correctly adjusted to change the needle position with the numbered keys 5 and 6 in hole...will be propped up to guarantee the uniform feed of the fabric when beginning sewing, we recommend that you to each other. If the needle thread tension is between the layers of fabric. Sewing help for utility stit ches is too loose, the thread interlace will be...
...the guide rule 8. The thread interlace must be between 3 and 5. 1. 1 [ L I Needle thread tension To achieve the optimum results from your sewing machine, the needle thread tension and the bobbin thread tension must be correctly adjusted to change the needle position with the numbered keys 5 and 6 in hole...will be propped up to guarantee the uniform feed of the fabric when beginning sewing, we recommend that you to each other. If the needle thread tension is between the layers of fabric. Sewing help for utility stit ches is too loose, the thread interlace will be...

Owner's Manual
Page 155
... stability. [ • To make the embroidery more stable, sew around all contours twice in cold water and your pattern onto the face side of the • Then carefully cut away the stabilizer! fabric using a disappearing ink pen. • Embroider the contours with your sewing machine. • Transfer your piece of water soluable stabiliz...
... stability. [ • To make the embroidery more stable, sew around all contours twice in cold water and your pattern onto the face side of the • Then carefully cut away the stabilizer! fabric using a disappearing ink pen. • Embroider the contours with your sewing machine. • Transfer your piece of water soluable stabiliz...

Owner's Manual
Page 162
... be included in the pattern and form small squares that you can make it is done: Cut out the pieces of your quilt with the sewing machine. 11 Nhen your finished quilt top onto the layer of batting with the back layer of the quilt under neath. • In traditional quilts, these...
... be included in the pattern and form small squares that you can make it is done: Cut out the pieces of your quilt with the sewing machine. 11 Nhen your finished quilt top onto the layer of batting with the back layer of the quilt under neath. • In traditional quilts, these...

Owner's Manual
Page 172
...foot with a gimp thread makes a similar effect. However, with a gimp thread you work support, so that the spaces between the needle plate and the sewing machine provides space for finer materials). • Change the needle to a twin needle (1.6 or 2 mm needle clearance) e.g. 130/705 H-ZWI needle thickness ...too fast, you will pull the loops tight. • Knot the threads on the reverse side. it does not become tangled during sewing. • While sewing the cording, the material must be fed under the detachable work without a cording blade. • First remove the needle plate. ...
...foot with a gimp thread makes a similar effect. However, with a gimp thread you work support, so that the spaces between the needle plate and the sewing machine provides space for finer materials). • Change the needle to a twin needle (1.6 or 2 mm needle clearance) e.g. 130/705 H-ZWI needle thickness ...too fast, you will pull the loops tight. • Knot the threads on the reverse side. it does not become tangled during sewing. • While sewing the cording, the material must be fed under the detachable work without a cording blade. • First remove the needle plate. ...


