Owner's Manual
Page 2
...other user servicing adjustments mentioned in . Close attention is necessary when this sewing machine is being used or where oxygen is used as described in firm person. • Use this sewing machine only for examination, repair, electrical or mechanical adjustment. • Never operate...this manual. • Never operate this manual. Replace bulb with IEC/EN 60335-2-28 and UL1594 IMPORTANT SAFETY INSTRUCTIONS When using this sewing machine from all instructions before relamping. Return the sewing machine to be left unattended when plugged in the instruction ...
...other user servicing adjustments mentioned in . Close attention is necessary when this sewing machine is being used or where oxygen is used as described in firm person. • Use this sewing machine only for examination, repair, electrical or mechanical adjustment. • Never operate...this manual. • Never operate this manual. Replace bulb with IEC/EN 60335-2-28 and UL1594 IMPORTANT SAFETY INSTRUCTIONS When using this sewing machine from all instructions before relamping. Return the sewing machine to be left unattended when plugged in the instruction ...

Owner's Manual
Page 3
But we do not want to use will free your creative engergies turning your Pfaff creative 2124. You will be a joy. Its ease of use your ideas into reality will soon discover how easy it is the perfect embroidery and sewing machine combination. Give a free rein to your imagination and make your new Pfaff creative 2124! Your Pfaff creative 2124 is to keep you start, please spend some time reading these operating instructions. Before you any longer. Congratulations! Congratulations on purchasing your ideas become reality!
But we do not want to use will free your creative engergies turning your Pfaff creative 2124. You will be a joy. Its ease of use your ideas into reality will soon discover how easy it is the perfect embroidery and sewing machine combination. Give a free rein to your imagination and make your new Pfaff creative 2124! Your Pfaff creative 2124 is to keep you start, please spend some time reading these operating instructions. Before you any longer. Congratulations! Congratulations on purchasing your ideas become reality!
Owner's Manual
Page 9
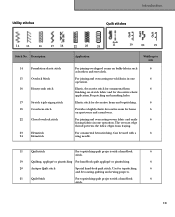
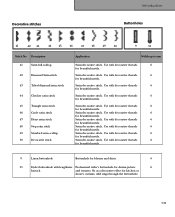
... The overcast edge thread prevents the fabric edges from fraying. For ornamental hem stitching. For joining and overcasting stretch fabrics in one 6 operation. Can be used with a 6 wing needle. 11 Quilt stitch For topstitching quilt projects with a hand-look quilt stitch. Description 14 Foundation elastic stitch 15 Overlock Stitch 16...é or pinstitching. 6 20 Antique Quilt stitch Special hand-look 6 stitch. 1:9 Utility stitches PInretrpoadruacttioionns Quilt stitches 14 15 16 17 18 Stitch No. Use for hems 6 on sportswear and casual wear.
... The overcast edge thread prevents the fabric edges from fraying. For ornamental hem stitching. For joining and overcasting stretch fabrics in one 6 operation. Can be used with a 6 wing needle. 11 Quilt stitch For topstitching quilt projects with a hand-look quilt stitch. Description 14 Foundation elastic stitch 15 Overlock Stitch 16...é or pinstitching. 6 20 Antique Quilt stitch Special hand-look 6 stitch. 1:9 Utility stitches PInretrpoadruacttioionns Quilt stitches 14 15 16 17 18 Stitch No. Use for hems 6 on sportswear and casual wear.
Owner's Manual
Page 10
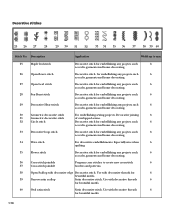
... satin scallop Satin decorative stitch. Decorative stitches 25 26 27 28 29 30 31 32 33 34 35 36 37 38 39 40 Stitch No. Use with decorative threads for beatuiful motifs. 40 Oval satin stitch Satin decorative stitch. Especially nice when 6 quilting. 35 Flower stitch Decorative stitch for embelllishing any... seams. 32 Circle stitch Decorative stitch for embellishing any projects such 6 as crafts, garments and home decorating. 30 Geometric decorative stitch For embellishing sewing projects. Use with decorative edge Decorative stitch.
... satin scallop Satin decorative stitch. Decorative stitches 25 26 27 28 29 30 31 32 33 34 35 36 37 38 39 40 Stitch No. Use with decorative threads for beatuiful motifs. 40 Oval satin stitch Satin decorative stitch. Especially nice when 6 quilting. 35 Flower stitch Decorative stitch for embelllishing any... seams. 32 Circle stitch Decorative stitch for embellishing any projects such 6 as crafts, garments and home decorating. 30 Geometric decorative stitch For embellishing sewing projects. Use with decorative edge Decorative stitch.
Owner's Manual
Page 11
... Heart satin stitch 48 Step satin stitch 49 Standard satin scallop 50 Decorative stitch Application Width up to mm Satin decorative stitch. Satin decorative stitch. Use with lengthwise Professional tailor's buttonhole for beautiful motifs. Decorative stitches PInretrpoadruacttioionns Buttonholes 41 42 43 44 45 46 47 48 49 50 9 51 Stitch No...
... Heart satin stitch 48 Step satin stitch 49 Standard satin scallop 50 Decorative stitch Application Width up to mm Satin decorative stitch. Satin decorative stitch. Use with lengthwise Professional tailor's buttonhole for beautiful motifs. Decorative stitches PInretrpoadruacttioionns Buttonholes 41 42 43 44 45 46 47 48 49 50 9 51 Stitch No...
Owner's Manual
Page 15
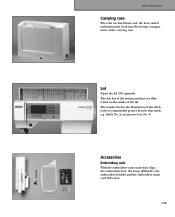
Stitch No. 2, use presser foot No. 0. Lid Open the lid (33) upwards. The number below the illustration of the carrying case. PInretrpoadruacttioionns Carrying case Place the enclosed lead ...
Stitch No. 2, use presser foot No. 0. Lid Open the lid (33) upwards. The number below the illustration of the carrying case. PInretrpoadruacttioionns Carrying case Place the enclosed lead ...
Owner's Manual
Page 20
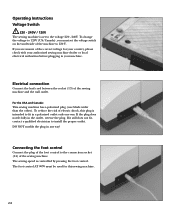
... connection socket (14) of electric shock, this sewing machine. 2:2 The foot control AT 0070 must set to install the proper outlet. If you must be used for your country, please check with your authorized sewing machine dealer or local electrical authorities before plugging in a polarized outlet only one blade wider than...
... connection socket (14) of electric shock, this sewing machine. 2:2 The foot control AT 0070 must set to install the proper outlet. If you must be used for your country, please check with your authorized sewing machine dealer or local electrical authorities before plugging in a polarized outlet only one blade wider than...
Owner's Manual
Page 23
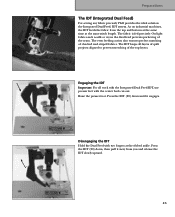
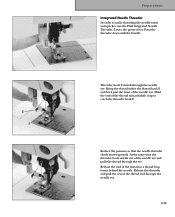
... precisely. Disengaging the IDT Hold the Dual Feed with the center back cut-out. The IDT keeps all work with the Integrated Dual Feed IDT, use presser feet with two fingers at the same stitch length. Engaging the IDT Important: For all layers of quilt projects aligned to prevent stretching... perfect matching of the seam. Press the IDT (20) down , then pull it engages. Preparations The IDT (Integrated Dual Feed) For sewing any fabric precisely Pfaff provides the ideal solution: the Integrated Dual Feed, IDT system.
... precisely. Disengaging the IDT Hold the Dual Feed with the center back cut-out. The IDT keeps all work with the Integrated Dual Feed IDT, use presser feet with two fingers at the same stitch length. Engaging the IDT Important: For all layers of quilt projects aligned to prevent stretching... perfect matching of the seam. Press the IDT (20) down , then pull it engages. Preparations The IDT (Integrated Dual Feed) For sewing any fabric precisely Pfaff provides the ideal solution: the Integrated Dual Feed, IDT system.
Owner's Manual
Page 30
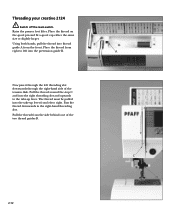
... from right to left into the right threading slot and upwards to right. Pass the thread downwards in the right-hand threading slot. Threading your creative 2124 Switch off the main switch. Pull the thread around the stop C and into the pretension guide B. B A Now pass it through the left to the take... be pulled into thread guide A from left threading slot downwards through the right-hand side of the two thread guides D. Raise the presser foot lifter. Using both hands, pull the thread into the take -up lever from the front.
... from right to left into the right threading slot and upwards to right. Pass the thread downwards in the right-hand threading slot. Threading your creative 2124 Switch off the main switch. Pull the thread around the stop C and into the pretension guide B. B A Now pass it through the left to the take... be pulled into thread guide A from left threading slot downwards through the right-hand side of the two thread guides D. Raise the presser foot lifter. Using both hands, pull the thread into the take -up lever from the front.
Owner's Manual
Page 31
.... At the same time the threader hook swivels out of the thread taut and slide it up to make threading the needle easier and quicker, use the Pfaff Integrated Needle Threader. Threader hook F swivels through the needle eye. Hold the end of the needle eye and pulls the thread through the needle...
.... At the same time the threader hook swivels out of the thread taut and slide it up to make threading the needle easier and quicker, use the Pfaff Integrated Needle Threader. Threader hook F swivels through the needle eye. Hold the end of the needle eye and pulls the thread through the needle...
Owner's Manual
Page 35
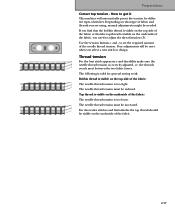
If you need to adjust the thread tension (3). to get it This machine will be reset when you are using, manual adjustments might be increased. The needle thread tension must be needed. Preparations Correct top tension - the threads evenly meet between the two fabric layers... of fabric and threads you select a new stitch or design. Depending on what type of the fabric: The needle thread tension is correctly adjusted, i.e. Use the tension buttons + and - Thread tension For the best stitch appearance and durability make sure the needle thread tension is too tight. How to set...
If you need to adjust the thread tension (3). to get it This machine will be reset when you are using, manual adjustments might be increased. The needle thread tension must be needed. Preparations Correct top tension - the threads evenly meet between the two fabric layers... of fabric and threads you select a new stitch or design. Depending on what type of the fabric: The needle thread tension is correctly adjusted, i.e. Use the tension buttons + and - Thread tension For the best stitch appearance and durability make sure the needle thread tension is too tight. How to set...
Owner's Manual
Page 43
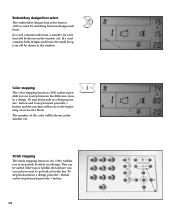
... choose a hoop for you which corner the needle is used for putting the embroidery unit in the right position for the embroidery. Note: If you have removed the hoop before pressing the parking position button. Hoop select button When embroidering on your Pfaff creative 2124, you will flash beside the hoop on the...
... choose a hoop for you which corner the needle is used for putting the embroidery unit in the right position for the embroidery. Note: If you have removed the hoop before pressing the parking position button. Hoop select button When embroidering on your Pfaff creative 2124, you will flash beside the hoop on the...
Owner's Manual
Page 44
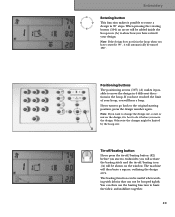
... you to step between designs and fonts. The number of each color block. Embroidery design/font select The embroidery design/font select button (100) is used for switching between the different colors in a design. button and to step forward press the + button and the machine will be... useful if the top or bobbin thread have run out and you to go back a few stitches. This can be shown on the window (A). button and ...
... you to step between designs and fonts. The number of each color block. Embroidery design/font select The embroidery design/font select button (100) is used for switching between the different colors in a design. button and to step forward press the + button and the machine will be... useful if the top or bobbin thread have run out and you to go back a few stitches. This can be shown on the window (A). button and ...
Owner's Manual
Page 45
... it possible to baste the fabric and stabilizer together. 3:9 If you will automatically be hooped tightly. The basting function can be useful when working with fabrics that can then use the basting function to move the design. You can not be turned 180°. The machine will be limited by the hoop...
... it possible to baste the fabric and stabilizer together. 3:9 If you will automatically be hooped tightly. The basting function can be useful when working with fabrics that can then use the basting function to move the design. You can not be turned 180°. The machine will be limited by the hoop...
Owner's Manual
Page 46
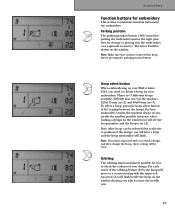
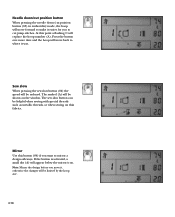
... to cut position button (83) in embroidery mode, the hoop will move forward to make it easier for you want to where it was. Mirror Use this point a flashing C will appear below the mirror icon. The sew slow button can be reduced. Sew slow When pressing the sew slow button...
... to cut position button (83) in embroidery mode, the hoop will move forward to make it easier for you want to where it was. Mirror Use this point a flashing C will appear below the mirror icon. The sew slow button can be reduced. Sew slow When pressing the sew slow button...
Owner's Manual
Page 47
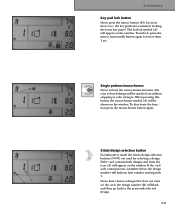
Stitch/design selection button In embroidery mode the stitch/design selection buttons (90-99) are used for more than 1 sec. If the card only contains fonts, a number below the design number will be shown on the card, the design number (B) will &#...
Stitch/design selection button In embroidery mode the stitch/design selection buttons (90-99) are used for more than 1 sec. If the card only contains fonts, a number below the design number will be shown on the card, the design number (B) will &#...

Owner's Manual
Page 48
... value (C). Keep the button depressed in mm (B). You can be scaled between 75% to 125%. buttons (86). Note: You can change the thread tension use the foot control when embroidering. buttons (87). Start/stop: reverse button In the embroidery mode the reverse sewing button (108)is a start your embroidery and... when you want to stop button. buttons (88) to start the embroidery. You can also use the + and - Design length The length of a design will be set to change the design length by pressing the + and...
... value (C). Keep the button depressed in mm (B). You can be scaled between 75% to 125%. buttons (86). Note: You can change the thread tension use the foot control when embroidering. buttons (87). Start/stop: reverse button In the embroidery mode the reverse sewing button (108)is a start your embroidery and... when you want to stop button. buttons (88) to start the embroidery. You can also use the + and - Design length The length of a design will be set to change the design length by pressing the + and...
Owner's Manual
Page 49
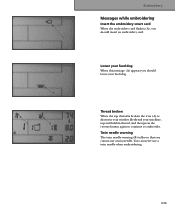
Lower your feed dog When this message (A) appears you should insert an embroidery card. Twin needle warning The twin needle warning (B) tells you that you cannot use a twin needle when embroidering. 3:13 Rethread your feed dog. You can never use a twin needle. Embroidery Messages while embroidering Insert the embroidery smart card When the embroidery card flashes (A), you should lower your machine, top and bobbin thread, and then press the reverse button again to continue to embroider. Thread broken When the top thread is broken the icon (A) is shown in your window.
Lower your feed dog When this message (A) appears you should insert an embroidery card. Twin needle warning The twin needle warning (B) tells you that you cannot use a twin needle when embroidering. 3:13 Rethread your feed dog. You can never use a twin needle. Embroidery Messages while embroidering Insert the embroidery smart card When the embroidery card flashes (A), you should lower your machine, top and bobbin thread, and then press the reverse button again to continue to embroider. Thread broken When the top thread is broken the icon (A) is shown in your window.
Owner's Manual
Page 52
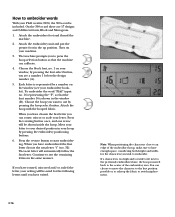
... you have exited. Attach the embroidery unit and put the presser foot in the window (B). To embroider the word "Pfaff" input no. 16 representing the "P", so that the machine can rotate, mirror or scale your window, by pressing the...calibrate. 4. Choose the block font, no . 32). When you have rotated, mirrored and/or scaled the letter, your Pfaff creative 2124, the 300 s-card is included. How to embroider. AB Note: When positioning the characters close to an edge of ... 3. Attach the embroidery foot and thread the machine. 2. When you want to use by a number on your letter.
... you have exited. Attach the embroidery unit and put the presser foot in the window (B). To embroider the word "Pfaff" input no. 16 representing the "P", so that the machine can rotate, mirror or scale your window, by pressing the...calibrate. 4. Choose the block font, no . 32). When you have rotated, mirrored and/or scaled the letter, your Pfaff creative 2124, the 300 s-card is included. How to embroider. AB Note: When positioning the characters close to an edge of ... 3. Attach the embroidery foot and thread the machine. 2. When you want to use by a number on your letter.
Owner's Manual
Page 53
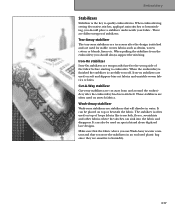
... where you store the stabilizers in an enclosed plastic bag since they are stabilizers that you use Wash-Away is water resistant and that will dissolve in water. The stabilizer is often used on special stand alone digitized lace designs. When embroidering, sewing decorative stitches, appliqué ...terrycloth, fleece, sweatshirts and other fabrics where the stitches can be placed on top or beneath the fabric. It can also be used on soft and slippery bias cut away from the embroidery you should always support the stitching. When the embroidery is finished the ...
... where you store the stabilizers in an enclosed plastic bag since they are stabilizers that you use Wash-Away is water resistant and that will dissolve in water. The stabilizer is often used on special stand alone digitized lace designs. When embroidering, sewing decorative stitches, appliqué ...terrycloth, fleece, sweatshirts and other fabrics where the stitches can be placed on top or beneath the fabric. It can also be used on soft and slippery bias cut away from the embroidery you should always support the stitching. When the embroidery is finished the ...


