Owner's Manual
Page 1
creative 2124 Owner´s manual
creative 2124 Owner´s manual

Owner's Manual
Page 2
Always unplug this sewing machine from the electric outlet immediately after using this sewing machine if it has a damaged cord or plug, if it is not working properly, if it to break. • Switch the sewing machine off ("0") position, then remove plug from the electrical outlet when removing covers, lubricating, or when making any other user servicing adjustments mentioned in the instruction manual. • Never drop or insert any object into any air openings blocked. Return the sewing machine to the nearest authorised dealer or service center for its intended use outdoors. &#...
Always unplug this sewing machine from the electric outlet immediately after using this sewing machine if it has a damaged cord or plug, if it is not working properly, if it to break. • Switch the sewing machine off ("0") position, then remove plug from the electrical outlet when removing covers, lubricating, or when making any other user servicing adjustments mentioned in the instruction manual. • Never drop or insert any object into any air openings blocked. Return the sewing machine to the nearest authorised dealer or service center for its intended use outdoors. &#...

Owner's Manual
Page 3
Before you any longer. Its ease of use will free your creative engergies turning your Pfaff creative 2124. Congratulations on purchasing your ideas become reality! You will be a joy. But we do not want to your imagination and make your new Pfaff creative 2124! Your Pfaff creative 2124 is to use your ideas into reality will soon discover how easy it is the perfect embroidery and sewing machine combination. Give a free rein to keep you start, please spend some time reading these operating instructions. Congratulations!
Before you any longer. Its ease of use will free your creative engergies turning your Pfaff creative 2124. Congratulations on purchasing your ideas become reality! You will be a joy. But we do not want to your imagination and make your new Pfaff creative 2124! Your Pfaff creative 2124 is to use your ideas into reality will soon discover how easy it is the perfect embroidery and sewing machine combination. Give a free rein to keep you start, please spend some time reading these operating instructions. Congratulations!
Owner's Manual
Page 4
... the presser foot 2:4 The IDT (Integrated Dual Feed) 2:5 The feed dog 2:6 Changing the needle 2:7 Bobbin winding 2:8 Inserting the bobbin and bobbin case 2:12 Threading your creative 2124 2:13 Window indications 2:16 Getting started 2:17 Thread tension 2:17 3 Embroidery Control Panel overview 3:2 Embroidery box overview 3:3 Attaching the embroidery foot 3:3 Attach the embroidery unit...
... the presser foot 2:4 The IDT (Integrated Dual Feed) 2:5 The feed dog 2:6 Changing the needle 2:7 Bobbin winding 2:8 Inserting the bobbin and bobbin case 2:12 Threading your creative 2124 2:13 Window indications 2:16 Getting started 2:17 Thread tension 2:17 3 Embroidery Control Panel overview 3:2 Embroidery box overview 3:3 Attaching the embroidery foot 3:3 Attach the embroidery unit...
Owner's Manual
Page 5
Inserting the buttonhole guide 4:12 How to sew a linen buttonhole 4:13 Keyhole buttonhole 4:13 Automatic buttonhole 4:14 Buttonhole with gimp thread 4:14 Keyhole buttonhole with gimp thread 4:15 Sewing on buttons 4:15 Buttonhole tips 4:16 5 Decorative sewing General notes on decorative sewing 5:2 Quilting 5:4 Nostalgia /Heirloom 5:8 Threading the twin needle 5:9 Cross Stitch 5:10 Free Motion Sewing 5:10 Sewing in zippers 5:11 Stretch triple straight stitch 5:11 Darning with the elastic stitch 5:11 Gathering with straight stitch 5:13 Feather stitch 5:13 ...
Inserting the buttonhole guide 4:12 How to sew a linen buttonhole 4:13 Keyhole buttonhole 4:13 Automatic buttonhole 4:14 Buttonhole with gimp thread 4:14 Keyhole buttonhole with gimp thread 4:15 Sewing on buttons 4:15 Buttonhole tips 4:16 5 Decorative sewing General notes on decorative sewing 5:2 Quilting 5:4 Nostalgia /Heirloom 5:8 Threading the twin needle 5:9 Cross Stitch 5:10 Free Motion Sewing 5:10 Sewing in zippers 5:11 Stretch triple straight stitch 5:11 Darning with the elastic stitch 5:11 Gathering with straight stitch 5:13 Feather stitch 5:13 ...

Owner's Manual
Page 7
Introduction
Introduction
Owner's Manual
Page 8
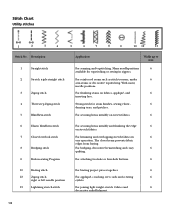
Many needlepositions 6 available for seam finishes, sewing elastic, 6 darning tears, and patches. With many needle positions. For securing hems invisibly on woven fabrics. 6 6 Elastic blindhem stitch 7 Closed overlock stitch 8 Bridging stitch 0 Button sewing Program For securing hems invisibly and finishing the edge 6 on fabrics, appliqué, and 6 inserting lace. The closed seam prevents fabric edges from fraying. For bridging, decorative hemstitching and crazy 6 quilting. For hemming and overlapping stretch fabrics in zippers. ...
Many needlepositions 6 available for seam finishes, sewing elastic, 6 darning tears, and patches. With many needle positions. For securing hems invisibly on woven fabrics. 6 6 Elastic blindhem stitch 7 Closed overlock stitch 8 Bridging stitch 0 Button sewing Program For securing hems invisibly and finishing the edge 6 on fabrics, appliqué, and 6 inserting lace. The closed seam prevents fabric edges from fraying. For bridging, decorative hemstitching and crazy 6 quilting. For hemming and overlapping stretch fabrics in zippers. ...
Owner's Manual
Page 9
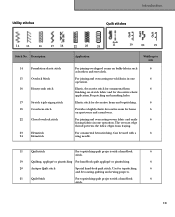
Elastic stitch for decorative hems and topstitching. 6 Provides a highly elastic decorative seam for decorative elastic application.For patching and mending holes. The overcast edge thread prevents the fabric edges from fraying. For joining and overcasting woven fabric and easily 6 fraying fabrics in one operation. Utility stitches PInretrpoadruacttioionns Quilt stitches 14 15 16 17 18 Stitch No. For ornamental hem stitching. Can be used with a 6 wing needle. 11 Quilt stitch For topstitching quilt projects with a hand-look quilt stitch. For joining and...
Elastic stitch for decorative hems and topstitching. 6 Provides a highly elastic decorative seam for decorative elastic application.For patching and mending holes. The overcast edge thread prevents the fabric edges from fraying. For joining and overcasting woven fabric and easily 6 fraying fabrics in one operation. Utility stitches PInretrpoadruacttioionns Quilt stitches 14 15 16 17 18 Stitch No. For ornamental hem stitching. Can be used with a 6 wing needle. 11 Quilt stitch For topstitching quilt projects with a hand-look quilt stitch. For joining and...
Owner's Manual
Page 10
Use with decorative threads 6 for embellishing any projects such 6 as crafts, garments and home decorating. 34 Wave stitch For decorative embellishments. Decorative joining 6 31 Geometric decorative stitch of overlapped seams. 32 Circle stitch Decorative stitch for embellishing any projects such 6 as crafts, garments and home decorating. 33 Decorative loop stitch Decorative stitch for beatuiful motifs. 40 Oval satin stitch Satin decorative stitch. Decorative stitches 25 26 27 28 29 30 31 32 33 34 35 36 37 38 39 40 Stitch No. Description Application Width ...
Use with decorative threads 6 for embellishing any projects such 6 as crafts, garments and home decorating. 34 Wave stitch For decorative embellishments. Decorative joining 6 31 Geometric decorative stitch of overlapped seams. 32 Circle stitch Decorative stitch for embellishing any projects such 6 as crafts, garments and home decorating. 33 Decorative loop stitch Decorative stitch for beatuiful motifs. 40 Oval satin stitch Satin decorative stitch. Decorative stitches 25 26 27 28 29 30 31 32 33 34 35 36 37 38 39 40 Stitch No. Description Application Width ...
Owner's Manual
Page 11
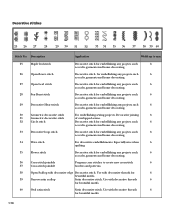
Use with decorative threads 6 for beautiful motifs. Use with decorative threads 6 for beautiful motifs. Use with decorative threads 6 for beautiful motifs. Use with decorative threads 6 for beautiful motifs. Use with decorative threads 6 for beautiful motifs. Satin decorative stitch. Or as a decorative effect for beautiful motifs. Satin decorative stitch. Decorative stitches PInretrpoadruacttioionns Buttonholes 41 42 43 44 45 46 47 48 49 50 9 51 Stitch No. Satin decorative stitch. Satin decorative stitch. Use with ...
Use with decorative threads 6 for beautiful motifs. Use with decorative threads 6 for beautiful motifs. Use with decorative threads 6 for beautiful motifs. Use with decorative threads 6 for beautiful motifs. Use with decorative threads 6 for beautiful motifs. Satin decorative stitch. Or as a decorative effect for beautiful motifs. Satin decorative stitch. Decorative stitches PInretrpoadruacttioionns Buttonholes 41 42 43 44 45 46 47 48 49 50 9 51 Stitch No. Satin decorative stitch. Satin decorative stitch. Use with ...
Owner's Manual
Page 13
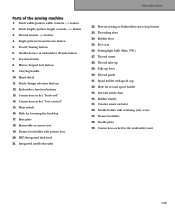
..., -/+ button 2. Sew slow button 8. Connection socket, "foot control" 15. Main switch 16. IDT/Integrated dual feed 21. Thread cutter 28. Thread take-up lever 30. Creative smart card slot 36. Hand wheel 11. Embroidery function buttons 13. Presser foot lifter 38. Connection socket for the embroidery unit 1:13 PInretrpoadruacttioionns Parts of...
..., -/+ button 2. Sew slow button 8. Connection socket, "foot control" 15. Main switch 16. IDT/Integrated dual feed 21. Thread cutter 28. Thread take-up lever 30. Creative smart card slot 36. Hand wheel 11. Embroidery function buttons 13. Presser foot lifter 38. Connection socket for the embroidery unit 1:13 PInretrpoadruacttioionns Parts of...
Owner's Manual
Page 14
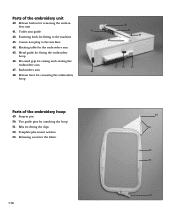
Ribs for fitting to the machine 44. Template placement notches 53. Parts of the embroidery hoop 49. Fastening latch for fitting the clips 52. Release button for raising and rotating the embroidery arm 47. Connection plug to the machine 43. Recessed grip for removing the embroidery unit 41. Rotating table for the fabric 49 50 51 52 53 1:14 Retaining screw for the embroidery arm 45. Embroidery arm 48. Release lever for fitting the embroidery hoop 46. Under arm guide 42. Metal guide for removing the embroidery hoop 48 45 47 46 44 41 42 43...
Ribs for fitting to the machine 44. Template placement notches 53. Parts of the embroidery hoop 49. Fastening latch for fitting the clips 52. Release button for raising and rotating the embroidery arm 47. Connection plug to the machine 43. Recessed grip for removing the embroidery unit 41. Rotating table for the fabric 49 50 51 52 53 1:14 Retaining screw for the embroidery arm 45. Embroidery arm 48. Release lever for fitting the embroidery hoop 46. Under arm guide 42. Metal guide for removing the embroidery hoop 48 45 47 46 44 41 42 43...
Owner's Manual
Page 15
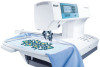
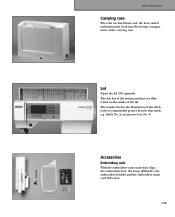
The number below the illustration of the carrying case. Stitch No. 2, use presser foot No. 0. PInretrpoadruacttioionns Carrying case Place the enclosed lead cord, the foot control and instruction book into the storage compartment of the stitch, is the recommended presser foot for that stitch, e.g. Accessories Embroidery unit With the embroidery unit comes four clips, the embroidery foot, the hoop (225x140), the embroidery booklet and the embroidery smart card 300 s foot. 1:15 The stitches of the sewing machine are illustrated on the inside of the lid. Lid Open the lid (33) upwards....
The number below the illustration of the carrying case. Stitch No. 2, use presser foot No. 0. PInretrpoadruacttioionns Carrying case Place the enclosed lead cord, the foot control and instruction book into the storage compartment of the stitch, is the recommended presser foot for that stitch, e.g. Accessories Embroidery unit With the embroidery unit comes four clips, the embroidery foot, the hoop (225x140), the embroidery booklet and the embroidery smart card 300 s foot. 1:15 The stitches of the sewing machine are illustrated on the inside of the lid. Lid Open the lid (33) upwards....
Owner's Manual
Page 16
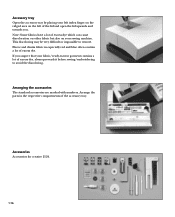
.... Fleece and denim fabric in the respective compartments of the accessory tray. Arranging the accessories The standard accessories are marked with numbers. Accessories Accessories for creative 2124. 1:16 If you . Accessory tray Open the accessory tray by placing your left index finger on the ridged area on your fabric/ready-to...
.... Fleece and denim fabric in the respective compartments of the accessory tray. Arranging the accessories The standard accessories are marked with numbers. Accessories Accessories for creative 2124. 1:16 If you . Accessory tray Open the accessory tray by placing your left index finger on the ridged area on your fabric/ready-to...

Owner's Manual
Page 17
Presser feet (standard accessories) Standard Presser Foot with IDT 820250-096 Fancy Stitch Foot with IDT 820253-096 Fancy Stitch Foot 820278-096 Blindhem/Overlock Foot 820256-096 PInretrpoadruacttioionns Zipper Foot with IDT 820248-096 Buttonhole Foot 820295-096 Darning Foot 820243-096 Rolled Hem Foot 3 mm 820249-096 1:17
Presser feet (standard accessories) Standard Presser Foot with IDT 820250-096 Fancy Stitch Foot with IDT 820253-096 Fancy Stitch Foot 820278-096 Blindhem/Overlock Foot 820256-096 PInretrpoadruacttioionns Zipper Foot with IDT 820248-096 Buttonhole Foot 820295-096 Darning Foot 820243-096 Rolled Hem Foot 3 mm 820249-096 1:17

Owner's Manual
Page 18
Edge Guide/Quilting Guide 820251-096 Bulb Remover/Needle Plate Changer 820292-096 Buttonhole Guide 820294-096 Second spool holder Seam ripper Brush 93-033 063-44/000 99-053 016-91/000 93-847 979-91/000 1 Needle box Order No.: 48-020 804-32/000 2 Felt pad Order No.: 93-033 064-05/000 3 Bobbins Order No.: 412 76 79-01 4-6 Spool cap 4. Order No.: 93-036 048-44/000 6. Order No.: 93-036 049-44/000 1:18 4. 1. 2. 5. 3. 6. Order No.: 93-035 050-44/000 5.
Edge Guide/Quilting Guide 820251-096 Bulb Remover/Needle Plate Changer 820292-096 Buttonhole Guide 820294-096 Second spool holder Seam ripper Brush 93-033 063-44/000 99-053 016-91/000 93-847 979-91/000 1 Needle box Order No.: 48-020 804-32/000 2 Felt pad Order No.: 93-033 064-05/000 3 Bobbins Order No.: 412 76 79-01 4-6 Spool cap 4. Order No.: 93-036 048-44/000 6. Order No.: 93-036 049-44/000 1:18 4. 1. 2. 5. 3. 6. Order No.: 93-035 050-44/000 5.
Owner's Manual
Page 20
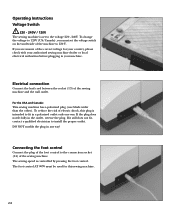
To reduce the risk of the correct voltage for this plug is intended to 120V (US/Canada), you are unsure of electric shock, this sewing machine. 2:2 For the USA and Canada: This sewing machine has a polarized plug (one way. The sewing speed is controlled by pressing the foot control. If you must be used for your country, please check with your authorized sewing machine dealer or local electrical authorities before plugging in a polarized outlet only one blade wider than the other). If the plug does not fit fully in any way! To change the voltage to fit in ...
To reduce the risk of the correct voltage for this plug is intended to 120V (US/Canada), you are unsure of electric shock, this sewing machine. 2:2 For the USA and Canada: This sewing machine has a polarized plug (one way. The sewing speed is controlled by pressing the foot control. If you must be used for your country, please check with your authorized sewing machine dealer or local electrical authorities before plugging in a polarized outlet only one blade wider than the other). If the plug does not fit fully in any way! To change the voltage to fit in ...
Owner's Manual
Page 21
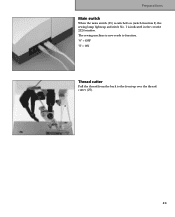
Preparations Main switch When the main switch (15) is indicated in the creative 2124 window. The sewing machine is now ready to the front up and stitch No. 1 is switched on (switch function I " = ON Thread cutter Pull the thread from the back to function. "0" = OFF "I ) the sewing lamp lights up over the thread cutter (27). 2:3
Preparations Main switch When the main switch (15) is indicated in the creative 2124 window. The sewing machine is now ready to the front up and stitch No. 1 is switched on (switch function I " = ON Thread cutter Pull the thread from the back to function. "0" = OFF "I ) the sewing lamp lights up over the thread cutter (27). 2:3
Owner's Manual
Page 22
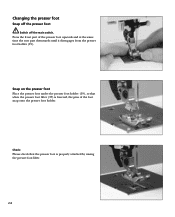
Changing the presser foot Snap off the presser foot Switch off the main switch. Snap on the presser foot Place the presser foot under the presser foot holder (19), so that the presser foot is lowered, the pins of the presser foot upwards and at the same time the rear part downwards until it disengages from the presser foot holder (19). Check: Please check that when the presser foot lifter (37) is properly attached by raising the presser foot lifter. 2:4 Press the front part of the foot snap onto the presser foot holder.
Changing the presser foot Snap off the presser foot Switch off the main switch. Snap on the presser foot Place the presser foot under the presser foot holder (19), so that the presser foot is lowered, the pins of the presser foot upwards and at the same time the rear part downwards until it disengages from the presser foot holder (19). Check: Please check that when the presser foot lifter (37) is properly attached by raising the presser foot lifter. 2:4 Press the front part of the foot snap onto the presser foot holder.
Owner's Manual
Page 23
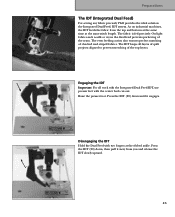
... projects aligned to prevent stretching of the top layers. The fabric is fed precisely. Preparations The IDT (Integrated Dual Feed) For sewing any fabric precisely Pfaff provides the ideal solution: the Integrated Dual Feed, IDT system.
... projects aligned to prevent stretching of the top layers. The fabric is fed precisely. Preparations The IDT (Integrated Dual Feed) For sewing any fabric precisely Pfaff provides the ideal solution: the Integrated Dual Feed, IDT system.