Owner's Manual
Page 2
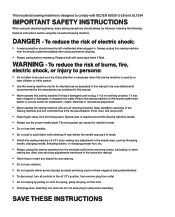
...risk of burns, fire, electric shock, or injury to persons: • Do not allow plug to break. • Switch the sewing machine off ("0") position, then remove plug from the electrical outlet when removing covers, lubricating, or when making any adjustment in the needle area, such... in the instruction manual. • Never drop or insert any object into any other user servicing adjustments mentioned in this sewing machine from all instructions before relamping. Always unplug this manual. Replace bulb with IEC/EN 60335-2-28 and UL1594 IMPORTANT SAFETY INSTRUCTIONS When...
...risk of burns, fire, electric shock, or injury to persons: • Do not allow plug to break. • Switch the sewing machine off ("0") position, then remove plug from the electrical outlet when removing covers, lubricating, or when making any adjustment in the needle area, such... in the instruction manual. • Never drop or insert any object into any other user servicing adjustments mentioned in this sewing machine from all instructions before relamping. Always unplug this manual. Replace bulb with IEC/EN 60335-2-28 and UL1594 IMPORTANT SAFETY INSTRUCTIONS When...

Owner's Manual
Page 3
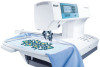
Congratulations on purchasing your ideas become reality! You will soon discover how easy it is the perfect embroidery and sewing machine combination. But we do not want to use will be a joy. Congratulations! Give a free rein to your imagination and make your new Pfaff creative 2124! Its ease of use your ideas into reality will free your creative engergies turning your Pfaff creative 2124. Your Pfaff creative 2124 is to keep you start, please spend some time reading these operating instructions. Before you any longer.
Congratulations on purchasing your ideas become reality! You will soon discover how easy it is the perfect embroidery and sewing machine combination. But we do not want to use will be a joy. Congratulations! Give a free rein to your imagination and make your new Pfaff creative 2124! Its ease of use your ideas into reality will free your creative engergies turning your Pfaff creative 2124. Your Pfaff creative 2124 is to keep you start, please spend some time reading these operating instructions. Before you any longer.
Owner's Manual
Page 4
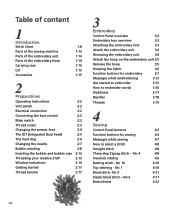
...Overlock stitches 4:9 Basting stitch - No 5 4:11 Elastic blind stitch - Table of content 1 Introduction Stitch Chart 1:8 Parts of the sewing machine 1:13 Parts of the embroidery unit 1:14 Parts of the embroidery hoop 1:14 Carrying case 1:15 Lid 1:15 Accessories 1:15 2 ... 2:5 The feed dog 2:6 Changing the needle 2:7 Bobbin winding 2:8 Inserting the bobbin and bobbin case 2:12 Threading your creative 2124 2:13 Window indications 2:16 Getting started 2:17 Thread tension 2:17 3 Embroidery Control Panel overview 3:2 Embroidery box overview 3:3 ...
...Overlock stitches 4:9 Basting stitch - No 5 4:11 Elastic blind stitch - Table of content 1 Introduction Stitch Chart 1:8 Parts of the sewing machine 1:13 Parts of the embroidery unit 1:14 Parts of the embroidery hoop 1:14 Carrying case 1:15 Lid 1:15 Accessories 1:15 2 ... 2:5 The feed dog 2:6 Changing the needle 2:7 Bobbin winding 2:8 Inserting the bobbin and bobbin case 2:12 Threading your creative 2124 2:13 Window indications 2:16 Getting started 2:17 Thread tension 2:17 3 Embroidery Control Panel overview 3:2 Embroidery box overview 3:3 ...
Owner's Manual
Page 13
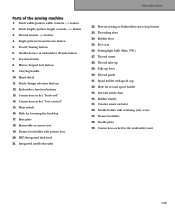
...lock button 9. Base plate 18. Free arm 26. PInretrpoadruacttioionns Parts of the sewing machine 1. Stitch width/pattern width controls, -/+ button 2. Stitch length/pattern length controls, -/+ button 3. Thread tension, -/+ button 4. Needle down/cut embroidery threads button 7. Sew slow button 8. Stitch/design selection buttons 12. Connection socket, "lead cord"... 24. Thread cutter 28. Take up 29. Thread guide 31. Lid with presser foot 20. Bobbin winder 35. Creative smart card slot 36. Presser foot lifter 38. Connection socket for the embroidery unit 1:13
...lock button 9. Base plate 18. Free arm 26. PInretrpoadruacttioionns Parts of the sewing machine 1. Stitch width/pattern width controls, -/+ button 2. Stitch length/pattern length controls, -/+ button 3. Thread tension, -/+ button 4. Needle down/cut embroidery threads button 7. Sew slow button 8. Stitch/design selection buttons 12. Connection socket, "lead cord"... 24. Thread cutter 28. Take up 29. Thread guide 31. Lid with presser foot 20. Bobbin winder 35. Creative smart card slot 36. Presser foot lifter 38. Connection socket for the embroidery unit 1:13
Owner's Manual
Page 15
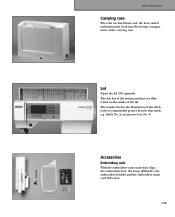
Lid Open the lid (33) upwards. The stitches of the sewing machine are illustrated on the inside of the carrying case. Stitch No. 2, use presser foot No. 0. Accessories Embroidery unit With the embroidery unit comes four clips, ...
Lid Open the lid (33) upwards. The stitches of the sewing machine are illustrated on the inside of the carrying case. Stitch No. 2, use presser foot No. 0. Accessories Embroidery unit With the embroidery unit comes four clips, ...
Owner's Manual
Page 16
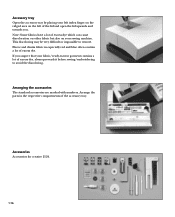
... accessories are marked with numbers. Accessories Accessories for creative 2124. 1:16 Accessory tray Open the accessory tray by placing your left index finger on the ridged area on your fabric/ready-to-wear garment contains a lot of excess dye, always pre-wash it before sewing/embroidering to remove. This discoloring may be... can cause discoloration on other fabric but also on the left of the lid and open the lid upwards and towards you suspect that your sewing machine.
... accessories are marked with numbers. Accessories Accessories for creative 2124. 1:16 Accessory tray Open the accessory tray by placing your left index finger on the ridged area on your fabric/ready-to-wear garment contains a lot of excess dye, always pre-wash it before sewing/embroidering to remove. This discoloring may be... can cause discoloration on other fabric but also on the left of the lid and open the lid upwards and towards you suspect that your sewing machine.
Owner's Manual
Page 20
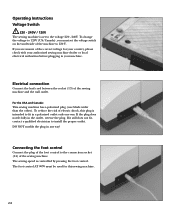
...the foot control Connect the plug of the foot control to the connection socket (14) of the machine to the voltage 220 - 240V. For the USA and Canada: This sewing machine has a polarized plug (one way. Electrical connection Connect the lead cord between the socket (13...) of electric shock, this sewing machine. 2:2 Operating Instructions Voltage Switch 220 - 240V / 120V The sewing machine is controlled by pressing the foot control. To...
...the foot control Connect the plug of the foot control to the connection socket (14) of the machine to the voltage 220 - 240V. For the USA and Canada: This sewing machine has a polarized plug (one way. Electrical connection Connect the lead cord between the socket (13...) of electric shock, this sewing machine. 2:2 Operating Instructions Voltage Switch 220 - 240V / 120V The sewing machine is controlled by pressing the foot control. To...
Owner's Manual
Page 21
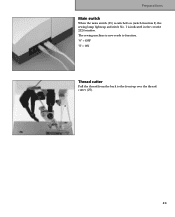
Preparations Main switch When the main switch (15) is switched on (switch function I " = ON Thread cutter Pull the thread from the back to the front up and stitch No. 1 is now ready to function. The sewing machine is indicated in the creative 2124 window. "0" = OFF "I ) the sewing lamp lights up over the thread cutter (27). 2:3
Preparations Main switch When the main switch (15) is switched on (switch function I " = ON Thread cutter Pull the thread from the back to the front up and stitch No. 1 is now ready to function. The sewing machine is indicated in the creative 2124 window. "0" = OFF "I ) the sewing lamp lights up over the thread cutter (27). 2:3
Owner's Manual
Page 23
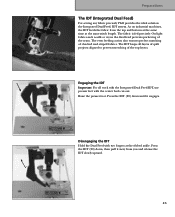
As on industrial machines, the IDT feeds the fabric from you and release the IDT slowly upward. 2:5 On light fabrics such as silk or rayon the dual feed prevents ... , then pull it engages. Disengaging the IDT Hold the Dual Feed with the center back cut-out. Preparations The IDT (Integrated Dual Feed) For sewing any fabric precisely Pfaff provides the ideal solution: the Integrated Dual Feed, IDT system. The fabric is fed precisely. Engaging the IDT Important: For all layers of...
As on industrial machines, the IDT feeds the fabric from you and release the IDT slowly upward. 2:5 On light fabrics such as silk or rayon the dual feed prevents ... , then pull it engages. Disengaging the IDT Hold the Dual Feed with the center back cut-out. Preparations The IDT (Integrated Dual Feed) For sewing any fabric precisely Pfaff provides the ideal solution: the Integrated Dual Feed, IDT system. The fabric is fed precisely. Engaging the IDT Important: For all layers of...
Owner's Manual
Page 24
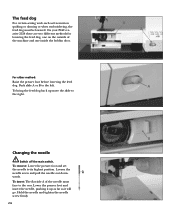
Push slide A or B to its highest position. To insert: The flat side A of the machine and one inside the bobbin door. Hold the needle and tighten the needle screw firmly. 2:6 To remove: Lower the presser foot and set the ... the presser foot and insert the needle, pushing it will go. On your Pfaff creative 2124 there are two different methods for lowering the feed dog, one on the outside of the needle must be lowered. The feed dog For certain sewing work such as it up move the slide to the right. B A A B Changing...
Push slide A or B to its highest position. To insert: The flat side A of the machine and one inside the bobbin door. Hold the needle and tighten the needle screw firmly. 2:6 To remove: Lower the presser foot and set the ... the presser foot and insert the needle, pushing it will go. On your Pfaff creative 2124 there are two different methods for lowering the feed dog, one on the outside of the needle must be lowered. The feed dog For certain sewing work such as it up move the slide to the right. B A A B Changing...
Owner's Manual
Page 26
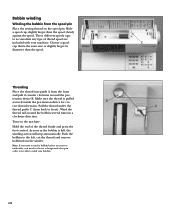
... Threading Place the thread into guide A from the winder. Pull the thread under the A thread guide C (from the spool pin Place the sewing thread on the machine. Bobbin winding Winding the bobbin from back to front). Choose a spool C cap that is the same size or slightly larger in order to ...thread spool are included with your bobbin. 2:8 Note: If you want to wind a bobbin before you start to embroider, you need to wind your machine. As soon as the bobbin is pulled securely inside the pre-tension device for cor- tension device B. Make sure the thread is full, the ...
... Threading Place the thread into guide A from the winder. Pull the thread under the A thread guide C (from the spool pin Place the sewing thread on the machine. Bobbin winding Winding the bobbin from back to front). Choose a spool C cap that is the same size or slightly larger in order to ...thread spool are included with your bobbin. 2:8 Note: If you want to wind a bobbin before you start to embroider, you need to wind your machine. As soon as the bobbin is pulled securely inside the pre-tension device for cor- tension device B. Make sure the thread is full, the ...
Owner's Manual
Page 29
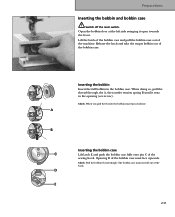
... bobbin case. Inserting the bobbin Insert the full bobbin in the opening (see arrow). Release the latch and take the empty bobbin out of the machine. Inserting the bobbin case Lift latch E and push the bobbin case fully onto pin C of the bobbin case must face upwards. Opening D of the... sewing hook. Check: Pull the bobbin thread sharply. Preparations Inserting the bobbin and bobbin case Switch off the main switch. Open the bobbin door at the ...
... bobbin case. Inserting the bobbin Insert the full bobbin in the opening (see arrow). Release the latch and take the empty bobbin out of the machine. Inserting the bobbin case Lift latch E and push the bobbin case fully onto pin C of the bobbin case must face upwards. Opening D of the... sewing hook. Check: Pull the bobbin thread sharply. Preparations Inserting the bobbin and bobbin case Switch off the main switch. Open the bobbin door at the ...
Owner's Manual
Page 34
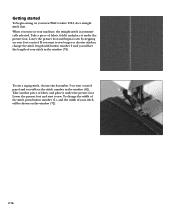
...number (1), and the width of your new Pfaff creative 2124, do a straight stitch first. Lower the presser foot and begin sewing on the window (72). 2:16 To sew a zigzag stitch, choose stitch number 3 on your control panel and you turn on your machine, the straight stitch is automatically selected. ...Take a piece of fabric and place it under the presser foot. Lower the presser foot and start to sew by stepping on your foot control. Take another piece of ...
...number (1), and the width of your new Pfaff creative 2124, do a straight stitch first. Lower the presser foot and begin sewing on the window (72). 2:16 To sew a zigzag stitch, choose stitch number 3 on your control panel and you turn on your machine, the straight stitch is automatically selected. ...Take a piece of fabric and place it under the presser foot. Lower the presser foot and start to sew by stepping on your foot control. Take another piece of ...
Owner's Manual
Page 35
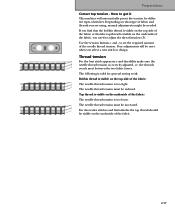
How to get it This machine will be reset when you need to set the required amount of the fabric or that the top thread is too tight. Top thread is ... be needed. Use the tension buttons + and - If you are using, manual adjustments might be increased. Your adjustments will automatically preset the tension for general sewing work: Bobbin thread is visible on the top side of the fabric: The needle thread tension is visible on the underside of the fabric, you...
How to get it This machine will be reset when you need to set the required amount of the fabric or that the top thread is too tight. Top thread is ... be needed. Use the tension buttons + and - If you are using, manual adjustments might be increased. Your adjustments will automatically preset the tension for general sewing work: Bobbin thread is visible on the top side of the fabric: The needle thread tension is visible on the underside of the fabric, you...
Owner's Manual
Page 40
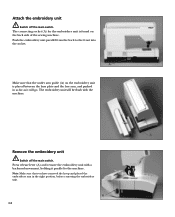
... remove the embroidery unit with a backward movement, holding it will be flush with the machine. Note: Make sure that the under arm guide (A) on the embroidery unit is found on the back side of the sewing machine. Attach the embroidery unit Switch off the main switch. Push the embroidery unit parallel from...
... remove the embroidery unit with a backward movement, holding it will be flush with the machine. Note: Make sure that the under arm guide (A) on the embroidery unit is found on the back side of the sewing machine. Attach the embroidery unit Switch off the main switch. Push the embroidery unit parallel from...
Owner's Manual
Page 89
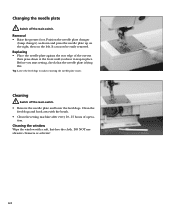
...; Raise the presser foot. Cleaning the window Wipe the window with the brush. • Clean the sewing machine after every 10 - 15 hours of the cut-out then press down at the front until you start sewing, check that the needle plate is lying flat. It can now be easily removed. Changing...
...; Raise the presser foot. Cleaning the window Wipe the window with the brush. • Clean the sewing machine after every 10 - 15 hours of the cut-out then press down at the front until you start sewing, check that the needle plate is lying flat. It can now be easily removed. Changing...
Owner's Manual
Page 90
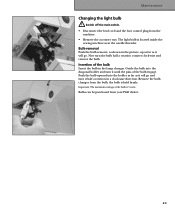
... counter clock-wise and remove the bulb. Guide the bulb into the holder as far as it will go . Bulbs can be purchased from the machine. • Remove the accessory tray. Now turn it until the pins of the bulb Insert the bulb in a clock-wise direction. Insertion of the bulb... engage. Maintenance Changing the light bulb Switch off the main switch. • Disconnect the lead cord and the foot control plug from your Pfaff dealer. 6:3 The light bulb is located inside the sewing machine near the needle threader.
... counter clock-wise and remove the bulb. Guide the bulb into the holder as far as it will go . Bulbs can be purchased from the machine. • Remove the accessory tray. Now turn it until the pins of the bulb Insert the bulb in a clock-wise direction. Insertion of the bulb... engage. Maintenance Changing the light bulb Switch off the main switch. • Disconnect the lead cord and the foot control plug from your Pfaff dealer. 6:3 The light bulb is located inside the sewing machine near the needle threader.
Owner's Manual
Page 92
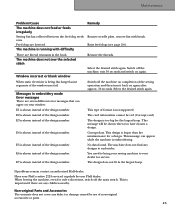
.... Have your Pfaff creative 2124 serviced regularly by use of format is not supported The card information cannot be shown when you have chosen a design. E3 is shown instead of the design number. E5 is shown instead of the design number. Remove the threads. Switch off the machine on completion of the sewing operation and...
.... Have your Pfaff creative 2124 serviced regularly by use of format is not supported The card information cannot be shown when you have chosen a design. E3 is shown instead of the design number. E5 is shown instead of the design number. Remove the threads. Switch off the machine on completion of the sewing operation and...
Owner's Manual
Page 95
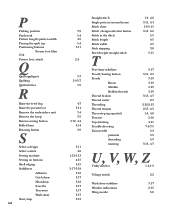
... R Raise the feed dog Raise the presserfoot Remove the embroidery unit Remove the hoop Reverse sewing button Rolled hem Rotating button S Select a design Select a stitch Sewing machine Sewing on buttons Shell edging Stabilizers Adhesive Cut-A-Away Heat-Away Iron-On Tear-away Wash-Away ... T Tear-Away stabilizer Tie-off/basting button Treads Rayon Metallic Bobbin threads Thread broken Thread cutter Threading Thread tension Three-step zig-zag stitch Test sew Top stitching Trouble-shooting Twin needle pintucks threading warning 1:8, 4:8 3:11, 4:4 1:8-1:11 3:11, 4:6 5:5 4:5 4:5 3:8 5:11 3:17 3:11...
... R Raise the feed dog Raise the presserfoot Remove the embroidery unit Remove the hoop Reverse sewing button Rolled hem Rotating button S Select a design Select a stitch Sewing machine Sewing on buttons Shell edging Stabilizers Adhesive Cut-A-Away Heat-Away Iron-On Tear-away Wash-Away ... T Tear-Away stabilizer Tie-off/basting button Treads Rayon Metallic Bobbin threads Thread broken Thread cutter Threading Thread tension Three-step zig-zag stitch Test sew Top stitching Trouble-shooting Twin needle pintucks threading warning 1:8, 4:8 3:11, 4:4 1:8-1:11 3:11, 4:6 5:5 4:5 4:5 3:8 5:11 3:17 3:11...
Owner's Manual
Page 96
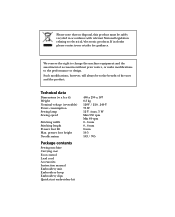
... data Dimensions (w x h x d) Weight Nominal voltage (reversible) Power consumption Sewing lamp Sewing speed Stitching width Stitching length Presser foot lift Max. presser foot height Needle system Package contents Sewing machine Carrying case Foot control Lead cord Accessories Instruction manual Embroidery unit Embroidery hoop Embroidery clips...Min 80 rpm 0...6 mm 0...6 mm 8 mm 10.5 103 / 705 If in accordance with relevant National legislation relating to change the machine equipment and the assortment of the user and the product. We reserve the right to electrical/electronic products.
... data Dimensions (w x h x d) Weight Nominal voltage (reversible) Power consumption Sewing lamp Sewing speed Stitching width Stitching length Presser foot lift Max. presser foot height Needle system Package contents Sewing machine Carrying case Foot control Lead cord Accessories Instruction manual Embroidery unit Embroidery hoop Embroidery clips...Min 80 rpm 0...6 mm 0...6 mm 8 mm 10.5 103 / 705 If in accordance with relevant National legislation relating to change the machine equipment and the assortment of the user and the product. We reserve the right to electrical/electronic products.


