Owner's Manual
Page 4
... bobbin and bobbin case 2:12 Threading your creative 2124 2:13 Window indications 2:16 Getting started 2:17 Thread tension 2:17 3 Embroidery Control Panel overview 3:2 Embroidery box overview 3:3 Attaching the embroidery foot 3:3 Attach the embroidery unit 3:4 Removing the embroidery unit 3:4 Attach the hoop on the embroidery unit 3:5 Remove the hoop 3:5 Hooping the fabric 3:6 Function buttons for embroidery 3:7 Messages while embroidering 3:13 Get started to...
... bobbin and bobbin case 2:12 Threading your creative 2124 2:13 Window indications 2:16 Getting started 2:17 Thread tension 2:17 3 Embroidery Control Panel overview 3:2 Embroidery box overview 3:3 Attaching the embroidery foot 3:3 Attach the embroidery unit 3:4 Removing the embroidery unit 3:4 Attach the hoop on the embroidery unit 3:5 Remove the hoop 3:5 Hooping the fabric 3:6 Function buttons for embroidery 3:7 Messages while embroidering 3:13 Get started to...
Owner's Manual
Page 13
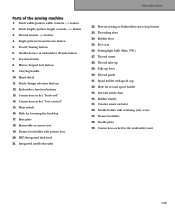
...slow button 8. Mirror/keypad lock button 9. Embroidery function buttons 13. Take up 29. Creative smart card slot 36. Needle plate 39. Connection socket for second spool holder 33. Hand wheel 11. Hole for the embroidery unit 1:13 Lid with presser foot 20. Presser...30. Connection socket, "foot control" 15. Thread tension, -/+ button 4. Main switch 16. Single pattern/monochrome button 5. Needle down/cut embroidery threads button 7. Connection socket, "lead cord" 14. Base plate 18. Removable accessory tray 19. Stitch/design selection buttons 12. Stitch ...
...slow button 8. Mirror/keypad lock button 9. Embroidery function buttons 13. Take up 29. Creative smart card slot 36. Needle plate 39. Connection socket for second spool holder 33. Hand wheel 11. Hole for the embroidery unit 1:13 Lid with presser foot 20. Presser...30. Connection socket, "foot control" 15. Thread tension, -/+ button 4. Main switch 16. Single pattern/monochrome button 5. Needle down/cut embroidery threads button 7. Connection socket, "lead cord" 14. Base plate 18. Removable accessory tray 19. Stitch/design selection buttons 12. Stitch ...
Owner's Manual
Page 14
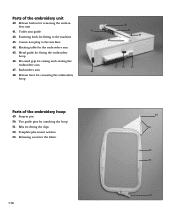
...43. Rotating table for fitting the clips 52. Retaining screw for raising and rotating the embroidery arm 47. Recessed grip for the fabric 49 50 51 52 53 1:14 Parts of the embroidery hoop 49. Template placement notches 53. Fastening latch for fitting to the machine 44. Metal... guide for attaching the hoop 51. Two guide pins for fitting the embroidery hoop 46. Release button for removing the embroidery hoop 48 45 47 46 44 41 42 43 40 Parts of the embroidery unit 40. Release lever for removing the...
...43. Rotating table for fitting the clips 52. Retaining screw for raising and rotating the embroidery arm 47. Recessed grip for the fabric 49 50 51 52 53 1:14 Parts of the embroidery hoop 49. Template placement notches 53. Fastening latch for fitting to the machine 44. Metal... guide for attaching the hoop 51. Two guide pins for fitting the embroidery hoop 46. Release button for removing the embroidery hoop 48 45 47 46 44 41 42 43 40 Parts of the embroidery unit 40. Release lever for removing the...
Owner's Manual
Page 15
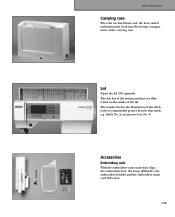
..., is the recommended presser foot for that stitch, e.g. The number below the illustration of the carrying case. Accessories Embroidery unit With the embroidery unit comes four clips, the embroidery foot, the hoop (225x140), the embroidery booklet and the embroidery smart card 300 s foot. 1:15 Stitch No. 2, use presser foot No. 0. The stitches of the sewing machine are...
..., is the recommended presser foot for that stitch, e.g. The number below the illustration of the carrying case. Accessories Embroidery unit With the embroidery unit comes four clips, the embroidery foot, the hoop (225x140), the embroidery booklet and the embroidery smart card 300 s foot. 1:15 Stitch No. 2, use presser foot No. 0. The stitches of the sewing machine are...
Owner's Manual
Page 39
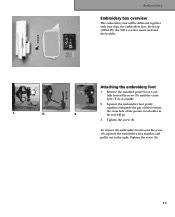
Embroidery Embroidery box overview The embroidery unit will go. 3. Remove the standard presser foot. far as 3. Carefully loosen the screw (S) until the crosshole (T) is accessible. 2. Tighten the screw (S). Tighten the screw (S). 3:3 S T 1. 2. Attaching the embroidery foot 1. Squeeze the embroidery foot gently together ...the right. To remove the embroidery foot loosen the screw (S), squeeze the embroidery foot together and pull it will be delivered together with four clips, the embroidery foot, the hoop (225x140), the 300 s- creative smart card and the booklet....
Embroidery Embroidery box overview The embroidery unit will go. 3. Remove the standard presser foot. far as 3. Carefully loosen the screw (S) until the crosshole (T) is accessible. 2. Tighten the screw (S). Tighten the screw (S). 3:3 S T 1. 2. Attaching the embroidery foot 1. Squeeze the embroidery foot gently together ...the right. To remove the embroidery foot loosen the screw (S), squeeze the embroidery foot together and pull it will be delivered together with four clips, the embroidery foot, the hoop (225x140), the 300 s- creative smart card and the booklet....
Owner's Manual
Page 40
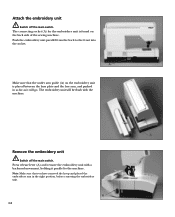
... flush with a backward movement, holding it will go. Note: Make sure that the under arm guide (A) on the embroidery unit is found on the back side of the sewing machine. Push the embroidery unit parallel from the back to the machine. A Make sure that you have removed the hoop and placed the... embroidery arm in as far as it parallel to the front into the socket. The connecting socket (A) for the embroidery unit is placed between the base plate and the free arm, and pushed in the right position...
... flush with a backward movement, holding it will go. Note: Make sure that the under arm guide (A) on the embroidery unit is found on the back side of the sewing machine. Push the embroidery unit parallel from the back to the machine. A Make sure that you have removed the hoop and placed the... embroidery arm in as far as it parallel to the front into the socket. The connecting socket (A) for the embroidery unit is placed between the base plate and the free arm, and pushed in the right position...
Owner's Manual
Page 41
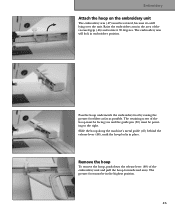
.... Slide the hoop along the machine's metal guide (45) behind the release lever (48), until the hoop locks in embroidery position. Embroidery Attach the hoop on the embroidery unit The embroidery arm (47) must be rotated, because it 90 degrees. The retaining screw of the hoop must be facing you and ...the guide pin (50) must be in the area of the embroidery unit and pull the hoop forwards and away. Raise the embroidery arm in the...
.... Slide the hoop along the machine's metal guide (45) behind the release lever (48), until the hoop locks in embroidery position. Embroidery Attach the hoop on the embroidery unit The embroidery arm (47) must be rotated, because it 90 degrees. The retaining screw of the hoop must be facing you and ...the guide pin (50) must be in the area of the embroidery unit and pull the hoop forwards and away. Raise the embroidery arm in the...
Owner's Manual
Page 42
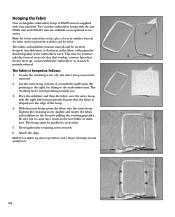
..., the finger should spring back. The retaining screw is draped over the outer hoop, with the guide pins (B) pointing to the embroidery unit. Place the stabilizer and then the fabric over the edge of color that overlap, contour lines that the fabric is now pointing towards you ...tighten the retaining screw securely. 6. Loosen the retaining screw (A); With the inner hoop, press the fabric into the outer hoop. Two circular embroidery hoops with the size 80x80 mm and 120x115 mm are available as follows: 1. The fabric is hooped as an optional accessories. The hoops must...
..., the finger should spring back. The retaining screw is draped over the outer hoop, with the guide pins (B) pointing to the embroidery unit. Place the stabilizer and then the fabric over the edge of color that overlap, contour lines that the fabric is now pointing towards you ...tighten the retaining screw securely. 6. Loosen the retaining screw (A); With the inner hoop, press the fabric into the outer hoop. Two circular embroidery hoops with the size 80x80 mm and 120x115 mm are available as follows: 1. The fabric is hooped as an optional accessories. The hoops must...
Owner's Manual
Page 43
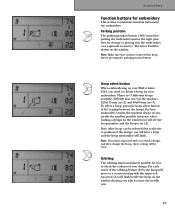
...the hoop sizenumber will flash. Hoop select button When embroidering on your Pfaff creative 2124, you need to the size or position of the design, you which corner the needle is used for putting the embroidery unit in the right position for storage or placing it possible for you have ... the hoop on the window. Orbiting The orbiting function makes it in the window), 120x115 mm (no 2) and 80x80 mm (no 1 in the embroidery case (optional accessory). An arrow (A) will move to a corner starting with the upper left. Parking position The parking position button (102) is in...
...the hoop sizenumber will flash. Hoop select button When embroidering on your Pfaff creative 2124, you need to the size or position of the design, you which corner the needle is used for putting the embroidery unit in the right position for storage or placing it possible for you have ... the hoop on the window. Orbiting The orbiting function makes it in the window), 120x115 mm (no 2) and 80x80 mm (no 1 in the embroidery case (optional accessory). An arrow (A) will move to a corner starting with the upper left. Parking position The parking position button (102) is in...
Owner's Manual
Page 51
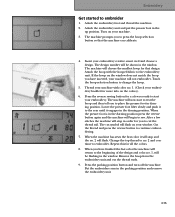
...embroidery creative smart card and choose a design. After a few seconds to cut the thread tail. Put the embroidery arm in the window. The machine will be flashing in the darning position. The cut the thread ends. 9. Repeat this for more info on your embroidery booklet for all the colors. 8. Attach the embroidery unit... button so that design. The machine will flash on the colors). 6. Touch the hoop selection button to the embroidery unit. When the machine has sewn the first color it to place the presser foot in order for that the machine...
...embroidery creative smart card and choose a design. After a few seconds to cut the thread tail. Put the embroidery arm in the window. The machine will be flashing in the darning position. The cut the thread ends. 9. Repeat this for more info on your embroidery booklet for all the colors. 8. Attach the embroidery unit... button so that design. The machine will flash on the colors). 6. Touch the hoop selection button to the embroidery unit. When the machine has sewn the first color it to place the presser foot in order for that the machine...
Owner's Manual
Page 52
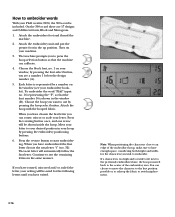
...have enough space, considering both height and width, for the following letters until you see your Pfaff creative 2124, the 300 s-card is included. To embroider the word "Pfaff" input no. 16 representing the "P", so that the machine can calibrate. 4. Attach the ...hoop with the hooped fabric. Press the rotating button once, and one , the hoop is shown in the window (B). AB Note: When positioning the characters close to an edge of the embroidery area. Attach the embroidery unit...
...have enough space, considering both height and width, for the following letters until you see your Pfaff creative 2124, the 300 s-card is included. To embroider the word "Pfaff" input no. 16 representing the "P", so that the machine can calibrate. 4. Attach the ...hoop with the hooped fabric. Press the rotating button once, and one , the hoop is shown in the window (B). AB Note: When positioning the characters close to an edge of the embroidery area. Attach the embroidery unit...
Owner's Manual
Page 56
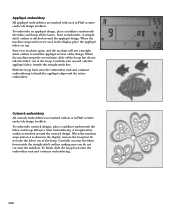
...é fabric outside the straight stitch line. When the machine stops and an A is shown in Pfaff creative cards/cds design booklets. Slide the hoop back onto the embroidery unit and continue embroidering to embroider. To embroider cutwork designs, place a stabilizer underneath the fabric and hoop all...hoop all layers. Appliqué embroidery All appliqué embroideries are marked with an A in the display, remove the hoop but do not cut away the fabric from inside the straight stitch outline making sure you see an A in Pfaff creative cards/cds design booklets. Carefully ...
...é fabric outside the straight stitch line. When the machine stops and an A is shown in Pfaff creative cards/cds design booklets. Slide the hoop back onto the embroidery unit and continue embroidering to embroider. To embroider cutwork designs, place a stabilizer underneath the fabric and hoop all...hoop all layers. Appliqué embroidery All appliqué embroideries are marked with an A in the display, remove the hoop but do not cut away the fabric from inside the straight stitch outline making sure you see an A in Pfaff creative cards/cds design booklets. Carefully ...
Owner's Manual
Page 93
... tray Adhesive stabilizer Appliqué/cutwork stop Arranging the accessories Attach the hoop Attach the embroidery foot Attach the embroidery unit 1:15-1:18, 3:3 1:16 3:18 3:16 1:16 3:5 3:3 3:4 B Balance:...embroidery sewing Creative smart card Cross hem knit stitch Cross-stitch Cut-Away stabilizer D Darning with elastic stitch position Decorative stitches Design length Design width Disengaging the IDT E Embroider designs words Embroider on small pieces of fabric Embroider on thin fabrics Embroider on terry cloth Embroidered word combinations Embroidery box Embroidery thread Embroidery unit...
... tray Adhesive stabilizer Appliqué/cutwork stop Arranging the accessories Attach the hoop Attach the embroidery foot Attach the embroidery unit 1:15-1:18, 3:3 1:16 3:18 3:16 1:16 3:5 3:3 3:4 B Balance:...embroidery sewing Creative smart card Cross hem knit stitch Cross-stitch Cut-Away stabilizer D Darning with elastic stitch position Decorative stitches Design length Design width Disengaging the IDT E Embroider designs words Embroider on small pieces of fabric Embroider on thin fabrics Embroider on terry cloth Embroidered word combinations Embroidery box Embroidery thread Embroidery unit...
Owner's Manual
Page 95
... top Positioning buttons Presser foot lifter 2:14 Presser foot, attach Q Quilt appliqués Quilting Quilt stitches R Raise the feed dog Raise the presserfoot Remove the embroidery unit Remove the hoop Reverse sewing button Rolled hem Rotating button S Select a design Select a stitch Sewing machine Sewing on buttons Shell edging Stabilizers Adhesive Cut-A-Away...
... top Positioning buttons Presser foot lifter 2:14 Presser foot, attach Q Quilt appliqués Quilting Quilt stitches R Raise the feed dog Raise the presserfoot Remove the embroidery unit Remove the hoop Reverse sewing button Rolled hem Rotating button S Select a design Select a stitch Sewing machine Sewing on buttons Shell edging Stabilizers Adhesive Cut-A-Away...
Owner's Manual
Page 96
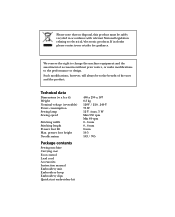
... relating to electrical/electronic products. presser foot height Needle system Package contents Sewing machine Carrying case Foot control Lead cord Accessories Instruction manual Embroidery unit Embroidery hoop Embroidery clips Quick start embroidery kit 408 x 290 x 187 8,3 kg 120V / 220...240 V 75 W 12 V /max. 5 W Max 950 rpm Min 80 rpm 0...6 mm 0...6 mm 8 mm 10.5 103 / 705...
... relating to electrical/electronic products. presser foot height Needle system Package contents Sewing machine Carrying case Foot control Lead cord Accessories Instruction manual Embroidery unit Embroidery hoop Embroidery clips Quick start embroidery kit 408 x 290 x 187 8,3 kg 120V / 220...240 V 75 W 12 V /max. 5 W Max 950 rpm Min 80 rpm 0...6 mm 0...6 mm 8 mm 10.5 103 / 705...


