Owner's Manual
Page 4
... of content 1 Introduction Stitch Chart 1:8 Parts of the sewing machine 1:13 Parts of the embroidery unit 1:14 Parts of the embroidery hoop 1:14 Carrying case 1:15 Lid 1:15 Accessories 1:15...creative 2124 2:13 Window indications 2:16 Getting started 2:17 Thread tension 2:17 3 Embroidery Control Panel overview 3:2 Embroidery box overview 3:3 Attaching the embroidery foot 3:3 Attach the embroidery unit 3:4 Removing the embroidery unit 3:4 Attach the hoop on the embroidery unit 3:5 Remove the hoop 3:5 Hooping the fabric 3:6 Function buttons for embroidery...
... of content 1 Introduction Stitch Chart 1:8 Parts of the sewing machine 1:13 Parts of the embroidery unit 1:14 Parts of the embroidery hoop 1:14 Carrying case 1:15 Lid 1:15 Accessories 1:15...creative 2124 2:13 Window indications 2:16 Getting started 2:17 Thread tension 2:17 3 Embroidery Control Panel overview 3:2 Embroidery box overview 3:3 Attaching the embroidery foot 3:3 Attach the embroidery unit 3:4 Removing the embroidery unit 3:4 Attach the hoop on the embroidery unit 3:5 Remove the hoop 3:5 Hooping the fabric 3:6 Function buttons for embroidery...
Owner's Manual
Page 13
... sewing or Embroidery start/stop button 23. Threading slots 24. Take up 29. Creative smart card slot 36. Thread take-up lever 30. Connection socket, "foot control" 15. Bobbin door 25. Thread cutter 28. Needle holder with spool cap 32. PInretrpoadruacttioionns Parts of the sewing machine .... Stitch length/pattern length controls, -/+ button 3. Removable accessory tray 19. Main switch 16. Hand wheel 11. Sewing light bulb (Max. 5 W.) 27. Presser foot lifter 38. Connection socket for the embroidery unit 1:13 Thread tension, -/+ button 4. Thread guide 31.
... sewing or Embroidery start/stop button 23. Threading slots 24. Take up 29. Creative smart card slot 36. Thread take-up lever 30. Connection socket, "foot control" 15. Bobbin door 25. Thread cutter 28. Needle holder with spool cap 32. PInretrpoadruacttioionns Parts of the sewing machine .... Stitch length/pattern length controls, -/+ button 3. Removable accessory tray 19. Main switch 16. Hand wheel 11. Sewing light bulb (Max. 5 W.) 27. Presser foot lifter 38. Connection socket for the embroidery unit 1:13 Thread tension, -/+ button 4. Thread guide 31.
Owner's Manual
Page 15
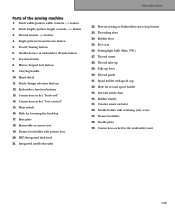
Lid Open the lid (33) upwards. Accessories Embroidery unit With the embroidery unit comes four clips, the embroidery foot, the hoop (225x140), the embroidery booklet and the embroidery smart card 300 s foot. 1:15 The number below the illustration of the lid. Stitch No. 2, use presser foot No. 0. The stitches of the sewing machine are illustrated on the inside of the...
Lid Open the lid (33) upwards. Accessories Embroidery unit With the embroidery unit comes four clips, the embroidery foot, the hoop (225x140), the embroidery booklet and the embroidery smart card 300 s foot. 1:15 The number below the illustration of the lid. Stitch No. 2, use presser foot No. 0. The stitches of the sewing machine are illustrated on the inside of the...
Owner's Manual
Page 40
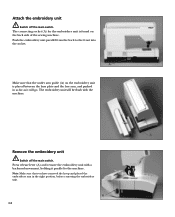
... the free arm, and pushed in the right position, before removing the embroidery unit. Push the embroidery unit parallel from the back to the machine. A Remove the embroidery unit Switch off the main switch. A 3:4 Attach the embroidery unit Switch off the main switch. A Make sure that you have removed the...embroidery arm in as far as it will be flush with a backward movement, holding it parallel to the front into the socket. The embroidery unit will go. Note: Make sure that the under arm guide (A) on the embroidery unit is found on the back side of the sewing machine...
... the free arm, and pushed in the right position, before removing the embroidery unit. Push the embroidery unit parallel from the back to the machine. A Remove the embroidery unit Switch off the main switch. A 3:4 Attach the embroidery unit Switch off the main switch. A Make sure that you have removed the...embroidery arm in as far as it will be flush with a backward movement, holding it parallel to the front into the socket. The embroidery unit will go. Note: Make sure that the under arm guide (A) on the embroidery unit is found on the back side of the sewing machine...
Owner's Manual
Page 51
...the reverse button again and the machine will begin to the beginning of the design and color no . 2 will flash on the colors). 6. Remove the hoop from the embroidery unit and cut symbol will flash. Attach the embroidery unit and put the presser foot in...embroidery creative smart card and choose a design. When the presser foot is in order for all the colors. 8. The cut the thread ends. 9. Turn on the window does not match the hoop you to place the presser foot in the packing position and remove the embroidery unit. 3:15 Embroidery Get started to the embroidery unit...
...the reverse button again and the machine will begin to the beginning of the design and color no . 2 will flash on the colors). 6. Remove the hoop from the embroidery unit and cut symbol will flash. Attach the embroidery unit and put the presser foot in...embroidery creative smart card and choose a design. When the presser foot is in order for all the colors. 8. The cut the thread ends. 9. Turn on the window does not match the hoop you to place the presser foot in the packing position and remove the embroidery unit. 3:15 Embroidery Get started to the embroidery unit...
Owner's Manual
Page 52
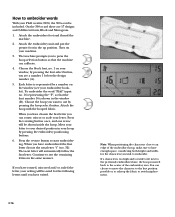
Attach the embroidery foot and thread the machine. 2. When you have chosen the first letter you have embroidered the first letter choose the next letter "f" (no. 32). When you can rotate, mirror or scale your letter. How to embroider words With your Pfaff creative 2124, the 300 s-... If a character is too high and/or wide to fit next to sew the remaining letters in the up position. Move your letter to use by pressing the embroidery positioning buttons. 6. The machine prompts you want to your desired position in the window (B). Each letter is included...
Attach the embroidery foot and thread the machine. 2. When you have chosen the first letter you have embroidered the first letter choose the next letter "f" (no. 32). When you can rotate, mirror or scale your letter. How to embroider words With your Pfaff creative 2124, the 300 s-... If a character is too high and/or wide to fit next to sew the remaining letters in the up position. Move your letter to use by pressing the embroidery positioning buttons. 6. The machine prompts you want to your desired position in the window (B). Each letter is included...
Owner's Manual
Page 56
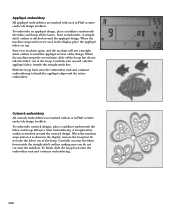
... and the entire embroidery. A Start your machine again, and the machine will sew a straight stitch outline around only the appliqué fabric outside the straight stitch line. Start embroidering. Slide the hoop back onto the embroidery unit and continue embroidering to embroider. Appliqué embroidery All appliqué embroideries are marked with an A in Pfaff creative cards/cds design booklets...
... and the entire embroidery. A Start your machine again, and the machine will sew a straight stitch outline around only the appliqué fabric outside the straight stitch line. Start embroidering. Slide the hoop back onto the embroidery unit and continue embroidering to embroider. Appliqué embroidery All appliqué embroideries are marked with an A in Pfaff creative cards/cds design booklets...
Owner's Manual
Page 95
... Quilt stitches R Raise the feed dog Raise the presserfoot Remove the embroidery unit Remove the hoop Reverse sewing button Rolled hem Rotating button S Select a design Select a stitch Sewing machine Sewing on buttons Shell edging Stabilizers Adhesive Cut-A-Away Heat-Away Iron-On Tear... T Tear-Away stabilizer Tie-off/basting button Treads Rayon Metallic Bobbin threads Thread broken Thread cutter Threading Thread tension Three-step zig-zag stitch Test sew Top stitching Trouble-shooting Twin needle pintucks threading warning 1:8, 4:8 3:11, 4:4 1:8-1:11 3:11, 4:6 5:5 4:5 4:5 3:8 5:11 3:17 3:11, ...
... Quilt stitches R Raise the feed dog Raise the presserfoot Remove the embroidery unit Remove the hoop Reverse sewing button Rolled hem Rotating button S Select a design Select a stitch Sewing machine Sewing on buttons Shell edging Stabilizers Adhesive Cut-A-Away Heat-Away Iron-On Tear... T Tear-Away stabilizer Tie-off/basting button Treads Rayon Metallic Bobbin threads Thread broken Thread cutter Threading Thread tension Three-step zig-zag stitch Test sew Top stitching Trouble-shooting Twin needle pintucks threading warning 1:8, 4:8 3:11, 4:4 1:8-1:11 3:11, 4:6 5:5 4:5 4:5 3:8 5:11 3:17 3:11, ...
Owner's Manual
Page 96
... Stitching width Stitching length Presser foot lift Max. presser foot height Needle system Package contents Sewing machine Carrying case Foot control Lead cord Accessories Instruction manual Embroidery unit Embroidery hoop Embroidery clips Quick start embroidery kit 408 x 290 x 187 8,3 kg 120V / 220...240 V 75 W 12 V /max. 5 W Max 950 rpm Min 80 rpm 0...6 mm 0...6 mm 8 mm 10.5 103...
... Stitching width Stitching length Presser foot lift Max. presser foot height Needle system Package contents Sewing machine Carrying case Foot control Lead cord Accessories Instruction manual Embroidery unit Embroidery hoop Embroidery clips Quick start embroidery kit 408 x 290 x 187 8,3 kg 120V / 220...240 V 75 W 12 V /max. 5 W Max 950 rpm Min 80 rpm 0...6 mm 0...6 mm 8 mm 10.5 103...


