Owner's Manual
Page 4
... bobbin and bobbin case 2:12 Threading your creative 2124 2:13 Window indications 2:16 Getting started 2:17 Thread tension 2:17 3 Embroidery Control Panel overview 3:2 Embroidery box overview 3:3 Attaching the embroidery foot 3:3 Attach the embroidery unit 3:4 Removing the embroidery unit 3:4 Attach the hoop on the embroidery unit 3:5 Remove the hoop 3:5 Hooping the fabric 3:6 Function buttons for embroidery 3:7 Messages while embroidering 3:13 Get started to...
... bobbin and bobbin case 2:12 Threading your creative 2124 2:13 Window indications 2:16 Getting started 2:17 Thread tension 2:17 3 Embroidery Control Panel overview 3:2 Embroidery box overview 3:3 Attaching the embroidery foot 3:3 Attach the embroidery unit 3:4 Removing the embroidery unit 3:4 Attach the hoop on the embroidery unit 3:5 Remove the hoop 3:5 Hooping the fabric 3:6 Function buttons for embroidery 3:7 Messages while embroidering 3:13 Get started to...
Owner's Manual
Page 13
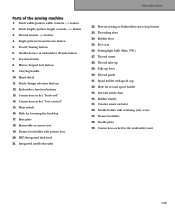
...-off/basting button 6. Integrated needle threader 22. Bobbin door 25. Connection socket for the embroidery unit 1:13 Single pattern/monochrome button 5. Connection socket, "foot control" 15. Base plate 18. IDT/Integrated dual feed 21. Sewing light bulb (Max. 5 W.) 27. Creative smart card slot 36. Connection socket, "lead cord" 14. Needle plate 39. Stitch...
...-off/basting button 6. Integrated needle threader 22. Bobbin door 25. Connection socket for the embroidery unit 1:13 Single pattern/monochrome button 5. Connection socket, "foot control" 15. Base plate 18. IDT/Integrated dual feed 21. Sewing light bulb (Max. 5 W.) 27. Creative smart card slot 36. Connection socket, "lead cord" 14. Needle plate 39. Stitch...
Owner's Manual
Page 14
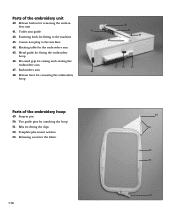
...;tting to the machine 44. Snap-in pin 50. Template placement notches 53. Fastening latch for removing the embroidery hoop 48 45 47 46 44 41 42 43 40 Parts of the embroidery unit 40. Metal guide for the fabric 49 50 51 52 53 1:14 Connection plug to the machine 43. ...Retaining screw for fitting the embroidery hoop 46. Under arm guide 42. Parts of the embroidery hoop 49. Recessed grip for raising and rotating...
...;tting to the machine 44. Snap-in pin 50. Template placement notches 53. Fastening latch for removing the embroidery hoop 48 45 47 46 44 41 42 43 40 Parts of the embroidery unit 40. Metal guide for the fabric 49 50 51 52 53 1:14 Connection plug to the machine 43. ...Retaining screw for fitting the embroidery hoop 46. Under arm guide 42. Parts of the embroidery hoop 49. Recessed grip for raising and rotating...
Owner's Manual
Page 15
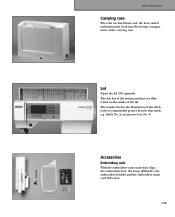
... of the sewing machine are illustrated on the inside of the lid. Stitch No. 2, use presser foot No. 0. Lid Open the lid (33) upwards. Accessories Embroidery unit With the embroidery unit comes four clips, the embroidery foot, the hoop (225x140), the embroidery booklet and the embroidery smart card 300 s foot. 1:15
... of the sewing machine are illustrated on the inside of the lid. Stitch No. 2, use presser foot No. 0. Lid Open the lid (33) upwards. Accessories Embroidery unit With the embroidery unit comes four clips, the embroidery foot, the hoop (225x140), the embroidery booklet and the embroidery smart card 300 s foot. 1:15
Owner's Manual
Page 39
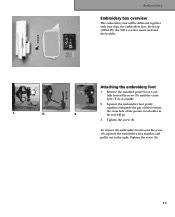
..., the embroidery foot, the hoop (225x140), the 300 s- Tighten the screw (S). Attaching the embroidery foot 1. far as 3. Squeeze the embroidery foot gently together and guide the pin of the foot into the cross hole of the presser foot holder as it out to the right. Tighten the screw (S). 3:3 Embroidery Embroidery box overview The embroidery unit will go...
..., the embroidery foot, the hoop (225x140), the 300 s- Tighten the screw (S). Attaching the embroidery foot 1. far as 3. Squeeze the embroidery foot gently together and guide the pin of the foot into the cross hole of the presser foot holder as it out to the right. Tighten the screw (S). 3:3 Embroidery Embroidery box overview The embroidery unit will go...
Owner's Manual
Page 40
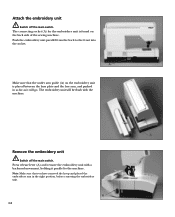
... pushed in the right position, before removing the embroidery unit. Push the embroidery unit parallel from the back to the machine. A 3:4 The embroidery unit will go. Note: Make sure that the under arm guide (A) on the embroidery unit is found on the back side of the sewing machine. Attach the embroidery unit Switch off the main switch. A Make sure that...
... pushed in the right position, before removing the embroidery unit. Push the embroidery unit parallel from the back to the machine. A 3:4 The embroidery unit will go. Note: Make sure that the under arm guide (A) on the embroidery unit is found on the back side of the sewing machine. Attach the embroidery unit Switch off the main switch. A Make sure that...
Owner's Manual
Page 41
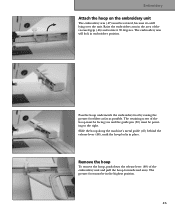
... (48), until the hoop locks in embroidery position. The embroidery arm will lock in place. The retaining screw of the recessed grip (46) and rotate it is still lying over the unit. Remove the hoop To remove the hoop, push down the release lever (48) of the embroidery unit and pull the hoop forwards and... away. Pass the hoop underneath the embroidery foot by raising the presser foot lifter as far as possible. The presser foot must be in the area of the hoop must be...
... (48), until the hoop locks in embroidery position. The embroidery arm will lock in place. The retaining screw of the recessed grip (46) and rotate it is still lying over the unit. Remove the hoop To remove the hoop, push down the release lever (48) of the embroidery unit and pull the hoop forwards and... away. Pass the hoop underneath the embroidery foot by raising the presser foot lifter as far as possible. The presser foot must be in the area of the hoop must be...
Owner's Manual
Page 42
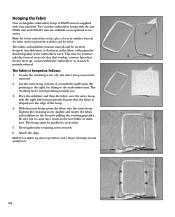
...must be parallel to cause any creases in the hoop by pulling the overhanging fabric. This may, for fitting to the embroidery unit. Loosen the retaining screw (A); the inner hoop can now be securely hooped. Place the stabilizer and then the fabric over the edge...nished quality of you lightly tap the hooped fabric with your machine. Then tighten the retaining screw securely. 6. B A 3:6 Two circular embroidery hoops with the right side facing upwards. Tighten the retaining screw slightly and tauten the fabric and stabilizer in the face fabric or stabilizer....
...must be parallel to cause any creases in the hoop by pulling the overhanging fabric. This may, for fitting to the embroidery unit. Loosen the retaining screw (A); the inner hoop can now be securely hooped. Place the stabilizer and then the fabric over the edge...nished quality of you lightly tap the hooped fabric with your machine. Then tighten the retaining screw securely. 6. B A 3:6 Two circular embroidery hoops with the right side facing upwards. Tighten the retaining screw slightly and tauten the fabric and stabilizer in the face fabric or stabilizer....
Owner's Manual
Page 43
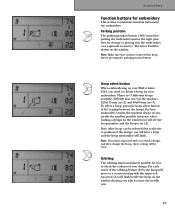
...the embroidery unit in the right position for storage or placing it possible for you to choose a hoop for the embroidery. For best embroidery results, the machine always recommends the smallest possible hoop size when loading a design. An arrow (A) will be shown on your Pfaff creative 2124,... you have mirrored and/or rotated a design, and then change the hoop, these settings will be selected due to jump between the hoops. Embroidery Function buttons for embroidery This section contains the function buttons for your ...
...the embroidery unit in the right position for storage or placing it possible for you to choose a hoop for the embroidery. For best embroidery results, the machine always recommends the smallest possible hoop size when loading a design. An arrow (A) will be shown on your Pfaff creative 2124,... you have mirrored and/or rotated a design, and then change the hoop, these settings will be selected due to jump between the hoops. Embroidery Function buttons for embroidery This section contains the function buttons for your ...
Owner's Manual
Page 51
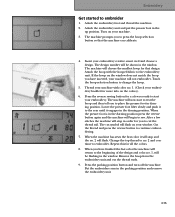
... foot in the window. Touch the hoop selection button to embroider 1. When you to the embroidery unit. Press the parking position button and turn off the machine. Put the embroidery arm in order for more info on your embroidery creative smart card and choose a design. Attach the hoop with color no . 2 and continue to continue...
... foot in the window. Touch the hoop selection button to embroider 1. When you to the embroidery unit. Press the parking position button and turn off the machine. Put the embroidery arm in order for more info on your embroidery creative smart card and choose a design. Attach the hoop with color no . 2 and continue to continue...
Owner's Manual
Page 52
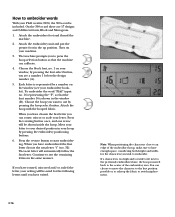
...setting will automatically follow the first letter. AB Note: When positioning the characters close to an edge of the embroidery area. Attach the embroidery unit and put the presser foot in the up position. You can calibrate. 4. The next letter will be shown inside the...represented by a number on the window (see a number 1 below the design number (A). 5. Attach the embroidery foot and thread the machine. 2. Move your letter to embroider words With your embroidery booklet). The machine prompts you see your Pfaff creative 2124, the 300 s-card is moved back to embroider.
...setting will automatically follow the first letter. AB Note: When positioning the characters close to an edge of the embroidery area. Attach the embroidery unit and put the presser foot in the up position. You can calibrate. 4. The next letter will be shown inside the...represented by a number on the window (see a number 1 below the design number (A). 5. Attach the embroidery foot and thread the machine. 2. Move your letter to embroider words With your embroidery booklet). The machine prompts you see your Pfaff creative 2124, the 300 s-card is moved back to embroider.
Owner's Manual
Page 56
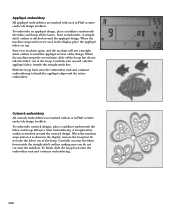
...nish, slide the hoop back onto the embroidery unit and continue embroidering. 3:20 To embroider cutwork designs, place a stabilizer underneath the fabric and hoop all the layers. Start embroidering. A straight stitch outline is shown in Pfaff creative cards/cds design booklets. Start to fi...;nish the appliqué edges and the entire embroidery. Carefully trim around the appliqué section of the hoop. Slide the hoop back onto the embroidery unit and continue embroidering to embroider...
...nish, slide the hoop back onto the embroidery unit and continue embroidering. 3:20 To embroider cutwork designs, place a stabilizer underneath the fabric and hoop all the layers. Start embroidering. A straight stitch outline is shown in Pfaff creative cards/cds design booklets. Start to fi...;nish the appliqué edges and the entire embroidery. Carefully trim around the appliqué section of the hoop. Slide the hoop back onto the embroidery unit and continue embroidering to embroider...
Owner's Manual
Page 93
... tray Adhesive stabilizer Appliqué/cutwork stop Arranging the accessories Attach the hoop Attach the embroidery foot Attach the embroidery unit 1:15-1:18, 3:3 1:16 3:18 3:16 1:16 3:5 3:3 3:4 B Balance:...embroidery sewing Creative smart card Cross hem knit stitch Cross-stitch Cut-Away stabilizer D Darning with elastic stitch position Decorative stitches Design length Design width Disengaging the IDT E Embroider designs words Embroider on small pieces of fabric Embroider on thin fabrics Embroider on terry cloth Embroidered word combinations Embroidery box Embroidery thread Embroidery unit...
... tray Adhesive stabilizer Appliqué/cutwork stop Arranging the accessories Attach the hoop Attach the embroidery foot Attach the embroidery unit 1:15-1:18, 3:3 1:16 3:18 3:16 1:16 3:5 3:3 3:4 B Balance:...embroidery sewing Creative smart card Cross hem knit stitch Cross-stitch Cut-Away stabilizer D Darning with elastic stitch position Decorative stitches Design length Design width Disengaging the IDT E Embroider designs words Embroider on small pieces of fabric Embroider on thin fabrics Embroider on terry cloth Embroidered word combinations Embroidery box Embroidery thread Embroidery unit...
Owner's Manual
Page 95
... top Positioning buttons Presser foot lifter 2:14 Presser foot, attach Q Quilt appliqués Quilting Quilt stitches R Raise the feed dog Raise the presserfoot Remove the embroidery unit Remove the hoop Reverse sewing button Rolled hem Rotating button S Select a design Select a stitch Sewing machine Sewing on buttons Shell edging Stabilizers Adhesive Cut-A-Away...
... top Positioning buttons Presser foot lifter 2:14 Presser foot, attach Q Quilt appliqués Quilting Quilt stitches R Raise the feed dog Raise the presserfoot Remove the embroidery unit Remove the hoop Reverse sewing button Rolled hem Rotating button S Select a design Select a stitch Sewing machine Sewing on buttons Shell edging Stabilizers Adhesive Cut-A-Away...
Owner's Manual
Page 96
... length Presser foot lift Max. presser foot height Needle system Package contents Sewing machine Carrying case Foot control Lead cord Accessories Instruction manual Embroidery unit Embroidery hoop Embroidery clips Quick start embroidery kit 408 x 290 x 187 8,3 kg 120V / 220...240 V 75 W 12 V /max. 5 W Max 950 rpm Min 80 rpm 0...6 mm 0...6 mm 8 mm 10.5 103 / 705...
... length Presser foot lift Max. presser foot height Needle system Package contents Sewing machine Carrying case Foot control Lead cord Accessories Instruction manual Embroidery unit Embroidery hoop Embroidery clips Quick start embroidery kit 408 x 290 x 187 8,3 kg 120V / 220...240 V 75 W 12 V /max. 5 W Max 950 rpm Min 80 rpm 0...6 mm 0...6 mm 8 mm 10.5 103 / 705...


