
Owner's Manual
Page 3
Before you any longer. Your Pfaff creative 2124 is to keep you start, please spend some time reading these operating instructions. But we do not want to use will be a joy. Congratulations! You will soon discover how easy it is the perfect embroidery and sewing machine combination. Give a free rein to your imagination and make your ideas into reality will free your creative engergies turning your ideas become reality! Its ease of use your new Pfaff creative 2124! Congratulations on purchasing your Pfaff creative 2124.
Before you any longer. Your Pfaff creative 2124 is to keep you start, please spend some time reading these operating instructions. But we do not want to use will be a joy. Congratulations! You will soon discover how easy it is the perfect embroidery and sewing machine combination. Give a free rein to your imagination and make your ideas into reality will free your creative engergies turning your ideas become reality! Its ease of use your new Pfaff creative 2124! Congratulations on purchasing your Pfaff creative 2124.
Owner's Manual
Page 4
... 2:7 Bobbin winding 2:8 Inserting the bobbin and bobbin case 2:12 Threading your creative 2124 2:13 Window indications 2:16 Getting started 2:17 Thread tension 2:17 3 Embroidery Control Panel overview 3:2 Embroidery box overview 3:3 Attaching the embroidery foot 3:3 Attach the embroidery unit 3:4 Removing the embroidery unit 3:4 Attach the hoop on the embroidery unit 3:5 Remove the hoop 3:5 Hooping the fabric 3:6 Function buttons for...
... 2:7 Bobbin winding 2:8 Inserting the bobbin and bobbin case 2:12 Threading your creative 2124 2:13 Window indications 2:16 Getting started 2:17 Thread tension 2:17 3 Embroidery Control Panel overview 3:2 Embroidery box overview 3:3 Attaching the embroidery foot 3:3 Attach the embroidery unit 3:4 Removing the embroidery unit 3:4 Attach the hoop on the embroidery unit 3:5 Remove the hoop 3:5 Hooping the fabric 3:6 Function buttons for...
Owner's Manual
Page 13
.... Base plate 18. Free arm 26. Hole for lowering the feed dog 17. Needle plate 39. Thread guide 31. Bobbin winder 35. Embroidery function buttons 13. Connection socket, "foot control" 15. Thread take-up lever 30. Carrying handle 10. Presser foot holder with stitch chart 34.... Bobbin door 25. Creative smart card slot 36. Spool holder with retaining (set) screw 37. Stitch length/pattern length controls, -/+ button 3. Integrated needle threader 22. ...
.... Base plate 18. Free arm 26. Hole for lowering the feed dog 17. Needle plate 39. Thread guide 31. Bobbin winder 35. Embroidery function buttons 13. Connection socket, "foot control" 15. Thread take-up lever 30. Carrying handle 10. Presser foot holder with stitch chart 34.... Bobbin door 25. Creative smart card slot 36. Spool holder with retaining (set) screw 37. Stitch length/pattern length controls, -/+ button 3. Integrated needle threader 22. ...
Owner's Manual
Page 14
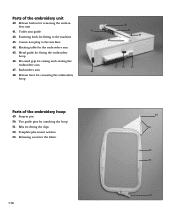
...guide 42. Fastening latch for fitting to the machine 44. Recessed grip for removing the embroidery unit 41. Embroidery arm 48. Snap-in pin 50. Release button for raising and rotating the embroidery arm 47. Connection plug to the machine 43. Metal guide for fitting the clips 52.... Ribs for fitting the embroidery hoop 46. Template placement notches 53. Two guide pins for the embroidery arm 45. Release lever for the fabric 49 50 51 52 53 1:14 Parts of the embroidery hoop 49. Rotating table for attaching the hoop 51. ...
...guide 42. Fastening latch for fitting to the machine 44. Recessed grip for removing the embroidery unit 41. Embroidery arm 48. Snap-in pin 50. Release button for raising and rotating the embroidery arm 47. Connection plug to the machine 43. Metal guide for fitting the clips 52.... Ribs for fitting the embroidery hoop 46. Template placement notches 53. Two guide pins for the embroidery arm 45. Release lever for the fabric 49 50 51 52 53 1:14 Parts of the embroidery hoop 49. Rotating table for attaching the hoop 51. ...
Owner's Manual
Page 15
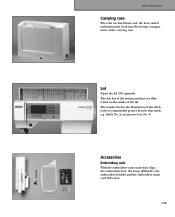
... that stitch, e.g. Lid Open the lid (33) upwards. The number below the illustration of the lid. Accessories Embroidery unit With the embroidery unit comes four clips, the embroidery foot, the hoop (225x140), the embroidery booklet and the embroidery smart card 300 s foot. 1:15 PInretrpoadruacttioionns Carrying case Place the enclosed lead cord, the foot control and...
... that stitch, e.g. Lid Open the lid (33) upwards. The number below the illustration of the lid. Accessories Embroidery unit With the embroidery unit comes four clips, the embroidery foot, the hoop (225x140), the embroidery booklet and the embroidery smart card 300 s foot. 1:15 PInretrpoadruacttioionns Carrying case Place the enclosed lead cord, the foot control and...
Owner's Manual
Page 33
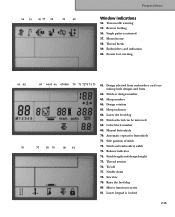
...feeding 56. Monochrome 58. Automatic repeat for buttonhole 71. Tie-off 77. Embroidery card indication 60. Design rotation 65. Thread tension 76. Sew slow 79. Thread break 59. Design selected from embroidery card containing both designs and fonts 62. Balance indicator 74. Single pattern ...activated 57. Stitch selected can be mirrored 68. Manual buttonhole 70. Stitch and embroidery width 73. Needle down 78. Lower keypad is active 81. Color block number 69. Mirror function is locked 2:15 Hoop number...
...feeding 56. Monochrome 58. Automatic repeat for buttonhole 71. Tie-off 77. Embroidery card indication 60. Design rotation 65. Thread tension 76. Sew slow 79. Thread break 59. Design selected from embroidery card containing both designs and fonts 62. Balance indicator 74. Single pattern ...activated 57. Stitch selected can be mirrored 68. Manual buttonhole 70. Stitch and embroidery width 73. Needle down 78. Lower keypad is active 81. Color block number 69. Mirror function is locked 2:15 Hoop number...
Owner's Manual
Page 38
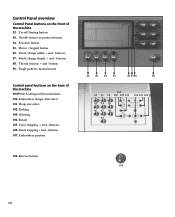
... Panel buttons on the base of the machine 82. Needle down/cut position button 84. Stitch/design width, + and - buttons 88. Embroidery design/font select 101. Color stepping, + and - Embroidery position 82 83 84 85 86 87 88 89 101 90 91 92 100 102 103 104 105 106 107 93 94...
... Panel buttons on the base of the machine 82. Needle down/cut position button 84. Stitch/design width, + and - buttons 88. Embroidery design/font select 101. Color stepping, + and - Embroidery position 82 83 84 85 86 87 88 89 101 90 91 92 100 102 103 104 105 106 107 93 94...
Owner's Manual
Page 39
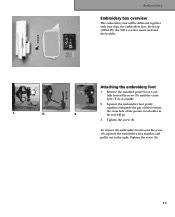
... foot holder as it out to the right. Embroidery Embroidery box overview The embroidery unit will go. 3. S T 1. 2. To remove the embroidery foot loosen the screw (S), squeeze the embroidery foot together and pull it will be delivered together with four clips, the embroidery foot, the hoop (225x140), the 300 s- creative smart card and the booklet. Remove the standard...
... foot holder as it out to the right. Embroidery Embroidery box overview The embroidery unit will go. 3. S T 1. 2. To remove the embroidery foot loosen the screw (S), squeeze the embroidery foot together and pull it will be delivered together with four clips, the embroidery foot, the hoop (225x140), the 300 s- creative smart card and the booklet. Remove the standard...
Owner's Manual
Page 40
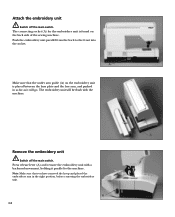
... arm, and pushed in the right position, before removing the embroidery unit. The embroidery unit will be flush with a backward movement, holding it will go. Press release lever (A) and remove the embroidery unit with the machine. A 3:4 Attach the embroidery unit Switch off the main switch. A Make sure that you... have removed the hoop and placed the embroidery arm in as far as it parallel to the front into the socket. A Remove the embroidery unit Switch off the main switch. Note: Make sure that the under arm guide (A) on ...
... arm, and pushed in the right position, before removing the embroidery unit. The embroidery unit will be flush with a backward movement, holding it will go. Press release lever (A) and remove the embroidery unit with the machine. A 3:4 Attach the embroidery unit Switch off the main switch. A Make sure that you... have removed the hoop and placed the embroidery arm in as far as it parallel to the front into the socket. A Remove the embroidery unit Switch off the main switch. Note: Make sure that the under arm guide (A) on ...
Owner's Manual
Page 41
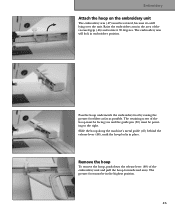
... degrees. Slide the hoop along the machine's metal guide (45) behind the release lever (48), until the hoop locks in embroidery position. The embroidery arm will lock in place. Raise the embroidery arm in the area of the hoop must be facing you and the guide pin (50) must be pointing to the... over the unit. Remove the hoop To remove the hoop, push down the release lever (48) of the embroidery unit and pull the hoop forwards and away. Pass the hoop underneath the embroidery foot by raising the presser foot lifter as far as possible. The presser foot must be in the highest...
... degrees. Slide the hoop along the machine's metal guide (45) behind the release lever (48), until the hoop locks in embroidery position. The embroidery arm will lock in place. Raise the embroidery arm in the area of the hoop must be facing you and the guide pin (50) must be pointing to the... over the unit. Remove the hoop To remove the hoop, push down the release lever (48) of the embroidery unit and pull the hoop forwards and away. Pass the hoop underneath the embroidery foot by raising the presser foot lifter as far as possible. The presser foot must be in the highest...
Owner's Manual
Page 42
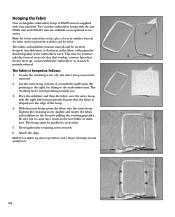
..., for fitting to each other. 5. The fabric is hooped as an optional accessories. Ensure that do not meet up, creases within the embroidery, or areas left unembroidered. Then tighten the retaining screw securely. 6. Loosen the retaining screw (A); The retaining screw is now pointing towards you with the... the fabric and hoop both the stabilizer and the fabric. the inner hoop can now be securely hooped. Note: For better embroidery results, place a layer of the embroidery work. Be sure not to cause any creases in the hoop by pulling the overhanging fabric. Two circular...
..., for fitting to each other. 5. The fabric is hooped as an optional accessories. Ensure that do not meet up, creases within the embroidery, or areas left unembroidered. Then tighten the retaining screw securely. 6. Loosen the retaining screw (A); The retaining screw is now pointing towards you with the... the fabric and hoop both the stabilizer and the fabric. the inner hoop can now be securely hooped. Note: For better embroidery results, place a layer of the embroidery work. Be sure not to cause any creases in the hoop by pulling the overhanging fabric. Two circular...
Owner's Manual
Page 43
... shown on your Pfaff creative 2124, you have mirrored and/or rotated a design, and then change the hoop, these settings will see the hoop number and the hoop icon (A). In the window you which corner the needle is used for putting the embroidery unit in the embroidery case (optional accessory). Embroidery Function buttons for embroidery This section...
... shown on your Pfaff creative 2124, you have mirrored and/or rotated a design, and then change the hoop, these settings will see the hoop number and the hoop icon (A). In the window you which corner the needle is used for putting the embroidery unit in the embroidery case (optional accessory). Embroidery Function buttons for embroidery This section...
Owner's Manual
Page 44
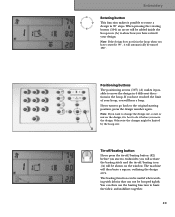
... be useful if the top or bobbin thread have run out and you to go back a few stitches. To step backwards in a design. A 3:8 Embroidery design/font select The embroidery design/font select button (100) is used for each color block. Stitch stepping The stitch stepping function (A) (106) enables you want to step...
... be useful if the top or bobbin thread have run out and you to go back a few stitches. To step backwards in a design. A 3:8 Embroidery design/font select The embroidery design/font select button (100) is used for each color block. Stitch stepping The stitch stepping function (A) (106) enables you want to step...
Owner's Manual
Page 45
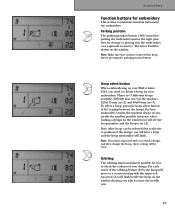
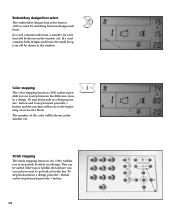
... the basting function to baste the fabric and stabilizer together. 3:9 A Tie-off/basting button If you start to do it will be turned 180°. Embroidery Rotating button This function makes it possible to move the design. If you have rotated it 90 °, it before you press the tie-off...
... the basting function to baste the fabric and stabilizer together. 3:9 A Tie-off/basting button If you start to do it will be turned 180°. Embroidery Rotating button This function makes it possible to move the design. If you have rotated it 90 °, it before you press the tie-off...
Owner's Manual
Page 46
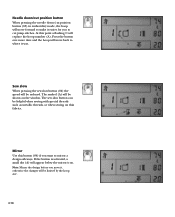
.... 3:10 If the button is activated, a small dot (A) will replace the hoop number (A). At this button (84) if you to cut position button (83) in embroidery mode, the hoop will be helpful when sewing with special threads such as metallic threads, or when sewing on the window. Needle down/cut position...
.... 3:10 If the button is activated, a small dot (A) will replace the hoop number (A). At this button (84) if you to cut position button (83) in embroidery mode, the hoop will be helpful when sewing with special threads such as metallic threads, or when sewing on the window. Needle down/cut position...
Owner's Manual
Page 47
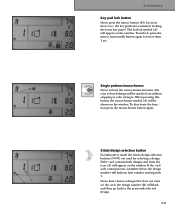
... shown on the window. The keylock symbol (A) will appear on the card, the design number (B) will appear on the window. Stitch/design selection button In embroidery mode the stitch/design selection buttons (90-99) are used for more than 1 sec. If the card only contains fonts, a number below the design number...
... shown on the window. The keylock symbol (A) will appear on the card, the design number (B) will appear on the window. Stitch/design selection button In embroidery mode the stitch/design selection buttons (90-99) are used for more than 1 sec. If the card only contains fonts, a number below the design number...

Owner's Manual
Page 48
Use the button when you want to start your embroidery and when you want to change the design width by pressing the + and - You can change the design length by pressing the + and - If you ... 75% to a predefined value (C). buttons (87). The design can also use the + and - buttons (88) to 125%. Start/stop: reverse button In the embroidery mode the reverse sewing button (108)is a start/stop . Design width The width of a design will be shown in the window in order to start...
Use the button when you want to start your embroidery and when you want to change the design width by pressing the + and - You can change the design length by pressing the + and - If you ... 75% to a predefined value (C). buttons (87). The design can also use the + and - buttons (88) to 125%. Start/stop: reverse button In the embroidery mode the reverse sewing button (108)is a start/stop . Design width The width of a design will be shown in the window in order to start...
Owner's Manual
Page 49
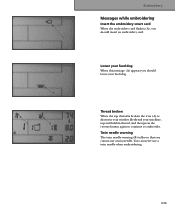
Twin needle warning The twin needle warning (B) tells you that you should insert an embroidery card. Lower your feed dog When this message (A) appears you cannot use a twin needle when embroidering. 3:13 Rethread your window. Embroidery Messages while embroidering Insert the embroidery smart card When the embroidery card flashes (A), you should lower your feed dog. You can never use a twin needle. Thread broken When the top thread is broken the icon (A) is shown in your machine, top and bobbin thread, and then press the reverse button again to continue to embroider.
Twin needle warning The twin needle warning (B) tells you that you should insert an embroidery card. Lower your feed dog When this message (A) appears you cannot use a twin needle when embroidering. 3:13 Rethread your window. Embroidery Messages while embroidering Insert the embroidery smart card When the embroidery card flashes (A), you should lower your feed dog. You can never use a twin needle. Thread broken When the top thread is broken the icon (A) is shown in your machine, top and bobbin thread, and then press the reverse button again to continue to embroider.

Owner's Manual
Page 50
...in the window instead of a color number, to indicate a stop in the design. Cut the thread When you have sewn a few stitches your Pfaff creative 2124 stops and flashes with the arrow flashing, you to cut the thread, press the reverse button again, and the machine will continue ... cut symbol (A), telling you should raise the presser foot to embroider. Appliqué and cutwork stop When embroidering an appliqué embroidery or a cutwork embroidery, you to embroider. Press the reverse button and start to the back until it to embroider. The warning will then disappear. The...
...in the window instead of a color number, to indicate a stop in the design. Cut the thread When you have sewn a few stitches your Pfaff creative 2124 stops and flashes with the arrow flashing, you to cut the thread, press the reverse button again, and the machine will continue ... cut symbol (A), telling you should raise the presser foot to embroider. Appliqué and cutwork stop When embroidering an appliqué embroidery or a cutwork embroidery, you to embroider. Press the reverse button and start to the back until it to embroider. The warning will then disappear. The...
Owner's Manual
Page 51
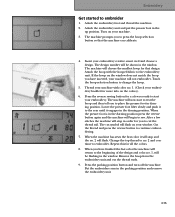
...to place the presser foot in the window. Insert your machine. 3. If the hoop on your embroidery creative smart card and choose a design. When you to cut the thread tail. Attach the embroidery foot and thread the machine. 2. The design number will flash. Lower the presser foot... and the no . 1, will flash on the colors). 6. Touch the hoop selection button to embroider 1. The cut the thread ends. 9. Embroidery Get started to change the hoop. 5. Cut the thread and press the reverse button to no . 1. (Check your window. When the presser foot ...
...to place the presser foot in the window. Insert your machine. 3. If the hoop on your embroidery creative smart card and choose a design. When you to cut the thread tail. Attach the embroidery foot and thread the machine. 2. The design number will flash. Lower the presser foot... and the no . 1, will flash on the colors). 6. Touch the hoop selection button to embroider 1. The cut the thread ends. 9. Embroidery Get started to change the hoop. 5. Cut the thread and press the reverse button to no . 1. (Check your window. When the presser foot ...


