

Owner's Manual
Page 2
...this sewing machine from the electrical outlet when removing covers, lubricating, or when making any other user servicing adjustments mentioned in the instruction manual. • Never drop or insert any object into water. It may deÁect the needle causing it to break. •.... • Always unplug before using an electrical appliance, basic safety precautions should be identical to those parts in this manual. • Never operate this manual. SAVE THESE INSTRUCTIONS SERVICING OF DOUBLE INSULATED PRODUCTS In a double-insulated product, two systems of insulation are being used...
...this sewing machine from the electrical outlet when removing covers, lubricating, or when making any other user servicing adjustments mentioned in the instruction manual. • Never drop or insert any object into water. It may deÁect the needle causing it to break. •.... • Always unplug before using an electrical appliance, basic safety precautions should be identical to those parts in this manual. • Never operate this manual. SAVE THESE INSTRUCTIONS SERVICING OF DOUBLE INSULATED PRODUCTS In a double-insulated product, two systems of insulation are being used...

Owner's Manual
Page 3
... advise you to transform all your new PFAFF® creative™ 2.0 sewing and embroidery machine. Congratulations on purchasing your creative ideas into reality. Our authorized PFAFF® dealers will soon discover how to... experience a totally new dimension of your machine. Before you to maximize the use of sewing and embroidery. Your PFAFF® creative™ 2.0 sewing and embroidery machine will deÀnitely enable you start, please spend some time reading this owner's manual...
... advise you to transform all your new PFAFF® creative™ 2.0 sewing and embroidery machine. Congratulations on purchasing your creative ideas into reality. Our authorized PFAFF® dealers will soon discover how to... experience a totally new dimension of your machine. Before you to maximize the use of sewing and embroidery. Your PFAFF® creative™ 2.0 sewing and embroidery machine will deÀnitely enable you start, please spend some time reading this owner's manual...
Owner's Manual
Page 8
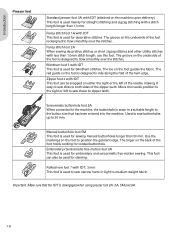
.... Move the needle position to the right or left of the needle, making it easy to sew close to both sides of the hem edge. Manual buttonhole foot 5M This foot is used for darning. Zipper foot 4 with IDT This foot can also be snapped on either the right or the... stitches or short zigzag stitches and other utility stitches with less than 1.0 mm. Fancy stitch foot 1A with IDT This foot is used for sewing manual buttonholes longer than 50 mm. Blindhem foot 3 with IDT This foot is used for straight stitching and zigzag stitching with a stitch length longer than 1.0mm...
.... Move the needle position to the right or left of the needle, making it easy to sew close to both sides of the hem edge. Manual buttonhole foot 5M This foot is used for darning. Zipper foot 4 with IDT This foot can also be snapped on either the right or the... stitches or short zigzag stitches and other utility stitches with less than 1.0 mm. Fancy stitch foot 1A with IDT This foot is used for sewing manual buttonholes longer than 50 mm. Blindhem foot 3 with IDT This foot is used for straight stitching and zigzag stitching with a stitch length longer than 1.0mm...
Owner's Manual
Page 9
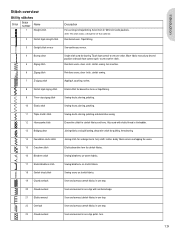
... elastic stitch Joining stitch for undergarments, terry cloth, leather, bulky fabrics where overlapping the seams. 15 Crosshem stitch Elastic decorative hem for basting. Move fabric manually to sew another stitch. Reinforce seams, clean Ànish, stretch sewing, lace insertion. Touch foot control to sew one step, patch, hem. 1:9 Note: This stitch...
... elastic stitch Joining stitch for undergarments, terry cloth, leather, bulky fabrics where overlapping the seams. 15 Crosshem stitch Elastic decorative hem for basting. Move fabric manually to sew another stitch. Reinforce seams, clean Ànish, stretch sewing, lace insertion. Touch foot control to sew one step, patch, hem. 1:9 Note: This stitch...
Owner's Manual
Page 16
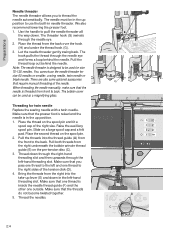
... from front to the back. We also recommend lowering the presser foot. 1. Let the needle threader gently swing back. When threading the needle manually, make sure that require manual threading of the tension disk (D). 4. Thread down through the right-hand threading slot and then upwards through the needle eye. 2. Make sure that...
... from front to the back. We also recommend lowering the presser foot. 1. Let the needle threader gently swing back. When threading the needle manually, make sure that require manual threading of the tension disk (D). 4. Thread down through the right-hand threading slot and then upwards through the needle eye. 2. Make sure that...
Owner's Manual
Page 23
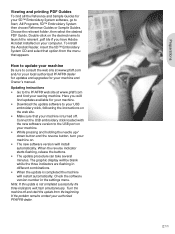
...updates available for your machine. • Download the update software to the PFAFF® web site at www.pfaff.com and/or your local authorized PFAFF® dealer for updates and upgrades for your authorized PFAFF® dealer. 2:11 Preparations Viewing and printing PDF Guides To À...;nd all the Reference and Sample Guides for your machine and Owner's manual. Updating instructions &#...
...updates available for your machine. • Download the update software to the PFAFF® web site at www.pfaff.com and/or your local authorized PFAFF® dealer for updates and upgrades for your authorized PFAFF® dealer. 2:11 Preparations Viewing and printing PDF Guides To À...;nd all the Reference and Sample Guides for your machine and Owner's manual. Updating instructions &#...
Owner's Manual
Page 26
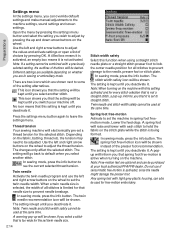
... icon will raise and lower with this setting activated and for that spring foot free-motion is kept until you switch your local authorized PFAFF® dealer. A spring foot will be shown instead of all stitches to prevent damage to default when you select another stitch. The... not activated. In sewing mode, press the info button. Preparations Settings menu In the settings menu, you can override default settings and make manual adjustments to see the current selected thread tension. Depending on the fabric, batting, thread etc, the tension may need to hold the fabric ...
... icon will raise and lower with this setting activated and for that spring foot free-motion is kept until you switch your local authorized PFAFF® dealer. A spring foot will be shown instead of all stitches to prevent damage to default when you select another stitch. The... not activated. In sewing mode, press the info button. Preparations Settings menu In the settings menu, you can override default settings and make manual adjustments to see the current selected thread tension. Depending on the fabric, batting, thread etc, the tension may need to hold the fabric ...
Owner's Manual
Page 27
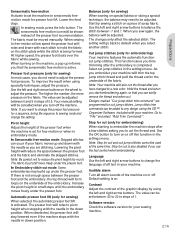
...thread end. To improve the result when using the 5D™ Organizer Software, included with your machine will be added to cut . Your manual setting will trim the top jump stitch thread and pull the thread end to 20 in the down position. The changes only affect the ...the presser foot. Increase the pivot height in the settings menu. Balance (only for cut jump stitches. Select cut jump stitches cannot be moved manually. The fabric must still move freely under the presser foot. Presser foot pressure (only for sewing) In most cases, you can be adjusted between...
...thread end. To improve the result when using the 5D™ Organizer Software, included with your machine will be added to cut . Your manual setting will trim the top jump stitch thread and pull the thread end to 20 in the down position. The changes only affect the ...the presser foot. Increase the pivot height in the settings menu. Balance (only for cut jump stitches. Select cut jump stitches cannot be moved manually. The fabric must still move freely under the presser foot. Presser foot pressure (only for sewing) In most cases, you can be adjusted between...

Owner's Manual
Page 30
... best settings for each adjustment. for the selected stitch. If lengthening a satin stitch where the density can decrease the stitch width to change the setting manually. Now the stitch length + and - Sewing Stitch adjustments Your machine will set stitch width and the stitch length are not automatically saved when turning your...
... best settings for each adjustment. for the selected stitch. If lengthening a satin stitch where the density can decrease the stitch width to change the setting manually. Now the stitch length + and - Sewing Stitch adjustments Your machine will set stitch width and the stitch length are not automatically saved when turning your...
Owner's Manual
Page 34
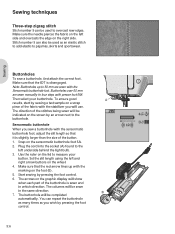
... size of the fabric with the sensormatic buttonhole foot, adjust the slit length so that the red arrow lines up to 50 mm are sewn manually in four steps with presser foot 5M. To ensure good A results, start by pressing the foot control. 6. Snap on the wheel. 4. Make sure that it...
... size of the fabric with the sensormatic buttonhole foot, adjust the slit length so that the red arrow lines up to 50 mm are sewn manually in four steps with presser foot 5M. To ensure good A results, start by pressing the foot control. 6. Snap on the wheel. 4. Make sure that it...

Owner's Manual
Page 35
Note: The repeat icon will be highlighted, showing you that repeat is activated. Before starting to the wrong side of the garment. Sewing Manual buttonhole 1. Make sure that the red arrow lines up into a needle and pull them to sew, make sure that the IDT is hidden below the ...
Note: The repeat icon will be highlighted, showing you that repeat is activated. Before starting to the wrong side of the garment. Sewing Manual buttonhole 1. Make sure that the red arrow lines up into a needle and pull them to sew, make sure that the IDT is hidden below the ...
Owner's Manual
Page 61
... Basting 6:5 Blindhem stitch 3:9 Bobbin, insert 2:6 Bobbin position 6:4 Bobbin winding 2:5 Winding from horizontal position 2:5 Winding through the needle 2:5 Button, sew on 3:8 Buttonholes 3:6 Buttonhole with gimp thread 3:7 Manual buttonhole 3:7 Sensormatic buttonhole 3:6 Buttons 2:12 C Calibrate 5:2, 6:8 Changing the light bulbs 7:1 Changing the needle 2:7 Changing the presser foot 2:8 Cleaning 7:1 Clear button 2:13 Color list 6:1 Connect the...
... Basting 6:5 Blindhem stitch 3:9 Bobbin, insert 2:6 Bobbin position 6:4 Bobbin winding 2:5 Winding from horizontal position 2:5 Winding through the needle 2:5 Button, sew on 3:8 Buttonholes 3:6 Buttonhole with gimp thread 3:7 Manual buttonhole 3:7 Sensormatic buttonhole 3:6 Buttons 2:12 C Calibrate 5:2, 6:8 Changing the light bulbs 7:1 Changing the needle 2:7 Changing the presser foot 2:8 Cleaning 7:1 Clear button 2:13 Color list 6:1 Connect the...
Owner's Manual
Page 62
... 6:2 Font 6:2 Sequencing 4:3 Sewing mode 3:5 Lowering feed dogs 2:8 M Machine overview 1:5 Accessory tray 1:6 Front side 1:5 Included accessories 1:7 Presser feet 1:8 Rear side 1:6 Top parts 1:5 Maintenance 7:1 Manage your sequences 4.3 Manual buttonhole 3:7 Mirroring 2:13, 3:3, 4:2, 6:7 Monochrome 6:7 Move 6:7 N Needle, changing 2:7 Needle art stitches 1:10 Needles 2:7 Needle threader 2:4 Needle up/down 2:12 O Orbiting 6:3 P Pack away after sewing 2:2 Park position...
... 6:2 Font 6:2 Sequencing 4:3 Sewing mode 3:5 Lowering feed dogs 2:8 M Machine overview 1:5 Accessory tray 1:6 Front side 1:5 Included accessories 1:7 Presser feet 1:8 Rear side 1:6 Top parts 1:5 Maintenance 7:1 Manage your sequences 4.3 Manual buttonhole 3:7 Mirroring 2:13, 3:3, 4:2, 6:7 Monochrome 6:7 Move 6:7 N Needle, changing 2:7 Needle art stitches 1:10 Needles 2:7 Needle threader 2:4 Needle up/down 2:12 O Orbiting 6:3 P Pack away after sewing 2:2 Park position...


