
Owner's Manual
Page 2
... bulb in the instruction manual. 17. Do not place or store sewing machine where it can cause the needle to persons: 1. Do not operate where aerosol (sprayl products are colour ed according to the following : Read all moving parts. Keep fingers away from outlet. 9. It may he adjusted by...the air openings may deflect the needle causing itto break. 15. Never operate this sewing machine if it has a damaged cord or plug, if it is not working properly, if it or change mechanical and accessory parts. Do not use the proper needle plate. Always use outdoors, 7. Do not ...
... bulb in the instruction manual. 17. Do not place or store sewing machine where it can cause the needle to persons: 1. Do not operate where aerosol (sprayl products are colour ed according to the following : Read all moving parts. Keep fingers away from outlet. 9. It may he adjusted by...the air openings may deflect the needle causing itto break. 15. Never operate this sewing machine if it has a damaged cord or plug, if it is not working properly, if it or change mechanical and accessory parts. Do not use the proper needle plate. Always use outdoors, 7. Do not ...

Owner's Manual
Page 3
... creative sewing. Straight stitch, zigzag and utility stitch programs and buttonhole pro gram 2 Embroidery stitch program. 3 Programming of embroidery and hand-sewn stitches, and alphabet programs. ydtrwAheoeiselgualnaalnwe,rodrcIhfirnedeTsngaoohte,ueisvvbyseeietwmwrhifipynlaallogsvybhueeipcowfornpuoinsrlbtehdtalh.aeecessmtreigsdyqnounteuoeorrswhtyPieooFalunAnpsdFF To make full use of the numerous tures of the sewing machine I ? 'II 4'.) 39 ) -l -2 - 3 4 - --5 -6 ----7 8 - -9 -- --23 -24 25 26 27 28 29 -30 7 Parts of the machine...
... creative sewing. Straight stitch, zigzag and utility stitch programs and buttonhole pro gram 2 Embroidery stitch program. 3 Programming of embroidery and hand-sewn stitches, and alphabet programs. ydtrwAheoeiselgualnaalnwe,rodrcIhfirnedeTsngaoohte,ueisvvbyseeietwmwrhifipynlaallogsvybhueeipcowfornpuoinsrlbtehdtalh.aeecessmtreigsdyqnounteuoeorrswhtyPieooFalunAnpsdFF To make full use of the numerous tures of the sewing machine I ? 'II 4'.) 39 ) -l -2 - 3 4 - --5 -6 ----7 8 - -9 -- --23 -24 25 26 27 28 29 -30 7 Parts of the machine...
Owner's Manual
Page 22
... backwards. Be sure to the left by a quarter turn with the screwdriver, then turn it up the carrying handle. Other than that, the machine is installed in the sewing hook area with the plus side (+) facing upwards: Place cover B in so that its left side first and press it also snaps in...LR 6 Only use only a 15-watt light bulb in place After changing the batteries, check the contents of operation. 7- Clean the teed dog and the parts in the base. S Tilt the needle plate up at the catches in recesses A and remove cover Take out the batteries. Swing out the work support...
... backwards. Be sure to the left by a quarter turn with the screwdriver, then turn it up the carrying handle. Other than that, the machine is installed in the sewing hook area with the plus side (+) facing upwards: Place cover B in so that its left side first and press it also snaps in...LR 6 Only use only a 15-watt light bulb in place After changing the batteries, check the contents of operation. 7- Clean the teed dog and the parts in the base. S Tilt the needle plate up at the catches in recesses A and remove cover Take out the batteries. Swing out the work support...
Owner's Manual
Page 37
.... 4). Draw up the bobbin thread Hold both threads until it there. F prog 10 13a 23 6 -- When you can place the damaged part of the fabric in serpentine fashion, placing the lines of the fabric, so that it rests against its slot. Tighten screw "D". Feed dog: lowered... Presser bar lifter: in darning position Sewing-cotton: embroidering and darning thread Darning position (Fig. 1): Lower presser bar lifter 'A', at the same time pushing it back slightly until the machine has made a few stitches in hole "C" and insert the toot so that...
.... 4). Draw up the bobbin thread Hold both threads until it there. F prog 10 13a 23 6 -- When you can place the damaged part of the fabric in serpentine fashion, placing the lines of the fabric, so that it rests against its slot. Tighten screw "D". Feed dog: lowered... Presser bar lifter: in darning position Sewing-cotton: embroidering and darning thread Darning position (Fig. 1): Lower presser bar lifter 'A', at the same time pushing it back slightly until the machine has made a few stitches in hole "C" and insert the toot so that...
Owner's Manual
Page 67
... • Select the following programs 1 x 84 2 x 00 EVA 2 x 00 1 x 84 • and enter them in the computer by pressing the same key again. Before sewing, mark the beginning of the text again. cut the joining threads between let ters, figures and spacings (Fig. 1). If you wish to check the text... can be sewn in different sizes The maximum character height is then begin with each part of the text The machine will then run through in the computer It can be stopped by pressing key 48 each line. Sewing texts If you wish to divide a text into several lines, select a tree M-rnemory ...
... • Select the following programs 1 x 84 2 x 00 EVA 2 x 00 1 x 84 • and enter them in the computer by pressing the same key again. Before sewing, mark the beginning of the text again. cut the joining threads between let ters, figures and spacings (Fig. 1). If you wish to check the text... can be sewn in different sizes The maximum character height is then begin with each part of the text The machine will then run through in the computer It can be stopped by pressing key 48 each line. Sewing texts If you wish to divide a text into several lines, select a tree M-rnemory ...

Owner's Manual
Page 79
... to 161. d) The drive belt must be connected to clean it, oil it or change mechanical and accessory parts. contents on pages 159 to use only a 15-watt light bulb in the sewing lamp. Some safety rules valid for United Kingdom only The wires in the mains lead are colour ed according... may not correspond with the colour coding of the terminals in your fingers by anyone but an authori zed Pfaff agent. b) Make sure you unplug the power cord whenever you have to leave the machine or want to the terminal which is coloured brown must never be adjusted by the needle during...
... to 161. d) The drive belt must be connected to clean it, oil it or change mechanical and accessory parts. contents on pages 159 to use only a 15-watt light bulb in the sewing lamp. Some safety rules valid for United Kingdom only The wires in the mains lead are colour ed according... may not correspond with the colour coding of the terminals in your fingers by anyone but an authori zed Pfaff agent. b) Make sure you unplug the power cord whenever you have to leave the machine or want to the terminal which is coloured brown must never be adjusted by the needle during...
Owner's Manual
Page 80
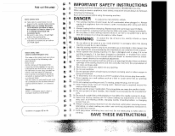
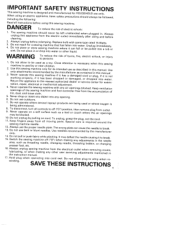
...disconnect, turn all moving parts. air openings 10. 11. required around the 12. 13. When using an electric appliance, including the following: basic safety precautions should never be followed, Read all instructions before 2. 3. 4. The sewing unplug this sewing 2. 3. Close machine is used by the ...the to break. Do not use the proper needle plate. The wrong bent or blunt needles. IMPORTANT SAFETY INSTRUCTIONS This sewing machine is sewing machine needle. Do not unplug by pulling on a soft surface may be used or where oxygen is necessary when this ...
...disconnect, turn all moving parts. air openings 10. 11. required around the 12. 13. When using an electric appliance, including the following: basic safety precautions should never be followed, Read all instructions before 2. 3. 4. The sewing unplug this sewing 2. 3. Close machine is used by the ...the to break. Do not use the proper needle plate. The wrong bent or blunt needles. IMPORTANT SAFETY INSTRUCTIONS This sewing machine is sewing machine needle. Do not unplug by pulling on a soft surface may be used or where oxygen is necessary when this ...
Owner's Manual
Page 82
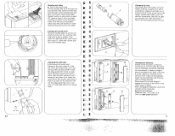
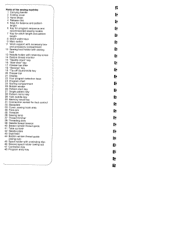
Parts of the sewing machine 1 Carrying handle 2 Folding cover 3 Hand wheel 4 Release disc 5 Keys for balance and pattern length 6 Key for program sequence and recommended sewing modes 7 Key for stitch length and pattern length 8 Stitch width keys 9 Main switch 11 Work support with accessory box and accessory compartment 12 Sewing foot holder with sewing...30 Memory recall key 31 Connection socket for foot control 32 Baseplate 33 Cover, sewing hook area 34 Free arm 35 Threader 36 Sewing lamp 37 Thread trimmer 38 Threading slots 39 Needle thread tension 40 Bobbin winder ...
Parts of the sewing machine 1 Carrying handle 2 Folding cover 3 Hand wheel 4 Release disc 5 Keys for balance and pattern length 6 Key for program sequence and recommended sewing modes 7 Key for stitch length and pattern length 8 Stitch width keys 9 Main switch 11 Work support with accessory box and accessory compartment 12 Sewing foot holder with sewing...30 Memory recall key 31 Connection socket for foot control 32 Baseplate 33 Cover, sewing hook area 34 Free arm 35 Threader 36 Sewing lamp 37 Thread trimmer 38 Threading slots 39 Needle thread tension 40 Bobbin winder ...

Owner's Manual
Page 123
...right side firmly down the lamp housing and hold it F also snaps in. Swing out the work support to the I new bulb so that , the machine is main F tenance-free and must not be oiled. Insert the edge guide into cutout D, push I • Disconnect the mains plug. I F I... I -I Changing the light bulb: I down until the retai ning hook snaps in the sewing lamp. Clean the feed dog and the parts in the illustration, every 15 to use only a 15-watt light bulb in audibly. Apply a drop of oil in the hook E ...
...right side firmly down the lamp housing and hold it F also snaps in. Swing out the work support to the I new bulb so that , the machine is main F tenance-free and must not be oiled. Insert the edge guide into cutout D, push I • Disconnect the mains plug. I F I... I -I Changing the light bulb: I down until the retai ning hook snaps in the sewing lamp. Clean the feed dog and the parts in the illustration, every 15 to use only a 15-watt light bulb in audibly. Apply a drop of oil in the hook E ...

Owner's Manual
Page 131
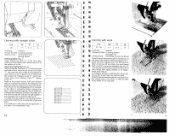
... and cut these through carefully, to avoid damage to the basting direction. Sew one stitch. Basting at 6 mm. Remove the basting thread after sewing. 49 KK ( -3 Ennge foot Stitch-width: 2 mm Needle: 80 Sewing thread: Machine embroider,' thread Basting is a useful method of pat terned materials, insert ...marked lines with basting stitches. In order to the rear. I When all contours with tailoring chalk on a garment, we recommend securing the parts previously with the fringe foot. Set the stitch length at 6 mm stitch length prog Co -- 00 KK -3 GA Stitch length: 6 ...
... and cut these through carefully, to avoid damage to the basting direction. Sew one stitch. Basting at 6 mm. Remove the basting thread after sewing. 49 KK ( -3 Ennge foot Stitch-width: 2 mm Needle: 80 Sewing thread: Machine embroider,' thread Basting is a useful method of pat terned materials, insert ...marked lines with basting stitches. In order to the rear. I When all contours with tailoring chalk on a garment, we recommend securing the parts previously with the fringe foot. Set the stitch length at 6 mm stitch length prog Co -- 00 KK -3 GA Stitch length: 6 ...

Owner's Manual
Page 158
...the damaged part of the fabric in an embroidery hoop. 74 F: F: F: F: F: F: F: I I Darning with straight stitch prog 006 reed dog: lowered Dresser bar lifter: in hole 'C" and insert the foot so that it there. Release clamp "E", which you move the fabric back and forth. First sew a few... stitches. Tighten screw 'D". Hold both threads until it back slightly until the machine has made a few stitches in serpentine fashion, placing the lines of its 3top. Insert the...
...the damaged part of the fabric in an embroidery hoop. 74 F: F: F: F: F: F: F: I I Darning with straight stitch prog 006 reed dog: lowered Dresser bar lifter: in hole 'C" and insert the foot so that it there. Release clamp "E", which you move the fabric back and forth. First sew a few... stitches. Tighten screw 'D". Hold both threads until it back slightly until the machine has made a few stitches in serpentine fashion, placing the lines of its 3top. Insert the...

Owner's Manual
Page 226
...have missed out a letter or figure or entered a wrong one vi-memory after each part of stitch E width key 8 (Fig. 2). The text will stop after the other with embroidery stitches he fabric. \fter sewing, cut the joining threads between let ers, figures and spacings (Fig. 1). F Programming... programs 1 x 84 2 x 00 E V A - - 2 x 00 Letters and figures in different sizes 1 x 84 • and enter them in different sizes. The machine will then run -through in the memory. The maximum character height is 9 mm. Before the first entry of the text again. It can be stopped...
...have missed out a letter or figure or entered a wrong one vi-memory after each part of stitch E width key 8 (Fig. 2). The text will stop after the other with embroidery stitches he fabric. \fter sewing, cut the joining threads between let ers, figures and spacings (Fig. 1). F Programming... programs 1 x 84 2 x 00 E V A - - 2 x 00 Letters and figures in different sizes 1 x 84 • and enter them in different sizes. The machine will then run -through in the memory. The maximum character height is 9 mm. Before the first entry of the text again. It can be stopped...


