
Owner's Manual
Page 2
... by a person responsible for their safety. • Children should be left unattended when plugged in. Special care is not intended for use by persons (including children) with reduced physical, sensory or mental capabilities, or lack of experience and knowledge, unless they have been given... supervision or instruction concerning use of burns, Àre, electric shock, or injury to persons: • This sewing machine is required around the sewing machine needle ...
... by a person responsible for their safety. • Children should be left unattended when plugged in. Special care is not intended for use by persons (including children) with reduced physical, sensory or mental capabilities, or lack of experience and knowledge, unless they have been given... supervision or instruction concerning use of burns, Àre, electric shock, or injury to persons: • This sewing machine is required around the sewing machine needle ...

Owner's Manual
Page 5
... including four legs and push pin (not pictured). Screwdriver 3. Tweezers 9. Two needles, size #14/90, are contained in the accessory box. 1. The push pin is used in the small holes in the table to the illustrations provided with the table. 28.Moveable upper cutter 29.Stitch Ànger lever 30.Stationary...
... including four legs and push pin (not pictured). Screwdriver 3. Tweezers 9. Two needles, size #14/90, are contained in the accessory box. 1. The push pin is used in the small holes in the table to the illustrations provided with the table. 28.Moveable upper cutter 29.Stitch Ànger lever 30.Stationary...

Owner's Manual
Page 6
...Elastic Foot guides and stretches narrow elastic (¼-½", 6-12mm) as you can cause discoloration on other elastic insertion techniques. The hem is used on this machine are available at your overlock machine. You can also create your own piping for active wear, lingerie and other fabric but ...also on your PFAFF® dealer. It is perfect for sewing invisible hems and for stabilizing shoulder seams. With this foot you sew it before sewing to ...
...Elastic Foot guides and stretches narrow elastic (¼-½", 6-12mm) as you can cause discoloration on other elastic insertion techniques. The hem is used on this machine are available at your overlock machine. You can also create your own piping for active wear, lingerie and other fabric but ...also on your PFAFF® dealer. It is perfect for sewing invisible hems and for stabilizing shoulder seams. With this foot you sew it before sewing to ...
Owner's Manual
Page 7
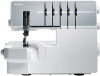
... foot control to adjust the sewing speed. If it clicks into the electric outlet. • Push the power switch to "1" to turn off the machine. coverlock 3.0 german design ATD C B A Preparations 7 SpeciÀcations vary from sewing, even if the foot control is already threaded, straighten the threads to prevent...Insert the spool stand then push to right as indicated on the spool pin. Connecting the foot control and the power supply Foot control to use with this plug is intended to Àt in a polarized outlet only way. To reduce the risk of the foot control is the ...
... foot control to adjust the sewing speed. If it clicks into the electric outlet. • Push the power switch to "1" to turn off the machine. coverlock 3.0 german design ATD C B A Preparations 7 SpeciÀcations vary from sewing, even if the foot control is already threaded, straighten the threads to prevent...Insert the spool stand then push to right as indicated on the spool pin. Connecting the foot control and the power supply Foot control to use with this plug is intended to Àt in a polarized outlet only way. To reduce the risk of the foot control is the ...
Owner's Manual
Page 9
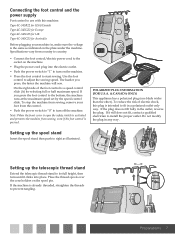
... B E D A. Note: When inserting needles into the A and/or B needle clamps it will go. • Securely tighten the needle clamp screw using the allen key. Overlock right needle C. Coverstitch middle needle E. Coverstitch right needle german design A BB A BB Preparations 9 Changing the needles Turn off the ... supplied with the allen key while you until the needles are holding the needles. Overlock left needle D. Needle information This overlock uses a Áat shank industrial needle that eliminates the possibility of any size or type in this may cause the needle clamp to...
... B E D A. Note: When inserting needles into the A and/or B needle clamps it will go. • Securely tighten the needle clamp screw using the allen key. Overlock right needle C. Coverstitch middle needle E. Coverstitch right needle german design A BB A BB Preparations 9 Changing the needles Turn off the ... supplied with the allen key while you until the needles are holding the needles. Overlock left needle D. Needle information This overlock uses a Áat shank industrial needle that eliminates the possibility of any size or type in this may cause the needle clamp to...

Owner's Manual
Page 10
... the 2-thread converter to insert the sharp edge (A) of the converter in the eye (B) of the upper looper. Before sewing, the 2-thread converter must be used. • Lift the hook (1) to the right and back until position A is visible from the front. Upper looper Disengaging For coverstitch and chaintitch sewing the... towards you until position B is visible from the front. Disengaging Turn off the main power switch and unplug the machine. 2-thread overlock stitches are sewn using one needle B thread and the lower looper thread.
... the 2-thread converter to insert the sharp edge (A) of the converter in the eye (B) of the upper looper. Before sewing, the 2-thread converter must be used. • Lift the hook (1) to the right and back until position A is visible from the front. Upper looper Disengaging For coverstitch and chaintitch sewing the... towards you until position B is visible from the front. Disengaging Turn off the main power switch and unplug the machine. 2-thread overlock stitches are sewn using one needle B thread and the lower looper thread.
Owner's Manual
Page 11
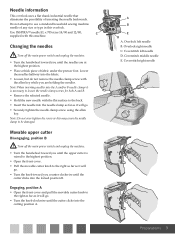
R When moving the stitch Ànger lever, be set to use for quick reference. N R N R General threading information A color coded diagram is threaded to sew a standard overlock. Tie your own threads to these threads and carefully pull ...
R When moving the stitch Ànger lever, be set to use for quick reference. N R N R General threading information A color coded diagram is threaded to sew a standard overlock. Tie your own threads to these threads and carefully pull ...
Owner's Manual
Page 12
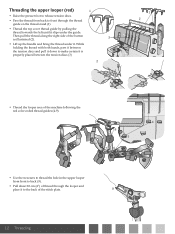
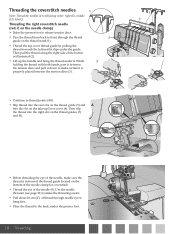
... it is properly placed between the tension discs (3) 2 1 2 • Thread the looper area of the machine following the red color coded thread guides (4-9). 9 4 8 5 76 • Use the tweezers to thread the hole in the upper looper from back to front through the thread guide on the thread stand (1). • Thread the...
... it is properly placed between the tension discs (3) 2 1 2 • Thread the looper area of the machine following the red color coded thread guides (4-9). 9 4 8 5 76 • Use the tweezers to thread the hole in the upper looper from back to front through the thread guide on the thread stand (1). • Thread the...
Owner's Manual
Page 13
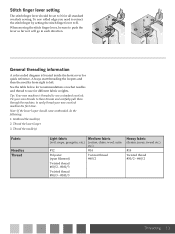
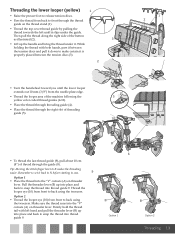
... lever (B) up the handle and bring the thread under the guide. Option 2 • Thread the looper eye (10) from front to back using the tweezers. Firmly hold the thread tail with both hands, pass it between the tension discs and pull it down to make certain it is...guide (8). Remember to set it . Make sure the thread runs into the "V" cutouts (A) on threader lever. Thread the looper eye (10) from front to back using the tweezers. Option 1 • Place the thread into the "V" cutouts (A) on threader lever. Threading the lower looper (yellow) 1 • Raise the presser ...
... lever (B) up the handle and bring the thread under the guide. Option 2 • Thread the looper eye (10) from front to back using the tweezers. Firmly hold the thread tail with both hands, pass it between the tension discs and pull it down to make certain it is...guide (8). Remember to set it . Make sure the thread runs into the "V" cutouts (A) on threader lever. Thread the looper eye (10) from front to back using the tweezers. Option 1 • Place the thread into the "V" cutouts (A) on threader lever. Threading the lower looper (yellow) 1 • Raise the presser ...
Owner's Manual
Page 14
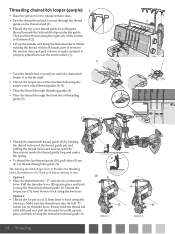
... the thread into the left hand and pull the threader lever (B) up , until it down to snap the thread into place and back to back using the tweezers. Pull the threader lever (B) up the handle and bring the thread under the guide. Tip: Moving the stitch Ànger lever to back... using the tweezers. Option 2 • Thread the looper eye (11) from front to snap the thread into place and back to make certain it . Then pull ...
... the thread into the left hand and pull the threader lever (B) up , until it down to snap the thread into place and back to back using the tweezers. Pull the threader lever (B) up the handle and bring the thread under the guide. Tip: Moving the stitch Ànger lever to back... using the tweezers. Option 2 • Thread the looper eye (11) from front to snap the thread into place and back to make certain it . Then pull ...

Owner's Manual
Page 15
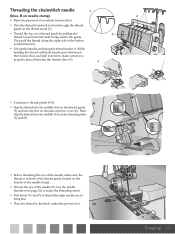
Use the needle threader (see page 21) to make sure the thread is properly placed between the tension discs (3). 2 1 2 • Continue to thread points (4-8). • Slip ...
Use the needle threader (see page 21) to make sure the thread is properly placed between the tension discs (3). 2 1 2 • Continue to thread points (4-8). • Slip ...

Owner's Manual
Page 16
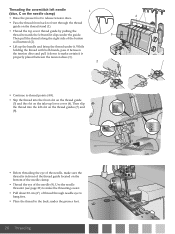
... the thread guide located on the bottom of the needle clamp. • Thread the eye of the button as illustrated (2). • Lift up lever cover (6). Use the needle threader (see page 21) to the back, under the guide. Threading the left until it . Then pull the thread along the right side...
... the thread guide located on the bottom of the needle clamp. • Thread the eye of the button as illustrated (2). • Lift up lever cover (6). Use the needle threader (see page 21) to the back, under the guide. Threading the left until it . Then pull the thread along the right side...
Owner's Manual
Page 17
... the thread from back to front through needle eye to hang free. • Place the thread to the back, under the presser foot. 6 4 5 7 8 9 9 Threading 17 Use the needle threader (see page 21) to make the threading easier. • Pull about 10 cm (4") of the needle, make certain it . Then slip the...
... the thread from back to front through needle eye to hang free. • Place the thread to the back, under the presser foot. 6 4 5 7 8 9 9 Threading 17 Use the needle threader (see page 21) to make the threading easier. • Pull about 10 cm (4") of the needle, make certain it . Then slip the...
Owner's Manual
Page 18
... order: right (E), middle (D), left until it is properly placed between the tension discs and pull it down to make certain it slips under the guide. Use the needle 9 threader (see page 21) to the back, under it. Then pull the thread along the right side of the needle (9). Then slip the...
... order: right (E), middle (D), left until it is properly placed between the tension discs and pull it down to make certain it slips under the guide. Use the needle 9 threader (see page 21) to the back, under it. Then pull the thread along the right side of the needle (9). Then slip the...

Owner's Manual
Page 19
..., D on the needle clamp) • Raise the presser foot to release tension discs. • Pass the thread from back to the back, under the guide. Use the needle threader (see page 21) to make the threading easier. • Pull about 10 cm (4") of thread through needle eye to hang free. •...
..., D on the needle clamp) • Raise the presser foot to release tension discs. • Pass the thread from back to the back, under the guide. Use the needle threader (see page 21) to make the threading easier. • Pull about 10 cm (4") of thread through needle eye to hang free. •...
Owner's Manual
Page 20
Use the needle threader (see page 21) to make the threading easier. • Pull about 10 cm (4") of thread through the thread guide on the thread ...
Use the needle threader (see page 21) to make the threading easier. • Pull about 10 cm (4") of thread through the thread guide on the thread ...
Owner's Manual
Page 21
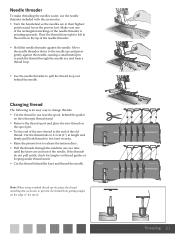
...change threads: • Cut the thread in the notch on thread guides or looping under thread stand. • Cut the thread behind the needle. PFAFF PFAFF Note: When using standard thread spools, place the thread unreeling disc as shown to prevent the thread from right to left in... getting caught on the spool pin. • Tie the end of the new thread to the needle eye and press gently against the needle. coverlock 3.0 german design coverlock 3.0 german design Threading 21 Cut the thread tails to 2-3 cm (1") in length and Àrmly pull both threads to test knot security. &#...
...change threads: • Cut the thread in the notch on thread guides or looping under thread stand. • Cut the thread behind the needle. PFAFF PFAFF Note: When using standard thread spools, place the thread unreeling disc as shown to prevent the thread from right to left in... getting caught on the spool pin. • Tie the end of the new thread to the needle eye and press gently against the needle. coverlock 3.0 german design coverlock 3.0 german design Threading 21 Cut the thread tails to 2-3 cm (1") in length and Àrmly pull both threads to test knot security. &#...
Owner's Manual
Page 22
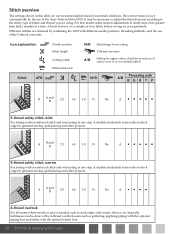
...the optional elastic foot. 22 Stitches & sewing techniques A durable chainstitch seam with different needle positions, threading methods, and the use of the 2-thread converter. Stitch overview The settings shown in one step. Icon explanation: AB C DE Needle position Stitch ...the ATD with overlock edge for garment sewing, quilt piecing and other projects. A durable chainstitch seam with overlock edge for upper cutter, clutch lever and use of cutter cover A or coverstitch table B N/R Threading path A/B BGRY P B A and D 2.5 6.0 1.0 N No A 5-thread safety stitch,...
...the optional elastic foot. 22 Stitches & sewing techniques A durable chainstitch seam with different needle positions, threading methods, and the use of the 2-thread converter. Stitch overview The settings shown in one step. Icon explanation: AB C DE Needle position Stitch ...the ATD with overlock edge for garment sewing, quilt piecing and other projects. A durable chainstitch seam with overlock edge for upper cutter, clutch lever and use of cutter cover A or coverstitch table B N/R Threading path A/B BGRY P B A and D 2.5 6.0 1.0 N No A 5-thread safety stitch,...
Owner's Manual
Page 23
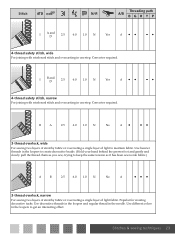
...For joining with reinforced stitch and overcasting in one step. Popular for creating decorative tucks. Use decorative threads in the loopers and regular thread in the loopers to get an interesting effect. Converter required. Use different colors in the needle. Stitch ATD A B C DE N/R Threading path A/B ...8226; •• 3-thread overlock, wide For sewing two layers of stretchy fabric or overcasting a single layer of light fabric. Use heavier threads in the loopers to create decorative braids. (Hold your hand behind the presser foot and gently and slowly pull the thread...
...For joining with reinforced stitch and overcasting in one step. Popular for creating decorative tucks. Use decorative threads in the loopers and regular thread in the loopers to get an interesting effect. Converter required. Use different colors in the needle. Stitch ATD A B C DE N/R Threading path A/B ...8226; •• 3-thread overlock, wide For sewing two layers of stretchy fabric or overcasting a single layer of light fabric. Use heavier threads in the loopers to create decorative braids. (Hold your hand behind the presser foot and gently and slowly pull the thread...
Owner's Manual
Page 24
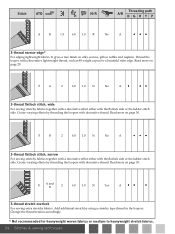
.... F B 2 6.0 1.0 N No A ••• 3-thread Áatlock stitch, narrow For sewing stretchy fabrics together with a decorative effect either with decorative thread. Add additional stretch by using a stretchy type thread in the loopers. Read more on page 30. Read more on page 29. Stitch ATD A B C DE N/R Threading path A/B BGRY P A B 1.5 6.0 1.0 R No A ••...
.... F B 2 6.0 1.0 N No A ••• 3-thread Áatlock stitch, narrow For sewing stretchy fabrics together with a decorative effect either with decorative thread. Add additional stretch by using a stretchy type thread in the loopers. Read more on page 30. Read more on page 29. Stitch ATD A B C DE N/R Threading path A/B BGRY P A B 1.5 6.0 1.0 R No A ••...


