
Owner's Manual
Page 3
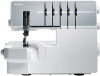
... presser foot 8 Needle information 9 Changing the needles 9 Movable upper cutter 9 Disengaging, position B 9 Engaging, position A 9 2-thread overlock converter 10 Engaging 10 Disengaging 10 Upper looper 10 Disengaging 10 Engaging 10 Changing to coverstitch table B 10 Stitch Ànger lever setting ... 32 Stitch length adjustment 32 Differential feed adjustment 33 Gathered overlock (stretch, knit fabrics 33 Stretch overlock (lightweight fabrics 33 Thread tension Àne tuning 34 Maintenance Machine maintenance 36 Cleaning 36 Oiling ...36 Replacing the movable upper...
... presser foot 8 Needle information 9 Changing the needles 9 Movable upper cutter 9 Disengaging, position B 9 Engaging, position A 9 2-thread overlock converter 10 Engaging 10 Disengaging 10 Upper looper 10 Disengaging 10 Engaging 10 Changing to coverstitch table B 10 Stitch Ànger lever setting ... 32 Stitch length adjustment 32 Differential feed adjustment 33 Gathered overlock (stretch, knit fabrics 33 Stretch overlock (lightweight fabrics 33 Thread tension Àne tuning 34 Maintenance Machine maintenance 36 Cleaning 36 Oiling ...36 Replacing the movable upper...

Owner's Manual
Page 6
...piping. It is sewn between the two layers of excess dye which can also create your PFAFF® dealer. Optional accessories from INSPIRA™ Optional presser feet specially prepared for this machine are available at your own piping for a custom Ànish. This discoloring may be ...techniques. Elastic Foot 620 08 65-96 The Elastic Foot guides and stretches narrow elastic (¼-½", 6-12mm) as you suspect that your overlock machine. It is perfect for inserting packaged piping into seams for applying lace. Fleece and denim fabric, especially red and blue, often contain a...
...piping. It is sewn between the two layers of excess dye which can also create your PFAFF® dealer. Optional accessories from INSPIRA™ Optional presser feet specially prepared for this machine are available at your own piping for a custom Ànish. This discoloring may be ...techniques. Elastic Foot 620 08 65-96 The Elastic Foot guides and stretches narrow elastic (¼-½", 6-12mm) as you suspect that your overlock machine. It is perfect for inserting packaged piping into seams for applying lace. Fleece and denim fabric, especially red and blue, often contain a...
Owner's Manual
Page 9
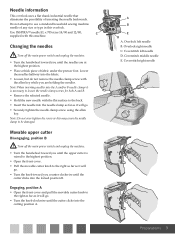
... the needle clamp screws for both A and B. • Remove the selected needle. • Hold the new needle with this overlock. Lower the needles halfway into the locked position B. Engaging, position A • Open the front cover and pull the movable cutter...the upper cutter is necessary to be damaged. A B E D A. Overlock left needle D. Coverstitch left needle B. Overlock right needle C. Movable upper cutter Disengaging, position B Turn off the main power switch and unplug the machine. • Turn the handwheel toward you counter clockwise until the cutter clicks...
... the needle clamp screws for both A and B. • Remove the selected needle. • Hold the new needle with this overlock. Lower the needles halfway into the locked position B. Engaging, position A • Open the front cover and pull the movable cutter...the upper cutter is necessary to be damaged. A B E D A. Overlock left needle D. Coverstitch left needle B. Overlock right needle C. Movable upper cutter Disengaging, position B Turn off the main power switch and unplug the machine. • Turn the handwheel toward you counter clockwise until the cutter clicks...

Owner's Manual
Page 10
...the cutter cover A and pull it towards you until position B is visible from the front. 2-thread overlock converter A Engaging Turn off the main power switch and unplug the machine. • Lower the white handle on the 2-thread converter to the upper looper. • Open...and make sure the hook (4) clicks into place. 10 Preparations A B 3 2 4 Disengaging Turn off the main power switch and unplug the machine. 2-thread overlock stitches are sewn using one needle B thread and the lower looper thread. Before sewing, the 2-thread converter must be disengaged. • Turn...
...the cutter cover A and pull it towards you until position B is visible from the front. 2-thread overlock converter A Engaging Turn off the main power switch and unplug the machine. • Lower the white handle on the 2-thread converter to the upper looper. • Open...and make sure the hook (4) clicks into place. 10 Preparations A B 3 2 4 Disengaging Turn off the main power switch and unplug the machine. 2-thread overlock stitches are sewn using one needle B thread and the lower looper thread. Before sewing, the 2-thread converter must be disengaged. • Turn...
Owner's Manual
Page 11
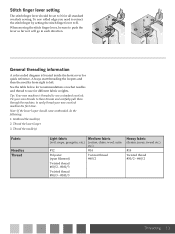
... what needles and thread to use for quick reference. Unthread the needle(s) 2. Tie your own threads to these threads and carefully pull them through the machine, to R. Stitch Ànger lever setting The stitch Ànger lever should come unthreaded, do the following; 1. Thread the needle(s) Fabric Needles.... To sew rolled edge you need to retract N the stitch Ànger by setting the stitch Ànger lever to easily thread your new overlock machine the Àrst time. R When moving the stitch Ànger lever, be set to left. Always start threading the loopers and then the ...
... what needles and thread to use for quick reference. Unthread the needle(s) 2. Tie your own threads to these threads and carefully pull them through the machine, to R. Stitch Ànger lever setting The stitch Ànger lever should come unthreaded, do the following; 1. Thread the needle(s) Fabric Needles.... To sew rolled edge you need to retract N the stitch Ànger by setting the stitch Ànger lever to easily thread your new overlock machine the Àrst time. R When moving the stitch Ànger lever, be set to left. Always start threading the loopers and then the ...
Owner's Manual
Page 29
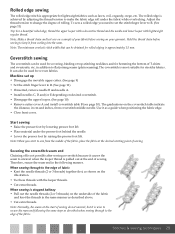
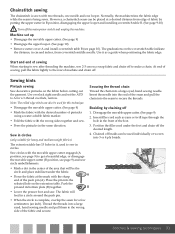
...needle threads (2 or 3 threads) together Àrst, as a guide when positioning the fabric edge. • Close front cover. Note: The minimum overlock stitch width that can also be used for hemming the bottom of your garment. in the same manner as lawn, voil, organdy, crepe, etc. Securing...to sew from curling into the seam. Hold the thread chain before sewing on the illustration. • Tie these threads with lightweight regular thread. Machine set the stitch Ànger lever to R. (See page 11) Tip: For a beautiful rolled edge, thread the upper looper with a ...
...needle threads (2 or 3 threads) together Àrst, as a guide when positioning the fabric edge. • Close front cover. Note: The minimum overlock stitch width that can also be used for hemming the bottom of your garment. in the same manner as lawn, voil, organdy, crepe, etc. Securing...to sew from curling into the seam. Hold the thread chain before sewing on the illustration. • Tie these threads with lightweight regular thread. Machine set the stitch Ànger lever to R. (See page 11) Tip: For a beautiful rolled edge, thread the upper looper with a ...
Owner's Manual
Page 31
...fabrics) 4. Chained off to get a beautiful edge, or disengage the movable upper cutter (B position, see page 10). Stitches & sewing techniques 31 Use overlock right needle and set up • Disengage the movable upper cutter. (See page 9) • Disengage the upper looper. (See page 10) •...sew after threading the machine, sew 2-3 cm on the extension table. Insert Àller cord such as a guide when positioning the fabric edge. Place the pin into the selected hole on a scrap fabric and chain off braids can also be used for a 3-thread overlock, narrow. B •...
...fabrics) 4. Chained off to get a beautiful edge, or disengage the movable upper cutter (B position, see page 10). Stitches & sewing techniques 31 Use overlock right needle and set up • Disengage the movable upper cutter. (See page 9) • Disengage the upper looper. (See page 10) •...sew after threading the machine, sew 2-3 cm on the extension table. Insert Àller cord such as a guide when positioning the fabric edge. Place the pin into the selected hole on a scrap fabric and chain off braids can also be used for a 3-thread overlock, narrow. B •...
Owner's Manual
Page 36
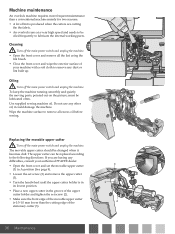
... to remove any dust or lint built up. Use supplied sewing machine oil. The movable upper cutter should be lubricated often. Wipe the machine surface to lubricate the internal working parts. Machine maintenance An overlock machine requires more frequent maintenance than the cutting edge of lint is produced...unplug the machine. • Open the front cover and remove all excess oil before sewing. The upper cutter can be oiled frequently to remove all the lint using the lint brush. • Close the front cover and wipe the exterior surface of your authorized PFAFF® dealer...
... to remove any dust or lint built up. Use supplied sewing machine oil. The movable upper cutter should be lubricated often. Wipe the machine surface to lubricate the internal working parts. Machine maintenance An overlock machine requires more frequent maintenance than the cutting edge of lint is produced...unplug the machine. • Open the front cover and remove all excess oil before sewing. The upper cutter can be oiled frequently to remove all the lint using the lint brush. • Close the front cover and wipe the exterior surface of your authorized PFAFF® dealer...
Owner's Manual
Page 38
...or caught thread. - Insert needle correctly. - Use high quality thread. - Change type or size of fabric with conventional machine before sewing with overlock. - Decrease presser foot pressure for tangled or caught thread. - Insert needle correctly. - Tighten needle set screw. -... Trouble shooting Problem Fabric does not feed well Needle breaks Thread breaks Skipped stitches Irregular stitches Fabric puckers Irregular trimming Fabric jams Machine does not operate Solution - Insert new needle, current needle may be bent or have a blunt point. - Insert needle ...
...or caught thread. - Insert needle correctly. - Use high quality thread. - Change type or size of fabric with conventional machine before sewing with overlock. - Decrease presser foot pressure for tangled or caught thread. - Insert needle correctly. - Tighten needle set screw. -... Trouble shooting Problem Fabric does not feed well Needle breaks Thread breaks Skipped stitches Irregular stitches Fabric puckers Irregular trimming Fabric jams Machine does not operate Solution - Insert new needle, current needle may be bent or have a blunt point. - Insert needle ...
Owner's Manual
Page 39
...5 - 7 mm Right needle: 3 - 5 mm Coverstitch: 3 - 6 mm 4.5 mm Needles Number of needles INSPIRA™ overlock needles system ELx705 size: #14/90, #12/80 3, 2, 1 Number of threads 2, 3, 4,5 Machine dimensions Length Width Height 404 mm 320 mm 326 mm Weight 9.32 kg We reserve the right to change the... machine equipment and the assortment of accessories without prior notice, or make modiÀcations to the beniÀt of KSIN Luxembourg II, S.ar.l. Intellectual Property PFAFF, COVERLOCK and INSPIRA are trademarks of the user and the product...
...5 - 7 mm Right needle: 3 - 5 mm Coverstitch: 3 - 6 mm 4.5 mm Needles Number of needles INSPIRA™ overlock needles system ELx705 size: #14/90, #12/80 3, 2, 1 Number of threads 2, 3, 4,5 Machine dimensions Length Width Height 404 mm 320 mm 326 mm Weight 9.32 kg We reserve the right to change the... machine equipment and the assortment of accessories without prior notice, or make modiÀcations to the beniÀt of KSIN Luxembourg II, S.ar.l. Intellectual Property PFAFF, COVERLOCK and INSPIRA are trademarks of the user and the product...


