
Owner's Manual
Page 2
... should be supervised to ensure that they have been given supervision or instruction concerning use of electric shock: • A sewing machine should always be left unattended when plugged in the instruction manual. • Never drop or insert any other user servicing ...play with IEC/EN 60335-2-28 and UL1594 IMPORTANT SAFETY INSTRUCTIONS When using this household sewing machine. This household sewing machine is designed to comply with the sewing machine. • Use this sewing machine only for its intended use as threading needle, changing needle, or changing presser foot,...
... should be supervised to ensure that they have been given supervision or instruction concerning use of electric shock: • A sewing machine should always be left unattended when plugged in the instruction manual. • Never drop or insert any other user servicing ...play with IEC/EN 60335-2-28 and UL1594 IMPORTANT SAFETY INSTRUCTIONS When using this household sewing machine. This household sewing machine is designed to comply with the sewing machine. • Use this sewing machine only for its intended use as threading needle, changing needle, or changing presser foot,...

Owner's Manual
Page 3
...threader 21 Changing thread 21 Stitches & Sewing techniques Stitch overview 22 Start sewing 28 Pin placement 28 Chain off 28 Rolled edge sewing 29 Coverstitch sewing 29 Machine set up 29 Start sewing 29 Securing the coverstitch seam end 29 Flatlock sewing 30 Standard Áatlock stitch 30 Ornamental... Áatlock stitch 30 Ladder stitch 30 Chainstitch sewing 31 Machine set up 31 Start and end of sewing 31 Sewing hints 31 Pintuck sewing 31 Sew in circles 31 Securing the thread chain 31 Braiding by chaining off 31 Stitch ...
...threader 21 Changing thread 21 Stitches & Sewing techniques Stitch overview 22 Start sewing 28 Pin placement 28 Chain off 28 Rolled edge sewing 29 Coverstitch sewing 29 Machine set up 29 Start sewing 29 Securing the coverstitch seam end 29 Flatlock sewing 30 Standard Áatlock stitch 30 Ornamental... Áatlock stitch 30 Ladder stitch 30 Chainstitch sewing 31 Machine set up 31 Start and end of sewing 31 Sewing hints 31 Pintuck sewing 31 Sew in circles 31 Securing the thread chain 31 Braiding by chaining off 31 Stitch ...

Owner's Manual
Page 5
....2-thread converter 35.Upper looper clutch 36.Chain/coverstitch thread guide 31 33 29 30 32 34 28 36 35 Accessories Accessories are in the machine on delivery. 1 23 4 9 10 13 5 6 7 8 11 12 14 Introduction 5 Thread unreeling discs (5) 5. Coverstitch table B (for the movable upper cutter) 4. Knife blade (...in the small holes in the table to the illustrations provided with the table. Two needles, size #14/90, are contained in place when sewing circles (see page 31). 16.Needle pack (not pictured) system ELx705 including three needles, size #14/90 and two needles, size #12/...
....2-thread converter 35.Upper looper clutch 36.Chain/coverstitch thread guide 31 33 29 30 32 34 28 36 35 Accessories Accessories are in the machine on delivery. 1 23 4 9 10 13 5 6 7 8 11 12 14 Introduction 5 Thread unreeling discs (5) 5. Coverstitch table B (for the movable upper cutter) 4. Knife blade (...in the small holes in the table to the illustrations provided with the table. Two needles, size #14/90, are contained in place when sewing circles (see page 31). 16.Needle pack (not pictured) system ELx705 including three needles, size #14/90 and two needles, size #12/...

Owner's Manual
Page 6
...pearls through a channel on the foot for easy application on this machine are available at your overlock machine. The Piping Foot makes it before sewing to insert piping into seams and on your PFAFF® dealer. Optional accessories from INSPIRA™ Optional presser feet ...specially prepared for this machine allows easy removal and replacement. Some fabrics have a ...
...pearls through a channel on the foot for easy application on this machine are available at your overlock machine. The Piping Foot makes it before sewing to insert piping into seams and on your PFAFF® dealer. Optional accessories from INSPIRA™ Optional presser feet ...specially prepared for this machine allows easy removal and replacement. Some fabrics have a ...
Owner's Manual
Page 7
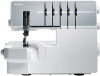
...345G22 for Europe Type 4C-345G25 for UK Type 4C-345G23 for selecting full or half maximum speed. If you press, the faster the machine will sew. A POLARIZED PLUG INFORMATION (FOR U.S.A. & CANADA ONLY) This appliance has a polarized plug (one blade wider than the other). Setting up... install the proper outlet. coverlock 3.0 german design ATD C B A Preparations 7 Use the foot control to turn off the machine. Setting up the spool stand Insert the spool stand then push to right as indicated on the machine. • Press the foot control to start sewing. If it clicks into...
...345G22 for Europe Type 4C-345G25 for UK Type 4C-345G23 for selecting full or half maximum speed. If you press, the faster the machine will sew. A POLARIZED PLUG INFORMATION (FOR U.S.A. & CANADA ONLY) This appliance has a polarized plug (one blade wider than the other). Setting up... install the proper outlet. coverlock 3.0 german design ATD C B A Preparations 7 Use the foot control to turn off the machine. Setting up the spool stand Insert the spool stand then push to right as indicated on the machine. • Press the foot control to start sewing. If it clicks into...
Owner's Manual
Page 8
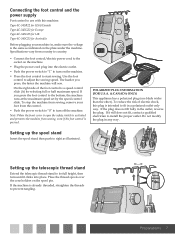
...are at the back of the presser foot ankle and the foot will snap into the bag while sewing. Lower the presser foot. Front cover Open First push the cover to the right as far as...Insert the U-shaped hooks of the waste tray onto the two suction cups on the back of the machine. Push the red button on the underside of the ankle while in the extra lift position. Pressing down... foot to the extra lift position and the foot will not sew if the front cover is nearly aligned with the pin right underneath the groove of the machine. Changing the presser foot Turn off . • Place the...
...are at the back of the presser foot ankle and the foot will snap into the bag while sewing. Lower the presser foot. Front cover Open First push the cover to the right as far as...Insert the U-shaped hooks of the waste tray onto the two suction cups on the back of the machine. Push the red button on the underside of the ankle while in the extra lift position. Pressing down... foot to the extra lift position and the foot will not sew if the front cover is nearly aligned with the pin right underneath the groove of the machine. Changing the presser foot Turn off . • Place the...
Owner's Manual
Page 9
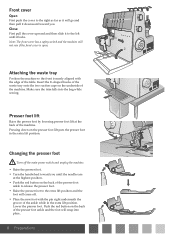
...8226; Place a thick piece of inserting the needle backwards. Overlock right needle C. Changing the needles Turn off the main power switch and unplug the machine. • Turn the handwheel toward you counter clockwise until the needles are holding the needles. Note: When inserting needles into the locked position B....8226; Securely tighten the needle clamp screw using the allen key. Coverstitch left needle B. Do not attempt to use a standard household sewing machine needle of any size or type in this may cause the needle clamp to the back. • Insert the needle into the fabric...
...8226; Place a thick piece of inserting the needle backwards. Overlock right needle C. Changing the needles Turn off the main power switch and unplug the machine. • Turn the handwheel toward you counter clockwise until the needles are holding the needles. Note: When inserting needles into the locked position B....8226; Securely tighten the needle clamp screw using the allen key. Coverstitch left needle B. Do not attempt to use a standard household sewing machine needle of any size or type in this may cause the needle clamp to the back. • Insert the needle into the fabric...

Owner's Manual
Page 10
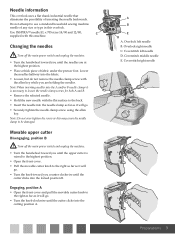
... 3 2 4 Disengaging Turn off the main power switch and unplug the machine. 2-thread overlock stitches are sewn using one needle B thread and the lower looper thread. Upper looper Disengaging For coverstitch and chaintitch sewing the upper looper needs to be disengaged. • Turn the handwheel until... you until position B is visible from the eye (B) of the upper looper. Changing to coverstitch table B 1 For coverstitch and chainstitch sewing the coverstitch table B should be attached to the upper looper. • Open the front cover. • Raise the white handle on...
... 3 2 4 Disengaging Turn off the main power switch and unplug the machine. 2-thread overlock stitches are sewn using one needle B thread and the lower looper thread. Upper looper Disengaging For coverstitch and chaintitch sewing the upper looper needs to be disengaged. • Turn the handwheel until... you until position B is visible from the eye (B) of the upper looper. Changing to coverstitch table B 1 For coverstitch and chainstitch sewing the coverstitch table B should be attached to the upper looper. • Open the front cover. • Raise the white handle on...
Owner's Manual
Page 11
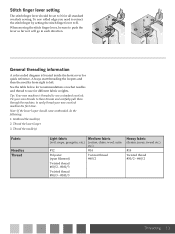
... each direction. N R N R General threading information A color coded diagram is threaded to sew a standard overlock. Always start threading the loopers and then the needles from right to easily thread your own threads to these threads and carefully pull them through the machine, to left. See the table below for recommendations on what needles...
... each direction. N R N R General threading information A color coded diagram is threaded to sew a standard overlock. Always start threading the loopers and then the needles from right to easily thread your own threads to these threads and carefully pull them through the machine, to left. See the table below for recommendations on what needles...
Owner's Manual
Page 13
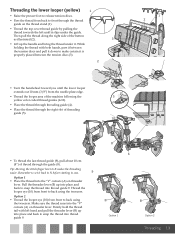
Tip: Moving the stitch Ànger lever to sew. Remember to set it back to N before starting to R makes the threading easier. Thread the looper eye (10) from front to back using the tweezers. ... holding the thread with left until the lower looper extends out 10 mm (3/8") from the needle plate edge. • Thread the looper area of the machine following the yellow color coded thread guides (4-10). • Place the thread through threading guide (4). • Place the thread through the right slot of threading...
Tip: Moving the stitch Ànger lever to sew. Remember to set it back to N before starting to R makes the threading easier. Thread the looper eye (10) from front to back using the tweezers. ... holding the thread with left until the lower looper extends out 10 mm (3/8") from the needle plate edge. • Thread the looper area of the machine following the yellow color coded thread guides (4-10). • Place the thread through threading guide (4). • Place the thread through the right slot of threading...
Owner's Manual
Page 14
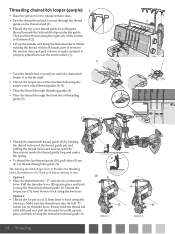
... guide pin and pulling the thread backward and up, until the chainstitch looper is at the far right. • Thread the looper area of the machine following the purple color coded thread guides (4-11). • Place the thread through threading guide (4). • Place the thread through the guide (9)....tension discs and pull it down to snap the thread into the "V" cutouts (A) on threader lever. Thread the looper eye (11) from front to sew. Firmly hold the thread tail with both hands, pass it between the tension discs (3). 2 • Turn the handwheel toward you until the thread ...
... guide pin and pulling the thread backward and up, until the chainstitch looper is at the far right. • Thread the looper area of the machine following the purple color coded thread guides (4-11). • Place the thread through threading guide (4). • Place the thread through the guide (9)....tension discs and pull it down to snap the thread into the "V" cutouts (A) on threader lever. Thread the looper eye (11) from front to sew. Firmly hold the thread tail with both hands, pass it between the tension discs (3). 2 • Turn the handwheel toward you until the thread ...
Owner's Manual
Page 28
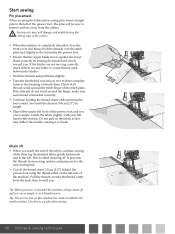
... the thread cutter on the left side of the presser foot and sew a test sample. Do not pull on this may deÁect the needle, causing it to the left hand while sewing. Tip: When you have re-threaded the machine, always chain off the thread chain 2-5 cm (1-2") behind the presser ... backwards and to the left. It prevents the threads from coming undone and prepares for the next sewing task. • Cut off and test sew a sample to start making a thread chain. Use this as this machine has marks to remove and are any fabric or waste thread stuck between the blades. • ...
... the thread cutter on the left side of the presser foot and sew a test sample. Do not pull on this may deÁect the needle, causing it to the left hand while sewing. Tip: When you have re-threaded the machine, always chain off the thread chain 2-5 cm (1-2") behind the presser ... backwards and to the left. It prevents the threads from coming undone and prepares for the next sewing task. • Cut off and test sew a sample to start making a thread chain. Use this as this machine has marks to remove and are any fabric or waste thread stuck between the blades. • ...
Owner's Manual
Page 29
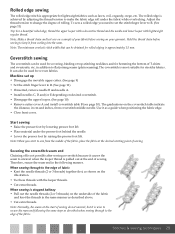
... thread the upper looper with a decorative thread and the needle and lower looper with the looper threads. • Cut extra threads. Stitches & sewing techniques 29 It can be used for covering, binding or top-stitching necklines and for lightweight fabrics such as described above. • Cut extra threads.... Machine set the stitch Ànger lever to Áat the end of rolling. Therefore, secure the seam end in the same manner as...
... thread the upper looper with a decorative thread and the needle and lower looper with the looper threads. • Cut extra threads. Stitches & sewing techniques 29 It can be used for covering, binding or top-stitching necklines and for lightweight fabrics such as described above. • Cut extra threads.... Machine set the stitch Ànger lever to Áat the end of rolling. Therefore, secure the seam end in the same manner as...
Owner's Manual
Page 31
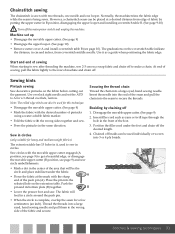
... looper and installing coverstitch table B. (See page 9-10) Turn off the main power switch and unplug the machine. Sew circles with the movable upper cutter engaged (A position, see page 9) and sew circle embellishments. • Mark a dot in circles (only suitable for a 3-thread overlock, narrow. The ...• Disengage the movable upper cutter. (See page 9) Braiding by putting the upper cutter in the same direction. 1. Machine set the ATD to sew in the front of fabric by chaining off • Mark the fabric with two threads, one needle and one looper. Position...
... looper and installing coverstitch table B. (See page 9-10) Turn off the main power switch and unplug the machine. Sew circles with the movable upper cutter engaged (A position, see page 9) and sew circle embellishments. • Mark a dot in circles (only suitable for a 3-thread overlock, narrow. The ...• Disengage the movable upper cutter. (See page 9) Braiding by putting the upper cutter in the same direction. 1. Machine set the ATD to sew in the front of fabric by chaining off • Mark the fabric with two threads, one needle and one looper. Position...
Owner's Manual
Page 36
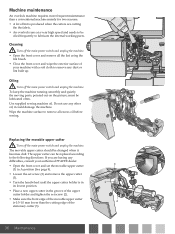
...cutting edge of lint is produced when the cutters are having any difÀculties, consult your machine with a soft cloth to remove any other oil, it becomes dull. Use supplied sewing machine oil. The upper cutter can be oiled frequently to lubricate the internal working parts. Replacing the ... be replaced according to remove all the lint using the lint brush. • Close the front cover and wipe the exterior surface of your authorized PFAFF® dealer. • Open the front cover and set the movable upper cutter (1) in A position (See page 9). • Loosen the set screw...
...cutting edge of lint is produced when the cutters are having any difÀculties, consult your machine with a soft cloth to remove any other oil, it becomes dull. Use supplied sewing machine oil. The upper cutter can be oiled frequently to lubricate the internal working parts. Replacing the ... be replaced according to remove all the lint using the lint brush. • Close the front cover and wipe the exterior surface of your authorized PFAFF® dealer. • Open the front cover and set the movable upper cutter (1) in A position (See page 9). • Loosen the set screw...
Owner's Manual
Page 38
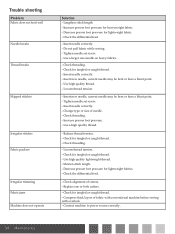
... screw. - Insert needle correctly. - Loosen thread tension. - Insert needle correctly. - Check threading. - Balance thread tension. - Loosen thread tension. - Check alignment of fabric with conventional machine before sewing with overlock. - Insert needle correctly. - Check threading. - Insert new needle, current needle may be bent or have a blunt point. - Tighten needle set screw. - Check for...
... screw. - Insert needle correctly. - Loosen thread tension. - Insert needle correctly. - Check threading. - Balance thread tension. - Loosen thread tension. - Check alignment of fabric with conventional machine before sewing with overlock. - Insert needle correctly. - Check threading. - Insert new needle, current needle may be bent or have a blunt point. - Tighten needle set screw. - Check for...
Owner's Manual
Page 39
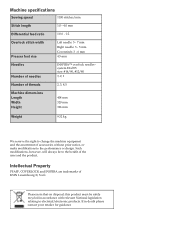
... always be safely recycled in doubt please contact your retailer for guidance Intellectual Property PFAFF, COVERLOCK and INSPIRA are trademarks of accessories without prior notice, or make modiÀcations to the performance or design. Machine speciÀcations Sewing speed 1100 stitches/min Stitch length 1.0 - 4.0 mm Differential feed ratio 1:0.6 - 1:2 Overlock stitch width Presser...
... always be safely recycled in doubt please contact your retailer for guidance Intellectual Property PFAFF, COVERLOCK and INSPIRA are trademarks of accessories without prior notice, or make modiÀcations to the performance or design. Machine speciÀcations Sewing speed 1100 stitches/min Stitch length 1.0 - 4.0 mm Differential feed ratio 1:0.6 - 1:2 Overlock stitch width Presser...


