

Owner's Manual
Page 2

Owner's Manual
Page 5
..., lubricating, or when making any other user servicing adjustments mentioned in or drop into any air openings blocked. Special care is being used by the manufacturer as threading needle, changing needle, threading bobbin, or changing presser foot, etc. 1 6. Do not pull or ... appliance to persons: 1. Never drop or insert any object into water or other liquid. \/1ARNING: To reduce the risk of -doors. 7. Always use out-of burns, fire, electric shock, or injury to electrical or mechanical the nearest adjustment. 4. Never operate the sewing machine with same type rated...
..., lubricating, or when making any other user servicing adjustments mentioned in or drop into any air openings blocked. Special care is being used by the manufacturer as threading needle, changing needle, threading bobbin, or changing presser foot, etc. 1 6. Do not pull or ... appliance to persons: 1. Never drop or insert any object into water or other liquid. \/1ARNING: To reduce the risk of -doors. 7. Always use out-of burns, fire, electric shock, or injury to electrical or mechanical the nearest adjustment. 4. Never operate the sewing machine with same type rated...
Owner's Manual
Page 6
...damage due to the laws concerning electromagnetic compatibility, no parts inside the machine which could be caused by a PFAFF mechanic. 5. To remove ny stubborn dirt, use a dry, clean, soft, lint-free cloth. The tension of a non-electrically driven foot control can ..., corrosive hemicals or liquids. Do not use at low speeds is 1 5 watts. 4. there is disturbed - its cord. 9. I 2.The machine is operated incorrectly. I 3. I 1.Only original PFAFF parts may be operated in openings on the specification plate. 6. Constant use the sewing machine if: - however, it...
...damage due to the laws concerning electromagnetic compatibility, no parts inside the machine which could be caused by a PFAFF mechanic. 5. To remove ny stubborn dirt, use a dry, clean, soft, lint-free cloth. The tension of a non-electrically driven foot control can ..., corrosive hemicals or liquids. Do not use at low speeds is 1 5 watts. 4. there is disturbed - its cord. 9. I 2.The machine is operated incorrectly. I 3. I 1.Only original PFAFF parts may be operated in openings on the specification plate. 6. Constant use the sewing machine if: - however, it...
Owner's Manual
Page 7
... your service with any material in design and tech nology, and this is no problem! If you . If you many enjoyable hours of them. Your PFAFF dealer will sew through thick and thin for you now take any help or advice you can go wrong. We wish you have any difference... study the instruction book, nothing can get started! So now you need. After all the things the machine can take time enough to the model 2040. It features the very latest in its stride and will be any further questions, that is the only way to make full...
... your service with any material in design and tech nology, and this is no problem! If you . If you many enjoyable hours of them. Your PFAFF dealer will sew through thick and thin for you now take any help or advice you can go wrong. We wish you have any difference... study the instruction book, nothing can get started! So now you need. After all the things the machine can take time enough to the model 2040. It features the very latest in its stride and will be any further questions, that is the only way to make full...

Owner's Manual
Page 12
Jtility stitch programs tiptronic 2040 1 ID Ill "i. The seams will stretch without breaking. for working on leggings, and for embroidery work , inserting lace, sewing with fringe etc. 4 Elastic stitch with ... upto mm - - 6 6 6 6 6 6 6 3 6 Gives an ornamental and hem stitching effect For buttonholes in program 3. (May be sewn from left to right or from right to left, using the pattern mirror key) stitch during sewing) 1 3 Stemstitch, narrow 1 4 Decorative elastic stitch Durable elastic seam, e.g. Description Application 1 Straight stitch with 13 For all straight stitch...
Jtility stitch programs tiptronic 2040 1 ID Ill "i. The seams will stretch without breaking. for working on leggings, and for embroidery work , inserting lace, sewing with fringe etc. 4 Elastic stitch with ... upto mm - - 6 6 6 6 6 6 6 3 6 Gives an ornamental and hem stitching effect For buttonholes in program 3. (May be sewn from left to right or from right to left, using the pattern mirror key) stitch during sewing) 1 3 Stemstitch, narrow 1 4 Decorative elastic stitch Durable elastic seam, e.g. Description Application 1 Straight stitch with 13 For all straight stitch...

Owner's Manual
Page 14
...3 needle positions, nFeoer dheigdh. Width upto mm - 2 Stretch triple straight stitch, with 1 3 needle positions, stitch length 0- 6 mm For at! Utility stitch programs tiptronic 2030 1234 6 101 '11 12 13 Ill I 1 Pro- Suitable for embroidery work , inserting lace, sewing with fringe etc. 4 Elastic stitch with LtNo perforations For sewing... - 1 2 Zigzag stitch (infinitely variable width of the zigzag As in program 3. (May be or from right to left, using sewn from the pattern left to right mirror key) 6 stitch during sewing) 1 3 Stmstitch, narrow 1 Durabie &astic seam, e.g.
...3 needle positions, nFeoer dheigdh. Width upto mm - 2 Stretch triple straight stitch, with 1 3 needle positions, stitch length 0- 6 mm For at! Utility stitch programs tiptronic 2030 1234 6 101 '11 12 13 Ill I 1 Pro- Suitable for embroidery work , inserting lace, sewing with fringe etc. 4 Elastic stitch with LtNo perforations For sewing... - 1 2 Zigzag stitch (infinitely variable width of the zigzag As in program 3. (May be or from right to left, using sewn from the pattern left to right mirror key) 6 stitch during sewing) 1 3 Stmstitch, narrow 1 Durabie &astic seam, e.g.
Owner's Manual
Page 20
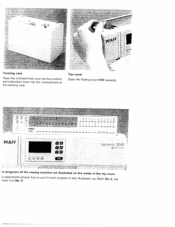
presser 0. ie programs of the sewing machine are illustrated on the inside of the carrying case. ie appropriate esser foot No. Stitch No. 2, use for each program is also illustrated, e.g. I Carrying case Place the enclosed lead cord, the foot control and instruction book into the compartment of the top cover. foot to use 4!' t,,,,,,,.,y -' A iVllJY.I1J)JJ1.' 11If1II!ff Jilt! PFAFF PFAFF 2040 -% '4 ' -1, -i .-1, -1 -A -1 tiptronic 2040 Mthbh; Top cover Open the folding cover (44) upwards.
presser 0. ie programs of the sewing machine are illustrated on the inside of the carrying case. ie appropriate esser foot No. Stitch No. 2, use for each program is also illustrated, e.g. I Carrying case Place the enclosed lead cord, the foot control and instruction book into the compartment of the top cover. foot to use 4!' t,,,,,,,.,y -' A iVllJY.I1J)JJ1.' 11If1II!ff Jilt! PFAFF PFAFF 2040 -% '4 ' -1, -i .-1, -1 -A -1 tiptronic 2040 Mthbh; Top cover Open the folding cover (44) upwards.

Owner's Manual
Page 21
... Connect the plug of the foot control to the connection socket (1 2) of the machine to 11 0 V. 19 The sewing speed is now ready to be used for Europe 220 V - 240 V. The foot control tvd ATK 0070 has to function. Master switch When the master switch (1 3) is indicated in the display. If...
... Connect the plug of the foot control to the connection socket (1 2) of the machine to 11 0 V. 19 The sewing speed is now ready to be used for Europe 220 V - 240 V. The foot control tvd ATK 0070 has to function. Master switch When the master switch (1 3) is indicated in the display. If...

Owner's Manual
Page 23
L Preparing the machine for bobbing winding Place an empty bobbin so that the black pin of the bobbing winder snaps into the slot of the sewing machine. When replacing the the detachable work support work support (free arm) In order to sew upwards out of using the free arm, swing the hole. Push the bobbin to the right Note: The bobbin can only be wound if it free arm of the bobbin. Removing the detachable work support, make sure to the left and it is flush with lift the it is moved fully to the right 21
L Preparing the machine for bobbing winding Place an empty bobbin so that the black pin of the bobbing winder snaps into the slot of the sewing machine. When replacing the the detachable work support work support (free arm) In order to sew upwards out of using the free arm, swing the hole. Push the bobbin to the right Note: The bobbin can only be wound if it free arm of the bobbin. Removing the detachable work support, make sure to the left and it is flush with lift the it is moved fully to the right 21
Owner's Manual
Page 28
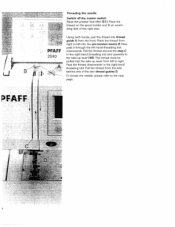
... switch Raise the presser foot lifter (51). Place the thread on the spool holder and fit an unwin ding disk of the two thread guides D. Using both hands, pull the thread into thread guide A from the front Place the thread from the side behind one of the right size. The thread...
... switch Raise the presser foot lifter (51). Place the thread on the spool holder and fit an unwin ding disk of the two thread guides D. Using both hands, pull the thread into thread guide A from the front Place the thread from the side behind one of the right size. The thread...
Owner's Manual
Page 31
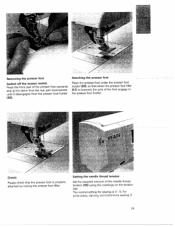
... the presser foot holder (30). •[ Removing the presser foot Switch off the master switch Press the front part of the needle thread tension (35) using the markings on the tension dial. Check: Please check that when the presser foot lifter (51) is 3 - 5.
... the presser foot holder (30). •[ Removing the presser foot Switch off the master switch Press the front part of the needle thread tension (35) using the markings on the tension dial. Check: Please check that when the presser foot lifter (51) is 3 - 5.
Owner's Manual
Page 33
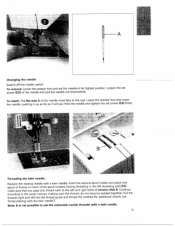
... pull the needle out downwards. Continue threading in the left threading slot (34), make sure that you pass one spool of thread on each to use the automatic needle threader with a twin needle. 31 Note: It is not possible to the left into the thread guide and thread the needles (for...
... pull the needle out downwards. Continue threading in the left threading slot (34), make sure that you pass one spool of thread on each to use the automatic needle threader with a twin needle. 31 Note: It is not possible to the left into the thread guide and thread the needles (for...

Owner's Manual
Page 35
Engaging the top feed/IDF Important For all work with the Dual Feed (IDF), use the presser feet with two fingers at the marked points. Stripes and plaids match perfectly due to the even feed of the material to be sewn. 33 on page 32). Press the top feed (31) down wards a little, then pull it engages. Disengaging the top feed/IDF Hold the Dual Feed with the center back cut out Raise the presser foot Press the top feed (31) downwards until it away from you and release the IDF slowly upward (see also fig.
Engaging the top feed/IDF Important For all work with the Dual Feed (IDF), use the presser feet with two fingers at the marked points. Stripes and plaids match perfectly due to the even feed of the material to be sewn. 33 on page 32). Press the top feed (31) down wards a little, then pull it engages. Disengaging the top feed/IDF Hold the Dual Feed with the center back cut out Raise the presser foot Press the top feed (31) downwards until it away from you and release the IDF slowly upward (see also fig.

Owner's Manual
Page 39
Adjusting the contrast on the display. setting on the display may change after the full bobbin is no thread on the bobbin, the bobbin symbol appears on the display The contrast transported. Bobbin thread monitor (model 2040) If the bobbin is nearing its end [2 yd (2 m) 3 '/ yd (3 m)1 or there is inserted and you start to the machine being This setting can be readjusted with the contrast regulator (54). The symbol disappears after long use or due to sew again. 38
Adjusting the contrast on the display. setting on the display may change after the full bobbin is no thread on the bobbin, the bobbin symbol appears on the display The contrast transported. Bobbin thread monitor (model 2040) If the bobbin is nearing its end [2 yd (2 m) 3 '/ yd (3 m)1 or there is inserted and you start to the machine being This setting can be readjusted with the contrast regulator (54). The symbol disappears after long use or due to sew again. 38

Owner's Manual
Page 40
... model 2030), and continue to scroll you wish to the numerical program selection: I. Model 2030: Program selection key in the case of the most commonly used programs (0 - 9) and for scrolling backward and forward in the sewing programs. Clockwise in ascending order Counterclockwise = in descending order If you are three ways of...
... model 2030), and continue to scroll you wish to the numerical program selection: I. Model 2030: Program selection key in the case of the most commonly used programs (0 - 9) and for scrolling backward and forward in the sewing programs. Clockwise in ascending order Counterclockwise = in descending order If you are three ways of...

Owner's Manual
Page 41
Each change : Stitch width w..% Pattern width Needle position for straight stitches. b and c (located to the right of the display) you can change the stitch and/or pattern width and/or pattern length, change the density or the balance of a selected pattern, and select the needle position for straight stitches ...2 Stitch length < Pattern length Stitch density vsz Pattern density Balance Use key pair a C 40 To change is visible on the display. Altering pattern sizes With key pairs a.
Each change : Stitch width w..% Pattern width Needle position for straight stitches. b and c (located to the right of the display) you can change the stitch and/or pattern width and/or pattern length, change the density or the balance of a selected pattern, and select the needle position for straight stitches ...2 Stitch length < Pattern length Stitch density vsz Pattern density Balance Use key pair a C 40 To change is visible on the display. Altering pattern sizes With key pairs a.

Owner's Manual
Page 43
When entered. Altering the stitch length The stitch length of standard width the pattern and can be is shown on model 2030). altered using key pair b. 42 For decorative stitches, program 63 comes up the in a overall width of a program can be altered using key pair a. Altering the pattern width e.g. Program 63 (Program 56 on the display.
When entered. Altering the stitch length The stitch length of standard width the pattern and can be is shown on model 2030). altered using key pair b. 42 For decorative stitches, program 63 comes up the in a overall width of a program can be altered using key pair a. Altering the pattern width e.g. Program 63 (Program 56 on the display.

Owner's Manual
Page 44
IF 1. Altering the pattern The pattern length of the but the pattern will be altered using key pair Ii Altering the stitch density Wpreadittthemrvnoarrceiaonduesbnsesteiatlcyltheorper drlo.egsTsrhademepsnasstetuleycr.hn as buttonhole, satin stitches, length will remain constant etc. the stitch density of length decorative patterns can be embroide 43
IF 1. Altering the pattern The pattern length of the but the pattern will be altered using key pair Ii Altering the stitch density Wpreadittthemrvnoarrceiaonduesbnsesteiatlcyltheorper drlo.egsTsrhademepsnasstetuleycr.hn as buttonhole, satin stitches, length will remain constant etc. the stitch density of length decorative patterns can be embroide 43

Owner's Manual
Page 49
... from the right will always retain the right-hand needle entry position, regardless of the stitch patterns The stitch pattern formation varies. Note: Do not use a twin needle if this symbol in width. i.e. when the stitch width is always retained. The left . [ ____ _____ Formation of any changes... in the display lights up (see page 47). 48 Some patterns are formed from one side! Do not use a twin needle to sew patterns that are formed from the left -hand piercing point is changed only the outside right piercing point of the ...
... from the right will always retain the right-hand needle entry position, regardless of the stitch patterns The stitch pattern formation varies. Note: Do not use a twin needle if this symbol in width. i.e. when the stitch width is always retained. The left . [ ____ _____ Formation of any changes... in the display lights up (see page 47). 48 Some patterns are formed from one side! Do not use a twin needle to sew patterns that are formed from the left -hand piercing point is changed only the outside right piercing point of the ...

Owner's Manual
Page 54
A-Z keys (2 x on the 2040, 1 x on the display. Cursor keys: for the direct selection of the pattern. Select an empty rn-memory by scrolling using the cursor key (8). 55 Keys for the pattern sequence The following keys can be found next to the selection knob (selection key on the model tiptronic 2030) rn-key: m) for...
A-Z keys (2 x on the 2040, 1 x on the display. Cursor keys: for the direct selection of the pattern. Select an empty rn-memory by scrolling using the cursor key (8). 55 Keys for the pattern sequence The following keys can be found next to the selection knob (selection key on the model tiptronic 2030) rn-key: m) for...


