
Owner's Manual
Page 2
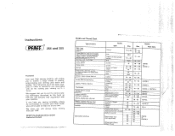
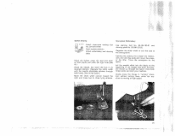
...leatherette, oIlcloth Synthetic Silk Silk -- ------ - --- We hope yOU with your machine. will be glad to help you will enable YOU to master a large variety of Fabric Thread Needle 284 and 285 Bed linen FIne linen Muslin Type Cotton Size 50 or 60 Size 80 70-...- 90 130/706 or 1301705 H Foreword Cotton, rayon staple fabrics Cotton 50 - 60 70 - 80 Your new Plait sewing machine will become well acquainted with your Pfaff dealer Elastic corsetry corsetry fabrics, fabrics, corset Firm satin Synthetic thread - 60 Cotton 40 70-90 1301705H who will always ...
...leatherette, oIlcloth Synthetic Silk Silk -- ------ - --- We hope yOU with your machine. will be glad to help you will enable YOU to master a large variety of Fabric Thread Needle 284 and 285 Bed linen FIne linen Muslin Type Cotton Size 50 or 60 Size 80 70-...- 90 130/706 or 1301705 H Foreword Cotton, rayon staple fabrics Cotton 50 - 60 70 - 80 Your new Plait sewing machine will become well acquainted with your Pfaff dealer Elastic corsetry corsetry fabrics, fabrics, corset Firm satin Synthetic thread - 60 Cotton 40 70-90 1301705H who will always ...
Owner's Manual
Page 3
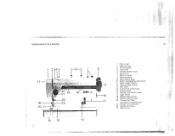
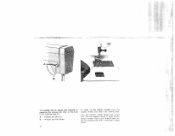
... motion knob 10 Motor disengaging mechanism 11 Stitch length control 12 Reverse feed control 13 Bed cover 14 Transverse rotary hook 15 Needle plate 16 Sewing foot thumb screw 17 Light switch 18 Stitch width control 19 Needle position lever 20 Presser bar lifter (on back of...
... motion knob 10 Motor disengaging mechanism 11 Stitch length control 12 Reverse feed control 13 Bed cover 14 Transverse rotary hook 15 Needle plate 16 Sewing foot thumb screw 17 Light switch 18 Stitch width control 19 Needle position lever 20 Presser bar lifter (on back of...
Owner's Manual
Page 4
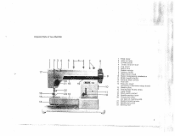
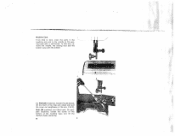
...Pfaff 285 1 Face cover 2 2 Takeup lever 3 Thread guide 4 Thread retainer stud U 5 Top cover 6 Spool pins 7 Bobbin winder 8 Balance wheel 11 9 Stop motion knob 9 10 Motor disengaging mechanism 11 Stitch length control 12 Reverse feed control 18 1 PFAFO 285... 13 Free arm 14 Free arm cover 10 (enclosing transverse rotary hook) 15 Needle plate 22 16 Sewing foot thumb screw 17 Light switch... 16 12 18 Stitch width control 19 Needle position lever 5 'VV V - 20 Presser bar lifter (on back of machine arm)...
...Pfaff 285 1 Face cover 2 2 Takeup lever 3 Thread guide 4 Thread retainer stud U 5 Top cover 6 Spool pins 7 Bobbin winder 8 Balance wheel 11 9 Stop motion knob 9 10 Motor disengaging mechanism 11 Stitch length control 12 Reverse feed control 18 1 PFAFO 285... 13 Free arm 14 Free arm cover 10 (enclosing transverse rotary hook) 15 Needle plate 22 16 Sewing foot thumb screw 17 Light switch... 16 12 18 Stitch width control 19 Needle position lever 5 'VV V - 20 Presser bar lifter (on back of machine arm)...
Owner's Manual
Page 5
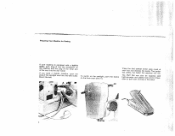
...Machine for Sewing tomihffoeytthoomeru,raccopmhruidasnhceihnitpanonleudtghiesthAweeqailnup'tlioupogputethladeett.wtrheietcheopatthaebcruleilet-noIdnn if you press, the faster within easy reach of the pedal. machine, push the into the wall outlet. push the button Place the foot control your foot and depress you have a treadle plug of both foot controls be supplied with foot control. The Pfaff... 284 can also builton motor and plastic ation of the sewlight cord Mount the belt. Oper is the same. 28 4 The harder the machine will run. To switch ...
...Machine for Sewing tomihffoeytthoomeru,raccopmhruidasnhceihnitpanonleudtghiesthAweeqailnup'tlioupogputethladeett.wtrheietcheopatthaebcruleilet-noIdnn if you press, the faster within easy reach of the pedal. machine, push the into the wall outlet. push the button Place the foot control your foot and depress you have a treadle plug of both foot controls be supplied with foot control. The Pfaff... 284 can also builton motor and plastic ation of the sewlight cord Mount the belt. Oper is the same. 28 4 The harder the machine will run. To switch ...
Owner's Manual
Page 6
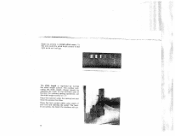
of engagement, all machines fitted with built-in . To engage the motor, flick this lever down. ith er Machines equipped with a treadle mechanism can be driven by a lever (10) underneath the balance wheel. With the motor swung out of icr in motor have completed sewing, flick it to its top position. ( 10- After you have a mechanism for engaging and disengaging the motor. This is operated by toot power. 5
of engagement, all machines fitted with built-in . To engage the motor, flick this lever down. ith er Machines equipped with a treadle mechanism can be driven by a lever (10) underneath the balance wheel. With the motor swung out of icr in motor have completed sewing, flick it to its top position. ( 10- After you have a mechanism for engaging and disengaging the motor. This is operated by toot power. 5
Owner's Manual
Page 13
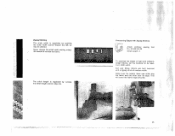
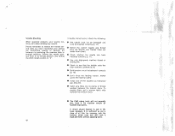
-- - ..-.- - :- - Place both threads back un der the sewing foot after it has been raised again. A = Presser bar lifter up B = Presser bar lifter down 12 To draw up the bobbin thread. Turn the balance wheel toward you a full turn. The sewing foot is raised and lowered by operating the presser bar litter on the back of the machine (see ill.). Pull the needle thread to draw up the bobbin thread, hold the needle thread and lower the sewing foot. r--.- -- -- -
-- - ..-.- - :- - Place both threads back un der the sewing foot after it has been raised again. A = Presser bar lifter up B = Presser bar lifter down 12 To draw up the bobbin thread. Turn the balance wheel toward you a full turn. The sewing foot is raised and lowered by operating the presser bar litter on the back of the machine (see ill.). Pull the needle thread to draw up the bobbin thread, hold the needle thread and lower the sewing foot. r--.- -- -- -
Owner's Manual
Page 15
- this end, push the stitch width control to right as far as it will run. 14 The hard the machine will go. To the ..- ..-.-- -.&'t-(. Place the foot control your foot and depress er you press, the faster within easy reach of the pedal. r tcoTtthhhapheeetpeinosssgtlstiosiitttttci.ectthhhcFhetIohelreenslntgeoignnhtrctodgthhtitccnhhoaclnreoytinonsrngotsrtleohrtweloh.gneicnuTh"glloha2etes"foeet.-dpnhneaurnbamsdythibooeusntruilsddr,eninisbndeoegtif Place the material under the sewing foot and lower the presser bar lifter. W_ -- Begin by sewing a straight-stitth seam.
- this end, push the stitch width control to right as far as it will run. 14 The hard the machine will go. To the ..- ..-.-- -.&'t-(. Place the foot control your foot and depress er you press, the faster within easy reach of the pedal. r tcoTtthhhapheeetpeinosssgtlstiosiitttttci.ectthhhcFhetIohelreenslntgeoignnhtrctodgthhtitccnhhoaclnreoytinonsrngotsrtleohrtweloh.gneicnuTh"glloha2etes"foeet.-dpnhneaurnbamsdythibooeusntruilsddr,eninisbndeoegtif Place the material under the sewing foot and lower the presser bar lifter. W_ -- Begin by sewing a straight-stitth seam.
Owner's Manual
Page 26
... needle is outside the fabric. Overcasting Edges with a zigzag stitch of light and mediumweight fabrics, set the machine for its edge. I. Soft and flimsy fabrics are best overcast with Zigzag Stitches 838 934 Attach ordinary sewing foot No. 93-838 954-00 Stitch length: 2 To overcast the edges of medium width. The...
... needle is outside the fabric. Overcasting Edges with a zigzag stitch of light and mediumweight fabrics, set the machine for its edge. I. Soft and flimsy fabrics are best overcast with Zigzag Stitches 838 934 Attach ordinary sewing foot No. 93-838 954-00 Stitch length: 2 To overcast the edges of medium width. The...
Owner's Manual
Page 32
... foot No. 93-106 103-91 and darning plate No. 93-030 125-25. Button Sewing 30 100139 Attach clear-view sewing foot No. 93100 179-00 Right needle position Attach embroidery and darning plate. Remove the sewing foot, attach the embroi dery and darning plate and lower the press er bar lifter.... Sew on the fabric. Let the needle stitch into the fabric at high speed. 31 Regulate the stitch width to suit the size of the design and draw the bob bin thread up through both thread ends and start your machine. Slowly move the hoops in...
... foot No. 93-106 103-91 and darning plate No. 93-030 125-25. Button Sewing 30 100139 Attach clear-view sewing foot No. 93100 179-00 Right needle position Attach embroidery and darning plate. Remove the sewing foot, attach the embroi dery and darning plate and lower the press er bar lifter.... Sew on the fabric. Let the needle stitch into the fabric at high speed. 31 Regulate the stitch width to suit the size of the design and draw the bob bin thread up through both thread ends and start your machine. Slowly move the hoops in...
Owner's Manual
Page 35
Pfaff 284 machines are tilted back. On Pfaff 285 machines, loosen the set screw, lift the front of the free arm cover and pull the cover out lengthwise of the machine base and tilt the machine back cautiously. 36 2 To this end, re move the needle, the sewing foot and the bobbin case with a soft brush. On port able machines, loosen the screw on the bottom of the arm (1 & 2). Machine Care From time to time, clean the parts in the machine arm and in the vicinity of the sew ing hook with the bobbin.
Pfaff 284 machines are tilted back. On Pfaff 285 machines, loosen the set screw, lift the front of the free arm cover and pull the cover out lengthwise of the machine base and tilt the machine back cautiously. 36 2 To this end, re move the needle, the sewing foot and the bobbin case with a soft brush. On port able machines, loosen the screw on the bottom of the arm (1 & 2). Machine Care From time to time, clean the parts in the machine arm and in the vicinity of the sew ing hook with the bobbin.

Owner's Manual
Page 36
Do not oil the bob bin winder. From time to time, put a drop of oil into the hook raceway (see ill, at left . P1 aff 284 Pfatf 285 37 - Longevity and smooth machine performance are only a few oiling points left and center). Since your Pfaff sewing ma chine has been made from high-grade ma terials, there are dependent on regular cleaning and proper oiling. The raceway in the sewing hook is an important oiling point.
Do not oil the bob bin winder. From time to time, put a drop of oil into the hook raceway (see ill, at left . P1 aff 284 Pfatf 285 37 - Longevity and smooth machine performance are only a few oiling points left and center). Since your Pfaff sewing ma chine has been made from high-grade ma terials, there are dependent on regular cleaning and proper oiling. The raceway in the sewing hook is an important oiling point.
Owner's Manual
Page 37
Trouble Shooting When operated properly, your sewing job (buttonhole sewing or darning, for instance) by switching the machine back to straight stitching, flicking the needle posilion lever to put a drop of thread wedged between the tension discs. • The Pfaff rotary hook will hardly develop any trouble. To remove them, pull a narrow fabric strip between...
Trouble Shooting When operated properly, your sewing job (buttonhole sewing or darning, for instance) by switching the machine back to straight stitching, flicking the needle posilion lever to put a drop of thread wedged between the tension discs. • The Pfaff rotary hook will hardly develop any trouble. To remove them, pull a narrow fabric strip between...

Owner's Manual
Page 38
... 23 18119 Darning Foot Drawing Up the Bobbin Thread 18 12 Dropping the Machine Feed 18 Electrical Equipment 4 Engaging and Disengaging the Sewing Mechanism 7 Essential Parts of Pfaff 284 2 Essential Parts of Pfaff 285 3 Flat Felled Seams 21 Foot Control 4 Foreword 1 Fundamentals of Machine Operation 13 Hemming 22 Hemstitching 24 Inserting a Full Bobbin 8 Inserting Lace 27...
... 23 18119 Darning Foot Drawing Up the Bobbin Thread 18 12 Dropping the Machine Feed 18 Electrical Equipment 4 Engaging and Disengaging the Sewing Mechanism 7 Essential Parts of Pfaff 284 2 Essential Parts of Pfaff 285 3 Flat Felled Seams 21 Foot Control 4 Foreword 1 Fundamentals of Machine Operation 13 Hemming 22 Hemstitching 24 Inserting a Full Bobbin 8 Inserting Lace 27...


