
Owner's Manual
Page 2
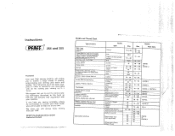
... book has been com piled in order to familiarize YoU thoroughly with all the sewing lobs coming up in this book so that you at any sewing problems please do not hesitate to contact your Pfaff dealer Elastic corsetry corsetry fabrics, fabrics, corset Firm satin Synthetic thread - 60 ...Cotton 40 70-90 1301705H who will be glad to master a large variety of Fabric Thread Needle 284 and 285 Bed linen FIne ...
... book has been com piled in order to familiarize YoU thoroughly with all the sewing lobs coming up in this book so that you at any sewing problems please do not hesitate to contact your Pfaff dealer Elastic corsetry corsetry fabrics, fabrics, corset Firm satin Synthetic thread - 60 ...Cotton 40 70-90 1301705H who will be glad to master a large variety of Fabric Thread Needle 284 and 285 Bed linen FIne ...
Owner's Manual
Page 3
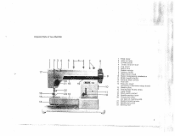
... motion knob 10 Motor disengaging mechanism 11 Stitch length control 12 Reverse feed control 13 Bed cover 14 Transverse rotary hook 15 Needle plate 16 Sewing foot thumb screw 17 Light switch 18 Stitch width control 19 Needle position lever 20 Presser bar lifter (on back of machine arm) 21 Needle...
... motion knob 10 Motor disengaging mechanism 11 Stitch length control 12 Reverse feed control 13 Bed cover 14 Transverse rotary hook 15 Needle plate 16 Sewing foot thumb screw 17 Light switch 18 Stitch width control 19 Needle position lever 20 Presser bar lifter (on back of machine arm) 21 Needle...
Owner's Manual
Page 4
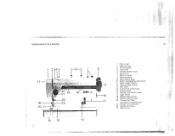
Essential Parts of Your Pfaff 285 1 Face cover 2 2 Takeup lever 3 Thread guide 4 Thread retainer stud U 5 Top cover 6 Spool pins 7 Bobbin winder 8 Balance wheel 11 9 Stop motion knob 9 10 Motor disengaging mechanism 11 Stitch length control 12 Reverse feed control 18 1 PFAFO 285 13 Free arm 14 ...Free arm cover 10 (enclosing transverse rotary hook) 15 Needle plate 22 16 Sewing foot thumb screw 17 Light switch 16 12 18 Stitch width control 19 Needle ...
Essential Parts of Your Pfaff 285 1 Face cover 2 2 Takeup lever 3 Thread guide 4 Thread retainer stud U 5 Top cover 6 Spool pins 7 Bobbin winder 8 Balance wheel 11 9 Stop motion knob 9 10 Motor disengaging mechanism 11 Stitch length control 12 Reverse feed control 18 1 PFAFO 285 13 Free arm 14 ...Free arm cover 10 (enclosing transverse rotary hook) 15 Needle plate 22 16 Sewing foot thumb screw 17 Light switch 16 12 18 Stitch width control 19 Needle ...
Owner's Manual
Page 5
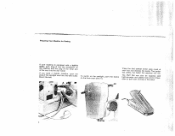
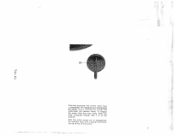
Preparing Your Machine for Sewing tomihffoeytthoomeru,raccopmhruidasnhceihnitpanonleudtghiesthAweeqailnup'tlioupogputethladeett.wtrheietcheopatthaebcruleilet-noIdnn if you press, the faster within easy reach of the sewlight cord Mount the belt. machine, push the into the ... foot control your foot and depress you have a treadle plug of the pedal. To switch on the sewlight, on the face cover (see ill.). The Pfaff 284 can also builton motor and plastic ation of both foot controls be supplied with foot control.
Preparing Your Machine for Sewing tomihffoeytthoomeru,raccopmhruidasnhceihnitpanonleudtghiesthAweeqailnup'tlioupogputethladeett.wtrheietcheopatthaebcruleilet-noIdnn if you press, the faster within easy reach of the sewlight cord Mount the belt. machine, push the into the ... foot control your foot and depress you have a treadle plug of the pedal. To switch on the sewlight, on the face cover (see ill.). The Pfaff 284 can also builton motor and plastic ation of both foot controls be supplied with foot control.
Owner's Manual
Page 6
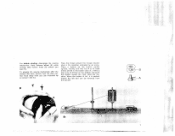
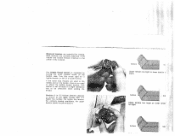
After you have a mechanism for engaging and disengaging the motor. ( 10- This is operated by toot power. 5 With the motor swung out of icr in motor have completed sewing, flick it to its top position. of engagement, all machines fitted with built-in . To engage the motor, flick this lever down. ith er Machines equipped with a treadle mechanism can be driven by a lever (10) underneath the balance wheel.
After you have a mechanism for engaging and disengaging the motor. ( 10- This is operated by toot power. 5 With the motor swung out of icr in motor have completed sewing, flick it to its top position. of engagement, all machines fitted with built-in . To engage the motor, flick this lever down. ith er Machines equipped with a treadle mechanism can be driven by a lever (10) underneath the balance wheel.
Owner's Manual
Page 8
... (see ill.). Place a bobbin on the bobbin and push the bobbin toward the left and can be removed from you (see ill.). To engage the sewing mechanism after the bobbin has been wound, turn the stop motion knob (9) toward you (as indicated by an arrow. Start the ma chine. For bobbin...
... (see ill.). Place a bobbin on the bobbin and push the bobbin toward the left and can be removed from you (see ill.). To engage the sewing mechanism after the bobbin has been wound, turn the stop motion knob (9) toward you (as indicated by an arrow. Start the ma chine. For bobbin...

Owner's Manual
Page 11
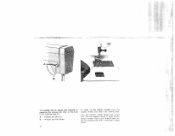
...(knee1f.lonprs)te.eht(rllv3daeaeTe)tirt.rnehhglaaeeoerrooncmynnmkth.itlnooaestgccPhekhtswerhieseneiitwstnuebsgdiifannrbcegtksahpeonselpaeaaaorecprefwremusaanottbhitiroiaonykelfsntpotistltufmha,artteshnreaneipcnPaahusgspfhisuanshoipiedftlpeoinwo2wt(ht8iri2onnlet5)l Tpi(nsoogeretrueaapmrnrdtoohwveuenilnlteohvcFeekirgw.oto2nr)b.kytphlepautebll,aincsgkwioonfugtthuaenpdmitsaswchsiiunnpge On the the bmwaasocerhpkilpnaletaesteohfasvtuhipnepgomnratochciisanrerp.yriensgsecdaseagbaainsest, 10 3 The sewing area of enlarged with the the aid Pfaff of an 284 Portable is extensIon (4).
...(knee1f.lonprs)te.eht(rllv3daeaeTe)tirt.rnehhglaaeeoerrooncmynnmkth.itlnooaestgccPhekhtswerhieseneiitwstnuebsgdiifannrbcegtksahpeonselpaeaaaorecprefwremusaanottbhitiroiaonykelfsntpotistltufmha,artteshnreaneipcnPaahusgspfhisuanshoipiedftlpeoinwo2wt(ht8iri2onnlet5)l Tpi(nsoogeretrueaapmrnrdtoohwveuenilnlteohvcFeekirgw.oto2nr)b.kytphlepautebll,aincsgkwioonfugtthuaenpdmitsaswchsiiunnpge On the the bmwaasocerhpkilpnaletaesteohfasvtuhipnepgomnratochciisanrerp.yriensgsecdaseagbaainsest, 10 3 The sewing area of enlarged with the the aid Pfaff of an 284 Portable is extensIon (4).
Owner's Manual
Page 13
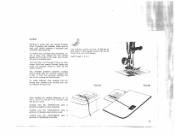
r--.- -- -- - Pull the needle thread to draw up the bobbin thread, hold the needle thread and lower the sewing foot. The sewing foot is raised and lowered by operating the presser bar litter on the back of the machine (see ill.). A = Presser bar lifter up B = Presser bar lifter down 12 To draw up the bobbin thread. Place both threads back un der the sewing foot after it has been raised again. Turn the balance wheel toward you a full turn. -- - ..-.- - :- -
r--.- -- -- - Pull the needle thread to draw up the bobbin thread, hold the needle thread and lower the sewing foot. The sewing foot is raised and lowered by operating the presser bar litter on the back of the machine (see ill.). A = Presser bar lifter up B = Presser bar lifter down 12 To draw up the bobbin thread. Place both threads back un der the sewing foot after it has been raised again. Turn the balance wheel toward you a full turn. -- - ..-.- - :- -
Owner's Manual
Page 15
Begin by sewing a straight-stitth seam. The hard the machine will go. - To the ..- ..-.-- -.&'t-(. Place the foot control your foot and depress er you press, the faster within easy reach of the pedal. this end, push the stitch width control to right as far as it will run. 14 W_ -- r tcoTtthhhapheeetpeinosssgtlstiosiitttttci.ectthhhcFhetIohelreenslntgeoignnhtrctodgthhtitccnhhoaclnreoytinonsrngotsrtleohrtweloh.gneicnuTh"glloha2etes"foeet.-dpnhneaurnbamsdythibooeusntruilsddr,eninisbndeoegtif Place the material under the sewing foot and lower the presser bar lifter.
Begin by sewing a straight-stitth seam. The hard the machine will go. - To the ..- ..-.-- -.&'t-(. Place the foot control your foot and depress er you press, the faster within easy reach of the pedal. this end, push the stitch width control to right as far as it will run. 14 W_ -- r tcoTtthhhapheeetpeinosssgtlstiosiitttttci.ectthhhcFhetIohelreenslntgeoignnhtrctodgthhtitccnhhoaclnreoytinonsrngotsrtleohrtweloh.gneicnuTh"glloha2etes"foeet.-dpnhneaurnbamsdythibooeusntruilsddr,eninisbndeoegtif Place the material under the sewing foot and lower the presser bar lifter.

Owner's Manual
Page 16
Various zigzag sewing operations are dis cussed on page 25 and the following pages. 15 To sew in reverse or backtack tL3 end of a seam, simply depress the fingertip control. The stitch width is regulated by pushing the stitch width control toward the left, as may be desired.
Various zigzag sewing operations are dis cussed on page 25 and the following pages. 15 To sew in reverse or backtack tL3 end of a seam, simply depress the fingertip control. The stitch width is regulated by pushing the stitch width control toward the left, as may be desired.
Owner's Manual
Page 17
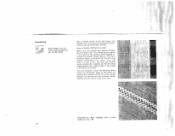
...tension. Both tensions are used in the center of tension on the bobbin case. Turn this screw right for a tighter tension, or left for sewing. This tension is regulated by turning the small knurled screw on the upper tension dial. bottom top Upper tension too tight. The higher the ... correctly if a slight resistance has to Upper tension too tight or lower tension loose. Balanced tensions are essential for a looser tension. For ordinary sewing operations, the upper tension should be overcome when pulling the thread. The bobbin thread tension is set at about 5.
...tension. Both tensions are used in the center of tension on the bobbin case. Turn this screw right for a tighter tension, or left for sewing. This tension is regulated by turning the small knurled screw on the upper tension dial. bottom top Upper tension too tight. The higher the ... correctly if a slight resistance has to Upper tension too tight or lower tension loose. Balanced tensions are essential for a looser tension. For ordinary sewing operations, the upper tension should be overcome when pulling the thread. The bobbin thread tension is set at about 5.

Owner's Manual
Page 22
First seam: Lay pieces together with quilting gauge for sewing parallel seams over the edge of the fabric. 21 Make sure the fabric enters the felling foot evenly and the bot tom fabric is folded ...
First seam: Lay pieces together with quilting gauge for sewing parallel seams over the edge of the fabric. 21 Make sure the fabric enters the felling foot evenly and the bot tom fabric is folded ...
Owner's Manual
Page 24
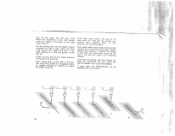
...of tension discs (see ill.), To render your Pfaff dealer). Use ordinary sewing foot No. 93-838 954-00, and insert a twin needle (which can be ob tamed from your cording more prominent, insert a filler cord. It Pfaff 284 23 Hold both needle threads :ghtly and rotate... No. 93-847 675-00 with grooves for medium-heavy fabrics, and cording foot No. 93-847 680-00 with the ordinary sewing foot is used . To make sure to 2 Pfaff 285 Twin needles for lightweight materials. --.5 7 .- - .-.- Stitch length: 1.5 to lead each thread between cording seams made with 3...
...of tension discs (see ill.), To render your Pfaff dealer). Use ordinary sewing foot No. 93-838 954-00, and insert a twin needle (which can be ob tamed from your cording more prominent, insert a filler cord. It Pfaff 284 23 Hold both needle threads :ghtly and rotate... No. 93-847 675-00 with grooves for medium-heavy fabrics, and cording foot No. 93-847 680-00 with the ordinary sewing foot is used . To make sure to 2 Pfaff 285 Twin needles for lightweight materials. --.5 7 .- - .-.- Stitch length: 1.5 to lead each thread between cording seams made with 3...
Owner's Manual
Page 25
... Slightly in the fabric previously. Insert a System 130 Zwi-Ho needle. Hemstitching effect obtained with a stitch width of the fabric by half a turn and sew the second seam, guiding the material so that the wing needle follows the hemline and the ordinary needle stitches into the fabric close to 2.5 Clear...-view sewing foot No. 93-100 179-00 Use a thread which is not too heavy and matches the material being hemstitched (pref erably a No. 50...
... Slightly in the fabric previously. Insert a System 130 Zwi-Ho needle. Hemstitching effect obtained with a stitch width of the fabric by half a turn and sew the second seam, guiding the material so that the wing needle follows the hemline and the ordinary needle stitches into the fabric close to 2.5 Clear...-view sewing foot No. 93-100 179-00 Use a thread which is not too heavy and matches the material being hemstitched (pref erably a No. 50...
Owner's Manual
Page 26
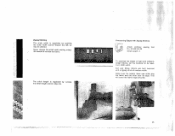
... of light and mediumweight fabrics, set the machine for its edge. Soft and flimsy fabrics are best overcast with Zigzag Stitches 838 934 Attach ordinary sewing foot No. 93-838 954-00 Stitch length: 2 To overcast the edges of medium width. This will cover the fabric edge securely. 7 / 25 Zigzag Stitching...
... of light and mediumweight fabrics, set the machine for its edge. Soft and flimsy fabrics are best overcast with Zigzag Stitches 838 934 Attach ordinary sewing foot No. 93-838 954-00 Stitch length: 2 To overcast the edges of medium width. This will cover the fabric edge securely. 7 / 25 Zigzag Stitching...

Owner's Manual
Page 27
... can be patched quickly. Trim away the ragged edges around the hole, cutting exactly along the in the same 28 Inserting Patches - 38?3.1 Attach ordinary sewing foot u No. 93-838 954-00.
... can be patched quickly. Trim away the ragged edges around the hole, cutting exactly along the in the same 28 Inserting Patches - 38?3.1 Attach ordinary sewing foot u No. 93-838 954-00.

Owner's Manual
Page 28
Inserting Lace Attach ordinary sewing foot Place the tace on the material and stitch it on both sides (1). Trim the fabric edges away on both sides of the lace. Cut the fabric open under the lace insertion (2) and iron it down with straight stitches made with short zigzag stitches of '1.5 on the wrong side. Sew over the edges of the lace with a stitch length of medium width (4).
Inserting Lace Attach ordinary sewing foot Place the tace on the material and stitch it on both sides (1). Trim the fabric edges away on both sides of the lace. Cut the fabric open under the lace insertion (2) and iron it down with straight stitches made with short zigzag stitches of '1.5 on the wrong side. Sew over the edges of the lace with a stitch length of medium width (4).

Owner's Manual
Page 29
CPFAFFD - - - 1- t Lever at left , respec tively. The needle position lever is done by mov ing lever (19) to the right or left of the needle plate slot. This is indispensable for sewing buttonholes. Changing the Needte F'osition Some special sewing jobs are made with the needle switched to the right and left center right 28
CPFAFFD - - - 1- t Lever at left , respec tively. The needle position lever is done by mov ing lever (19) to the right or left of the needle plate slot. This is indispensable for sewing buttonholes. Changing the Needte F'osition Some special sewing jobs are made with the needle switched to the right and left center right 28

Owner's Manual
Page 30
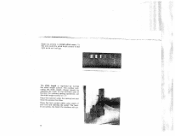
For heavier threads, slightly increase the stitch length. For sewing buttonholes, you can obtain buttonhole sewing foot No. 94-847 616-00 from your dealer. 3 4 R2 Ri CPFAFFD 2 4 29 Sewing Buttonholes 4 Attach all-purpose sewing foot No. 93-1 00 179-00 Flick the needle to its left position and put the stitch width control in... stitch length control so that the white dot is opposite the groove (see Figs. 2 and 3). To obtain more prominent buttonholes, place a filler cord of the sewing foot.
For heavier threads, slightly increase the stitch length. For sewing buttonholes, you can obtain buttonhole sewing foot No. 94-847 616-00 from your dealer. 3 4 R2 Ri CPFAFFD 2 4 29 Sewing Buttonholes 4 Attach all-purpose sewing foot No. 93-1 00 179-00 Flick the needle to its left position and put the stitch width control in... stitch length control so that the white dot is opposite the groove (see Figs. 2 and 3). To obtain more prominent buttonholes, place a filler cord of the sewing foot.
Owner's Manual
Page 31
... stitch width control (18) to the sec ond notch H 2, make 3 to the the second but about '/i inch from your seam the bartacks. (5). Sew the first seam over the filler cord. Lower the foot and let the needle descend on the right of the first seam. Flick the stitch...make 4 to 6 bartack stitch es, slightly holding the material to reduce the length of the foot (2). Push stitch width control first notch R 1 and sew tonhole seam, stopping (18) back to 4 fastening stitches. Be careful not to injure filler threads your dealer. When the buttonhole is the right length, ...
... stitch width control (18) to the sec ond notch H 2, make 3 to the the second but about '/i inch from your seam the bartacks. (5). Sew the first seam over the filler cord. Lower the foot and let the needle descend on the right of the first seam. Flick the stitch...make 4 to 6 bartack stitch es, slightly holding the material to reduce the length of the foot (2). Push stitch width control first notch R 1 and sew tonhole seam, stopping (18) back to 4 fastening stitches. Be careful not to injure filler threads your dealer. When the buttonhole is the right length, ...


