

Owner's Manual
Page 2
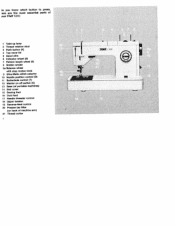
... Shell edging 52 Blindstitching 53 Inserting patches 54 Reinforcing edges of Ptaff machines 214 and 1222-E 3 viachine drive 4 3 reparations for bobbin winding 5 Removing the bobbin case 6 Bobbin winding 7 Disengaging the sewing mechanism 7 Inserting the bobbin 8 Inserting the bobbin case 9 Upper ... stitching 15 Foot control 15 Reverse sewing 16 Dropping the machine feed 16 Presser bar lifter 17 Stopmatic control 17 Dual feed 18/19 Sewing over cross seams Electronic control Changing the needle Changing the sewing foot Regulating the thread tensions Detachable...
... Shell edging 52 Blindstitching 53 Inserting patches 54 Reinforcing edges of Ptaff machines 214 and 1222-E 3 viachine drive 4 3 reparations for bobbin winding 5 Removing the bobbin case 6 Bobbin winding 7 Disengaging the sewing mechanism 7 Inserting the bobbin 8 Inserting the bobbin case 9 Upper ... stitching 15 Foot control 15 Reverse sewing 16 Dropping the machine feed 16 Presser bar lifter 17 Stopmatic control 17 Dual feed 18/19 Sewing over cross seams Electronic control Changing the needle Changing the sewing foot Regulating the thread tensions Detachable...

Owner's Manual
Page 3
...; Instruction Book for the Push-Button Pfaff 1213, 1214 and 1222-E 194 Dear (new) Pfaff Customer: Welcome to the modern, efficient world of your Pfaff. PFAFF-HANDELSG ESELLSCHAFT für Haushaltnähmaschinen m.b.H. 7500 Karlsruhe 41 West-Germany You are illustrated. Your Pfaff sewing machine is very versatile, and we suggest that sewing with your Pfatf will quickly familiarize...
...; Instruction Book for the Push-Button Pfaff 1213, 1214 and 1222-E 194 Dear (new) Pfaff Customer: Welcome to the modern, efficient world of your Pfaff. PFAFF-HANDELSG ESELLSCHAFT für Haushaltnähmaschinen m.b.H. 7500 Karlsruhe 41 West-Germany You are illustrated. Your Pfaff sewing machine is very versatile, and we suggest that sewing with your Pfatf will quickly familiarize...
Owner's Manual
Page 4
o you know which button to press, ere are the most essential parts of tour Pfaff 1213: 1 Take-up lever 2 Thread retainer stud 3 Push button (K) 4 Top cover lid 5 Spool pins 6 Indicator wheel (S) 7 Pattern length wheel (E) 8 Bobbin winder Ba Balance wheel with ...stop motion knob 9 Ultra-Matic stitch selector 10 Needle position control (D) 11 Buttonhole control () 12 Master on-off switch (C) 13 Base (of portable machInes) 14 Bed cover 15 Sewing foot 16 Dualfeed 17 Needle threader control 18 Upper tension 19 Reverse-teed control 20 Presser bar lifter (on back of...
o you know which button to press, ere are the most essential parts of tour Pfaff 1213: 1 Take-up lever 2 Thread retainer stud 3 Push button (K) 4 Top cover lid 5 Spool pins 6 Indicator wheel (S) 7 Pattern length wheel (E) 8 Bobbin winder Ba Balance wheel with ...stop motion knob 9 Ultra-Matic stitch selector 10 Needle position control (D) 11 Buttonhole control () 12 Master on-off switch (C) 13 Base (of portable machInes) 14 Bed cover 15 Sewing foot 16 Dualfeed 17 Needle threader control 18 Upper tension 19 Reverse-teed control 20 Presser bar lifter (on back of...

Owner's Manual
Page 5
...Bobbin winder 8a Balance wheel with stop motion knob (Pfaff 1214) 9 Ultra-Matic stitch selector 10 Needle position control (D) 11 Buttonhole control (1) 12 Master on-off switch (C) 13 Free arm 14 Free arm cover (enclosing the sewing hook) 15 Sewing foot 16 Dualfeed 17 Needle threader control 18 Upper... tension 19 Reverse-feed control 20 Presser bar lifter (on back of machine arm) 21 Thread cutter
...Bobbin winder 8a Balance wheel with stop motion knob (Pfaff 1214) 9 Ultra-Matic stitch selector 10 Needle position control (D) 11 Buttonhole control (1) 12 Master on-off switch (C) 13 Free arm 14 Free arm cover (enclosing the sewing hook) 15 Sewing foot 16 Dualfeed 17 Needle threader control 18 Upper... tension 19 Reverse-feed control 20 Presser bar lifter (on back of machine arm) 21 Thread cutter

Owner's Manual
Page 6
Just plug in the machine base, and plug B into socket A in the machine, wind the bobbin and thread the needle. Push the master plug into the wall socket. only a few simple steps are necessary. Place the foot control under the table in a convenient position. o start sewing right away. All you have to do now is push button C which is the on-off control of your machine This button also switches on the glare-free sewing light. 4 Th.
Just plug in the machine base, and plug B into socket A in the machine, wind the bobbin and thread the needle. Push the master plug into the wall socket. only a few simple steps are necessary. Place the foot control under the table in a convenient position. o start sewing right away. All you have to do now is push button C which is the on-off control of your machine This button also switches on the glare-free sewing light. 4 Th.

Owner's Manual
Page 7
These two threads are locked together in this way is illustrated below. The seam produced in the middle of the fabric to page 21. To wind the bobbin, turn to form a lock stitch. If your seam doesn't look like the illustration, turn the machine on by -step bobbin winding instructions please refer to sew a seam: an upper and a lower thread. The sewing mechanism must be disengaged (see page 7). Before you start winding the bobbin remember that you need two threads to page 7. For step-by pushing button C (page 4).
These two threads are locked together in this way is illustrated below. The seam produced in the middle of the fabric to page 21. To wind the bobbin, turn to form a lock stitch. If your seam doesn't look like the illustration, turn the machine on by -step bobbin winding instructions please refer to sew a seam: an upper and a lower thread. The sewing mechanism must be disengaged (see page 7). Before you start winding the bobbin remember that you need two threads to page 7. For step-by pushing button C (page 4).

Owner's Manual
Page 9
... is re-engaged automatically on starting the machine, On the Pfaff 1222-E, the sewing mechanism is full, To re-engage the sewing mechanism after bobbin winding, turn the stop motion ...bobbin, as shown in position magnetically (see ill, at leffl. I to wind the bobbin and disengage the sewing mechanism: Raise both spool pins and place a spool of thread on the foot control. Push lever E against... the bobbin, hold the balance wheel, and turn the stop motion knob of Pfaft machines 1213 and 1214 (8a on bobbin winder disc S where it is held in the above illustration, Wind ...
... is re-engaged automatically on starting the machine, On the Pfaff 1222-E, the sewing mechanism is full, To re-engage the sewing mechanism after bobbin winding, turn the stop motion ...bobbin, as shown in position magnetically (see ill, at leffl. I to wind the bobbin and disengage the sewing mechanism: Raise both spool pins and place a spool of thread on the foot control. Push lever E against... the bobbin, hold the balance wheel, and turn the stop motion knob of Pfaft machines 1213 and 1214 (8a on bobbin winder disc S where it is held in the above illustration, Wind ...

Owner's Manual
Page 15
...shown set for a medium zigzag stitch in stitch range 8. -U. The Ultra-Matic stitch selector The Ultra-Matic stitch selector sets your Pfaff run . In the illustration on the Ultra-Matic stitch selector in the mate rial when you press the foot control pedal, the faster your... medium dense Now try a zigzag stitch. The harder you turn the Liltra-Matic stitch selector. Zigzag stitches are marked by making a sewing test. For instance, the range from 0 to 4 comprises straight stitches of your machine will run at different speeds. Press the foot control pedal, and watch your...
...shown set for a medium zigzag stitch in stitch range 8. -U. The Ultra-Matic stitch selector The Ultra-Matic stitch selector sets your Pfaff run . In the illustration on the Ultra-Matic stitch selector in the mate rial when you press the foot control pedal, the faster your... medium dense Now try a zigzag stitch. The harder you turn the Liltra-Matic stitch selector. Zigzag stitches are marked by making a sewing test. For instance, the range from 0 to 4 comprises straight stitches of your machine will run at different speeds. Press the foot control pedal, and watch your...
Owner's Manual
Page 16
Darning with your machine down, moving it returns to position A automati cally (Fig. 2). When this control is turned to B. If you wish to sew a longer seam in reverse, flick the reverse-feed control to position C (vertical), as shown in Fig. 3. 3 When this control is discussed on the front of your Pfaff is released, it from A to position 0 (Fig. 4), the darning symbol is visible, and the machine teed is disengaged .2 ; ' 4 ro sew backwards or backtack a seam, press reverse-feed control 19 on page 26.
Darning with your machine down, moving it returns to position A automati cally (Fig. 2). When this control is turned to B. If you wish to sew a longer seam in reverse, flick the reverse-feed control to position C (vertical), as shown in Fig. 3. 3 When this control is discussed on the front of your Pfaff is released, it from A to position 0 (Fig. 4), the darning symbol is visible, and the machine teed is disengaged .2 ; ' 4 ro sew backwards or backtack a seam, press reverse-feed control 19 on page 26.

Owner's Manual
Page 18
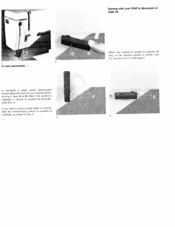
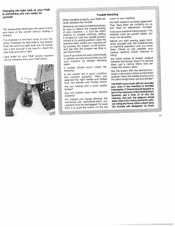
To disengage this foot, push it down in the slot of the raised sewing foot until it up out of fabric wiH match erfectly, no matter how long the seam iay be. our Ptaff is used for perfectly matching plaids, striped and patterned fabrics. The dual feed is also used for sewing long seams and for sewing over thick cross seams. To engage the dual feed, simply push it down slightly, then pull it snaps into place (see arrow in illustra tion at bottom left). This foot is the only home sewing machine the world featuring a dual feed. wo pieces of the slot in the sewing foot.
To disengage this foot, push it down in the slot of the raised sewing foot until it up out of fabric wiH match erfectly, no matter how long the seam iay be. our Ptaff is used for perfectly matching plaids, striped and patterned fabrics. The dual feed is also used for sewing long seams and for sewing over thick cross seams. To engage the dual feed, simply push it down slightly, then pull it snaps into place (see arrow in illustra tion at bottom left). This foot is the only home sewing machine the world featuring a dual feed. wo pieces of the slot in the sewing foot.

Owner's Manual
Page 19
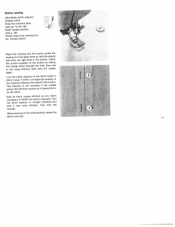
... for stitching through the thickest spots in the top illustration (below) when you have to sew over thick seams or several layers of your assistance whenever you sew without the dual feed, Whenyoujointwopiecesofcheckedmaterial with the dual feed include the hemmer foot, blindstitch foot and... and the electronic control instantly reduces the speed of fabric. The electronic control which can be similar to slow stitchbystitch sewing for the dectronic Control of the Pfaff 1222-E. Just relieve the pressure on the foot control . . . Other feet which operates' behind the scenes" ...
... for stitching through the thickest spots in the top illustration (below) when you have to sew over thick seams or several layers of your assistance whenever you sew without the dual feed, Whenyoujointwopiecesofcheckedmaterial with the dual feed include the hemmer foot, blindstitch foot and... and the electronic control instantly reduces the speed of fabric. The electronic control which can be similar to slow stitchbystitch sewing for the dectronic Control of the Pfaff 1222-E. Just relieve the pressure on the foot control . . . Other feet which operates' behind the scenes" ...

Owner's Manual
Page 20
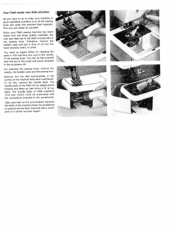
...lower the presser bar lifter and flick it up as far as simple. Tighten screw B again before starting to the correct position for a specific sewing job is attached in the reverse order. Insert a new needle and push it to position D (see ill, below) and pull the old ...needle out of your machine contains several special sewing feet (hemmer foot, buttonhole foot, etc.) which are used for various sewing operations. Which sewing foot to its shank faces toward the back. The new sewing foot is discussed on page 63. A detailed Needle and Thread Chart...
...lower the presser bar lifter and flick it up as far as simple. Tighten screw B again before starting to the correct position for a specific sewing job is attached in the reverse order. Insert a new needle and push it to position D (see ill, below) and pull the old ...needle out of your machine contains several special sewing feet (hemmer foot, buttonhole foot, etc.) which are used for various sewing operations. Which sewing foot to its shank faces toward the back. The new sewing foot is discussed on page 63. A detailed Needle and Thread Chart...

Owner's Manual
Page 22
I Straightstitch and zigzag sewing work Pwipplfliuinutashssfhtfaremadetdainoecotntehvariecnbrheetatlshhboeew1le2.f1awr4epToepharrinkasopdrpmlwra1ito2aeu2rt,nek2tapi-lsElhaisttoaheslroeetwsiwssnuoipsniigpnmultiptihehdldeyee machine. detachab'e workplate increases your Pfaff 1213 Portable, attach the bedplate extension illustrated below. To increase the sewing area of your vorking surface...
I Straightstitch and zigzag sewing work Pwipplfliuinutashssfhtfaremadetdainoecotntehvariecnbrheetatlshhboeew1le2.f1awr4epToepharrinkasopdrpmlwra1ito2aeu2rt,nek2tapi-lsElhaisttoaheslroeetwsiwssnuoipsniigpnmultiptihehdldeyee machine. detachab'e workplate increases your Pfaff 1213 Portable, attach the bedplate extension illustrated below. To increase the sewing area of your vorking surface...

Owner's Manual
Page 23
Now see for yourself what your Pfaff can be obtained from your Pfaff dealer) . They are made in straight and zigzag stitching. Second seam: ...of the top piece, but the top edge must not be folded over the edge of the many possibilities this machine offers you in two opera tions: First seam: Lay the two pieces of fabric. Open the two pieces.... FeHing Ultra-Matic stitch selector: straight stitch Stitch length: 1.5-2 Engage dual feed if material requires it taut while sewing. :I r- 23 Lightly pull the fabric sideways to the left, starting at the same end as the first seam...
Now see for yourself what your Pfaff can be obtained from your Pfaff dealer) . They are made in straight and zigzag stitching. Second seam: ...of the top piece, but the top edge must not be folded over the edge of the many possibilities this machine offers you in two opera tions: First seam: Lay the two pieces of fabric. Open the two pieces.... FeHing Ultra-Matic stitch selector: straight stitch Stitch length: 1.5-2 Engage dual feed if material requires it taut while sewing. :I r- 23 Lightly pull the fabric sideways to the left, starting at the same end as the first seam...

Owner's Manual
Page 27
...close stitches across and lengthwise. Tubular articles, such as sleeves, trouser legs and stockings, can be easily darned on the free arm of the Pfaff 1222. Then turn the fabric at high speed. Triangular tears and rips are closely spaced. This anchors the threads in the un worn area around... the hole. Stitch back and forth across the hole lengthwise, with the machine running at right angles and sew back and forth over the preceding work with both hands. After you have finished darning, swing the reverse-feed control back to ...
...close stitches across and lengthwise. Tubular articles, such as sleeves, trouser legs and stockings, can be easily darned on the free arm of the Pfaff 1222. Then turn the fabric at high speed. Triangular tears and rips are closely spaced. This anchors the threads in the un worn area around... the hole. Stitch back and forth across the hole lengthwise, with the machine running at right angles and sew back and forth over the preceding work with both hands. After you have finished darning, swing the reverse-feed control back to ...
Owner's Manual
Page 37
... hole exactly as you deem necessary to the distance between the holes in the button. Then trim the threads. Button sewing Ultra-Matic stitch selector: straight stitch Drop the machine feed (see p. 38). Check the correct position of the button by letting the needle stitch through the hole.... Sew one or two tying stitches, then raise the needle again. When sewing on four-hole buttons, repeat the above process. - - . - Attach clear-view sewing foot No. 93...
... hole exactly as you deem necessary to the distance between the holes in the button. Then trim the threads. Button sewing Ultra-Matic stitch selector: straight stitch Drop the machine feed (see p. 38). Check the correct position of the button by letting the needle stitch through the hole.... Sew one or two tying stitches, then raise the needle again. When sewing on four-hole buttons, repeat the above process. - - . - Attach clear-view sewing foot No. 93...

Owner's Manual
Page 38
...and the thread being used. To set for each subsequent buttonhole. The machine is thus set the machine for the central needie position is positioned below the setting mark. they are out (see ill. Now sew this seam, making it snaps into the buttonhole seam completely and trim both... again to the buttonhole length marked. 2. ewhig buttonhoes Mtach buttonhole too \Io. 93-040 924-91. Repeat this phase, the machine makes a few zigzag stitches for sewing the left seam. Pull the filler cord into place again with your seam ripper. Use No. 50 nachine embroidery thread as the...
...and the thread being used. To set for each subsequent buttonhole. The machine is thus set the machine for the central needie position is positioned below the setting mark. they are out (see ill. Now sew this seam, making it snaps into the buttonhole seam completely and trim both... again to the buttonhole length marked. 2. ewhig buttonhoes Mtach buttonhole too \Io. 93-040 924-91. Repeat this phase, the machine makes a few zigzag stitches for sewing the left seam. Pull the filler cord into place again with your seam ripper. Use No. 50 nachine embroidery thread as the...

Owner's Manual
Page 40
Drop the machine feed. Attach darning foot No. 93-040 960-91. 3 Trace the monogram first on the fabric. Monogram embroêdery Ultra-Matic stitch selector: zigzag .... 42 Move the hoop slowly and evenly, and follow the traced outlines as if you will be embroider ed with the cording or clear-view sewing foot. Place the material in fabrics that are not too flimsy without using a darning hoop. / - :1 r Once you have acquired a little practice, you were writing. Straight...
Drop the machine feed. Attach darning foot No. 93-040 960-91. 3 Trace the monogram first on the fabric. Monogram embroêdery Ultra-Matic stitch selector: zigzag .... 42 Move the hoop slowly and evenly, and follow the traced outlines as if you will be embroider ed with the cording or clear-view sewing foot. Place the material in fabrics that are not too flimsy without using a darning hoop. / - :1 r Once you have acquired a little practice, you were writing. Straight...
Owner's Manual
Page 62
...of packed lint are best removed with the screwdriver included in the vicinity of the Pfaff 1213 is the sewing hook. To do this yourself with a soft brush. This you have to do to keep your Pfaff sewing machine has been made from the finest quality materials, the only part that no expert ...bobbin case and put a drop of oil into the hook raceway every so often, You need no lint accumulates between the teeth of Pfaff machines 1214 and 1222E must be oiled occasionally is simply pulled forward and lifted up (see arrow in good operating condition is to be unscrewed with a tooth...
...of packed lint are best removed with the screwdriver included in the vicinity of the Pfaff 1213 is the sewing hook. To do this yourself with a soft brush. This you have to do to keep your Pfaff sewing machine has been made from the finest quality materials, the only part that no expert ...bobbin case and put a drop of oil into the hook raceway every so often, You need no lint accumulates between the teeth of Pfaff machines 1214 and 1222E must be oiled occasionally is simply pulled forward and lifted up (see arrow in good operating condition is to be unscrewed with a tooth...
Owner's Manual
Page 63
... the needle position must be obtained from the Needle and Thread Chart? turn it at about 2; switch your machine off button, and see whether your set your machine for your Pfaff sewing machine can easily do yourself The sewing light illuminates the work in front and back of the needle without casting a shadow. or darned, we...
... the needle position must be obtained from the Needle and Thread Chart? turn it at about 2; switch your machine off button, and see whether your set your machine for your Pfaff sewing machine can easily do yourself The sewing light illuminates the work in front and back of the needle without casting a shadow. or darned, we...


