
*ist Manual
Page 2
... service station to receive a copy of the warranty policy. Always obtain a quotation for at the time of purchase, or contact the PENTAX distributor in some countries can be used . Incorporating a broad range of advanced technologies and highly accurate automation, this camera will be borne...not made by other manufacturers. 153 the manufacturer will perform superbly for more information and to proceed with your Pentax camera. The camera does not operate when a lens with , or actual damage to the manufacturer. Lenses and accessories produced by the sender. Before sending your ...
... service station to receive a copy of the warranty policy. Always obtain a quotation for at the time of purchase, or contact the PENTAX distributor in some countries can be used . Incorporating a broad range of advanced technologies and highly accurate automation, this camera will be borne...not made by other manufacturers. 153 the manufacturer will perform superbly for more information and to proceed with your Pentax camera. The camera does not operate when a lens with , or actual damage to the manufacturer. Lenses and accessories produced by the sender. Before sending your ...
*ist Manual
Page 4
...changes in a place with a dry soft cloth. • Do not drop the camera or allow it may cause rust. Store it to a Pentax service center for proper care • Never touch the shutter curtain or mirror with your picture with a margin of fungus. Precautions for inspection. •...is a high-precision mechanism. Use a cushion to protect the camera when carrying it in a motorcycle, car, boat, etc. • Condensation on the lens or viewfinder. • Never use a spray blower for extended periods in places where the humidity and temperature are very high, such as in a car....
...changes in a place with a dry soft cloth. • Do not drop the camera or allow it may cause rust. Store it to a Pentax service center for proper care • Never touch the shutter curtain or mirror with your picture with a margin of fungus. Precautions for inspection. •...is a high-precision mechanism. Use a cushion to protect the camera when carrying it in a motorcycle, car, boat, etc. • Condensation on the lens or viewfinder. • Never use a spray blower for extended periods in places where the humidity and temperature are very high, such as in a car....
*ist Manual
Page 7
... Battery Warning 26 Step 3 TURNING ON THE POWER 27 Step 4 ADJUSTING THE DATE AND TIME 28 Step 5 IMPRINTING THE DATE OR TIME 30 Step 6 ATTACHING A LENS 32 Step 7 ADJUSTING THE VIEWFINDER'S DIOPTER .34 Step 8 LOADING FILM 35 Step 9 OPERATING THE SHUTTER RELEASE BUTTON 37
... Battery Warning 26 Step 3 TURNING ON THE POWER 27 Step 4 ADJUSTING THE DATE AND TIME 28 Step 5 IMPRINTING THE DATE OR TIME 30 Step 6 ATTACHING A LENS 32 Step 7 ADJUSTING THE VIEWFINDER'S DIOPTER .34 Step 8 LOADING FILM 35 Step 9 OPERATING THE SHUTTER RELEASE BUTTON 37
*ist Manual
Page 8
... MODE TO AF.S 43 Step 5.SETTING THE FOCUS POINT MODE TO AUTO 44 Step 6.SETTING THE AUTO POP UP FLASH . . . . . .45 Step 7.USING THE ZOOM LENS 46 Step 8.HOLDING THE CAMERA 47 Step 9.TAKING A PICTURE 48 Step 10.UNLOADING A FILM 50 Step 11.REWINDING A FILM IN MID-ROLL 51 SETTING THE...
... MODE TO AF.S 43 Step 5.SETTING THE FOCUS POINT MODE TO AUTO 44 Step 6.SETTING THE AUTO POP UP FLASH . . . . . .45 Step 7.USING THE ZOOM LENS 46 Step 8.HOLDING THE CAMERA 47 Step 9.TAKING A PICTURE 48 Step 10.UNLOADING A FILM 50 Step 11.REWINDING A FILM IN MID-ROLL 51 SETTING THE...

*ist Manual
Page 10
8 TABLE OF CONTENTS POP-UP THE BUILT-IN FLASH MANUALLY 106 Daylight-Sync Shooting 108 FLASH RECOMMENDED INFORMATION 109 INAPPROPRIATE LENS WARNING WHEN THE BUILT- IN FLASH IS USED 110 ADVANCED OPERATION FOR THE BUILT-IN FLASH 111 1.When Using the Auto Picture and Picture Modes ... the Built-in Flash and External Flash .124 Red-eye Reduction Flash Function 126 Trailing-Shutter-Curtain Sync Flash 126 Multi-burst Flash with the Pentax Dedicated Flash 126
8 TABLE OF CONTENTS POP-UP THE BUILT-IN FLASH MANUALLY 106 Daylight-Sync Shooting 108 FLASH RECOMMENDED INFORMATION 109 INAPPROPRIATE LENS WARNING WHEN THE BUILT- IN FLASH IS USED 110 ADVANCED OPERATION FOR THE BUILT-IN FLASH 111 1.When Using the Auto Picture and Picture Modes ... the Built-in Flash and External Flash .124 Red-eye Reduction Flash Function 126 Trailing-Shutter-Curtain Sync Flash 126 Multi-burst Flash with the Pentax Dedicated Flash 126
*ist Manual
Page 11
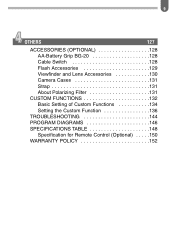
9 OTHERS 127 ACCESSORIES (OPTIONAL 128 AA-Battery Grip BG-20 128 Cable Switch 128 Flash Accessories 129 Viewfinder and Lens Accessories 130 Camera Cases 131 Strap 131 About Polarizing Filter 131 CUSTOM FUNCTIONS 132 Basic Setting of Custom Functions 134 Setting the Custom Function 136 TROUBLESHOOTING 144 PROGRAM DIAGRAMS 146 SPECIFICATIONS TABLE 148 Specification for Remote Control (Optional) . . . . .150 WARRANTY POLICY 152
9 OTHERS 127 ACCESSORIES (OPTIONAL 128 AA-Battery Grip BG-20 128 Cable Switch 128 Flash Accessories 129 Viewfinder and Lens Accessories 130 Camera Cases 131 Strap 131 About Polarizing Filter 131 CUSTOM FUNCTIONS 132 Basic Setting of Custom Functions 134 Setting the Custom Function 136 TROUBLESHOOTING 144 PROGRAM DIAGRAMS 146 SPECIFICATIONS TABLE 148 Specification for Remote Control (Optional) . . . . .150 WARRANTY POLICY 152
*ist Manual
Page 12
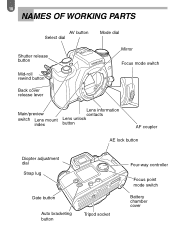
10 NAMES OF WORKING PARTS AV button Select dial Shutter release button Mid-roll rewind button Back cover release lever Mode dial Mirror Focus mode switch Main/preview switch Lens mount index Lens information contacts Lens unlock button AF coupler AE lock button Diopter adjustment dial Strap lug Date button Auto bracketing button Tripod socket Four-way controller Focus point mode switch Battery chamber cover
10 NAMES OF WORKING PARTS AV button Select dial Shutter release button Mid-roll rewind button Back cover release lever Mode dial Mirror Focus mode switch Main/preview switch Lens mount index Lens information contacts Lens unlock button AF coupler AE lock button Diopter adjustment dial Strap lug Date button Auto bracketing button Tripod socket Four-way controller Focus point mode switch Battery chamber cover
*ist Manual
Page 17
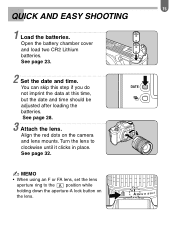
...See page 32. ✍ MEMO • When using an F or FA lens, set the lens aperture ring to clockwise until it clicks in place. See page 28. 3 Attach the lens. 15 QUICK AND EASY SHOOTING 1 Load the batteries. Turn the lens to the position while holding down the aperture-A lock button on the camera and... lens mounts. See page 23. 2 Set the date and time. Align the red ...
...See page 32. ✍ MEMO • When using an F or FA lens, set the lens aperture ring to clockwise until it clicks in place. See page 28. 3 Attach the lens. 15 QUICK AND EASY SHOOTING 1 Load the batteries. Turn the lens to the position while holding down the aperture-A lock button on the camera and... lens mounts. See page 23. 2 Set the date and time. Align the red ...

*ist Manual
Page 20
18 CAMERA FUNCTIONS AVAILABLE WITH VARIOUS LENSES Lenses that can be used with this camera Only an FA J lens and an FA/F/A lens having an position on the aperture ring cannot be used unless custom function number [CF17] is set to the position. : Functions...cannot be used only when the aperture ring is set to [2]. Function Autofocus Manual focus Lens [Mount type] (Lens only) (With AF adapter 1.7X)*1 (With the focus indicator)*2 (With Matte field) FA J, FA lens [KAF, KAF2]*3 F lens [KAF]*3 A lens [KA] Eleven focus points Power zoom *4 Auto Picture Mode, Picture Mode Aperture-Priority ...
18 CAMERA FUNCTIONS AVAILABLE WITH VARIOUS LENSES Lenses that can be used with this camera Only an FA J lens and an FA/F/A lens having an position on the aperture ring cannot be used unless custom function number [CF17] is set to the position. : Functions...cannot be used only when the aperture ring is set to [2]. Function Autofocus Manual focus Lens [Mount type] (Lens only) (With AF adapter 1.7X)*1 (With the focus indicator)*2 (With Matte field) FA J, FA lens [KAF, KAF2]*3 F lens [KAF]*3 A lens [KA] Eleven focus points Power zoom *4 Auto Picture Mode, Picture Mode Aperture-Priority ...

*ist Manual
Page 21
To use an F/FA soft 85mm f/2.8 lens or FA soft 28mm f/2.8 lens, set . *4. Lenses and accessories that cannot be used with the aperture you set custom function number [CF17] to a position other than the position. • When ... custom function number [CF17] is changed to [2] (see pages 134 and 142): • When a lens without an position is used. • When an F or FA lens is used . Lens with a maximum aperture of f/5.6 or larger (smaller aperture number). *3. Lens with the Autofocus SLR camera. Only the standard program mode works in the Auto picture...
To use an F/FA soft 85mm f/2.8 lens or FA soft 28mm f/2.8 lens, set . *4. Lenses and accessories that cannot be used with the aperture you set custom function number [CF17] to a position other than the position. • When ... custom function number [CF17] is changed to [2] (see pages 134 and 142): • When a lens without an position is used. • When an F or FA lens is used . Lens with a maximum aperture of f/5.6 or larger (smaller aperture number). *3. Lens with the Autofocus SLR camera. Only the standard program mode works in the Auto picture...
*ist Manual
Page 23
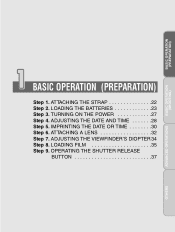
TURNING ON THE POWER 27 Step 4. BASIC OPERATION (PREPARATION) BASIC OPERATION (SHOOTING) BASIC OPERATION (PREPARATION) Step 1. OPERATING THE SHUTTER RELEASE BUTTON 37 ADVANCED OPERATIONS OTHERS ADJUSTING THE DATE AND TIME 28 Step 5. IMPRINTING THE DATE OR TIME 30 Step 6. ADJUSTING THE VIEWFINDER'S DIOPTER 34 Step 8. LOADING THE BATTERIES 23 Step 3. LOADING FILM 35 Step 9. ATTACHING THE STRAP 22 Step 2. ATTACHING A LENS 32 Step 7.
TURNING ON THE POWER 27 Step 4. BASIC OPERATION (PREPARATION) BASIC OPERATION (SHOOTING) BASIC OPERATION (PREPARATION) Step 1. OPERATING THE SHUTTER RELEASE BUTTON 37 ADVANCED OPERATIONS OTHERS ADJUSTING THE DATE AND TIME 28 Step 5. IMPRINTING THE DATE OR TIME 30 Step 6. ADJUSTING THE VIEWFINDER'S DIOPTER 34 Step 8. LOADING THE BATTERIES 23 Step 3. LOADING FILM 35 Step 9. ATTACHING THE STRAP 22 Step 2. ATTACHING A LENS 32 Step 7.

*ist Manual
Page 34
32 Step 6 ATTACHING A LENS 1 Remove the body mount cap and rear lens cap . 2 Align the red dots on the lens and camera while attaching the lens to the camera, then turn the lens clockwise until it clicks in place. 3 As shown in the illustration, remove the front lens cap. 4 To detach the lens, hold down the lens unlock button and turn the lens counterclockwise.
32 Step 6 ATTACHING A LENS 1 Remove the body mount cap and rear lens cap . 2 Align the red dots on the lens and camera while attaching the lens to the camera, then turn the lens clockwise until it clicks in place. 3 As shown in the illustration, remove the front lens cap. 4 To detach the lens, hold down the lens unlock button and turn the lens counterclockwise.

*ist Manual
Page 35
...8226; We assume no responsibility nor liability for damages resulting from the use of lenses made by other manufacturers. • To protect the lens information contacts and AF coupler of the camera from dust and scratches upon factory shipment. For long-term camera storage, the optional accessory "Body... Mount Cap K" is locked in place. • The camera body and lens mount incorporate lens information contacts and an AF coupler. BASIC OPERATION (PREPARATION) 33 ✍ MEMO • The body mount cap protects the inside of the...
...8226; We assume no responsibility nor liability for damages resulting from the use of lenses made by other manufacturers. • To protect the lens information contacts and AF coupler of the camera from dust and scratches upon factory shipment. For long-term camera storage, the optional accessory "Body... Mount Cap K" is locked in place. • The camera body and lens mount incorporate lens information contacts and an AF coupler. BASIC OPERATION (PREPARATION) 33 ✍ MEMO • The body mount cap protects the inside of the...
*ist Manual
Page 41
SETTING THE AUTO PICTURE MODE . . . .41 Step 3. USING THE ZOOM LENS 46 Step 8. HOLDING THE CAMERA 47 Step 9. SETTING THE AUTO FOCUS MODE TO AF.S 43 Step 5. REWINDING A FILM IN MID-ROLL . . . . . .51 SETTING THE FILM ...
SETTING THE AUTO PICTURE MODE . . . .41 Step 3. USING THE ZOOM LENS 46 Step 8. HOLDING THE CAMERA 47 Step 9. SETTING THE AUTO FOCUS MODE TO AF.S 43 Step 5. REWINDING A FILM IN MID-ROLL . . . . . .51 SETTING THE FILM ...

*ist Manual
Page 43
...1 Set the mode dial to the position while holding down the aperture-A lock button on the lens. • The Auto picture mode operates only when an FA J, FA or F lens is attached. ADVANCED OPERATIONS OTHERS The selected picture mode appears in the viewfinder. When an... A lens is attached, the exposure mode is selected ✍ MEMO • When using an F or FA lens, set the lens aperture ring to the . When "standard" is automatically fixed to the requirement of 5 picture modes...
...1 Set the mode dial to the position while holding down the aperture-A lock button on the lens. • The Auto picture mode operates only when an FA J, FA or F lens is attached. ADVANCED OPERATIONS OTHERS The selected picture mode appears in the viewfinder. When an... A lens is attached, the exposure mode is selected ✍ MEMO • When using an F or FA lens, set the lens aperture ring to the . When "standard" is automatically fixed to the requirement of 5 picture modes...

*ist Manual
Page 45
See page 94. • AF.C: Continuous focus. See page 91 to . ADVANCED OPERATIONS OTHERS See page 93. Step 4 43 SETTING THE AUTO FOCUS MODE TO AF.S When the shutter release button is pressed halfway down, the lens adjusts focus automatically. 1 Set the focus mode switch to 101 for various focusing methods. BASIC OPERATION (PREPARATION) BASIC OPERATION (SHOOTING) ✍ MEMO You can also focus in the following ways: • MF: Focus manually.
See page 94. • AF.C: Continuous focus. See page 91 to . ADVANCED OPERATIONS OTHERS See page 93. Step 4 43 SETTING THE AUTO FOCUS MODE TO AF.S When the shutter release button is pressed halfway down, the lens adjusts focus automatically. 1 Set the focus mode switch to 101 for various focusing methods. BASIC OPERATION (PREPARATION) BASIC OPERATION (SHOOTING) ✍ MEMO You can also focus in the following ways: • MF: Focus manually.

*ist Manual
Page 47
...; MEMO • The built-in flash does not retract automatically except when you turn off the power, push the built-in flash down after use a lens hood when the built-in flash is in the picture corners. Step 6 45 SETTING THE AUTO POP UP FLASH 1 Press the flash mode button until...
...; MEMO • The built-in flash does not retract automatically except when you turn off the power, push the built-in flash down after use a lens hood when the built-in flash is in the picture corners. Step 6 45 SETTING THE AUTO POP UP FLASH 1 Press the flash mode button until...

*ist Manual
Page 48
46 Step 7 USING THE ZOOM LENS 1 Turning the zoom ring to the right makes the subject appear larger (telephoto) and turning it to the left makes the subject appear smaller (wide angle). ✍ MEMO • The smaller the number shown on the zoom scale ring , the wider the angle. Conversely, the larger the number, the more magnified the image appears. • The Image Size Tracking Mode, Zoom Clip Mode, Auto Zoom Effect Mode and Power Zoom function do not operate with this camera even if an FA lens is attached. Telephoto Wide angle
46 Step 7 USING THE ZOOM LENS 1 Turning the zoom ring to the right makes the subject appear larger (telephoto) and turning it to the left makes the subject appear smaller (wide angle). ✍ MEMO • The smaller the number shown on the zoom scale ring , the wider the angle. Conversely, the larger the number, the more magnified the image appears. • The Image Size Tracking Mode, Zoom Clip Mode, Auto Zoom Effect Mode and Power Zoom function do not operate with this camera even if an FA lens is attached. Telephoto Wide angle

*ist Manual
Page 49
...vertically ✍ MEMO • To reduce camera shake, support your left hand supporting the camera and lens as shown in general the shutter speed for instance. • When using an telephoto lens, a tripod that is heavier than this. Sudden force on a solid object - BASIC OPERATION (PREPARATION)... will cause camera shake, making the picture blurred. OTHERS A tripod should be used for it is the inverse of the camera and lens is recommended to avoid camera shake. • Although there are individual differences among photographers, in the illustrations. • While taking a...
...vertically ✍ MEMO • To reduce camera shake, support your left hand supporting the camera and lens as shown in general the shutter speed for instance. • When using an telephoto lens, a tripod that is heavier than this. Sudden force on a solid object - BASIC OPERATION (PREPARATION)... will cause camera shake, making the picture blurred. OTHERS A tripod should be used for it is the inverse of the camera and lens is recommended to avoid camera shake. • Although there are individual differences among photographers, in the illustrations. • While taking a...

*ist Manual
Page 50
... the viewfinder lights up. The subject is difficult to imprint or not. 2 Look through the viewfinder and frame the subject with the focus points . The lens adjusts focus automatically. 48 Step 9 TAKING A PICTURE 1 Confirm that the focus mode switch is set to and select the data mode to be focused.
... the viewfinder lights up. The subject is difficult to imprint or not. 2 Look through the viewfinder and frame the subject with the focus points . The lens adjusts focus automatically. 48 Step 9 TAKING A PICTURE 1 Confirm that the focus mode switch is set to and select the data mode to be focused.


