
*ist Manual
Page 4
... for storage • Avoid leaving the camera for inspection. • Be careful not to subject the camera to prevent the growth of the film frame. Store it from rain, splashing water, or any other object. • Use a lens brush to remove dust accumulated on the extreme... edges of fungus. Furthermore, if the camera is a high-precision mechanism. 2 PRECAUTIONS FOR YOUR CAMERA Your Pentax camera is taken from warm temperature to a subfreezing one or vice versa, the formation of icelets may be extremely harmful to the camera mechanism...
... for storage • Avoid leaving the camera for inspection. • Be careful not to subject the camera to prevent the growth of the film frame. Store it from rain, splashing water, or any other object. • Use a lens brush to remove dust accumulated on the extreme... edges of fungus. Furthermore, if the camera is a high-precision mechanism. 2 PRECAUTIONS FOR YOUR CAMERA Your Pentax camera is taken from warm temperature to a subfreezing one or vice versa, the formation of icelets may be extremely harmful to the camera mechanism...
*ist Manual
Page 7
... 4 ADJUSTING THE DATE AND TIME 28 Step 5 IMPRINTING THE DATE OR TIME 30 Step 6 ATTACHING A LENS 32 Step 7 ADJUSTING THE VIEWFINDER'S DIOPTER .34 Step 8 LOADING FILM 35 Step 9 OPERATING THE SHUTTER RELEASE BUTTON 37
... 4 ADJUSTING THE DATE AND TIME 28 Step 5 IMPRINTING THE DATE OR TIME 30 Step 6 ATTACHING A LENS 32 Step 7 ADJUSTING THE VIEWFINDER'S DIOPTER .34 Step 8 LOADING FILM 35 Step 9 OPERATING THE SHUTTER RELEASE BUTTON 37
*ist Manual
Page 8
... FLASH . . . . . .45 Step 7.USING THE ZOOM LENS 46 Step 8.HOLDING THE CAMERA 47 Step 9.TAKING A PICTURE 48 Step 10.UNLOADING A FILM 50 Step 11.REWINDING A FILM IN MID-ROLL 51 SETTING THE FILM SPEED (ISO) MANUALLY . . . . .52 ADVANCED OPERATIONS 53 SELECTING A DRIVE MODE 54 Consecutive Shooting 55 Self-Timer Mode 56 Remote Control...
... FLASH . . . . . .45 Step 7.USING THE ZOOM LENS 46 Step 8.HOLDING THE CAMERA 47 Step 9.TAKING A PICTURE 48 Step 10.UNLOADING A FILM 50 Step 11.REWINDING A FILM IN MID-ROLL 51 SETTING THE FILM SPEED (ISO) MANUALLY . . . . .52 ADVANCED OPERATIONS 53 SELECTING A DRIVE MODE 54 Consecutive Shooting 55 Self-Timer Mode 56 Remote Control...

*ist Manual
Page 13
11 Built-in flash Metering mode switch Flash pop up button Release socket cap Hot shoe Viewfinder Film information window LCD panel Drive mode button Flash mode button
11 Built-in flash Metering mode switch Flash pop up button Release socket cap Hot shoe Viewfinder Film information window LCD panel Drive mode button Flash mode button
*ist Manual
Page 14
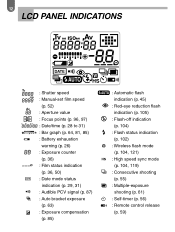
... (p. 52) : Aperture value : Focus points (p. 96, 97) : Date/time (p. 28 to 31) : Bar graph (p. 64, 81, 85) : Battery exhaustion warning (p. 26) : Exposure counter (p. 36) : Film status indication (p. 36, 50) : Date mode status indication (p. 29, 31) : Audible PCV signal (p. 87) : Auto bracket exposure (p. 63) : Exposure compensation (p. 85) : Automatic flash indication (p. 45) : ...
... (p. 52) : Aperture value : Focus points (p. 96, 97) : Date/time (p. 28 to 31) : Bar graph (p. 64, 81, 85) : Battery exhaustion warning (p. 26) : Exposure counter (p. 36) : Film status indication (p. 36, 50) : Date mode status indication (p. 29, 31) : Audible PCV signal (p. 87) : Auto bracket exposure (p. 63) : Exposure compensation (p. 85) : Automatic flash indication (p. 45) : ...

*ist Manual
Page 16
... is superimposed in red (the surrounding area is pressed halfway down. See pages 134 and 138. Keep this in mind when ordering copies of the film frame. The superimpose function can be upside down in the viewfinder when the shutter release button is also dimly lit) in relation to the picture... mode Focus indicator Shutter speed Aperture value AE lock Bar graph Exposure compensation • Regular size color prints may cut off what appears on the film will be canceled using the custom function [CF6].
... is superimposed in red (the surrounding area is pressed halfway down. See pages 134 and 138. Keep this in mind when ordering copies of the film frame. The superimpose function can be upside down in the viewfinder when the shutter release button is also dimly lit) in relation to the picture... mode Focus indicator Shutter speed Aperture value AE lock Bar graph Exposure compensation • Regular size color prints may cut off what appears on the film will be canceled using the custom function [CF6].

*ist Manual
Page 18
See page 34. 6 Set the Auto Picture mode. See page 35. 16 QUICK AND EASY SHOOTING 4 Turn the power switch ON. Set the mode dial to ON. See page 27. 5 Adjust the viewfinder's diopter. Align the film leader with film leader end mark (orange colored). See page 41. 7 Load the film. Turn the diopter adjustment dial left or right until the indications in the viewfinder looks sharp. Turn the main/preview switch to the position.
See page 34. 6 Set the Auto Picture mode. See page 35. 16 QUICK AND EASY SHOOTING 4 Turn the power switch ON. Set the mode dial to ON. See page 27. 5 Adjust the viewfinder's diopter. Align the film leader with film leader end mark (orange colored). See page 41. 7 Load the film. Turn the diopter adjustment dial left or right until the indications in the viewfinder looks sharp. Turn the main/preview switch to the position.
*ist Manual
Page 23
ATTACHING THE STRAP 22 Step 2. IMPRINTING THE DATE OR TIME 30 Step 6. ADJUSTING THE VIEWFINDER'S DIOPTER 34 Step 8. BASIC OPERATION (PREPARATION) BASIC OPERATION (SHOOTING) BASIC OPERATION (PREPARATION) Step 1. ADJUSTING THE DATE AND TIME 28 Step 5. LOADING FILM 35 Step 9. LOADING THE BATTERIES 23 Step 3. OPERATING THE SHUTTER RELEASE BUTTON 37 ADVANCED OPERATIONS OTHERS ATTACHING A LENS 32 Step 7. TURNING ON THE POWER 27 Step 4.
ATTACHING THE STRAP 22 Step 2. IMPRINTING THE DATE OR TIME 30 Step 6. ADJUSTING THE VIEWFINDER'S DIOPTER 34 Step 8. BASIC OPERATION (PREPARATION) BASIC OPERATION (SHOOTING) BASIC OPERATION (PREPARATION) Step 1. ADJUSTING THE DATE AND TIME 28 Step 5. LOADING FILM 35 Step 9. LOADING THE BATTERIES 23 Step 3. OPERATING THE SHUTTER RELEASE BUTTON 37 ADVANCED OPERATIONS OTHERS ATTACHING A LENS 32 Step 7. TURNING ON THE POWER 27 Step 4.

*ist Manual
Page 24
Position the clasp away from underneath. ✍ MEMO • The strap's clasp can be used to rewind the film in mid-roll or to alter the date or time. 22 Step 1 ATTACHING THE STRAP 1 Pass the end of the strap through the strap lug from underneath, then pass the strap through the clasp from underneath. 2 Pass the other end of the strap through the protection cover and triangular ring, then pass the strap through the clasp from the camera body.
Position the clasp away from underneath. ✍ MEMO • The strap's clasp can be used to rewind the film in mid-roll or to alter the date or time. 22 Step 1 ATTACHING THE STRAP 1 Pass the end of the strap through the strap lug from underneath, then pass the strap through the clasp from underneath. 2 Pass the other end of the strap through the protection cover and triangular ring, then pass the strap through the clasp from the camera body.
*ist Manual
Page 31
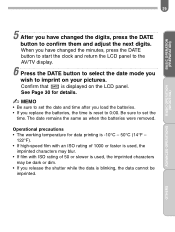
... for data printing is -10°C - 50°C (14°F - 122°F). • If high-speed film with an ISO rating of 1000 or faster is used, the imprinted characters may blur. • If film with ISO rating of 50 or slower is used, the imprinted characters may be imprinted. Be sure...
... for data printing is -10°C - 50°C (14°F - 122°F). • If high-speed film with an ISO rating of 1000 or faster is used, the imprinted characters may blur. • If film with ISO rating of 50 or slower is used, the imprinted characters may be imprinted. Be sure...
*ist Manual
Page 33
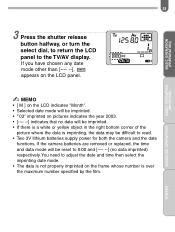
... be difficult to adjust the date and time then select the imprinting date mode. • The data is over the maximum number specified by the film. If the camera batteries are removed or replaced, the time and data mode will be reset to the TV/AV display.
... be difficult to adjust the date and time then select the imprinting date mode. • The data is over the maximum number specified by the film. If the camera batteries are removed or replaced, the time and data mode will be reset to the TV/AV display.

*ist Manual
Page 37
Be careful not to reach the take-up the back cover release lever in the direction of the arrow. 2 Place the film cartridge in the film chamber as shown in the illustration. BASIC OPERATION (SHOOTING) ADVANCED OPERATIONS 3 Pull the film leader out far enough to touch the shutter curtains. 4 Align the film leader with film leader end mark (orange colored) and make sure that the film leader is positioned under the film retainer as shown in the illustration. BASIC OPERATION (PREPARATION) Step 8 35 LOADING FILM 1 To open the back cover, slide up spool. OTHERS
Be careful not to reach the take-up the back cover release lever in the direction of the arrow. 2 Place the film cartridge in the film chamber as shown in the illustration. BASIC OPERATION (SHOOTING) ADVANCED OPERATIONS 3 Pull the film leader out far enough to touch the shutter curtains. 4 Align the film leader with film leader end mark (orange colored) and make sure that the film leader is positioned under the film retainer as shown in the illustration. BASIC OPERATION (PREPARATION) Step 8 35 LOADING FILM 1 To open the back cover, slide up spool. OTHERS

*ist Manual
Page 38
... camera. This camera uses infrared rays to frame 1 automatically and the LCD panel will advance to detect film transport so infrared film may be used , the correct film speed is automatically set the film speed manually. Do not touch them with its operations. • Always load and unload the.... See page 52. • Infrared film cannot be exposed. 36 LOADING FILM 5 Close the back cover and turn the main switch to become familiar with your fingers or any other object while loading the film. • Automatic film speed setting When DX-coded film is used . If you use a ...
... camera. This camera uses infrared rays to frame 1 automatically and the LCD panel will advance to detect film transport so infrared film may be used , the correct film speed is automatically set the film speed manually. Do not touch them with its operations. • Always load and unload the.... See page 52. • Infrared film cannot be exposed. 36 LOADING FILM 5 Close the back cover and turn the main switch to become familiar with your fingers or any other object while loading the film. • Automatic film speed setting When DX-coded film is used . If you use a ...

*ist Manual
Page 39
... release button has two positions. When taking a picture, press the shutter release button gently to prevent camera shake. ✍ MEMO • Before loading a roll of film, slowly press the shutter release button to learn where the first position is released from the halfway position. BASIC OPERATION (PREPARATION) BASIC OPERATION (SHOOTING) Not...
... release button has two positions. When taking a picture, press the shutter release button gently to prevent camera shake. ✍ MEMO • Before loading a roll of film, slowly press the shutter release button to learn where the first position is released from the halfway position. BASIC OPERATION (PREPARATION) BASIC OPERATION (SHOOTING) Not...
*ist Manual
Page 41
...MODE TO AF.S 43 Step 5. USING THE ZOOM LENS 46 Step 8. SETTING MULTI(16)-SEGMENT METERING MODE 42 Step 4. TAKING A PICTURE 48 Step 10. UNLOADING A FILM 50 Step 11. HOLDING THE CAMERA 47 Step 9. SETTING THE AUTO PICTURE MODE . . . .41 Step 3. SETTING THE FOCUS POINT MODE TO AUTO 44 Step 6....MODE . .40 Step 2. SETTING THE AUTO POP UP FLASH . . . . .45 Step 7. BASIC OPERATION (PREPARATION) BASIC OPERATION (SHOOTING) ADVANCED OPERATIONS BASIC OPERATION (SHOOTING) Step 1. REWINDING A FILM IN MID-ROLL . . . . . .51 SETTING THE FILM SPEED (ISO) MANUALLY . . . .52 OTHERS
...MODE TO AF.S 43 Step 5. USING THE ZOOM LENS 46 Step 8. SETTING MULTI(16)-SEGMENT METERING MODE 42 Step 4. TAKING A PICTURE 48 Step 10. UNLOADING A FILM 50 Step 11. HOLDING THE CAMERA 47 Step 9. SETTING THE AUTO PICTURE MODE . . . .41 Step 3. SETTING THE FOCUS POINT MODE TO AUTO 44 Step 6....MODE . .40 Step 2. SETTING THE AUTO POP UP FLASH . . . . .45 Step 7. BASIC OPERATION (PREPARATION) BASIC OPERATION (SHOOTING) ADVANCED OPERATIONS BASIC OPERATION (SHOOTING) Step 1. REWINDING A FILM IN MID-ROLL . . . . . .51 SETTING THE FILM SPEED (ISO) MANUALLY . . . .52 OTHERS

*ist Manual
Page 52
... counter counts frame numbers in processing. See pages 134 and 139. 50 Step 10 UNLOADING A FILM 1 The film automatically rewinds at the end of 24-exposure film takes about 13 seconds to [2], the film is blinking. • The shutter may be released a frame or more after the specified number...used as indicated on the LCD panel, indicating that is not automatically rewound. During rewinding, blinks on the film cartridge. However, those extra frames may be lost in reverse. 2 When the film is fully rewound, blinks on the LCD panel. 3 Open the back cover and remove the...
... counter counts frame numbers in processing. See pages 134 and 139. 50 Step 10 UNLOADING A FILM 1 The film automatically rewinds at the end of 24-exposure film takes about 13 seconds to [2], the film is blinking. • The shutter may be released a frame or more after the specified number...used as indicated on the LCD panel, indicating that is not automatically rewound. During rewinding, blinks on the film cartridge. However, those extra frames may be lost in reverse. 2 When the film is fully rewound, blinks on the LCD panel. 3 Open the back cover and remove the...

*ist Manual
Page 53
When the film is fully rewound, blinks on the LCD panel. • Before opening the back cover, check that is blinking, and the exposure counter disappears from the LCD panel. 3 Open the back cover and remove the film. ADVANCED OPERATIONS OTHERS Step 11 51 REWINDING A FILM IN MID-ROLL BASIC OPERATION (PREPARATION) BASIC OPERATION (SHOOTING) If you wish to unload the film before exposing all the frames, use this function. 1 Turn the main/preview switch to ON, then use the strap clasp's protrusion to press the mid-roll rewind button. 2 Rewind starts.
When the film is fully rewound, blinks on the LCD panel. • Before opening the back cover, check that is blinking, and the exposure counter disappears from the LCD panel. 3 Open the back cover and remove the film. ADVANCED OPERATIONS OTHERS Step 11 51 REWINDING A FILM IN MID-ROLL BASIC OPERATION (PREPARATION) BASIC OPERATION (SHOOTING) If you wish to unload the film before exposing all the frames, use this function. 1 Turn the main/preview switch to ON, then use the strap clasp's protrusion to press the mid-roll rewind button. 2 Rewind starts.
*ist Manual
Page 54
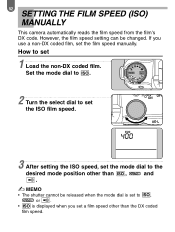
... , or . • is set to set the film speed manually. If you set a film speed other than , and . ✍ MEMO • The shutter cannot be changed. 52 SETTING THE FILM SPEED (ISO) MANUALLY This camera automatically reads the film speed from the film's DX code. However, the film speed setting can be released when the mode...
... , or . • is set to set the film speed manually. If you set a film speed other than , and . ✍ MEMO • The shutter cannot be changed. 52 SETTING THE FILM SPEED (ISO) MANUALLY This camera automatically reads the film speed from the film's DX code. However, the film speed setting can be released when the mode...
*ist Manual
Page 64
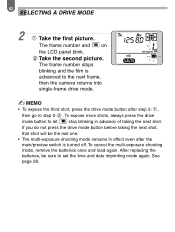
62 SELECTING A DRIVE MODE 2 Take the first picture. The frame number stops blinking and the film is advanced to the next frame, then the camera returns into single-frame drive mode. ✍ MEMO • To expose the third shot, press the ...
62 SELECTING A DRIVE MODE 2 Take the first picture. The frame number stops blinking and the film is advanced to the next frame, then the camera returns into single-frame drive mode. ✍ MEMO • To expose the third shot, press the ...

*ist Manual
Page 65
.... OTHERS The first frame is over exposed. 63 AUTO BRACKETING When you pressed shutter release button, three consecutive frames will not be noticeable on negative film (especially on negative color print processed by auto-print). 1 Press the auto bracketing button until and the bar graph appear on the LCD panel. The...
.... OTHERS The first frame is over exposed. 63 AUTO BRACKETING When you pressed shutter release button, three consecutive frames will not be noticeable on negative film (especially on negative color print processed by auto-print). 1 Press the auto bracketing button until and the bar graph appear on the LCD panel. The...


