
*ist Manual
Page 4
... come in contact with good dry air circulation to remove dust accumulated on the extreme edges of the film frame. Furthermore, if the camera is a high-precision mechanism. If the camera suffers a shock or impact, take it with moth balls or in temperature difference is not weather, water, or liquid ...or plastic bag so that any other object. • Use a lens brush to prevent the growth of safety at the edges. Handle it to a Pentax service center for proper care • Never touch the shutter curtain or mirror with your picture with a dry soft cloth. • Do not drop ...
... come in contact with good dry air circulation to remove dust accumulated on the extreme edges of the film frame. Furthermore, if the camera is a high-precision mechanism. If the camera suffers a shock or impact, take it with moth balls or in temperature difference is not weather, water, or liquid ...or plastic bag so that any other object. • Use a lens brush to prevent the growth of safety at the edges. Handle it to a Pentax service center for proper care • Never touch the shutter curtain or mirror with your picture with a dry soft cloth. • Do not drop ...
*ist Manual
Page 7
... OF CONTENTS 5 NAMES OF WORKING PARTS 10 LCD PANEL INDICATIONS 12 VIEWFINDER INDICATIONS 14 QUICK AND EASY SHOOTING 15 CAMERA FUNCTIONS AVAILABLE WITH VARIOUS LENSES 18 HOW TO USE THIS OPERATING MANUAL 20 BASIC OPERATION (PREPARATION) 21 Step 1. ATTACHING THE STRAP 22 Step 2 LOADING THE ... 4 ADJUSTING THE DATE AND TIME 28 Step 5 IMPRINTING THE DATE OR TIME 30 Step 6 ATTACHING A LENS 32 Step 7 ADJUSTING THE VIEWFINDER'S DIOPTER .34 Step 8 LOADING FILM 35 Step 9 OPERATING THE SHUTTER RELEASE BUTTON 37
... OF CONTENTS 5 NAMES OF WORKING PARTS 10 LCD PANEL INDICATIONS 12 VIEWFINDER INDICATIONS 14 QUICK AND EASY SHOOTING 15 CAMERA FUNCTIONS AVAILABLE WITH VARIOUS LENSES 18 HOW TO USE THIS OPERATING MANUAL 20 BASIC OPERATION (PREPARATION) 21 Step 1. ATTACHING THE STRAP 22 Step 2 LOADING THE ... 4 ADJUSTING THE DATE AND TIME 28 Step 5 IMPRINTING THE DATE OR TIME 30 Step 6 ATTACHING A LENS 32 Step 7 ADJUSTING THE VIEWFINDER'S DIOPTER .34 Step 8 LOADING FILM 35 Step 9 OPERATING THE SHUTTER RELEASE BUTTON 37
*ist Manual
Page 8
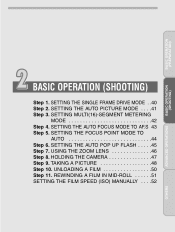
... 6.SETTING THE AUTO POP UP FLASH . . . . . .45 Step 7.USING THE ZOOM LENS 46 Step 8.HOLDING THE CAMERA 47 Step 9.TAKING A PICTURE 48 Step 10.UNLOADING A FILM 50 Step 11.REWINDING A FILM IN MID-ROLL 51 SETTING THE FILM SPEED (ISO) MANUALLY . . . . .52 ADVANCED OPERATIONS 53 SELECTING A DRIVE MODE 54 Consecutive Shooting 55 Self-Timer...
... 6.SETTING THE AUTO POP UP FLASH . . . . . .45 Step 7.USING THE ZOOM LENS 46 Step 8.HOLDING THE CAMERA 47 Step 9.TAKING A PICTURE 48 Step 10.UNLOADING A FILM 50 Step 11.REWINDING A FILM IN MID-ROLL 51 SETTING THE FILM SPEED (ISO) MANUALLY . . . . .52 ADVANCED OPERATIONS 53 SELECTING A DRIVE MODE 54 Consecutive Shooting 55 Self-Timer...

*ist Manual
Page 24
22 Step 1 ATTACHING THE STRAP 1 Pass the end of the strap through the strap lug from underneath, then pass the strap through the clasp from underneath. 2 Pass the other end of the strap through the protection cover and triangular ring, then pass the strap through the clasp from the camera body. Position the clasp away from underneath. ✍ MEMO • The strap's clasp can be used to rewind the film in mid-roll or to alter the date or time.
22 Step 1 ATTACHING THE STRAP 1 Pass the end of the strap through the strap lug from underneath, then pass the strap through the clasp from underneath. 2 Pass the other end of the strap through the protection cover and triangular ring, then pass the strap through the clasp from the camera body. Position the clasp away from underneath. ✍ MEMO • The strap's clasp can be used to rewind the film in mid-roll or to alter the date or time.
*ist Manual
Page 33
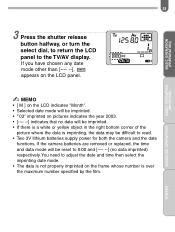
You need to read. • Two 3V lithium batteries supply power for both the camera and the date functions. BASIC OPERATION (PREPARATION) BASIC OPERATION (SHOOTING) 31 3 Press the shutter release button halfway, or turn the select dial, to return the ... a white or yellow object in the right bottom corner of the picture where the data is over the maximum number specified by the film. ADVANCED OPERATIONS OTHERS If the camera batteries are removed or replaced, the time and data mode will be imprinted. • "'03" imprinted on the frame whose number is...
You need to read. • Two 3V lithium batteries supply power for both the camera and the date functions. BASIC OPERATION (PREPARATION) BASIC OPERATION (SHOOTING) 31 3 Press the shutter release button halfway, or turn the select dial, to return the ... a white or yellow object in the right bottom corner of the picture where the data is over the maximum number specified by the film. ADVANCED OPERATIONS OTHERS If the camera batteries are removed or replaced, the time and data mode will be imprinted. • "'03" imprinted on the frame whose number is...

*ist Manual
Page 38
... them with your fingers or any other object while loading the film. • Automatic film speed setting When DX-coded film is used . If you use a non-DX coded film, you first operate the camera with no film loaded to ON. 36 LOADING FILM 5 Close the back cover and turn the main switch to... are made from fine precision material. See page 52. • Infrared film cannot be exposed. Open the back cover and load the film again. ✍ MEMO • We suggest that you can set for the camera. This camera uses infrared rays to frame 1 automatically and the LCD panel will advance ...
... them with your fingers or any other object while loading the film. • Automatic film speed setting When DX-coded film is used . If you use a non-DX coded film, you first operate the camera with no film loaded to ON. 36 LOADING FILM 5 Close the back cover and turn the main switch to... are made from fine precision material. See page 52. • Infrared film cannot be exposed. Open the back cover and load the film again. ✍ MEMO • We suggest that you can set for the camera. This camera uses infrared rays to frame 1 automatically and the LCD panel will advance ...

*ist Manual
Page 39
... The shutter release button has two positions. ADVANCED OPERATIONS OTHERS When taking a picture, press the shutter release button gently to prevent camera shake. ✍ MEMO • Before loading a roll of film, slowly press the shutter release button to learn where the first position is. • The LCD indication stays on the exposure...
... The shutter release button has two positions. ADVANCED OPERATIONS OTHERS When taking a picture, press the shutter release button gently to prevent camera shake. ✍ MEMO • Before loading a roll of film, slowly press the shutter release button to learn where the first position is. • The LCD indication stays on the exposure...
*ist Manual
Page 41
... Step 3. SETTING MULTI(16)-SEGMENT METERING MODE 42 Step 4. UNLOADING A FILM 50 Step 11. USING THE ZOOM LENS 46 Step 8. REWINDING A FILM IN MID-ROLL . . . . . .51 SETTING THE FILM SPEED (ISO) MANUALLY . . . .52 OTHERS SETTING THE AUTO POP UP FLASH . . . . .45 Step 7. HOLDING THE CAMERA 47 Step 9. BASIC OPERATION (PREPARATION) BASIC OPERATION (SHOOTING) ADVANCED...
... Step 3. SETTING MULTI(16)-SEGMENT METERING MODE 42 Step 4. UNLOADING A FILM 50 Step 11. USING THE ZOOM LENS 46 Step 8. REWINDING A FILM IN MID-ROLL . . . . . .51 SETTING THE FILM SPEED (ISO) MANUALLY . . . .52 OTHERS SETTING THE AUTO POP UP FLASH . . . . .45 Step 7. HOLDING THE CAMERA 47 Step 9. BASIC OPERATION (PREPARATION) BASIC OPERATION (SHOOTING) ADVANCED...

*ist Manual
Page 52
... 134 and 139. When you take important pictures, rewind the film when the film reaches the number of frames indicated on the LCD panel. 3 Open the back cover and remove the film. ✍ MEMO • When removing the film from the camera, avoid direct sun light. • A roll of 24-...exposure film takes about 13 seconds to [2], the film is being rewound, the exposure counter counts frame numbers in processing. 50...
... 134 and 139. When you take important pictures, rewind the film when the film reaches the number of frames indicated on the LCD panel. 3 Open the back cover and remove the film. ✍ MEMO • When removing the film from the camera, avoid direct sun light. • A roll of 24-...exposure film takes about 13 seconds to [2], the film is being rewound, the exposure counter counts frame numbers in processing. 50...
*ist Manual
Page 54
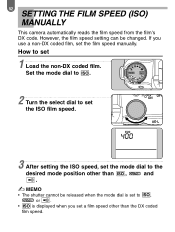
... is displayed when you use a non-DX coded film, set the mode dial to the desired mode position other than , and . ✍ MEMO • The shutter cannot be changed. Set the mode dial to . 2 Turn the select dial to set the ISO film speed. 3 After setting the ISO speed, set... the film speed manually. If you set 1 Load the non-DX coded film. 52 SETTING THE FILM SPEED (ISO) MANUALLY This camera automatically reads the film speed from the film's DX code. How to , or . • is set...
... is displayed when you use a non-DX coded film, set the mode dial to the desired mode position other than , and . ✍ MEMO • The shutter cannot be changed. Set the mode dial to . 2 Turn the select dial to set the ISO film speed. 3 After setting the ISO speed, set... the film speed manually. If you set 1 Load the non-DX coded film. 52 SETTING THE FILM SPEED (ISO) MANUALLY This camera automatically reads the film speed from the film's DX code. How to , or . • is set...
*ist Manual
Page 64
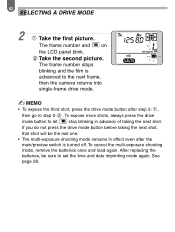
The frame number stops blinking and the film is turned off. To cancel the multi-exposure shooting mode, remove the batteries once and load again. The frame number and on the LCD panel ... press the drive mode button to let stop blinking in effect even after the main/preview switch is advanced to the next frame, then the camera returns into single-frame drive mode. ✍ MEMO • To expose the third shot, press the drive mode button after step 2- , then go to set...
The frame number stops blinking and the film is turned off. To cancel the multi-exposure shooting mode, remove the batteries once and load again. The frame number and on the LCD panel ... press the drive mode button to let stop blinking in effect even after the main/preview switch is advanced to the next frame, then the camera returns into single-frame drive mode. ✍ MEMO • To expose the third shot, press the drive mode button after step 2- , then go to set...

*ist Manual
Page 76
... shutter speed Faster shutter speed Effect of shutter speed The shutter speed determines the film exposure times, or the length of time that the light is possible to the subject's brightness. If the subject is moving, the image will allow ... Effect of Aperture and Shutter Speed A correct exposure is used. Different shutter speed and aperture settings produce different effects. A faster shutter speed also helps prevent camera shake. There are many correct combinations of shutter speed and aperture for a particular subject's brightness.
... shutter speed Faster shutter speed Effect of shutter speed The shutter speed determines the film exposure times, or the length of time that the light is possible to the subject's brightness. If the subject is moving, the image will allow ... Effect of Aperture and Shutter Speed A correct exposure is used. Different shutter speed and aperture settings produce different effects. A faster shutter speed also helps prevent camera shake. There are many correct combinations of shutter speed and aperture for a particular subject's brightness.

*ist Manual
Page 77
...the landscape. ADVANCED OPERATIONS OTHERS If the aperture is farther from an object which passes through the lens, controlling how much light strikes the film. Open aperture Stopped down the aperture increases the in -focus subject will be focused. That is stopped down to rise out of its structure... person will not be blurred, making the person appear to reduce the amount of light, the depth of reflected light from the camera. 75 BASIC OPERATION (PREPARATION) BASIC OPERATION (SHOOTING) Effect of aperture The aperture increases or reduces the amount of field increases.
...the landscape. ADVANCED OPERATIONS OTHERS If the aperture is farther from an object which passes through the lens, controlling how much light strikes the film. Open aperture Stopped down the aperture increases the in -focus subject will be focused. That is stopped down to rise out of its structure... person will not be blurred, making the person appear to reduce the amount of light, the depth of reflected light from the camera. 75 BASIC OPERATION (PREPARATION) BASIC OPERATION (SHOOTING) Effect of aperture The aperture increases or reduces the amount of field increases.

*ist Manual
Page 107
When using ISO 400 film). ✍ MEMO • The flash effective range does not come closer than 0.7m (2.6ft), ...obtained, and you will trigger the slave unit to position the flash as far away from the camera as possible. Red-eye Reduction Flash Function This camera includes a red-eye reduction flash function, which in turn out reddish in the print. See...), even if the lens aperture is very small. is used ) is within about four meters (using a Pentax dedicated flash unit off the camera, it may also help to fire. Then the main flash is discharged while the pupils are smaller, which...
When using ISO 400 film). ✍ MEMO • The flash effective range does not come closer than 0.7m (2.6ft), ...obtained, and you will trigger the slave unit to position the flash as far away from the camera as possible. Red-eye Reduction Flash Function This camera includes a red-eye reduction flash function, which in turn out reddish in the print. See...), even if the lens aperture is very small. is used ) is within about four meters (using a Pentax dedicated flash unit off the camera, it may also help to fire. Then the main flash is discharged while the pupils are smaller, which...

*ist Manual
Page 114
... to take a flash photograph. 1. If the flash is used in the formula above is less than 0.7m (2.3ft), the flash cannot be set. In this camera. ✍ MEMO • When the distance to the subject is a fixed value applied to the camerato-subject distance. The guide number (GN) depends upon the...
... to take a flash photograph. 1. If the flash is used in the formula above is less than 0.7m (2.3ft), the flash cannot be set. In this camera. ✍ MEMO • When the distance to the subject is a fixed value applied to the camerato-subject distance. The guide number (GN) depends upon the...

*ist Manual
Page 115
Calculating the aperture according to the camera-to-subject distance Aperture = Guide Number ÷ Camera-to-subject distance Example: If the camera-to-subject distance is 2.5m and ISO 100 film is used at f/4 in flash Thus, the flash effective distance is obtained as follows: Guide Number (11)...Set at an aperture of f/3.5, the flash effective distance is from approx. 0.7m to 3.14m. 2. BASIC OPERATION (PREPARATION) 113 Example: If an ISO100 film is used , the effective aperture is obtained as follows: For maximum distance Guide Number (11) ÷ f/3.5 = 3.14m For minimum distance 3.14 ...
Calculating the aperture according to the camera-to-subject distance Aperture = Guide Number ÷ Camera-to-subject distance Example: If the camera-to-subject distance is 2.5m and ISO 100 film is used at f/4 in flash Thus, the flash effective distance is obtained as follows: Guide Number (11)...Set at an aperture of f/3.5, the flash effective distance is from approx. 0.7m to 3.14m. 2. BASIC OPERATION (PREPARATION) 113 Example: If an ISO100 film is used , the effective aperture is obtained as follows: For maximum distance Guide Number (11) ÷ f/3.5 = 3.14m For minimum distance 3.14 ...
*ist Manual
Page 130
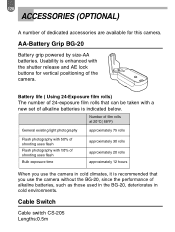
...) The number of 24-exposure film rolls that can be taken with the shutter release and AE lock buttons for vertical positioning of dedicated accessories are available for this camera. AA-Battery Grip BG-20 Battery grip powered by size-AA batteries. Usability is enhanced with a new set of ...alkaline batteries is recommended that you use the camera without the BG-20, since the performance of shooting uses flash Bulb exposure time approximately 30 rolls approximately 20 rolls approximately 12 hours When ...
...) The number of 24-exposure film rolls that can be taken with the shutter release and AE lock buttons for vertical positioning of dedicated accessories are available for this camera. AA-Battery Grip BG-20 Battery grip powered by size-AA batteries. Usability is enhanced with a new set of ...alkaline batteries is recommended that you use the camera without the BG-20, since the performance of shooting uses flash Bulb exposure time approximately 30 rolls approximately 20 rolls approximately 12 hours When ...

*ist Manual
Page 134
... focus point Setting the AF function to your shooting preferences. 132 CUSTOM FUNCTIONS The camera provides 17 custom functions so you can set the camera according to the AE lock button Setting the film speed manually Autofocus Functions [CF6] Superimposing the focus points Flash Functions [CF7] Enabling...[CF9] Setting the flash pop-up button's function during wireless operation with the AF360FGZ Film Rewind Functions [CF10] Setting the film rewind method [CF11] Setting the status of the end of the film when rewound Self-timer Functions [CF12] Setting the self-timer delay time Pages 136 ...
... focus point Setting the AF function to your shooting preferences. 132 CUSTOM FUNCTIONS The camera provides 17 custom functions so you can set the camera according to the AE lock button Setting the film speed manually Autofocus Functions [CF6] Superimposing the focus points Flash Functions [CF7] Enabling...[CF9] Setting the flash pop-up button's function during wireless operation with the AF360FGZ Film Rewind Functions [CF10] Setting the film rewind method [CF11] Setting the status of the end of the film when rewound Self-timer Functions [CF12] Setting the self-timer delay time Pages 136 ...

*ist Manual
Page 141
...SHOOTING) 139 [CF8] Using the built-in flash as a wireless control for the AF360FGZ When the AF360FGZ is used and the camera flash mode is set to wireless, you can assign the wireless control function to the built-in flash. • Custom Function ...-in flash consecutively for modeling [CF10] Setting the film rewind method • Custom Function number [CF10] • Setting number [1] . . . .Automatically rewinds the film at the end of the roll [2] . . . .Disables automatic film rewind. ADVANCED OPERATIONS OTHERS To rewind the film, press the midroll rewind button (see page 51)....
...SHOOTING) 139 [CF8] Using the built-in flash as a wireless control for the AF360FGZ When the AF360FGZ is used and the camera flash mode is set to wireless, you can assign the wireless control function to the built-in flash. • Custom Function ...-in flash consecutively for modeling [CF10] Setting the film rewind method • Custom Function number [CF10] • Setting number [1] . . . .Automatically rewinds the film at the end of the roll [2] . . . .Disables automatic film rewind. ADVANCED OPERATIONS OTHERS To rewind the film, press the midroll rewind button (see page 51)....

*ist Manual
Page 142
... number [CF13] • Setting number [1] . . . .Picture taken after 3 sec. [2] . . . .Picture taken immediately This reduces camera shake caused by the mirror's movement. With mirror lock-up, the reflex mirror stays up the film completely [2] . . . .Leaves the end of the film unwound [CF12] Setting the self-timer delay time • Custom Function number [CF12] •...
... number [CF13] • Setting number [1] . . . .Picture taken after 3 sec. [2] . . . .Picture taken immediately This reduces camera shake caused by the mirror's movement. With mirror lock-up, the reflex mirror stays up the film completely [2] . . . .Leaves the end of the film unwound [CF12] Setting the self-timer delay time • Custom Function number [CF12] •...


