

ZX-50 Manual
Page 5
...from warm temperature to strong vibrations, shock or pressure. mulated on the lens or viewfinder. • Never use the camera where it to a Pentax service center for an extended period in temperature difference is a high-precision mecha- Should the camera get wet from the bag until temperature has ... camera to a subfreezing one or vice versa, the formation of icelets may be caused by water, dirt or dust at points of the film frame. Also check for proper care • Never touch the shutter curtain or mirror with your picture with good dry air circulation to protect...
...from warm temperature to strong vibrations, shock or pressure. mulated on the lens or viewfinder. • Never use the camera where it to a Pentax service center for an extended period in temperature difference is a high-precision mecha- Should the camera get wet from the bag until temperature has ... camera to a subfreezing one or vice versa, the formation of icelets may be caused by water, dirt or dust at points of the film frame. Also check for proper care • Never touch the shutter curtain or mirror with your picture with good dry air circulation to protect...

ZX-50 Manual
Page 8
... Operating the shutter release button 13-26 13 14 17 18 20 Turning on the power 20 Using the Data Back 21 Film loading 22 Unloading film 25 • Rewinding a film in mid-roll 26 II BASIC OPERATION (SHOOTING) 27-45 Using the Green Operation Mode 27 Setting the Single-Frame Drive Mode...
... Operating the shutter release button 13-26 13 14 17 18 20 Turning on the power 20 Using the Data Back 21 Film loading 22 Unloading film 25 • Rewinding a film in mid-roll 26 II BASIC OPERATION (SHOOTING) 27-45 Using the Green Operation Mode 27 Setting the Single-Frame Drive Mode...

ZX-50 Manual
Page 9
... • Compatibility of F and FA lenses with the built-in flash 72 Setting the film speed (ISO) manually 73 Installing the battery in the Data Back 74 Adjusting the data on the Data Back 75 Using a Pentax Dedicated External Flash 77 • Contrast-Control-Sync Flash Photography 79 Daylight-sync shooting 81...
... • Compatibility of F and FA lenses with the built-in flash 72 Setting the film speed (ISO) manually 73 Installing the battery in the Data Back 74 Adjusting the data on the Data Back 75 Using a Pentax Dedicated External Flash 77 • Contrast-Control-Sync Flash Photography 79 Daylight-sync shooting 81...

ZX-50 Manual
Page 10
...(p.37,38) : Red-eye reduction flash indication (p.43) 'J A : Automatic flash function information (p.45) (Smart flash information) ISO : Manual-set film speed (p.73) Tv 2000 : Shutter speed Av 22 : Battery exhaustion warning (p.17) : Aperture value : Exposure compensation (p.68) : Audible PCV signal (p.69) ...CI__- 20 : Film status information (p.24,25) : Exposure counter (p.24) and Exposure compensation value (p.68) LCD (Liquid-Crystal Display) When the LCD is ...
...(p.37,38) : Red-eye reduction flash indication (p.43) 'J A : Automatic flash function information (p.45) (Smart flash information) ISO : Manual-set film speed (p.73) Tv 2000 : Shutter speed Av 22 : Battery exhaustion warning (p.17) : Aperture value : Exposure compensation (p.68) : Audible PCV signal (p.69) ...CI__- 20 : Film status information (p.24,25) : Exposure counter (p.24) and Exposure compensation value (p.68) LCD (Liquid-Crystal Display) When the LCD is ...

ZX-50 Manual
Page 13
... the Autofocus Mode O 711 Open the back cover, insert a roll of film, align the end of the film leader with the zoom ring 'MP 0 ' AP 0 I 0 •=. While looking through the viewfinder, turn the zoom ring to take a photo. (See page 34.) Focus on ... desired composition. (See page 30.) Focus [ ] on the subject and shoot I Set the focus mode switch to the first frame automatically. (See page 24.) 8. The film should advance to [ AF ]. (See page 33.) 9. Composing the scene with the red mark, and close the back cover. 9 6.
... the Autofocus Mode O 711 Open the back cover, insert a roll of film, align the end of the film leader with the zoom ring 'MP 0 ' AP 0 I 0 •=. While looking through the viewfinder, turn the zoom ring to take a photo. (See page 34.) Focus on ... desired composition. (See page 30.) Focus [ ] on the subject and shoot I Set the focus mode switch to the first frame automatically. (See page 24.) 8. The film should advance to [ AF ]. (See page 33.) 9. Composing the scene with the red mark, and close the back cover. 9 6.

ZX-50 Manual
Page 20
...freshness of the times) Bulb exposure time about 30 rolls about 15 rolls about 7 rolls about 8 hours Battery Life using 24 exposure film rolls at CM without a lens attached. Slide the main switch to the ON position and check that the LCD panel shows the information... about 12 rolls Bulb exposure time about 2 hours CR2 batteries were used under Pentax testing conditions. Battery Life itsimi 24 exposure film rolls at 20 C. 68 F General existing light photography about 100 rolls Flash photography (using flash 50% of the times) Flash photography ( using flash 100% of the battery....
...freshness of the times) Bulb exposure time about 30 rolls about 15 rolls about 7 rolls about 8 hours Battery Life using 24 exposure film rolls at CM without a lens attached. Slide the main switch to the ON position and check that the LCD panel shows the information... about 12 rolls Bulb exposure time about 2 hours CR2 batteries were used under Pentax testing conditions. Battery Life itsimi 24 exposure film rolls at 20 C. 68 F General existing light photography about 100 rolls Flash photography (using flash 50% of the times) Flash photography ( using flash 100% of the battery....
ZX-50 Manual
Page 24
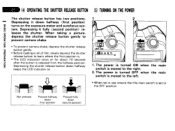
... the shutter release button gently to prevent camera shake. • To prevent camera shake, depress the shutter release button gently. • Before loading a roll of film, slowly depress the shutter release button to the OFF position. Depressing it down halfway (first position) turns on . 2 O[1FF4O2DN a x. The power is turned ON when...
... the shutter release button gently to prevent camera shake. • To prevent camera shake, depress the shutter release button gently. • Before loading a roll of film, slowly depress the shutter release button to the OFF position. Depressing it down halfway (first position) turns on . 2 O[1FF4O2DN a x. The power is turned ON when...

ZX-50 Manual
Page 26
... back cover and remove the protective card. DO NOT TOUCH THE SHUTTER CURTAINS. 2 1. Place the film cartridge in the film chamber as shown in the illustration. • Always load and unload film in the direction of the arrow. 2. (7) FILM LOADING We suggest that you can set for the first time after purchase, 5 open the... back cover, slide the back cover release lever in the shade or by using your body to 5000. 0z • When DX-coded film is used, the correct film speed is 1-2 automatically set the film speed manually. See page 73. • Before loading...
... back cover and remove the protective card. DO NOT TOUCH THE SHUTTER CURTAINS. 2 1. Place the film cartridge in the film chamber as shown in the illustration. • Always load and unload film in the direction of the arrow. 2. (7) FILM LOADING We suggest that you can set for the first time after purchase, 5 open the... back cover, slide the back cover release lever in the shade or by using your body to 5000. 0z • When DX-coded film is used, the correct film speed is 1-2 automatically set the film speed manually. See page 73. • Before loading...

ZX-50 Manual
Page 27
... to reach the take -up spool. Keep them gently with the film leader end mark 0 as shown. • Make sure that the film leader is positioned under the film retainer as shown in the illustration. • Make sure that the film perforations properly engage on the sprocket tooth 0. • If the ..., straighten it back into the cartridge to reduce the slack. • The DX information pins in the illustration, pull the film leader out only far enough to read film speed. Align the film leader with a soft, dry cloth. 4. DO NOT TOUCH THEM WITH YOUR FINGERS OR ANY OTHER OBJECT WHILE LOADING...
... to reach the take -up spool. Keep them gently with the film leader end mark 0 as shown. • Make sure that the film leader is positioned under the film retainer as shown in the illustration. • Make sure that the film perforations properly engage on the sprocket tooth 0. • If the ..., straighten it back into the cartridge to reduce the slack. • The DX information pins in the illustration, pull the film leader out only far enough to read film speed. Align the film leader with a soft, dry cloth. 4. DO NOT TOUCH THEM WITH YOUR FINGERS OR ANY OTHER OBJECT WHILE LOADING...

ZX-50 Manual
Page 28
Open the back cover and load the film once again. 5. Close the back cover and set the main switch to the first frame. • Check that I I e__I on the LCD panel. • The film counter indication advances one each time the shutter is not loaded properly. The film automatically advances to [ ON 1. NES Film loaded with slack No! 5 NMI BASIC OPERATION (PREPARATION) Film loaded flat Yes! IILei OFF • N ■ a .1 o sk .40 (7 0_E • If the film is not loaded properly, I and are displayed on the LCD panel blinks, indicating that the film is released.
Open the back cover and load the film once again. 5. Close the back cover and set the main switch to the first frame. • Check that I I e__I on the LCD panel. • The film counter indication advances one each time the shutter is not loaded properly. The film automatically advances to [ ON 1. NES Film loaded with slack No! 5 NMI BASIC OPERATION (PREPARATION) Film loaded flat Yes! IILei OFF • N ■ a .1 o sk .40 (7 0_E • If the film is not loaded properly, I and are displayed on the LCD panel blinks, indicating that the film is released.

ZX-50 Manual
Page 29
..., the exposure counter counts frame numbers in reverse. • Never open the back cover until the whole film roll is fully rewound, only [ Q 5 the roll. When the film is completely rewound. • When removing the film from the camera, protect it from exposure to direct sun light. co 23 fA C) 0 m OFF ON CA...
..., the exposure counter counts frame numbers in reverse. • Never open the back cover until the whole film roll is fully rewound, only [ Q 5 the roll. When the film is completely rewound. • When removing the film from the camera, protect it from exposure to direct sun light. co 23 fA C) 0 m OFF ON CA...

ZX-50 Manual
Page 30
... rewind. • Before opening the back cover, check that 0 is 0 M . 33 ››.mZ-_,,,,, 3 I„i-x-- Set the main switch to unload the film before exposing all the frames, use this function. When you wish to the ON position, and then depress the mid-roll rewind button by the... number of frames on the film cartridge. z 3. 3 IMP CO C 6 5 y is blinking. • The shutter may be released a frame or more after the specified number of frames have ...
... rewind. • Before opening the back cover, check that 0 is 0 M . 33 ››.mZ-_,,,,, 3 I„i-x-- Set the main switch to unload the film before exposing all the frames, use this function. When you wish to the ON position, and then depress the mid-roll rewind button by the... number of frames on the film cartridge. z 3. 3 IMP CO C 6 5 y is blinking. • The shutter may be released a frame or more after the specified number of frames have ...

ZX-50 Manual
Page 75
... subject is distributed unevenly and the picture may be overexposed. • The value 5 used . The guide number (GN) depends upon the film speed used at an aperture of f/2.8, the flash effective distance is set. GN7.8 ISO400 -> GN22 ISO100 -.- GN11 Thus, the flash effective ...camera-to -subject distance. However, in this case). GN15.6 ISO50 -- am= cated f-stop on what aperture is obtained as shown below. If an ISO100 film is used as follows: Guide Number (11) = f/2.8 = 3.9m 3.9 ÷ 5 = 0.8m Calculating the flash effective distance according to the camera-to...
... subject is distributed unevenly and the picture may be overexposed. • The value 5 used . The guide number (GN) depends upon the film speed used at an aperture of f/2.8, the flash effective distance is set. GN7.8 ISO400 -> GN22 ISO100 -.- GN11 Thus, the flash effective ...camera-to -subject distance. However, in this case). GN15.6 ISO50 -- am= cated f-stop on what aperture is obtained as shown below. If an ISO100 film is used as follows: Guide Number (11) = f/2.8 = 3.9m 3.9 ÷ 5 = 0.8m Calculating the flash effective distance according to the camera-to...

ZX-50 Manual
Page 77
... setting can be released with the mode dial set at ISO SET • ISO i is displayed when the film speed is set 1. If you use a non-DX coded film, set the mode dial to any other position other than [ ISO SET]. • To change the ISO, turn the select switch to the... left for a smaller number (lower film speed, or right for a larger number (higher film speed). • The shutter cannot be changed. After the ISO is displayed on the LCD panel. 3. (8) SETTING THE...
... setting can be released with the mode dial set at ISO SET • ISO i is displayed when the film speed is set 1. If you use a non-DX coded film, set the mode dial to any other position other than [ ISO SET]. • To change the ISO, turn the select switch to the... left for a smaller number (lower film speed, or right for a larger number (higher film speed). • The shutter cannot be changed. After the ISO is displayed on the LCD panel. 3. (8) SETTING THE...

ZX-50 Manual
Page 78
... battery chamber cover, and tighten the battery chamber fixing screw. • If the data indication does not appear on the LCD panel, it means that a film is replaced, adjust the data by the following adjustment procedures described on a picture or the LCD panel becomes weak or invisible. Open the back cover...
... battery chamber cover, and tighten the battery chamber fixing screw. • If the data indication does not appear on the LCD panel, it means that a film is replaced, adjust the data by the following adjustment procedures described on a picture or the LCD panel becomes weak or invisible. Open the back cover...

ZX-50 Manual
Page 80
Holding the button for data printing is 0-50-C. • Use DX-coded films with ISO rating from blinking. • The digit increases one each time you release the shutter while the blinking data is being corrected, the data ... the SELECT button 0 to make the hour, minute or second ( : ) you want to stop the adjusted hour minute from 25 - 1600. • If high-speed film with an ISO rating of 50 or slower is used , the printed characters may blur. • If...
Holding the button for data printing is 0-50-C. • Use DX-coded films with ISO rating from blinking. • The digit increases one each time you release the shutter while the blinking data is being corrected, the data ... the SELECT button 0 to make the hour, minute or second ( : ) you want to stop the adjusted hour minute from 25 - 1600. • If high-speed film with an ISO rating of 50 or slower is used , the printed characters may blur. • If...

ZX-50 Manual
Page 82
... to a slower speed which does not cause camera shake. However, when a non-autofocus lens (A -lens) is in use . • Multiple flash burst on what ISO film is set to 1 100 second. The shutter speed varies within the shutter speed range of 1 100 second to the lens focal length. Depressing the shutter...
... to a slower speed which does not cause camera shake. However, when a non-autofocus lens (A -lens) is in use . • Multiple flash burst on what ISO film is set to 1 100 second. The shutter speed varies within the shutter speed range of 1 100 second to the lens focal length. Depressing the shutter...

ZX-50 Manual
Page 90
Effect of Shutter Speed The shutter speed determines the film exposure time, or the length of shutter speed and aperture setting according to enhance the effect of motion, (The movement of shutter speed and aperture ... helps prevent camera shake. Different shutter speed and aperture settings produce different effects. terfall) by a combination of time that light is allowed to strike the film. 4 If the subject is moving the image will allow the image of a moving subject to be blurred when_ a slow shutter speed is possible to the...
Effect of Shutter Speed The shutter speed determines the film exposure time, or the length of shutter speed and aperture setting according to enhance the effect of motion, (The movement of shutter speed and aperture ... helps prevent camera shake. Different shutter speed and aperture settings produce different effects. terfall) by a combination of time that light is allowed to strike the film. 4 If the subject is moving the image will allow the image of a moving subject to be blurred when_ a slow shutter speed is possible to the...

ZX-50 Manual
Page 91
... the aperture is , the range of focus (depth of reflected light from an object which passes through the lens, controlling how much light strikes the film. That is closed down to rise out of and behind an in-focus subject will be blurred, making the person appear to reduce the amount...
... the aperture is , the range of focus (depth of reflected light from an object which passes through the lens, controlling how much light strikes the film. That is closed down to rise out of and behind an in-focus subject will be blurred, making the person appear to reduce the amount...

ZX-50 Manual
Page 93
.... (18) INFRARED INDEX 89 SNOLLVI:13dO O39NVACIV 5 PEttfAXiA35-80 T35 C000000D 00Opp A r 161185.64 0 When infrared film and an "R2" or "02" filter are used the focal point is read from that of ordinary film exposed in visible light. cusing ring to the left by the distance indicated on a subject manually and... autofocus system cannot compensate for infrared pictures, refer to [ MF ] 2. Use the Metered Manual Mode. Set the focus mode switch to the instructions accompanying the film.
.... (18) INFRARED INDEX 89 SNOLLVI:13dO O39NVACIV 5 PEttfAXiA35-80 T35 C000000D 00Opp A r 161185.64 0 When infrared film and an "R2" or "02" filter are used the focal point is read from that of ordinary film exposed in visible light. cusing ring to the left by the distance indicated on a subject manually and... autofocus system cannot compensate for infrared pictures, refer to [ MF ] 2. Use the Metered Manual Mode. Set the focus mode switch to the instructions accompanying the film.


