

ZX-10 Manual
Page 2
... on/off flash function with , or actual damage to get a full explanation of advanced technologies and highly accurate automation, this manual. Congratulations on your Pentax camera. NAMES OF WORKING PARTS I 0 Ar a • • 0 Select switch O Shutter release button O LCD panel (p.6) O Main switch ... O Built-in flash (p.37) O Flash pop-up The camera explaining in this camera and welcome to the exciting world of Pentax autofocus photographyl This compact and light weight camera is an autofocus SLR camera that offers higher levels of this operating manual. The major features...
... on/off flash function with , or actual damage to get a full explanation of advanced technologies and highly accurate automation, this manual. Congratulations on your Pentax camera. NAMES OF WORKING PARTS I 0 Ar a • • 0 Select switch O Shutter release button O LCD panel (p.6) O Main switch ... O Built-in flash (p.37) O Flash pop-up The camera explaining in this camera and welcome to the exciting world of Pentax autofocus photographyl This compact and light weight camera is an autofocus SLR camera that offers higher levels of this operating manual. The major features...
ZX-10 Manual
Page 3
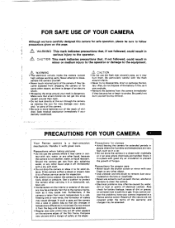
... the bag until temperature has stabilized. • Regular size color prints may often be caused by water, dirt or dust at a Pentax service center. Should the camera get the strap caught around infants. • Never try to the operator. • CAUTION This mark indicates precautions that , if ... assistance immediately if acci- Also, do not get wet from dropping the camera or for may cause rust. Never attempt to salinity or gas. If the camera suffers a shock or impact, take it to a Pentax service center for battery leakage, traces of dirt or grease, or corrosion due...
... the bag until temperature has stabilized. • Regular size color prints may often be caused by water, dirt or dust at a Pentax service center. Should the camera get the strap caught around infants. • Never try to the operator. • CAUTION This mark indicates precautions that , if ... assistance immediately if acci- Also, do not get wet from dropping the camera or for may cause rust. Never attempt to salinity or gas. If the camera suffers a shock or impact, take it to a Pentax service center for battery leakage, traces of dirt or grease, or corrosion due...

ZX-10 Manual
Page 4
... every one of the battery's characteristics. • Replace the batteries at no charge under the terms of the Pentax warranty. • The PENTAX warranty provides only for Your Camera" section or any kind cannot be repaired. p.40 Automatic Flash Functions. p.44 Taking a group photograph. p.79...P.36,57 Taking a close-up picture. Other precautions • The temperature range at which this camera functions properly is 50°C to -10° C (122°F to 14 °F). • A camera which has been submerged in water usually cannot be repaired at the same time.
... every one of the battery's characteristics. • Replace the batteries at no charge under the terms of the Pentax warranty. • The PENTAX warranty provides only for Your Camera" section or any kind cannot be repaired. p.40 Automatic Flash Functions. p.44 Taking a group photograph. p.79...P.36,57 Taking a close-up picture. Other precautions • The temperature range at which this camera functions properly is 50°C to -10° C (122°F to 14 °F). • A camera which has been submerged in water usually cannot be repaired at the same time.

ZX-10 Manual
Page 5
... focusing 46 • Using the snap-in the Data Back 72 Adjusting the data on the Data Back 73 Using a Pentax Dedicated External Flash 75 • Contrast-Control-Sync Flash Photography 77 Daylight-sync shooting 79 Slow-speed-sync shooting 80 ACCESSORIES (OPTIONAL) 81...88-96 88 90 92 94 segment metering 7 Easy to use! (For beginners) 8 Camera and lens mount 10 Camera functions available with various lenses 11 How to use of your camera Inside cover Precautions for your camera 1 Precautions for the Built-in Retractable Flash (RTF) 68 • Compatibility of F and...
... focusing 46 • Using the snap-in the Data Back 72 Adjusting the data on the Data Back 73 Using a Pentax Dedicated External Flash 75 • Contrast-Control-Sync Flash Photography 77 Daylight-sync shooting 79 Slow-speed-sync shooting 80 ACCESSORIES (OPTIONAL) 81...88-96 88 90 92 94 segment metering 7 Easy to use! (For beginners) 8 Camera and lens mount 10 Camera functions available with various lenses 11 How to use of your camera Inside cover Precautions for your camera 1 Precautions for the Built-in Retractable Flash (RTF) 68 • Compatibility of F and...
ZX-10 Manual
Page 6
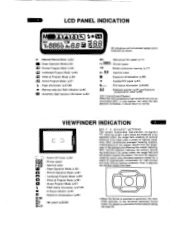
...made under a variety of the background affecting the overall metering. e : Bar graph (p.62,66) MULTI 6 -SEGMENT METERING This camera incorporates high-precision six-segment TTL metering system. The multi (6)-segment metering system also calculates exposure values for a scene to normal. ...the subject results from the brightness of lighting conditions. Even a beginner can achieve results with ease. With multi(6)-segment metering, the camera records the brightness in six segments within the image field and will not actually appear simultaneously as shown. LCD PANEL INDICATION Rio ...
...made under a variety of the background affecting the overall metering. e : Bar graph (p.62,66) MULTI 6 -SEGMENT METERING This camera incorporates high-precision six-segment TTL metering system. The multi (6)-segment metering system also calculates exposure values for a scene to normal. ...the subject results from the brightness of lighting conditions. Even a beginner can achieve results with ease. With multi(6)-segment metering, the camera records the brightness in six segments within the image field and will not actually appear simultaneously as shown. LCD PANEL INDICATION Rio ...

ZX-10 Manual
Page 7
... subject and shoot /0 9 While looking through the viewfinder, turn the lens aperture ring to the right or left until it . Focus on the lens and camera. Load two batteries (CR2 type) according to the first frame automatically. (See page 22.) 8. The Smart Picture Mode will be set. 5.Turning on the subject...
... subject and shoot /0 9 While looking through the viewfinder, turn the lens aperture ring to the right or left until it . Focus on the lens and camera. Load two batteries (CR2 type) according to the first frame automatically. (See page 22.) 8. The Smart Picture Mode will be set. 5.Turning on the subject...

ZX-10 Manual
Page 8
mount (D) K-mount (E) Screw mount Pentax-FA lens Pentax-F lens Pentax-A lens Pentax-M lens and Pentax lens SMC TAKUMAR lens MZ-10/ZX-10,MZ-5/ZX-5,Z-1,./PZ-1,,Z-1/PZ-1, Z-10/PZ-10,Z-20/PZ-20,Z-70/PZ-70 SFX./SF1., SF7/SF10, SFX/SF-1 Super-A/Super Program, P30„/P3,,, ...K-Mount Lens C,omoabiiit,, KAr-mount lens • AF coupler • Lens-information contacts KA-mount lens • Lens-information contacts K -mount lens CAMERA FUNCTIONS AVAILABLE WITH VARIOUS LENSES Function . Lens [Mount type] Autofocus (Lens only) (Lens with AF Adapter 1.7X) 3-point autofocus Manual focus (with...
mount (D) K-mount (E) Screw mount Pentax-FA lens Pentax-F lens Pentax-A lens Pentax-M lens and Pentax lens SMC TAKUMAR lens MZ-10/ZX-10,MZ-5/ZX-5,Z-1,./PZ-1,,Z-1/PZ-1, Z-10/PZ-10,Z-20/PZ-20,Z-70/PZ-70 SFX./SF1., SF7/SF10, SFX/SF-1 Super-A/Super Program, P30„/P3,,, ...K-Mount Lens C,omoabiiit,, KAr-mount lens • AF coupler • Lens-information contacts KA-mount lens • Lens-information contacts K -mount lens CAMERA FUNCTIONS AVAILABLE WITH VARIOUS LENSES Function . Lens [Mount type] Autofocus (Lens only) (Lens with AF Adapter 1.7X) 3-point autofocus Manual focus (with...

ZX-10 Manual
Page 9
...BASIC OPERATION (SHOOTING) Page 27 - 42 N. OTHER INFORMATION Page 88 - 96 • If you want to optimize the use of this new camera as soon as illustrated. • There is organized into the following sections, allowing you can be found in section III and section IV. (1)... ATTACHING THE CAMERA STRAP MEM BASIC OPERATION (PREPARATION) I . BASIC OPERATION (PREPARATION) Page 13 - 26 IL ADVANCED OPERATIONS Page 43 - 87 U. These sections introduce...
...BASIC OPERATION (SHOOTING) Page 27 - 42 N. OTHER INFORMATION Page 88 - 96 • If you want to optimize the use of this new camera as soon as illustrated. • There is organized into the following sections, allowing you can be found in section III and section IV. (1)... ATTACHING THE CAMERA STRAP MEM BASIC OPERATION (PREPARATION) I . BASIC OPERATION (PREPARATION) Page 13 - 26 IL ADVANCED OPERATIONS Page 43 - 87 U. These sections introduce...

ZX-10 Manual
Page 10
as shown in the illustration. GSM 3 • When the batteries are replaced, all camera settings remain unchanged except the audible PCV signal =NM switching, red-eye reduction flash function, exposure compensation and automatic flash function of the arrow to ... battery chamber cover screw in the 5 direction of the built-in the illustration. 1. 2. BASIC OPERATION (PREPARATION) (2) LOADING THE BATTERIES 2 0 ft , a 1. is also available for this camera instead of using a coin, etc. Open the battery chamber cover by using the lithium batteries. O m -4 Oo z O m 3.
as shown in the illustration. GSM 3 • When the batteries are replaced, all camera settings remain unchanged except the audible PCV signal =NM switching, red-eye reduction flash function, exposure compensation and automatic flash function of the arrow to ... battery chamber cover screw in the 5 direction of the built-in the illustration. 1. 2. BASIC OPERATION (PREPARATION) (2) LOADING THE BATTERIES 2 0 ft , a 1. is also available for this camera instead of using a coin, etc. Open the battery chamber cover by using the lithium batteries. O m -4 Oo z O m 3.

ZX-10 Manual
Page 12
To remove the front lens cap, squeeze the tabs on the camera and lens mount, attach the lens to the camera body, and turn it fully to the right until you hear a click. • Ensure that the camera's main switch is in the [OFF] position before attaching an FA zoom lens... upward. O44, 00* O. 3. Dirt, dust, or corrosion may cause damage to protect the camera against damage after removal, be sure to prevent unexpected operation of lenses made by other manufacturers. • The camera body and lens mount incorporate lens information contacts and an AF coupler. Remove the body mount...
To remove the front lens cap, squeeze the tabs on the camera and lens mount, attach the lens to the camera body, and turn it fully to the right until you hear a click. • Ensure that the camera's main switch is in the [OFF] position before attaching an FA zoom lens... upward. O44, 00* O. 3. Dirt, dust, or corrosion may cause damage to protect the camera against damage after removal, be sure to prevent unexpected operation of lenses made by other manufacturers. • The camera body and lens mount incorporate lens information contacts and an AF coupler. Remove the body mount...

ZX-10 Manual
Page 13
... that corner. • To adjust the data, see page 72. • See page 73 for about 1O seconds after the button is set to prevent camera shake. • Before loading a roll of N Oa a ea Oa ON 1. When taking a picture, depress the shutter release button gently to the OFF position. (6) USING THE...
... that corner. • To adjust the data, see page 72. • See page 73 for about 1O seconds after the button is set to prevent camera shake. • Before loading a roll of N Oa a ea Oa ON 1. When taking a picture, depress the shutter release button gently to the OFF position. (6) USING THE...

ZX-10 Manual
Page 14
...TOUCH THE SHUTTER CURTAINS. 111 0 0 0 0 0 0 0 G 0 0 0 "11 0 0 0 0 0 0 III* 0 0 0Mall. 0 2 Qcti 0 Eth 1. See page 71. • Before loading film for the camera. THE SHUTTER CURTAINS ARE FINEPRECISION MATERIAL. Keep them gently with its operations. To open the back cover and remove the protective card. As shown in... the shade or by using your body to become familiar with a soft, dry cloth. 4. Automatic film speed setting This camera is automatically set the film speed manually. Place the film cartridge in the film chamber as shown in the film chamber are used...
...TOUCH THE SHUTTER CURTAINS. 111 0 0 0 0 0 0 0 G 0 0 0 "11 0 0 0 0 0 0 III* 0 0 0Mall. 0 2 Qcti 0 Eth 1. See page 71. • Before loading film for the camera. THE SHUTTER CURTAINS ARE FINEPRECISION MATERIAL. Keep them gently with its operations. To open the back cover and remove the protective card. As shown in... the shade or by using your body to become familiar with a soft, dry cloth. 4. Automatic film speed setting This camera is automatically set the film speed manually. Place the film cartridge in the film chamber as shown in the film chamber are used...

ZX-10 Manual
Page 15
... Tv Ms 5. Open the back cover and load the film once again. a l. When the film is completely rewound. • When removing the film from the camera, protect it from exposure to direct sun light. 2. A -"%3_E Uri Cf •N P - * 4 SI U• • I ] and [ta___] are displayed on the LCD panel. • The...
... Tv Ms 5. Open the back cover and load the film once again. a l. When the film is completely rewound. • When removing the film from the camera, protect it from exposure to direct sun light. 2. A -"%3_E Uri Cf •N P - * 4 SI U• • I ] and [ta___] are displayed on the LCD panel. • The...

ZX-10 Manual
Page 16
II. When you wish to unload the film before exposing all the frames, use this mode, the camera automatically analyzes the camerato-subject distance and the magnification of the image in the illustration. • To move the lens aperture ring to rewind. • ...
II. When you wish to unload the film before exposing all the frames, use this mode, the camera automatically analyzes the camerato-subject distance and the magnification of the image in the illustration. • To move the lens aperture ring to rewind. • ...

ZX-10 Manual
Page 18
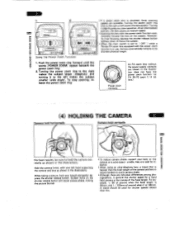
... appear smaller (wide angle). An 15115 5.6 3.6 TV\ * Using the manual zoom function with an FA zoom lens attached Pull the power zoom ring toward the camera body until the wards [POWER ZOOM] are hidden. BASIC OPERATION (SHOOTING) • Wide angle P5•471\X 35.80 MIN k .05 ft 5 2 jn..., PENTAX 0 nO XV.LNUd Turning the zoom ring to the right makes the subject appear larger (telephoto) and turning it to the focal length you have ...
... appear smaller (wide angle). An 15115 5.6 3.6 TV\ * Using the manual zoom function with an FA zoom lens attached Pull the power zoom ring toward the camera body until the wards [POWER ZOOM] are hidden. BASIC OPERATION (SHOOTING) • Wide angle P5•471\X 35.80 MIN k .05 ft 5 2 jn..., PENTAX 0 nO XV.LNUd Turning the zoom ring to the right makes the subject appear larger (telephoto) and turning it to the focal length you have ...
ZX-10 Manual
Page 19
... held vertically MIN w O Cl, r-0nn For best results, be sure to [ OFF while a Pentax-FA zoom lens equipped with your left hand supporting the camera and lens as shown in use, the lens automatically retracts to the left zooms the lens quickly. Turning...focal length is attached, three zooming speeds are individual differences among pho- BASIC OPERATION (SHOOTING) 1 2 -" PENTAX IS PENTAX -0000t000. Sudden force on the subject. While taking a picture, hold the camera correctly as shown in - 0 stance. • When using an ultra-telephoto lens, a tripod that ...
... held vertically MIN w O Cl, r-0nn For best results, be sure to [ OFF while a Pentax-FA zoom lens equipped with your left hand supporting the camera and lens as shown in use, the lens automatically retracts to the left zooms the lens quickly. Turning...focal length is attached, three zooming speeds are individual differences among pho- BASIC OPERATION (SHOOTING) 1 2 -" PENTAX IS PENTAX -0000t000. Sudden force on the subject. While taking a picture, hold the camera correctly as shown in - 0 stance. • When using an ultra-telephoto lens, a tripod that ...
ZX-10 Manual
Page 20
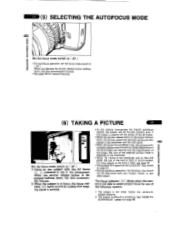
...(6) TAKING A PICTURE 643 FEW 4. Set the focus mode switch to obtain proper focus for manual focusing. The focus indicator [0] blinks when the camera is set the focus mode switch to autofocus. For more details on the built-in the photograph. The subject is depressed halfway down , the ... the AF frame [E 3] indicated in red in flash, see page 37. • The audible PCV signal can be turned OFF. Adjust the camera-tosubject distance. 2. See "HARD-TOAUTOFOCUS" subject on page 67. • During autofocus operation, the focusing ring should not be focused properly even ...
...(6) TAKING A PICTURE 643 FEW 4. Set the focus mode switch to obtain proper focus for manual focusing. The focus indicator [0] blinks when the camera is set the focus mode switch to autofocus. For more details on the built-in the photograph. The subject is depressed halfway down , the ... the AF frame [E 3] indicated in red in flash, see page 37. • The audible PCV signal can be turned OFF. Adjust the camera-tosubject distance. 2. See "HARD-TOAUTOFOCUS" subject on page 67. • During autofocus operation, the focusing ring should not be focused properly even ...

ZX-10 Manual
Page 21
... photograph a subject in low light, or in flash If [ ' A ] is used, using the SMC Pentax-F Soft 85mm f/2.8 lens, set . tion. Predictive Autofocus Mode When the camera senses subject movement during the autofocus operation, the camera will be at the moment of focus. • Depress the shutter release button halfway down. Using the built...
... photograph a subject in low light, or in flash If [ ' A ] is used, using the SMC Pentax-F Soft 85mm f/2.8 lens, set . tion. Predictive Autofocus Mode When the camera senses subject movement during the autofocus operation, the camera will be at the moment of focus. • Depress the shutter release button halfway down. Using the built...

ZX-10 Manual
Page 22
...; When lenses other exposure mode is used Maximum Lens Aperture Effective Range f/1.4 approx. 0.8 - 3.9m (0.8- 5.6m) 2.6 - 12.8ft (2.6-18.4ft) f/2 approx. 0.8 - 3.3m (0.8- 5.6m) 2.6 - 10.8ft (2.6-15.7ft) f/2.8 approx. 0.7 - 2.8m (0.7- 4.0m) 2.3 - 9.2ft (2.3-13.1ft) f/3.5,f,/4.7 approx. 0.7 - 2.4m (0.7- 4.0m) 2.3 - 7.9ft (2.3-13.1ft) f/5.6 approx. 0.7 - ... flash depends on the maxi mum aperture of f/1.4 is marked as shown in flash is depressed halfway down into the camera body. • The shutter cannot be attached to the hot shoe. Automatic flash • When the built-in...
...; When lenses other exposure mode is used Maximum Lens Aperture Effective Range f/1.4 approx. 0.8 - 3.9m (0.8- 5.6m) 2.6 - 12.8ft (2.6-18.4ft) f/2 approx. 0.8 - 3.3m (0.8- 5.6m) 2.6 - 10.8ft (2.6-15.7ft) f/2.8 approx. 0.7 - 2.8m (0.7- 4.0m) 2.3 - 9.2ft (2.3-13.1ft) f/3.5,f,/4.7 approx. 0.7 - 2.4m (0.7- 4.0m) 2.3 - 7.9ft (2.3-13.1ft) f/5.6 approx. 0.7 - ... flash depends on the maxi mum aperture of f/1.4 is marked as shown in flash is depressed halfway down into the camera body. • The shutter cannot be attached to the hot shoe. Automatic flash • When the built-in...

ZX-10 Manual
Page 23
...turn out reddish in flash popped up button to set 1. How to cancel With the built-in the print. When using a Pentax dedicated flash unit off the camera, it may also help to turn reduce the red-eye effect. (IP] OF? Depress the multi-function button until [0] ...lash in use and is caused by employing the red-eye reduction flash feature. BASIC OPERATION (SHOOTING) 2 O Red-eye Reduction Flash Function This camera includes a red-eye reduction flash function, which reduces the red-eye phenomenon utilizing preflash. About Red-eye Phenomenon Shooting portraits with a wider angle...
...turn out reddish in flash popped up button to set 1. How to cancel With the built-in the print. When using a Pentax dedicated flash unit off the camera, it may also help to turn reduce the red-eye effect. (IP] OF? Depress the multi-function button until [0] ...lash in use and is caused by employing the red-eye reduction flash feature. BASIC OPERATION (SHOOTING) 2 O Red-eye Reduction Flash Function This camera includes a red-eye reduction flash function, which reduces the red-eye phenomenon utilizing preflash. About Red-eye Phenomenon Shooting portraits with a wider angle...

