

ZX-10 Manual
Page 2
... Lenses and accessories produced by other manufacturers are listed on /off flash function with , or actual damage to the exciting world of Pentax autofocus photographyl This compact and light weight camera is an autofocus SLR camera that offers higher levels of sophistication and performance. Icon indicators ... perform superbly for difficulties resulting from the use . Congratulations on your purchase of this camera and welcome to , your Pentax camera. We do not assume any responsibility or liability for the most exacting photographer. Keep the flaps unfolded for quick reference...
... Lenses and accessories produced by other manufacturers are listed on /off flash function with , or actual damage to the exciting world of Pentax autofocus photographyl This compact and light weight camera is an autofocus SLR camera that offers higher levels of sophistication and performance. Icon indicators ... perform superbly for difficulties resulting from the use . Congratulations on your purchase of this camera and welcome to , your Pentax camera. We do not assume any responsibility or liability for the most exacting photographer. Keep the flaps unfolded for quick reference...
ZX-10 Manual
Page 3
...warranty and charges may cause rust. Should the camera get the strap caught around their neck. • Do not look directly at a Pentax service center. Compose your camera inspected at the sun through the camera, as viewing the sun for extended periods in places where the ...Wrapping the strap around your neck is dangerous. Precautions when taking pictures • Do not use the flash near anyone's eyes, as it to a Pentax service center for inspection. • Be careful not to subject the camera to the equipment. ,L WARNING • The electronic circuits inside the camera ...
...warranty and charges may cause rust. Should the camera get the strap caught around their neck. • Do not look directly at a Pentax service center. Compose your camera inspected at the sun through the camera, as viewing the sun for extended periods in places where the ...Wrapping the strap around your neck is dangerous. Precautions when taking pictures • Do not use the flash near anyone's eyes, as it to a Pentax service center for inspection. • Be careful not to subject the camera to the equipment. ,L WARNING • The electronic circuits inside the camera ...

ZX-10 Manual
Page 4
...period, or is faulty; p.44 Taking a horizontally dynamic panorama picture. --p.50 Taking a picture of this camera functions properly is 50°C to -10° C (122°F to 14 °F). • A camera which this product in flash is in the shadow. p.40 Automatic Flash ... spare battery on a picture. p.54 Taking a portrait photograph. It may be repaired at no charge under the terms of the Pentax warranty. • The PENTAX warranty provides only for Your Camera" section or any kind cannot be temporarily hindered in a roomy place such as leakage, overheating, ...
...period, or is faulty; p.44 Taking a horizontally dynamic panorama picture. --p.50 Taking a picture of this camera functions properly is 50°C to -10° C (122°F to 14 °F). • A camera which this product in flash is in the shadow. p.40 Automatic Flash ... spare battery on a picture. p.54 Taking a portrait photograph. It may be repaired at no charge under the terms of the Pentax warranty. • The PENTAX warranty provides only for Your Camera" section or any kind cannot be temporarily hindered in a roomy place such as leakage, overheating, ...

ZX-10 Manual
Page 5
...) 68 • Compatibility of F and FA lenses with various lenses 11 How to use ! (For beginners) 8 Camera and lens mount 10 Camera functions available with the built-in flash 70 Setting the film speed (ISO) manually 71 Installing the battery in the Data Back 72 Adjusting... When the battery is exhausted 17 Attaching the lens 18 Operating the shutter release button 20 Turning on the Data Back 73 Using a Pentax Dedicated External Flash 75 • Contrast-Control-Sync Flash Photography 77 Daylight-sync shooting 79 Slow-speed-sync shooting 80 ACCESSORIES (OPTIONAL) ...
...) 68 • Compatibility of F and FA lenses with various lenses 11 How to use ! (For beginners) 8 Camera and lens mount 10 Camera functions available with the built-in flash 70 Setting the film speed (ISO) manually 71 Installing the battery in the Data Back 72 Adjusting... When the battery is exhausted 17 Attaching the lens 18 Operating the shutter release button 20 Turning on the Data Back 73 Using a Pentax Dedicated External Flash 75 • Contrast-Control-Sync Flash Photography 77 Daylight-sync shooting 79 Slow-speed-sync shooting 80 ACCESSORIES (OPTIONAL) ...
ZX-10 Manual
Page 6
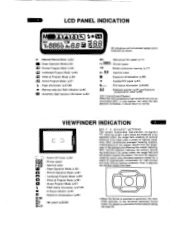
VIEWFINDER INDICATION C F8.6 ail : 3-point AF frame (p.35) : Shutter speed : Aperture value Green Operation Mode (p.53) :: Portrait Operation Mode (p.54) Landscape Program Mode (p.55) : Close-up Program Mode (p.56) : Action Program Mode (p.57) : Flash information (p.37,39) : Red-eye reduction flash indication (p.40) '4A : Automatic flash function information (p.42) ISO : Manual-set film speed (p.71) 88S : Tv Shutter speed : Battery exhaustion warning (p.17) : Aperture value : Exposure compensation (p.66) : Audible PCV signal (p.67) : Film status information (p.24,25) : Exposure ...
VIEWFINDER INDICATION C F8.6 ail : 3-point AF frame (p.35) : Shutter speed : Aperture value Green Operation Mode (p.53) :: Portrait Operation Mode (p.54) Landscape Program Mode (p.55) : Close-up Program Mode (p.56) : Action Program Mode (p.57) : Flash information (p.37,39) : Red-eye reduction flash indication (p.40) '4A : Automatic flash function information (p.42) ISO : Manual-set film speed (p.71) 88S : Tv Shutter speed : Battery exhaustion warning (p.17) : Aperture value : Exposure compensation (p.66) : Audible PCV signal (p.67) : Film status information (p.24,25) : Exposure ...

ZX-10 Manual
Page 7
The Smart Picture Mode will be set. 5.Turning on the lens and camera. The film should advance to [ AF ]. (See page 34.) 9. Turn the lens to the right until you obtain the desired com- Selecting the Autofocus Mode 0 0 'MR - Attaching the lens Open the battery chamber cover by using a coin. Loading the batteries 2. Composing the scene with the zoom ring Set the focus mode switch to the first frame automatically. (See page 22.) 8. Set the mode dial to the [ A ] position. (See page 27.) 4. Positioning the aperture ring mr• PSJI 4. \ oo901167 I11 &#...
The Smart Picture Mode will be set. 5.Turning on the lens and camera. The film should advance to [ AF ]. (See page 34.) 9. Turn the lens to the right until you obtain the desired com- Selecting the Autofocus Mode 0 0 'MR - Attaching the lens Open the battery chamber cover by using a coin. Loading the batteries 2. Composing the scene with the zoom ring Set the focus mode switch to the first frame automatically. (See page 22.) 8. Set the mode dial to the [ A ] position. (See page 27.) 4. Positioning the aperture ring mr• PSJI 4. \ oo901167 I11 &#...

ZX-10 Manual
Page 8
... O x O x *7 x S lens [Screw] x x x x O x x x x x x O x O x O x *7 x Notes: * 1. Manual focusing using the focus indicator (FI) (0) in the viewfinder. * 3. Pentax-FA zoom lenses with Matte field) Power zoom Image size tracking Zoom clip Auto zoom effect Picture Mode Smart Picture Mode Aperture-Priority AE Shutter...Pentax "Mount Adapter K". (A) through (D) with a maximum aperture of f/5.6 or larger. * 4. mount (D) K-mount (E) Screw mount Pentax-FA lens Pentax-F lens Pentax-A lens Pentax-M lens and Pentax lens SMC TAKUMAR lens MZ-10/ZX-10,MZ-5/ZX-5,Z-1,./PZ-1,,Z-1/PZ-1, Z-10/PZ-10...
... O x O x *7 x S lens [Screw] x x x x O x x x x x x O x O x O x *7 x Notes: * 1. Manual focusing using the focus indicator (FI) (0) in the viewfinder. * 3. Pentax-FA zoom lenses with Matte field) Power zoom Image size tracking Zoom clip Auto zoom effect Picture Mode Smart Picture Mode Aperture-Priority AE Shutter...Pentax "Mount Adapter K". (A) through (D) with a maximum aperture of f/5.6 or larger. * 4. mount (D) K-mount (E) Screw mount Pentax-FA lens Pentax-F lens Pentax-A lens Pentax-M lens and Pentax lens SMC TAKUMAR lens MZ-10/ZX-10,MZ-5/ZX-5,Z-1,./PZ-1,,Z-1/PZ-1, Z-10/PZ-10...

ZX-10 Manual
Page 9
BASIC OPERATION (SHOOTING) Page 27 - 42 N. More detailed information can store the finder cap, release socket cover, hot shoe cover or any other small accessory as possible, read section I . BASIC OPERATION (PREPARATION) Fit the strap on the camera as illustrated. • There is organized into the following sections, allowing you to begin taking pictures with this camera. SHOW TO USE THIS OPERATING MANUAL This manual is a pocket on the strap so you want to optimize the use of this new camera as soon as illustrated. OTHER INFORMATION Page 88 - 96 • If you can ...
BASIC OPERATION (SHOOTING) Page 27 - 42 N. More detailed information can store the finder cap, release socket cover, hot shoe cover or any other small accessory as possible, read section I . BASIC OPERATION (PREPARATION) Fit the strap on the camera as illustrated. • There is organized into the following sections, allowing you to begin taking pictures with this camera. SHOW TO USE THIS OPERATING MANUAL This manual is a pocket on the strap so you want to optimize the use of this new camera as soon as illustrated. OTHER INFORMATION Page 88 - 96 • If you can ...

ZX-10 Manual
Page 10
as shown in the illustration. O m -4 Oo z O m 3. Turn the battery chamber cover screw in the 5 direction of the built-in the illustration. 1. 2. Load two 3V lithium batteries (CR2) or equivalent as shown in flash. • The optional "AA-Battery Pack F." is also available for this camera instead of using a coin, etc. Open the battery chamber cover by using the lithium batteries. BASIC OPERATION (PREPARATION) (2) LOADING THE BATTERIES 2 0 ft , a 1. GSM 3 • When the batteries are replaced, all camera settings remain unchanged except the audible PCV signal =...
as shown in the illustration. O m -4 Oo z O m 3. Turn the battery chamber cover screw in the 5 direction of the built-in the illustration. 1. 2. Load two 3V lithium batteries (CR2) or equivalent as shown in flash. • The optional "AA-Battery Pack F." is also available for this camera instead of using a coin, etc. Open the battery chamber cover by using the lithium batteries. BASIC OPERATION (PREPARATION) (2) LOADING THE BATTERIES 2 0 ft , a 1. GSM 3 • When the batteries are replaced, all camera settings remain unchanged except the audible PCV signal =...

ZX-10 Manual
Page 11
... are nearly exhausted, the battery symbol [4=m] appears on usage of the times) about 12 rolls Bulb exposure time about 8 hours CR2 batteries were used under Pentax testing conditions. BASIC OPERATION (PREPARATION) BASIC OPERATION (PREPARATION) 4 OFF QN ■ Tv L 4. Battery Life using 24-exposure film rolls, General existing light photography about 120...
... are nearly exhausted, the battery symbol [4=m] appears on usage of the times) about 12 rolls Bulb exposure time about 8 hours CR2 batteries were used under Pentax testing conditions. BASIC OPERATION (PREPARATION) BASIC OPERATION (PREPARATION) 4 OFF QN ■ Tv L 4. Battery Life using 24-exposure film rolls, General existing light photography about 120...

ZX-10 Manual
Page 12
Remove the body mount cap and rear lens cap 0 as shown in the direction of the arrow. • We assume no responsibility nor liability for damages resulting from the use of lenses made by other manufacturers. • The camera body and lens mount incorporate lens information contacts and an AF coupler. To remove the front lens cap, squeeze the tabs on the camera and lens mount, attach the lens to the camera body, and turn it fully to the right until you hear a click. • Ensure that the camera's main switch is available. 2. BASIC OPERATION (PREPARATION) 3 r. is in the [OFF] ...
Remove the body mount cap and rear lens cap 0 as shown in the direction of the arrow. • We assume no responsibility nor liability for damages resulting from the use of lenses made by other manufacturers. • The camera body and lens mount incorporate lens information contacts and an AF coupler. To remove the front lens cap, squeeze the tabs on the camera and lens mount, attach the lens to the camera body, and turn it fully to the right until you hear a click. • Ensure that the camera's main switch is available. 2. BASIC OPERATION (PREPARATION) 3 r. is in the [OFF] ...

ZX-10 Manual
Page 13
Depressing the shutter release button down halfway keeps the LCD indicator on a 3V lithium battery. When composing your photographs clearly on for about 1O seconds after the button is . • The LCD indication stays on each press of the DATE button as shown in the illustration, the mode on the LCD panel of the Data Back switches as indicated in the chart. • [ M ] on the exposure meter and autofocus system. To replace the battery see page 73. • The dating unit automatically switches the imprint mode between the standard and panorama according to learn where the first...
Depressing the shutter release button down halfway keeps the LCD indicator on a 3V lithium battery. When composing your photographs clearly on for about 1O seconds after the button is . • The LCD indication stays on each press of the DATE button as shown in the illustration, the mode on the LCD panel of the Data Back switches as indicated in the chart. • [ M ] on the exposure meter and autofocus system. To replace the battery see page 73. • The dating unit automatically switches the imprint mode between the standard and panorama according to learn where the first...

ZX-10 Manual
Page 14
Automatic film speed setting This camera is designed to use a non-DX coded film, you can set for the first time after purchase, open the back cover slide the back cover release lever in the shade or by using your body to shade the camera. 3 0 -n Pl. •6 00 0 4 co 0 5 0 I" 11 0 000 3. DO NOT TOUCH THE SHUTTER CURTAINS. 111 0 0 0 0 0 0 0 G 0 0 0 "11 0 0 0 0 0 0 III* 0 0 0Mall. 0 2 Qcti 0 Eth 1. To open the back cover and remove the protective card. Place the film cartridge in the film chamber as shown in the illustration. • Always load and unload film in ...
Automatic film speed setting This camera is designed to use a non-DX coded film, you can set for the first time after purchase, open the back cover slide the back cover release lever in the shade or by using your body to shade the camera. 3 0 -n Pl. •6 00 0 4 co 0 5 0 I" 11 0 000 3. DO NOT TOUCH THE SHUTTER CURTAINS. 111 0 0 0 0 0 0 0 G 0 0 0 "11 0 0 0 0 0 0 III* 0 0 0Mall. 0 2 Qcti 0 Eth 1. To open the back cover and remove the protective card. Place the film cartridge in the film chamber as shown in the illustration. • Always load and unload film in ...

ZX-10 Manual
Page 15
Close the back cover and set the main switch to direct sun light. 2. Open the back cover and load the film once again. When the film is fully rewound, only [ blinks on the LCD panel blinks, indicating that the film is not loaded properly. The film automatically advances to the first frame. • Check that the film is being rewound, the exposure counter counts frame numbers in reverse. • Never open the back cover until the whole film roll is completely rewound. • When removing the film from the camera, protect it from exposure to [ ON ] . A -"%3_E ...
Close the back cover and set the main switch to direct sun light. 2. Open the back cover and load the film once again. When the film is fully rewound, only [ blinks on the LCD panel blinks, indicating that the film is not loaded properly. The film automatically advances to the first frame. • Check that the film is being rewound, the exposure counter counts frame numbers in reverse. • Never open the back cover until the whole film roll is completely rewound. • When removing the film from the camera, protect it from exposure to [ ON ] . A -"%3_E ...

ZX-10 Manual
Page 16
In this function. tion as indicated by simply depressing the shutter release button. Set the main switch to the requirement of frames on the film cartridge. The lens aperture ring can be lost in the viewfinder, and it then selects one of 5 picture modes according to the ON position, and then depress the mid-roll rewind button by using the protruding part of the strap clamp. • Do not depress the button with an object having a sharp tip. • Before opening the back cover, check that [ 0 ] is blinking. • The shutter may be released from the [ A ] position in ...
In this function. tion as indicated by simply depressing the shutter release button. Set the main switch to the requirement of frames on the film cartridge. The lens aperture ring can be lost in the viewfinder, and it then selects one of 5 picture modes according to the ON position, and then depress the mid-roll rewind button by using the protruding part of the strap clamp. • Do not depress the button with an object having a sharp tip. • Before opening the back cover, check that [ 0 ] is blinking. • The shutter may be released from the [ A ] position in ...

ZX-10 Manual
Page 17
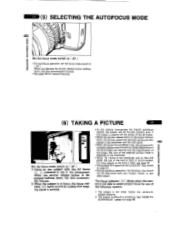
The Green Operation Mode oper- finder. [0] is displayed on the LCD panel to indicate that the Smart Picture Mode is set. • The Smart Picture Mode operates only when an FA or F lens is displayed in the view- ates only with an A-lens attached. • See page 60 to the [El] position. BASIC OPERATION (SHOOTING) 2 • The selected picture mode is attached. Set the mode dial to the [(Pm)] position. (2) SETTING THE SINGLE-FRAME DRIVE MODE • One picture is taken each time the shutter release button is depressed. • See page 43 for any other available function....
The Green Operation Mode oper- finder. [0] is displayed on the LCD panel to indicate that the Smart Picture Mode is set. • The Smart Picture Mode operates only when an FA or F lens is displayed in the view- ates only with an A-lens attached. • See page 60 to the [El] position. BASIC OPERATION (SHOOTING) 2 • The selected picture mode is attached. Set the mode dial to the [(Pm)] position. (2) SETTING THE SINGLE-FRAME DRIVE MODE • One picture is taken each time the shutter release button is depressed. • See page 43 for any other available function....

ZX-10 Manual
Page 18
... the camera body until the wards [POWER ZOOM] are hidden. BASIC OPERATION (SHOOTING) • Wide angle P5•471\X 35.80 MIN k .05 ft 5 2 jn, PENTAX 0 nO XV.LNUd Turning the zoom ring to the right makes the subject appear larger (telephoto) and turning it to the focal length you have...
... the camera body until the wards [POWER ZOOM] are hidden. BASIC OPERATION (SHOOTING) • Wide angle P5•471\X 35.80 MIN k .05 ft 5 2 jn, PENTAX 0 nO XV.LNUd Turning the zoom ring to the right makes the subject appear larger (telephoto) and turning it to the focal length you have...
ZX-10 Manual
Page 19
... lens, a tripod that is in use, the lens automatically retracts to hold your breath and gently depress the shutter release button. BASIC OPERATION (SHOOTING) 1 2 -" PENTAX IS PENTAX -0000t000. POWSPI ZOOM A22141115.63.11 \UR_ A.1.-56-51111 Using the Power Zoom Function • If a power zoom lens is set to the left zooms... correctly as shown in the illustrations. Turning the power zoom ring to the right makes the subject larger (telephoto) and turning it to [ OFF while a Pentax-FA zoom lens equipped with your body or the camera on the subject.
... lens, a tripod that is in use, the lens automatically retracts to hold your breath and gently depress the shutter release button. BASIC OPERATION (SHOOTING) 1 2 -" PENTAX IS PENTAX -0000t000. POWSPI ZOOM A22141115.63.11 \UR_ A.1.-56-51111 Using the Power Zoom Function • If a power zoom lens is set to the left zooms... correctly as shown in the illustrations. Turning the power zoom ring to the right makes the subject larger (telephoto) and turning it to [ OFF while a Pentax-FA zoom lens equipped with your body or the camera on the subject.
ZX-10 Manual
Page 20
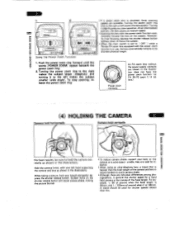
Adjust the camera-tosubject distance. 2. The subject is depressed halfway down, the lens automatically focuses. 2. When the subject is in focus, the focus indicator [0] lights up and an audible PCV beeping signal is emitted. • As this camera incorporates the 3-point autofocus system, the subject will be focused properly even if the subject is slightly off the center of the AF frame. • When the shutter release button is depressed halfway down , the lens automatically focuses. • See page 46 for one of the following reasons. 1. For more details on ...
Adjust the camera-tosubject distance. 2. The subject is depressed halfway down, the lens automatically focuses. 2. When the subject is in focus, the focus indicator [0] lights up and an audible PCV beeping signal is emitted. • As this camera incorporates the 3-point autofocus system, the subject will be focused properly even if the subject is slightly off the center of the AF frame. • When the shutter release button is depressed halfway down , the lens automatically focuses. • See page 46 for one of the following reasons. 1. For more details on ...

ZX-10 Manual
Page 21
... charging automatically. 3. To refocus on another subject, lift your finger off the shutter release button. • When using a lens hood is used, using the SMC Pentax-F Soft 85mm f/2.8 lens, set . In the Shutter-Priority AE Mode and Metered Manual Mode, the flash-recommended indicator blinks only when attempting to photograph a subject...
... charging automatically. 3. To refocus on another subject, lift your finger off the shutter release button. • When using a lens hood is used, using the SMC Pentax-F Soft 85mm f/2.8 lens, set . In the Shutter-Priority AE Mode and Metered Manual Mode, the flash-recommended indicator blinks only when attempting to photograph a subject...