

Super Program Manual
Page 2
... technology, it invites you take the time to the World of Pentax Multi-mode Photography Pentax Super Program is digitally displayed in the viewfinder by means of an extraordinary camera. It will help you to approx. 3.5 frames per second, a digital data back, etc. Since the Super Program has a great many special features and functions, take full advantage...
... technology, it invites you take the time to the World of Pentax Multi-mode Photography Pentax Super Program is digitally displayed in the viewfinder by means of an extraordinary camera. It will help you to approx. 3.5 frames per second, a digital data back, etc. Since the Super Program has a great many special features and functions, take full advantage...

Super Program Manual
Page 5
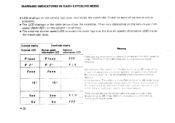
... 55 21 Infrared index mark 56 22 Using screw-mount Takumar lenses 57 23 How to use various accessories 24 with your Super Program 58 28 O & As on your Pentax Super Program 59 Camera maintenance 60 29 Resistance to temperature extremes and 30 changes, A few notes on the LCD 32 (Liquid Crystal Display) 61 34 Specifications...
... 55 21 Infrared index mark 56 22 Using screw-mount Takumar lenses 57 23 How to use various accessories 24 with your Super Program 58 28 O & As on your Pentax Super Program 59 Camera maintenance 60 29 Resistance to temperature extremes and 30 changes, A few notes on the LCD 32 (Liquid Crystal Display) 61 34 Specifications...
Super Program Manual
Page 6
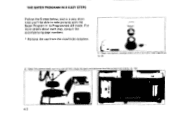
THE SUPER PROGRAM IN 9 EASY STEPS Follow the 9 steps below, and in a very short time you'll be able to the first frame. (p. 16) 1111tr4Ti.nIPg 4tb_ at - • 2 Open the camera back, put in its Programmed AE mode. Open the battery compartment with the Super Program in a roll of film, close the back and advance the film to take pictures with a coin and insert batteries. (p. 6) 2. For more details about each step, consult the accompanying page numbers. • Remove the cap from the viewfinder eyepiece. 1.
THE SUPER PROGRAM IN 9 EASY STEPS Follow the 9 steps below, and in a very short time you'll be able to the first frame. (p. 16) 1111tr4Ti.nIPg 4tb_ at - • 2 Open the camera back, put in its Programmed AE mode. Open the battery compartment with the Super Program in a roll of film, close the back and advance the film to take pictures with a coin and insert batteries. (p. 6) 2. For more details about each step, consult the accompanying page numbers. • Remove the cap from the viewfinder eyepiece. 1.
Super Program Manual
Page 7
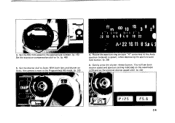
3. Set the ISO film speed to the appropriate number. (p. 15) Set the exposure compensation dial to the Auto position (indexed in the Programmed AE mode. (p. 32) I• • ft m Co 10 t5 3 e 2 8 I I :2 18 84 4 8 18 22 I AJ 22 16 11 8 5.8 4 2 4. Gently press the shutter release button....lx. (p. 46) 5. Set the shutter dial to Auto. With both shutter speed and aperture setting indicated on the viewfinder LCD and on Auto, the camera is now in green), while depressing the aperture auto lock button. (p. 28) 6. You will see both lens and shutter on the external shutter speed...
3. Set the ISO film speed to the appropriate number. (p. 15) Set the exposure compensation dial to the Auto position (indexed in the Programmed AE mode. (p. 32) I• • ft m Co 10 t5 3 e 2 8 I I :2 18 84 4 8 18 22 I AJ 22 16 11 8 5.8 4 2 4. Gently press the shutter release button....lx. (p. 46) 5. Set the shutter dial to Auto. With both shutter speed and aperture setting indicated on the viewfinder LCD and on Auto, the camera is now in green), while depressing the aperture auto lock button. (p. 28) 6. You will see both lens and shutter on the external shutter speed...
Super Program Manual
Page 8
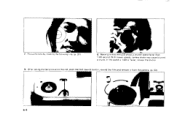
With slower speeds, camera shake may cause blurred pictures If the speed is 1/60 or faster, release the shutter. 9. Focus the lens by rotating the focusing nng (p 211 8. Make sure that the LCD shows a shutter speed faster than 1;60 second. After taking the last picture on the roll, push the film rewind button, rewind the film and remove it from the camera. (p. 231 • 4 7.
With slower speeds, camera shake may cause blurred pictures If the speed is 1/60 or faster, release the shutter. 9. Focus the lens by rotating the focusing nng (p 211 8. Make sure that the LCD shows a shutter speed faster than 1;60 second. After taking the last picture on the roll, push the film rewind button, rewind the film and remove it from the camera. (p. 231 • 4 7.

Super Program Manual
Page 10
If the LCDs on the camera top and in the viewfinder indicate shutter speed information, the batteries are properly inserted and sufficient in the compartment with '+' marks downward, and close the ... them with a clean dry cloth. • Open the battery compartment cover with a coin or similar object. • Place the two batteries in voltage for normal camera functioning. • 6 Use two 1.5V silver or alkaline batteries, or a 3V lithium battery. INSERTING BATTERIES Your Super Program doesn't operate without batteries.
If the LCDs on the camera top and in the viewfinder indicate shutter speed information, the batteries are properly inserted and sufficient in the compartment with '+' marks downward, and close the ... them with a clean dry cloth. • Open the battery compartment cover with a coin or similar object. • Place the two batteries in voltage for normal camera functioning. • 6 Use two 1.5V silver or alkaline batteries, or a 3V lithium battery. INSERTING BATTERIES Your Super Program doesn't operate without batteries.
Super Program Manual
Page 11
... and a row of 000 's. Starting with the first frame on This alternate LCD indication tells you that both inside and outside the camera warn you take your finger off As an energy-saving measure, a timer switch is integrated into the exposure meter circuit. It automatically ...off power approximately 30 sec. Low battery warning When batteries become weak, the display windows both batteries should be replaced promptly to restore the camera to the designated exposure mode. Note: The shutter speed LCD will indicate "1000" until the exposure counter registers "0". This fast speed ...
... and a row of 000 's. Starting with the first frame on This alternate LCD indication tells you that both inside and outside the camera warn you take your finger off As an energy-saving measure, a timer switch is integrated into the exposure meter circuit. It automatically ...off power approximately 30 sec. Low battery warning When batteries become weak, the display windows both batteries should be replaced promptly to restore the camera to the designated exposure mode. Note: The shutter speed LCD will indicate "1000" until the exposure counter registers "0". This fast speed ...

Super Program Manual
Page 12
...power that may be carefully checked while inserting batteries. Do not mix battery brands and types, or old batteries with your camera may result from the camera. If either battery is approximately six months for alkaline and approximately one year for silver or lithium batteries. • ...When not using the camera for convenience in photographing outdoors or while travel ing, etc. • When keeping the camera in cold climates to prevent lowering of performance. • Keep spare batteries on hand for...
...power that may be carefully checked while inserting batteries. Do not mix battery brands and types, or old batteries with your camera may result from the camera. If either battery is approximately six months for alkaline and approximately one year for silver or lithium batteries. • ...When not using the camera for convenience in photographing outdoors or while travel ing, etc. • When keeping the camera in cold climates to prevent lowering of performance. • Keep spare batteries on hand for...

Super Program Manual
Page 13
Note: The grip should be removed from the camera body when using the Motor Drive A or the Winder ME II. 9• GRIP SUPER A • To remove the grip, loosen the grip mount screw fully, and keeping the camera faced downward, slide the grip up until it comes off. • To mount the grip, fit the grip mount socket (on the rear side of the grip) to the grip lug on the camera. • Align the grip mount screw with the grip mount receptacle on the camera, and keeping the grip pushed down as indicated by the arrow, tighten the grip mount screw with a coin.
Note: The grip should be removed from the camera body when using the Motor Drive A or the Winder ME II. 9• GRIP SUPER A • To remove the grip, loosen the grip mount screw fully, and keeping the camera faced downward, slide the grip up until it comes off. • To mount the grip, fit the grip mount socket (on the rear side of the grip) to the grip lug on the camera. • Align the grip mount screw with the grip mount receptacle on the camera, and keeping the grip pushed down as indicated by the arrow, tighten the grip mount screw with a coin.

Super Program Manual
Page 14
... and then the belt ring, and further through neck strap ring of the clasp. • Insert the camera body into the back case and put both case hooks around the camera's strap eyelets. The camera body is tightly caught by the clasp. The strap end may be passed through the belt ring and... then clasp as illustrated. The strap is then folded back. • Let the strap end run through the inside or outside of the camera.
... and then the belt ring, and further through neck strap ring of the clasp. • Insert the camera body into the back case and put both case hooks around the camera's strap eyelets. The camera body is tightly caught by the clasp. The strap end may be passed through the belt ring and... then clasp as illustrated. The strap is then folded back. • Let the strap end run through the inside or outside of the camera.
Super Program Manual
Page 15
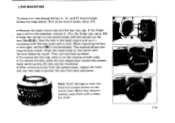
... on the notches at both sides. • To remove the lens, press the lens release lever toward the camera body while turning the lens counter-clockwise. • After removing a lens from the camera body, replace the front and rear lens caps to protect the lens from dust and stains. riliz) fte usizz... them with a clean, dry cloth. When mounting the lens in on lens barrel with the lens release by touch. LENS MOUNTING To mount or interchange Pentax K, KA and Kf mount lenses follow the steps below. (For screw mount lenses, see p. 53). • Align the red dot on the...
... on the notches at both sides. • To remove the lens, press the lens release lever toward the camera body while turning the lens counter-clockwise. • After removing a lens from the camera body, replace the front and rear lens caps to protect the lens from dust and stains. riliz) fte usizz... them with a clean, dry cloth. When mounting the lens in on lens barrel with the lens release by touch. LENS MOUNTING To mount or interchange Pentax K, KA and Kf mount lenses follow the steps below. (For screw mount lenses, see p. 53). • Align the red dot on the...
Super Program Manual
Page 19
... right end of the film package and insert it in the memo holder frame on your thumb a firmer hold on the camera. 15* The grip is securely locked in your camera, tear off the top of the back cover. Depress the film speed dial lock button, and set the desired ISO speed...
... right end of the film package and insert it in the memo holder frame on your thumb a firmer hold on the camera. 15* The grip is securely locked in your camera, tear off the top of the back cover. Depress the film speed dial lock button, and set the desired ISO speed...
Super Program Manual
Page 20
so that you can advance film quickly until the counter registers "0". • The camera back opens when you lift up spool. This will automatically set the shutter speed to place, rotate the knob while lightly depressing it. • Draw ... film rewind knob to AUTO or M. Insert the film in the direction shown in the shade, avoiding direct sunlight. • 16 FILM LOADING Load the camera with a 35mm film cartridge. Set the shutter dial index (red line) to its original position.
so that you can advance film quickly until the counter registers "0". • The camera back opens when you lift up spool. This will automatically set the shutter speed to place, rotate the knob while lightly depressing it. • Draw ... film rewind knob to AUTO or M. Insert the film in the direction shown in the shade, avoiding direct sunlight. • 16 FILM LOADING Load the camera with a 35mm film cartridge. Set the shutter dial index (red line) to its original position.

Super Program Manual
Page 26
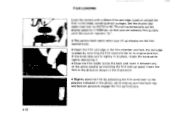
... Super Program before inserting your body. It is essential to minimize camera shake which causes blurred pictures. In any case, hold the camera tightly to your first film cartridge. Strong pressure on your hands. Take a secure, well-balanced posture without straining yourself. Accessory Grip Super... A and the memo holder/grip will help you keep a steady hold the camera. a • 22 The portion marked O in order to reduce camera shake to hold on the shutter release button may cause ...
... Super Program before inserting your body. It is essential to minimize camera shake which causes blurred pictures. In any case, hold the camera tightly to your first film cartridge. Strong pressure on your hands. Take a secure, well-balanced posture without straining yourself. Accessory Grip Super... A and the memo holder/grip will help you keep a steady hold the camera. a • 22 The portion marked O in order to reduce camera shake to hold on the shutter release button may cause ...
Super Program Manual
Page 27
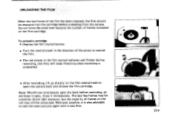
... film rewind indicator will flicker during rewinding, and they will cease flickering when rewinding is also advisable to open the back before unloading from the camera. Note: Should you erroneously open the camera back and remove the film cartridge.
... film rewind indicator will flicker during rewinding, and they will cease flickering when rewinding is also advisable to open the back before unloading from the camera. Note: Should you erroneously open the camera back and remove the film cartridge.

Super Program Manual
Page 31
If you use a TTL flash unit, and set the camera in the Aperture-priority AE mode, you use a Pentax dedicated TTL flash unit with a Pentax dedicated TTL Auto Flash unit, the metering cell inside the mirror box of -field in flash photos. (Rf. 42 page for details) 0 ... 27* priority AE mode, the camera will automatically select the proper aperture and automatically s control flash output. (Rf. 43 page for details) Programmed Auto Flash If you can choose any aperture in the flash range, thereby achieving great control over depth-of the Super Program will detect the light hitting the ...
If you use a TTL flash unit, and set the camera in the Aperture-priority AE mode, you use a Pentax dedicated TTL flash unit with a Pentax dedicated TTL Auto Flash unit, the metering cell inside the mirror box of -field in flash photos. (Rf. 42 page for details) 0 ... 27* priority AE mode, the camera will automatically select the proper aperture and automatically s control flash output. (Rf. 43 page for details) Programmed Auto Flash If you can choose any aperture in the flash range, thereby achieving great control over depth-of the Super Program will detect the light hitting the ...
Super Program Manual
Page 34
...;:apettu, e coup' ha ante rh the Sn.fiter-0.,0, .4 AE rode AlaprO0. ,ate exp054.4 e oht.h.s.thle 115 t"e snuffs., s0eed. • 30 They vary depending on the camera top cover and inside the viewfinder fl icker to warn of various errors or problems. • The LCD displays in use, film speed (ASA/ISO...
...;:apettu, e coup' ha ante rh the Sn.fiter-0.,0, .4 AE rode AlaprO0. ,ate exp054.4 e oht.h.s.thle 115 t"e snuffs., s0eed. • 30 They vary depending on the camera top cover and inside the viewfinder fl icker to warn of various errors or problems. • The LCD displays in use, film speed (ASA/ISO...

Super Program Manual
Page 36
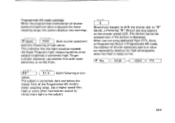
... release button, and a programmed combination of shutter speed and aperture value will release the shutter. However, the "P" display remains on. PO 22 16 11 8 • Set the shutter dial index (red line) on top of the camera to the index. When you take your Pentax "A" lens, and rotate ...its A-index (green line) to the AUTO position. "P" (Programmed) will then be displayed on the LCD indicator in the external LCD indicator. At the ...
... release button, and a programmed combination of shutter speed and aperture value will release the shutter. However, the "P" display remains on. PO 22 16 11 8 • Set the shutter dial index (red line) on top of the camera to the index. When you take your Pentax "A" lens, and rotate ...its A-index (green line) to the AUTO position. "P" (Programmed) will then be displayed on the LCD indicator in the external LCD indicator. At the ...
Super Program Manual
Page 37
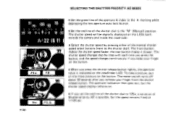
...dial to "B" (Bulb), a flickering "E" (Error) warning appears on the shutter speed LCD. This indicates that the light situation exceeds the Super Program's light measuring ability since subject brightness is ready to the subject. 330 The shutter cannot be released even if the button is extremely dark ...and below the lowest limit of shutter speed and aperture value is beyond the meter coupling range, the camera displays two warnings. The subject is depressed. IP So F 2. 8- 1-d. 125$ F4 P2" F i.4 Both flickering at high values. To get a ...
...dial to "B" (Bulb), a flickering "E" (Error) warning appears on the shutter speed LCD. This indicates that the light situation exceeds the Super Program's light measuring ability since subject brightness is ready to the subject. 330 The shutter cannot be released even if the button is extremely dark ...and below the lowest limit of shutter speed and aperture value is beyond the meter coupling range, the camera displays two warnings. The subject is depressed. IP So F 2. 8- 1-d. 125$ F4 P2" F i.4 Both flickering at high values. To get a ...
Super Program Manual
Page 40
... shutter speed changes step by pressing either of Shutter-priority AE is possible, but the shutter speed display remains on the LCDs both outside the camera and inside the viewfinder. • Select the shutter speed by step with each time you press the button, and the speed changes continuously if you...
... shutter speed changes step by pressing either of Shutter-priority AE is possible, but the shutter speed display remains on the LCDs both outside the camera and inside the viewfinder. • Select the shutter speed by step with each time you press the button, and the speed changes continuously if you...


