

Super Program Manual
Page 2
.... As the situation demands you to read this manual carefully. Incorporating the latest electronics technology, it invites you can enjoy the full versatility of the Super Program with a wide range of Pentax Multi-mode Photography Pentax Super Program is digitally displayed in the viewfinder by means of an extraordinary camera.
.... As the situation demands you to read this manual carefully. Incorporating the latest electronics technology, it invites you can enjoy the full versatility of the Super Program with a wide range of Pentax Multi-mode Photography Pentax Super Program is digitally displayed in the viewfinder by means of an extraordinary camera.
Super Program Manual
Page 3
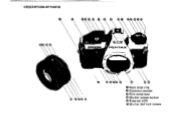
DESCRIPTION OF PARTS 2 34 5 6 7 8 9 10 2 28 ERPROAWfl 22 23 0 Neck strap ring 0 Exposure counter 0 Film wind lever 0 Shutter release button 0 External LCD 0 Shutter dial lock release
DESCRIPTION OF PARTS 2 34 5 6 7 8 9 10 2 28 ERPROAWfl 22 23 0 Neck strap ring 0 Exposure counter 0 Film wind lever 0 Shutter release button 0 External LCD 0 Shutter dial lock release
Super Program Manual
Page 4
... cover release knob el ISO film speed scale CD Film rewind crank Film speed dial lock button Film speed dial/Exposure compensation dial lb Grip Super A Self-timer lever ID Lens release lever IL Preview lever D Lens information contacts 01' 4 Lens alignment index Ii' Instant return mirror fij Lighting button for...
... cover release knob el ISO film speed scale CD Film rewind crank Film speed dial lock button Film speed dial/Exposure compensation dial lb Grip Super A Self-timer lever ID Lens release lever IL Preview lever D Lens information contacts 01' 4 Lens alignment index Ii' Instant return mirror fij Lighting button for...

Super Program Manual
Page 5
... cover 55 21 Infrared index mark 56 22 Using screw-mount Takumar lenses 57 23 How to use various accessories 24 with your Super Program 58 28 O & As on your Pentax Super Program 59 Camera maintenance 60 29 Resistance to temperature extremes and 30 changes, A few notes on the LCD 32 (Liquid Crystal Display) 61...
... cover 55 21 Infrared index mark 56 22 Using screw-mount Takumar lenses 57 23 How to use various accessories 24 with your Super Program 58 28 O & As on your Pentax Super Program 59 Camera maintenance 60 29 Resistance to temperature extremes and 30 changes, A few notes on the LCD 32 (Liquid Crystal Display) 61...
Super Program Manual
Page 6
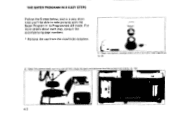
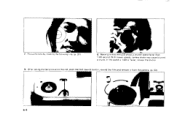
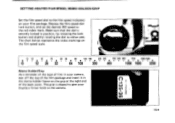
Open the battery compartment with the Super Program in its Programmed AE mode. THE SUPER PROGRAM IN 9 EASY STEPS Follow the 9 steps below, and in a very short time you'll be able to the first frame. (p. 16) 1111tr4Ti.nIPg 4tb_ at - • 2 For more details about each step, consult the accompanying page numbers. • Remove the cap from the viewfinder eyepiece. 1. Open the camera back, put in a roll of film, close the back and advance the film to take pictures with a coin and insert batteries. (p. 6) 2.
Open the battery compartment with the Super Program in its Programmed AE mode. THE SUPER PROGRAM IN 9 EASY STEPS Follow the 9 steps below, and in a very short time you'll be able to the first frame. (p. 16) 1111tr4Ti.nIPg 4tb_ at - • 2 For more details about each step, consult the accompanying page numbers. • Remove the cap from the viewfinder eyepiece. 1. Open the camera back, put in a roll of film, close the back and advance the film to take pictures with a coin and insert batteries. (p. 6) 2.
Super Program Manual
Page 7
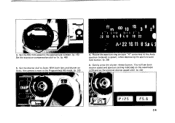
... F5. 6 3* 3. With both shutter speed and aperture setting indicated on the viewfinder LCD and on your "A" series lens to the Auto position (indexed in the Programmed AE mode. (p. 32) I• • ft m Co 10 t5 3 e 2 8 I I :2 18 84 4 8 18 22 I AJ 22 16 11 8 5.8 4 2 4. Set the shutter dial to lx. (p. 46) 5. Gently...
... F5. 6 3* 3. With both shutter speed and aperture setting indicated on the viewfinder LCD and on your "A" series lens to the Auto position (indexed in the Programmed AE mode. (p. 32) I• • ft m Co 10 t5 3 e 2 8 I I :2 18 84 4 8 18 22 I AJ 22 16 11 8 5.8 4 2 4. Set the shutter dial to lx. (p. 46) 5. Gently...
Super Program Manual
Page 8
Make sure that the LCD shows a shutter speed faster than 1;60 second. Focus the lens by rotating the focusing nng (p 211 8. With slower speeds, camera shake may cause blurred pictures If the speed is 1/60 or faster, release the shutter. 9. After taking the last picture on the roll, push the film rewind button, rewind the film and remove it from the camera. (p. 231 • 4 7.
Make sure that the LCD shows a shutter speed faster than 1;60 second. Focus the lens by rotating the focusing nng (p 211 8. With slower speeds, camera shake may cause blurred pictures If the speed is 1/60 or faster, release the shutter. 9. After taking the last picture on the roll, push the film rewind button, rewind the film and remove it from the camera. (p. 231 • 4 7.

Super Program Manual
Page 9
OPERATING INSTRUCTIONS Please refer to pages 32 - 43 for detailed information on the Super Program six exposure modes. • Programmed AE mode • Aperture-priority AE mode • Shutter-priority AE mode • Metered Manual mode • TTL Auto Flash mode • Programmed Auto Flash mode
OPERATING INSTRUCTIONS Please refer to pages 32 - 43 for detailed information on the Super Program six exposure modes. • Programmed AE mode • Aperture-priority AE mode • Shutter-priority AE mode • Metered Manual mode • TTL Auto Flash mode • Programmed Auto Flash mode

Super Program Manual
Page 10
...; Open the battery compartment cover with a coin or similar object. • Place the two batteries in voltage for normal camera functioning. • 6 INSERTING BATTERIES Your Super Program doesn't operate without batteries. Use two 1.5V silver or alkaline batteries, or a 3V lithium battery.
...; Open the battery compartment cover with a coin or similar object. • Place the two batteries in voltage for normal camera functioning. • 6 INSERTING BATTERIES Your Super Program doesn't operate without batteries. Use two 1.5V silver or alkaline batteries, or a 3V lithium battery.
Super Program Manual
Page 11
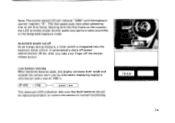
Low battery warning When batteries become weak, the display windows both batteries should be replaced promptly to restore the camera to normal functioning. 7. Starting with the first frame on This alternate LCD indication tells you that both inside and outside the camera warn you take your finger off As an energy-saving measure, a timer switch is integrated into the exposure meter circuit. after you by alternately displaying exposure information and a row of 000 's. This fast speed saves time when advancing film to the designated exposure mode. Automatic power cut-off the ...
Low battery warning When batteries become weak, the display windows both batteries should be replaced promptly to restore the camera to normal functioning. 7. Starting with the first frame on This alternate LCD indication tells you that both inside and outside the camera warn you take your finger off As an energy-saving measure, a timer switch is integrated into the exposure meter circuit. after you by alternately displaying exposure information and a row of 000 's. This fast speed saves time when advancing film to the designated exposure mode. Automatic power cut-off the ...

Super Program Manual
Page 12
Always keep batteries out of the reach of children. • Never break, recharge, or throw used batteries into fire as a precaution against explosions. • Batteries should be kept warm in cold climates to prevent lowering of performance. • Keep spare batteries on hand for long periods of time, you . • Replace both batteries at the same time. Using batteries correctly • Incorrect usage of batteries causes such hazards as it has taken some time to reach you should remove batteries from accidental ly releasing the shutter. • 8 Old batteries are apt to...
Always keep batteries out of the reach of children. • Never break, recharge, or throw used batteries into fire as a precaution against explosions. • Batteries should be kept warm in cold climates to prevent lowering of performance. • Keep spare batteries on hand for long periods of time, you . • Replace both batteries at the same time. Using batteries correctly • Incorrect usage of batteries causes such hazards as it has taken some time to reach you should remove batteries from accidental ly releasing the shutter. • 8 Old batteries are apt to...

Super Program Manual
Page 13
Note: The grip should be removed from the camera body when using the Motor Drive A or the Winder ME II. 9• GRIP SUPER A • To remove the grip, loosen the grip mount screw fully, and keeping the camera faced downward, slide the grip up until it comes off. • To mount the grip, fit the grip mount socket (on the rear side of the grip) to the grip lug on the camera. • Align the grip mount screw with the grip mount receptacle on the camera, and keeping the grip pushed down as indicated by the arrow, tighten the grip mount screw with a coin.
Note: The grip should be removed from the camera body when using the Motor Drive A or the Winder ME II. 9• GRIP SUPER A • To remove the grip, loosen the grip mount screw fully, and keeping the camera faced downward, slide the grip up until it comes off. • To mount the grip, fit the grip mount socket (on the rear side of the grip) to the grip lug on the camera. • Align the grip mount screw with the grip mount receptacle on the camera, and keeping the grip pushed down as indicated by the arrow, tighten the grip mount screw with a coin.

Super Program Manual
Page 14
The strap end may be passed through the belt ring and then clasp as illustrated. The strap is then folded back. • Let the strap end run through the inside or outside of the clasp. • Insert the camera body into the back case and put both case hooks around the camera's strap eyelets. •10 STRAP AND CASE • First strip the clasp and belt ring from either end of the strap. • Let the strap end go through the neck strap ring and then the belt ring, and further through neck strap ring of the cover unlocks. Now the end is now held securely in the case. • ...
The strap end may be passed through the belt ring and then clasp as illustrated. The strap is then folded back. • Let the strap end run through the inside or outside of the clasp. • Insert the camera body into the back case and put both case hooks around the camera's strap eyelets. •10 STRAP AND CASE • First strip the clasp and belt ring from either end of the strap. • Let the strap end go through the neck strap ring and then the belt ring, and further through neck strap ring of the cover unlocks. Now the end is now held securely in the case. • ...
Super Program Manual
Page 15
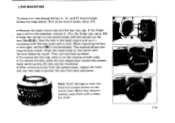
LENS MOUNTING To mount or interchange Pentax K, KA and Kf mount lenses follow the steps below. (For screw mount lenses, see p. 53). • Align the red dot on the camera body with ...
LENS MOUNTING To mount or interchange Pentax K, KA and Kf mount lenses follow the steps below. (For screw mount lenses, see p. 53). • Align the red dot on the camera body with ...
Super Program Manual
Page 16
After completing a series of pictures, the lever should be pushed in to its end. Note: The wind lever may stop in red. Do not torce the lever and rewind the film, leaving the lever as follows: • •0-2.4 34 . 36, with the film winding mechanism, indicates the number of a stroke when the film comes to the original position. • 12 Film advance stroke The film wind lever should be set at the stand-off position for faster film advance. Stand-off angle Setting the wind lever for rapid shooting The film wind lever can be thrown as far as it is. The counter, ...
After completing a series of pictures, the lever should be pushed in to its end. Note: The wind lever may stop in red. Do not torce the lever and rewind the film, leaving the lever as follows: • •0-2.4 34 . 36, with the film winding mechanism, indicates the number of a stroke when the film comes to the original position. • 12 Film advance stroke The film wind lever should be set at the stand-off position for faster film advance. Stand-off angle Setting the wind lever for rapid shooting The film wind lever can be thrown as far as it is. The counter, ...

Super Program Manual
Page 17
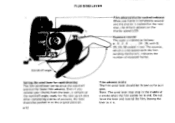
Set the shutter dial index to "L", and the shutter release will release the shutter. Further pressure will be locked with electronic flash unit B = Bulb shutter speed setting for synchronization with the exposure meter switched off the shutter release button. • If you have finished shooting and the shutter is automatically locked at the AUTO or M position. L = Shutter release button lock IX B• AUTO = Automatic shutter speed control M = Manual shutter speed selection 125X = 1/125 sec. The exposure meter automatically switches off approx. 30 seconds after you activate ...
Set the shutter dial index to "L", and the shutter release will release the shutter. Further pressure will be locked with electronic flash unit B = Bulb shutter speed setting for synchronization with the exposure meter switched off the shutter release button. • If you have finished shooting and the shutter is automatically locked at the AUTO or M position. L = Shutter release button lock IX B• AUTO = Automatic shutter speed control M = Manual shutter speed selection 125X = 1/125 sec. The exposure meter automatically switches off approx. 30 seconds after you activate ...
Super Program Manual
Page 19
The grip is securely locked in your thumb a firmer hold on your film package. Depress the film speed dial lock button, and set the desired ISO speed to the red index mark. Make sure that the dial is shaped to give your camera, tear off the top of the film package and insert it in the memo holder frame on the grip at the right end of film in position, by releasing the lock button and slightly rotating the dial to either side. • • The chart below represents the index markings on the film speed scale. 8• 1•0 • 1•6 • 2•5 • 4&#...
The grip is securely locked in your thumb a firmer hold on your film package. Depress the film speed dial lock button, and set the desired ISO speed to the red index mark. Make sure that the dial is shaped to give your camera, tear off the top of the film package and insert it in the memo holder frame on the grip at the right end of film in position, by releasing the lock button and slightly rotating the dial to either side. • • The chart below represents the index markings on the film speed scale. 8• 1•0 • 1•6 • 2•5 • 4&#...
Super Program Manual
Page 20
so that both top and bottom sprockets engage the film perforations. If the knob does not fit tightly in place by advancing the film wind lever to its original position. This will automatically set the shutter speed to AUTO or M. • 16 FILM LOADING Load the camera with a 35mm film cartridge. Set the shutter dial index (red line) to 1/1000 sec. Load or unload the film in the photo, while making sure that you can advance film quickly until the counter registers "0". • The camera back opens when you lift up sharply on the film rewind knob. • Insert the film ...
so that both top and bottom sprockets engage the film perforations. If the knob does not fit tightly in place by advancing the film wind lever to its original position. This will automatically set the shutter speed to AUTO or M. • 16 FILM LOADING Load the camera with a 35mm film cartridge. Set the shutter dial index (red line) to 1/1000 sec. Load or unload the film in the photo, while making sure that you can advance film quickly until the counter registers "0". • The camera back opens when you lift up sharply on the film rewind knob. • Insert the film ...
Super Program Manual
Page 21
O • Repeat shutter-tripping/film-advancing operation until any slack is taken up, and confirm that the film is properly fitted between both guide rails. this indicates that the red vertical stripes of the rewinding knob. Close the back cover tightly. • Advance the film wind lever to "0". The next frame is advancing properly. Film advance can be also checked by the rotation of the film wind/rewind indicator flicker; • Lightly rotate the film rewinding knob until the exposure counter reaches to check that the film is ready for the first shot. 17 •
O • Repeat shutter-tripping/film-advancing operation until any slack is taken up, and confirm that the film is properly fitted between both guide rails. this indicates that the red vertical stripes of the rewinding knob. Close the back cover tightly. • Advance the film wind lever to "0". The next frame is advancing properly. Film advance can be also checked by the rotation of the film wind/rewind indicator flicker; • Lightly rotate the film rewinding knob until the exposure counter reaches to check that the film is ready for the first shot. 17 •

Super Program Manual
Page 22
... information includes auto/manual exposure data for each exposure mode, automatic flash data, exposure compensation warning, low battery warning, and error indication. 'Shutter information LCD P Programmed AE mode. ?Goo /V Shutter speed in use. 2000 stands for 1/2000 sec. 15", stands for shutter speed and aperture value. "Bulb" time exposure. • 18...
... information includes auto/manual exposure data for each exposure mode, automatic flash data, exposure compensation warning, low battery warning, and error indication. 'Shutter information LCD P Programmed AE mode. ?Goo /V Shutter speed in use. 2000 stands for 1/2000 sec. 15", stands for shutter speed and aperture value. "Bulb" time exposure. • 18...
