

PZ-70 Manual
Page 5
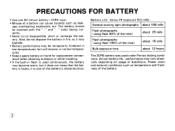
... may often be caused by water, dirt or dust at points of dirt or grease, or corrosion due to normal. (I) Also check for battery leakage, traces of electrical contact. LCD Liquid-Crystal Display When the LCD is exposed to high temperatures over about in water can- Never attempt ...°C to -10°C (122°F to clean the camera. • Electrical problems may be assessed. Other precautions • Temperature range at a Pentax service center. Precautions for taking care • Never touch the shutter curtain or mirror with it. • Repair made necessary due to usage of this...
... may often be caused by water, dirt or dust at points of dirt or grease, or corrosion due to normal. (I) Also check for battery leakage, traces of electrical contact. LCD Liquid-Crystal Display When the LCD is exposed to high temperatures over about in water can- Never attempt ...°C to -10°C (122°F to clean the camera. • Electrical problems may be assessed. Other precautions • Temperature range at a Pentax service center. Precautions for taking care • Never touch the shutter curtain or mirror with it. • Repair made necessary due to usage of this...
PZ-70 Manual
Page 6
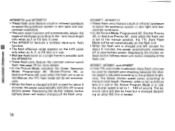
..., short or recharge the bat- it may explode. • Battery performance may become warm, but will recover in flash is one 6V lithium battery (2CR5 type). • Misuse of a battery can cause hazards such as temperature and fresh- ience when shooting ...outdoors or while traveling. • If the built-in normal tempera- PRECAUTIONS FOR BATTERY • Use one of the battery's characteristics. Also, do not dispose the battery in fire, as it is used under Pentax...
..., short or recharge the bat- it may explode. • Battery performance may become warm, but will recover in flash is one 6V lithium battery (2CR5 type). • Misuse of a battery can cause hazards such as temperature and fresh- ience when shooting ...outdoors or while traveling. • If the built-in normal tempera- PRECAUTIONS FOR BATTERY • Use one of the battery's characteristics. Also, do not dispose the battery in fire, as it is used under Pentax...
PZ-70 Manual
Page 8
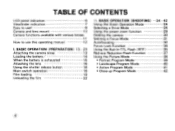
... with various lenses 11 How to use this operating manual 12 I. BASIC OPERATION (PREPARATION) 13 - 23 Attaching the camera strap 13 Loading the battery/ 14 When the battery is exhausted 15 Attaching the lens 16 Using the shutter release button 18 Main switch operation 18 Film loading 19 Unloading the film 22...
... with various lenses 11 How to use this operating manual 12 I. BASIC OPERATION (PREPARATION) 13 - 23 Attaching the camera strap 13 Loading the battery/ 14 When the battery is exhausted 15 Attaching the lens 16 Using the shutter release button 18 Main switch operation 18 Film loading 19 Unloading the film 22...
PZ-70 Manual
Page 10
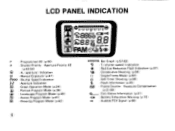
... (p.64) O : Single-Frame Mode (p.63) 0 : Self-Timer Shooting (p.64) : Flash Information (p.35) as : Frame Counter Exposure Compensation (p.21,62) G___: Film Status Information (p.21) • : Battery Exhaustion Warning (p.15) ▪ : Audible PCV Signal (p.66)
... (p.64) O : Single-Frame Mode (p.63) 0 : Self-Timer Shooting (p.64) : Flash Information (p.35) as : Frame Counter Exposure Compensation (p.21,62) G___: Film Status Information (p.21) • : Battery Exhaustion Warning (p.15) ▪ : Audible PCV Signal (p.66)
PZ-70 Manual
Page 12
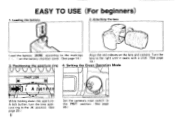
...down the apertureA-lock button, turn the lens aperture ring to the A I Celt; Turn the lens to the PICT: position. (See page 25.) Loading the battery 2. POWER zoom 80 28 $ A 22,1611 .635 PICT I position. (See page 25.) 8 Set the camera's main swtich to the right until it seats... with a click. (See page 16.) 3. Attaching the lens Load the battery _2CR5; Positioning the aperture ring 4. according to the markings ( . ) on the battery chamber cover. (See page 14.) Align the red indexes on the lens and camera. EASY TO USE (For beginners)...
...down the apertureA-lock button, turn the lens aperture ring to the A I Celt; Turn the lens to the PICT: position. (See page 25.) Loading the battery 2. POWER zoom 80 28 $ A 22,1611 .635 PICT I position. (See page 25.) 8 Set the camera's main swtich to the right until it seats... with a click. (See page 16.) 3. Attaching the lens Load the battery _2CR5; Positioning the aperture ring 4. according to the markings ( . ) on the battery chamber cover. (See page 14.) Align the red indexes on the lens and camera. EASY TO USE (For beginners)...
PZ-70 Manual
Page 18
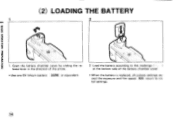
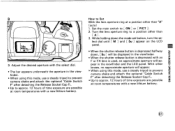
ISO] return to the markings ( - , at the bottom side of the arrow. • Use one 6V lithium battery 2CR5 or equivalent. 2. Open the battery chamber cover by sliding the release lever in the direction of the battery chamber cover. • When the battery is replaced, all camera settings except the exposure and film speed . I BASIC OPERATION (PREPARATION) (2) LOADING THE BATTERY 1 2 te gFe N• , 1. Load the battery according to initial settings.
ISO] return to the markings ( - , at the bottom side of the arrow. • Use one 6V lithium battery 2CR5 or equivalent. 2. Open the battery chamber cover by sliding the release lever in the direction of the battery chamber cover. • When the battery is replaced, all camera settings except the exposure and film speed . I BASIC OPERATION (PREPARATION) (2) LOADING THE BATTERY 1 2 te gFe N• , 1. Load the battery according to initial settings.
PZ-70 Manual
Page 19
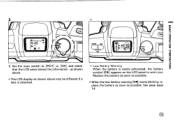
Replace the battery as soon as possible. • When the low battery warning [1=0] starts blinking, replace the battery as soon as shown above may be different if a lens is attached. * Low Battery Warning When the battery is nearly exhausted, the battery symbol [4=a] appears on the LCD panel to [PICT] or [ON] and check that the LCD panel shows the information as shown above. • The LCD display as possible. Set the main switch to warn you. 3 thN uu BASIC OPERATION (PREPARATION) otCi DRIVE GD a lere-a.s" PICT O // 3. See page page 14.
Replace the battery as soon as possible. • When the low battery warning [1=0] starts blinking, replace the battery as soon as shown above may be different if a lens is attached. * Low Battery Warning When the battery is nearly exhausted, the battery symbol [4=a] appears on the LCD panel to [PICT] or [ON] and check that the LCD panel shows the information as shown above. • The LCD display as possible. Set the main switch to warn you. 3 thN uu BASIC OPERATION (PREPARATION) otCi DRIVE GD a lere-a.s" PICT O // 3. See page page 14.
PZ-70 Manual
Page 65
...Up to a position other than [ A ]. 3. Turn the lens aperture ring to approx. 12 hours of time exposure are possible at room temperatures with a new lithium battery. lect dial until [ M ] and [ bu ] appear on the LCD panel. • When the shutter release button is depressed with a new lithium... battery. 61 Set the main switch to approx. 12 hours of time exposure are possible at a position other than "A" (auto) 1. 3 Tvbu 4Cr '..7/13.0o__ M 3. While...
...Up to a position other than [ A ]. 3. Turn the lens aperture ring to approx. 12 hours of time exposure are possible at room temperatures with a new lithium battery. lect dial until [ M ] and [ bu ] appear on the LCD panel. • When the shutter release button is depressed with a new lithium... battery. 61 Set the main switch to approx. 12 hours of time exposure are possible at a position other than "A" (auto) 1. 3 Tvbu 4Cr '..7/13.0o__ M 3. While...
PZ-70 Manual
Page 78
... speed is set automatically. • When the flash is charged and left unused for about 3 minutes, the power automatically switches off to save battery power. The slower shutter speed varies according to the lens focal length. However, when a non-autofocus lens is in use . • Multiple...flash unit. • When the flash unit is charged and left unused for about 5 minutes, the power automatically switches off to save battery power. SNOLLVInd0 030NVAOV III AF500FTZ and AF330FTZ • These flash units feature a built-in infrared spotbeam to assist the autofocus system in dim...
... speed is set automatically. • When the flash is charged and left unused for about 3 minutes, the power automatically switches off to save battery power. The slower shutter speed varies according to the lens focal length. However, when a non-autofocus lens is in use . • Multiple...flash unit. • When the flash unit is charged and left unused for about 5 minutes, the power automatically switches off to save battery power. SNOLLVInd0 030NVAOV III AF500FTZ and AF330FTZ • These flash units feature a built-in infrared spotbeam to assist the autofocus system in dim...
PZ-70 Manual
Page 88
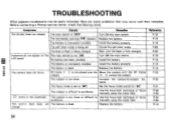
... [OFF]. Here are some problems that may be easily remedied. P.14 The battery is improperly installed. LCD panel. Before contacting a Pentax service center, check the follwing items. Symptoms Causes Remedies Reference The shutter does not release.... Replace the battery. Install the battery properly. Cancel the self-timer mode. P.18 P.14 The battery is improperly installed. P.31 The subject...
... [OFF]. Here are some problems that may be easily remedied. P.14 The battery is improperly installed. LCD panel. Before contacting a Pentax service center, check the follwing items. Symptoms Causes Remedies Reference The shutter does not release.... Replace the battery. Install the battery properly. Cancel the self-timer mode. P.18 P.14 The battery is improperly installed. P.31 The subject...

PZ-70 Manual
Page 90
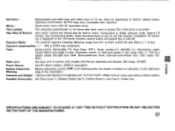
...warning, c I CA Type: TTL autofocus, auto-exposure 35mm SLR with AF coupler, lens information contacts and power contacts) Compatible Lens: Pentax K lenses. D I 0 is available), Shutter-Priority AE Mode, Aperture-Priority AE Mode, Manual Exposure Mode, Bulb Mode Shutter: ...24x36mm Usable Film: 35mm perforated cartridge film. and K -mount lenses are set to 90, Bar graph - f 1.2 to ISO 100. Lens Mount: Pentax K. Manual Exposure Mode, Bulb Exposure, - Self-timer shooting, 1 mil 1- non-DX coded films are usable. bu = Priority Aperture-Priority AE Modes...
...warning, c I CA Type: TTL autofocus, auto-exposure 35mm SLR with AF coupler, lens information contacts and power contacts) Compatible Lens: Pentax K lenses. D I 0 is available), Shutter-Priority AE Mode, Aperture-Priority AE Mode, Manual Exposure Mode, Bulb Mode Shutter: ...24x36mm Usable Film: 35mm perforated cartridge film. and K -mount lenses are set to 90, Bar graph - f 1.2 to ISO 100. Lens Mount: Pentax K. Manual Exposure Mode, Bulb Exposure, - Self-timer shooting, 1 mil 1- non-DX coded films are usable. bu = Priority Aperture-Priority AE Modes...
PZ-70 Manual
Page 91
... Single advance mode, Approx.1.8 frames/sec.(consecutive mode), Auto rewinding starts at ISO100 with Pentax dedicated auto flashes, ISO range= 25-800 Power Source: One 6V lithium battery (2CR5 or equivalent) O Battery Exhaustion Battery exhaustion symbol [ 4=a] is lit (blinking when the shutter is provided Film Wind &... viewfinder.) en Dimesion and Weight: 146.0mm(W)x93.0mm(H)x66.5mm(D) (5.7"x3.7"x2.6") 450g(15.9 oz) body only without lithium battery Supplied Accessories: Hot Shoe Cover FF, Release Socket Cap FF. Camera Strap F., Eye Cup FF, Finder Cap SPECIFICATIONS ARE SUBJECT TO...
... Single advance mode, Approx.1.8 frames/sec.(consecutive mode), Auto rewinding starts at ISO100 with Pentax dedicated auto flashes, ISO range= 25-800 Power Source: One 6V lithium battery (2CR5 or equivalent) O Battery Exhaustion Battery exhaustion symbol [ 4=a] is lit (blinking when the shutter is provided Film Wind &... viewfinder.) en Dimesion and Weight: 146.0mm(W)x93.0mm(H)x66.5mm(D) (5.7"x3.7"x2.6") 450g(15.9 oz) body only without lithium battery Supplied Accessories: Hot Shoe Cover FF, Release Socket Cap FF. Camera Strap F., Eye Cup FF, Finder Cap SPECIFICATIONS ARE SUBJECT TO...
PZ-70 Manual
Page 94
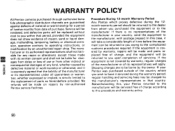
...from whom you within that period, provided the equipment does not show evidence of impact, sand or liquid damage, mishandling, tampering, battery or chemical corrosion, operation contrary to operating instructions, or modification by the owner. Notwithstanding this, your country, send the equipment to...representatives shall not be liable for a period of twelve months from date of purchase. Procedure During 12-month Warranty Period Any Pentax which proves defective during the warranty period, regular handling and servicing fees may be charged by defective material or workmanship or ...
...from whom you within that period, provided the equipment does not show evidence of impact, sand or liquid damage, mishandling, tampering, battery or chemical corrosion, operation contrary to operating instructions, or modification by the owner. Notwithstanding this, your country, send the equipment to...representatives shall not be liable for a period of twelve months from date of purchase. Procedure During 12-month Warranty Period Any Pentax which proves defective during the warranty period, regular handling and servicing fees may be charged by defective material or workmanship or ...
PZ-70 Manual
Page 96
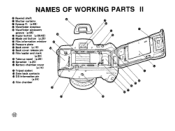
NAMES OF WORKING PARTS II Rewind shaft Shutter curtains 0 Eyecup F. (p.65) Viewfinder eyepiece Viewfinder accessory groove (p.65) IS Hyper button (p.59.62) Mode set button (p.25) * Film information window O O Pressure plate al/ Back cover (p.19) 0 O Back cover release pin Film leader end mark (p.20) Take-up spool (p.20) O Sprocket (p.20) Battery chamber cover (p.14) Tripod socket 0 0 Date back contacts DX-information pin 0 (p.20) Film chamber
NAMES OF WORKING PARTS II Rewind shaft Shutter curtains 0 Eyecup F. (p.65) Viewfinder eyepiece Viewfinder accessory groove (p.65) IS Hyper button (p.59.62) Mode set button (p.25) * Film information window O O Pressure plate al/ Back cover (p.19) 0 O Back cover release pin Film leader end mark (p.20) Take-up spool (p.20) O Sprocket (p.20) Battery chamber cover (p.14) Tripod socket 0 0 Date back contacts DX-information pin 0 (p.20) Film chamber


