
PZ-70 Manual
Page 2
... front cover shows the PZ- 70 with the Pentax-F Zoom 35-80mm lens. • Illustrations of this camera used in this manual show the camera with or actual damage to the exciting world of Pentax autofocus photography! This camera is combined with an F Zoom lens, certain features such as...operations before use of lenses and accessories made to our precise specifications and therefore, may cause difficulties with the Pentax-FA Power Zoom 2880mm lens. When the PZ-70 is an autofocus SLR camera that offers higher levels of sophistication and performance. The names of the camera's ...
... front cover shows the PZ- 70 with the Pentax-F Zoom 35-80mm lens. • Illustrations of this camera used in this manual show the camera with or actual damage to the exciting world of Pentax autofocus photography! This camera is combined with an F Zoom lens, certain features such as...operations before use of lenses and accessories made to our precise specifications and therefore, may cause difficulties with the Pentax-FA Power Zoom 2880mm lens. When the PZ-70 is an autofocus SLR camera that offers higher levels of sophistication and performance. The names of the camera's ...
PZ-70 Manual
Page 3
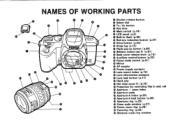
...) Release socket cap FF (p.61) Back cover release lever (p.19) m Auxiliary rewind button (p.23) @ Focus mode switch (p.31) 0 Mirror AF coupler is Power supply contacts 6 Lens mount index (p.16) 0 Lens information contacts Lens lock button (p.17) 6 Hand grip Hot shoe cover FF (p.72) 0 Projection for rewinding film in mid.
...) Release socket cap FF (p.61) Back cover release lever (p.19) m Auxiliary rewind button (p.23) @ Focus mode switch (p.31) 0 Mirror AF coupler is Power supply contacts 6 Lens mount index (p.16) 0 Lens information contacts Lens lock button (p.17) 6 Hand grip Hot shoe cover FF (p.72) 0 Projection for rewinding film in mid.
PZ-70 Manual
Page 4
... the camera in a place where the camera may cut off immediately with margin of safety at the edges. • When a macro or telephoto lens is not wether resistant. etc. • Condensation on the developed photograph. Store it in a place with mothballs or in a area where chemicals are... handled. PRECAUTIONS FOR YOUR CAMERA Your Pentax camera is minimized, take it to a Pentax service center for extended periods in places where the humidity and temperature are very high such as it out of the ...
... the camera in a place where the camera may cut off immediately with margin of safety at the edges. • When a macro or telephoto lens is not wether resistant. etc. • Condensation on the developed photograph. Store it in a place with mothballs or in a area where chemicals are... handled. PRECAUTIONS FOR YOUR CAMERA Your Pentax camera is minimized, take it to a Pentax service center for extended periods in places where the humidity and temperature are very high such as it out of the ...

PZ-70 Manual
Page 5
Never attempt to disassemble it. • Use a blower and lens brush to remove dust accumulated on the lens or viewfinder. • Never use solvents such as paint thinner, alcohol or benzine to clean the camera. • Electrical problems may be assessed. If... circuit inside the camera contains high voltage working parts. Also check for battery leakage, traces of dirt or grease, or corrosion due to contact a Pentax Service Center immediately. • To maintain optimum performance, it is recommended that you cannot correct the problems, have the camera inspected or test shoot ...
Never attempt to disassemble it. • Use a blower and lens brush to remove dust accumulated on the lens or viewfinder. • Never use solvents such as paint thinner, alcohol or benzine to clean the camera. • Electrical problems may be assessed. If... circuit inside the camera contains high voltage working parts. Also check for battery leakage, traces of dirt or grease, or corrosion due to contact a Pentax Service Center immediately. • To maintain optimum performance, it is recommended that you cannot correct the problems, have the camera inspected or test shoot ...
PZ-70 Manual
Page 7
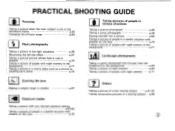
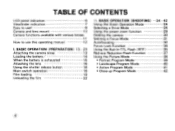
...scenery in the background. p.71 Landscape photography Taking a scenic photograph that focuses from the foreground to the background. p.71 Zooming the lens Making a subject larger or smaller. p.71 Taking a picture in low light situations. p.39 Putting yourself into a picture. p.27...with shadow on the face. p.41,52 Taking consecutive pictures of people in a backlit situation with night scenery in the background. p.70 Taking a picture of people in I various situations Taking a portrait photograph. p.40 Taking a picture of people in a backlit ...
...scenery in the background. p.71 Landscape photography Taking a scenic photograph that focuses from the foreground to the background. p.71 Zooming the lens Making a subject larger or smaller. p.71 Taking a picture in low light situations. p.39 Putting yourself into a picture. p.27...with shadow on the face. p.41,52 Taking consecutive pictures of people in a backlit situation with night scenery in the background. p.70 Taking a picture of people in I various situations Taking a portrait photograph. p.40 Taking a picture of people in a backlit ...
PZ-70 Manual
Page 8
... Program Mode 42 BASIC OPERATION (PREPARATION) 13 - 23 Attaching the camera strap 13 Loading the battery/ 14 When the battery is exhausted 15 Attaching the lens 16 Using the shutter release button 18 Main switch operation 18 Film loading 19 Unloading the film 22 II . TABLE OF CONTENTS LCD panel indication...
... Program Mode 42 BASIC OPERATION (PREPARATION) 13 - 23 Attaching the camera strap 13 Loading the battery/ 14 When the battery is exhausted 15 Attaching the lens 16 Using the shutter release button 18 Main switch operation 18 Film loading 19 Unloading the film 22 II . TABLE OF CONTENTS LCD panel indication...
PZ-70 Manual
Page 12
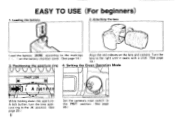
... the markings ( . ) on the battery chamber cover. (See page 14.) Align the red indexes on the lens and camera. as While holding down the apertureA-lock button, turn the lens aperture ring to the PICT: position. (See page 25.) according to the right until it seats with a click. (See... page 16.) 3. Positioning the aperture ring 4. Attaching the lens Load the battery _2CR5; Loading the battery 2. EASY TO...
... the markings ( . ) on the battery chamber cover. (See page 14.) Align the red indexes on the lens and camera. as While holding down the apertureA-lock button, turn the lens aperture ring to the PICT: position. (See page 25.) according to the right until it seats with a click. (See... page 16.) 3. Positioning the aperture ring 4. Attaching the lens Load the battery _2CR5; Loading the battery 2. EASY TO...
PZ-70 Manual
Page 13
... OO 0 Open the back cover, insert a roll of film, align the end of the film leader with the zoom ring • When an FA zoom lens is attached, the power zoom function can operate. Focus on the subject, depress the shutter release button halfway down to lock focus, and then depress...
... OO 0 Open the back cover, insert a roll of film, align the end of the film leader with the zoom ring • When an FA zoom lens is attached, the power zoom function can operate. Focus on the subject, depress the shutter release button halfway down to lock focus, and then depress...
PZ-70 Manual
Page 14
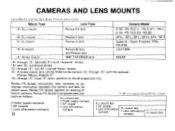
... (E) Screw mount Pentax-FA lens Pentax-F lens Pentax-A lens Pentax-M lens and Pentax lens SMC TAKUMAR lens Z-70/PZ-70,Z-1,/PZ-1,,Z-1/PZ-1, Z-10/PZ-10,Z-20/PZ-20 SFXN z SF1N, SF7/SF10, SFX/SF-1 Super-A/Super Program, P30N/ P3N,P30r LX,K1000 ESII,SP (A) through (D): basically K-mount (bayonet) lenses. (A) and (B): autofocus lenses. (C) through (E): non-AF (manual-focus) lenses. (E): A screw mount lens can be fitted to ex- Pentax FA lenses operate...
... (E) Screw mount Pentax-FA lens Pentax-F lens Pentax-A lens Pentax-M lens and Pentax lens SMC TAKUMAR lens Z-70/PZ-70,Z-1,/PZ-1,,Z-1/PZ-1, Z-10/PZ-10,Z-20/PZ-20 SFXN z SF1N, SF7/SF10, SFX/SF-1 Super-A/Super Program, P30N/ P3N,P30r LX,K1000 ESII,SP (A) through (D): basically K-mount (bayonet) lenses. (A) and (B): autofocus lenses. (C) through (E): non-AF (manual-focus) lenses. (E): A screw mount lens can be fitted to ex- Pentax FA lenses operate...

PZ-70 Manual
Page 15
...the (A) position, the aperture cannot be used. CAMERA FUNCTIONS AVAILABLE WITH VARIOUS LENSES Function Lens [Mount type] Autofocus (Lens only) (Lens with AF Adapter 1.7X) Manual focus (with Fl) *2 (with a maximum aperture...with a maximum aperture of Pentax-F Soft 85mm/f2.8. * 6. f-stop indication FA lens [KAF2] 0 O*3 0 O*4 0 0 0 0 0 0 0 0 0 F lens [KAF] 0 O*3 0 x O*5 0 0* 5 0 0 0 0 0 0 A lens [KA] x O * 1 O*3 0 x 0 0 0 0 0 0 0 0 x M lens [K] x O * 1 0 *3 0 x x 0* 6 x 0 *6 x 0 x x *7 x S lens [Screw] x x x 0 X x 0* 6 x 0 *6 x 0 x x*7 x Notes: * 1. Pentax-FA zoom lenses only. * 5.
...the (A) position, the aperture cannot be used. CAMERA FUNCTIONS AVAILABLE WITH VARIOUS LENSES Function Lens [Mount type] Autofocus (Lens only) (Lens with AF Adapter 1.7X) Manual focus (with Fl) *2 (with a maximum aperture...with a maximum aperture of Pentax-F Soft 85mm/f2.8. * 6. f-stop indication FA lens [KAF2] 0 O*3 0 O*4 0 0 0 0 0 0 0 0 0 F lens [KAF] 0 O*3 0 x O*5 0 0* 5 0 0 0 0 0 0 A lens [KA] x O * 1 O*3 0 x 0 0 0 0 0 0 0 0 x M lens [K] x O * 1 0 *3 0 x x 0* 6 x 0 *6 x 0 x x *7 x S lens [Screw] x x x 0 X x 0* 6 x 0 *6 x 0 x x*7 x Notes: * 1. Pentax-FA zoom lenses only. * 5.
PZ-70 Manual
Page 19
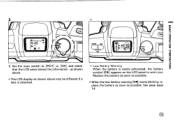
See page page 14. 3 thN uu BASIC OPERATION (PREPARATION) otCi DRIVE GD a lere-a.s" PICT O // 3. Replace the battery as soon as possible. • When the low battery warning [1=0] starts blinking, replace the battery as soon as shown above . • The LCD display as possible. Set the main switch to [PICT] or [ON] and check that the LCD panel shows the information as shown above may be different if a lens is attached. * Low Battery Warning When the battery is nearly exhausted, the battery symbol [4=a] appears on the LCD panel to warn you.
See page page 14. 3 thN uu BASIC OPERATION (PREPARATION) otCi DRIVE GD a lere-a.s" PICT O // 3. Replace the battery as soon as possible. • When the low battery warning [1=0] starts blinking, replace the battery as soon as shown above . • The LCD display as possible. Set the main switch to [PICT] or [ON] and check that the LCD panel shows the information as shown above may be different if a lens is attached. * Low Battery Warning When the battery is nearly exhausted, the battery symbol [4=a] appears on the LCD panel to warn you.
PZ-70 Manual
Page 20
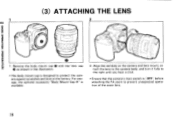
... the camera body, and turn it fully to the right until you hear a click. • Ensure that the camera's main switch is available. 2. (3) ATTACHING THE LENS 2 CO 0 m O 0 z oc coo' 11 o- For storage, the optional accessory -Body Mount Cap K" is [OFF] before attaching the FA zoom to protect the camera against ...scratches and dust at the factory. Remove the body mount cap 0 and rear lens cap 0 as shown in the illustration. • The body mount cap is designed to prevent unexpected operation of the zoom...
... the camera body, and turn it fully to the right until you hear a click. • Ensure that the camera's main switch is available. 2. (3) ATTACHING THE LENS 2 CO 0 m O 0 z oc coo' 11 o- For storage, the optional accessory -Body Mount Cap K" is [OFF] before attaching the FA zoom to protect the camera against ...scratches and dust at the factory. Remove the body mount cap 0 and rear lens cap 0 as shown in the illustration. • The body mount cap is designed to prevent unexpected operation of the zoom...
PZ-70 Manual
Page 21
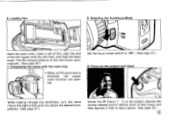
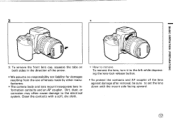
... BASIC OPERATION (PREPARATION) 0 0 0 la 0 0 0 0 3. To remove the front lens cap, squeeze the tabs on both sides in the direction of the arrow. • We assume no responsibility nor liability for damages resulting from the use of the lens against damage after removal, be sure to the electrical system. Dirt..., dust, or corrosion may often cause damage to set the lens down with a soft, dry cloth. * How to remove To remove the lens, turn it to the left while depressing the lens-lock-release button. • To protect the contacts and AF coupler of lenses ...
... BASIC OPERATION (PREPARATION) 0 0 0 la 0 0 0 0 3. To remove the front lens cap, squeeze the tabs on both sides in the direction of the arrow. • We assume no responsibility nor liability for damages resulting from the use of the lens against damage after removal, be sure to the electrical system. Dirt..., dust, or corrosion may often cause damage to set the lens down with a soft, dry cloth. * How to remove To remove the lens, turn it to the left while depressing the lens-lock-release button. • To protect the contacts and AF coupler of lenses ...
PZ-70 Manual
Page 22
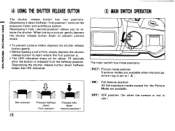
....) Depressing it fully (second position) allows you to [ A ]. [ON]: Full-feature position All the exposure modes except for the Picture Mode are available when the lens aperture ring is released from the halfway position. When taking a picture, gently depress the shutter release button down (first position) (second position) (5) MAIN SWITCH OPERATION...
....) Depressing it fully (second position) allows you to [ A ]. [ON]: Full-feature position All the exposure modes except for the Picture Mode are available when the lens aperture ring is released from the halfway position. When taking a picture, gently depress the shutter release button down (first position) (second position) (5) MAIN SWITCH OPERATION...

PZ-70 Manual
Page 29
Set the main switch to Set 1. While holding down the mode set button, turn the aperture ring while holding down the aperture-A lock button. 2. CC30000C POWER ZOOM eo 28 6a5I0 / • I A 241611 8 dy 11 7,lA. Turn the aperture ring to the [A] position as shown in the illustration. • To move the lens aperture ring to the [ A (Auto) ] position, turn the select dial until [0] superimposes on [:_.•.,] on the LCD panel. a • / / (ONIIIOOHS) NOLLVEBdO 0ISVS HOW to [PICT].
Set the main switch to Set 1. While holding down the mode set button, turn the aperture ring while holding down the aperture-A lock button. 2. CC30000C POWER ZOOM eo 28 6a5I0 / • I A 241611 8 dy 11 7,lA. Turn the aperture ring to the [A] position as shown in the illustration. • To move the lens aperture ring to the [ A (Auto) ] position, turn the select dial until [0] superimposes on [:_.•.,] on the LCD panel. a • / / (ONIIIOOHS) NOLLVEBdO 0ISVS HOW to [PICT].
PZ-70 Manual
Page 31
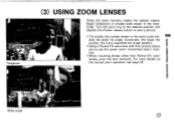
For more magnified the image appears. • Using a Pentax-FA zoom lens with this camera allows you to take a picture. • The smaller the number shown in the viewfinder. (DNI100HS) NOI1V1:13d0 OISY Telephoto (3) USING ZOOM LENSES ... ring to the desired position and depress the shutter release button to use the power zoom (motorized zoom) function. • When mounting lenses other than Pentax-FA zoom lenses, zoom the lens manually.
For more magnified the image appears. • Using a Pentax-FA zoom lens with this camera allows you to take a picture. • The smaller the number shown in the viewfinder. (DNI100HS) NOI1V1:13d0 OISY Telephoto (3) USING ZOOM LENSES ... ring to the desired position and depress the shutter release button to use the power zoom (motorized zoom) function. • When mounting lenses other than Pentax-FA zoom lenses, zoom the lens manually.
PZ-70 Manual
Page 32
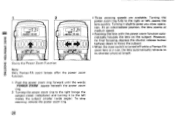
... depress the shutter release button halfway down to focus the subject. • When the main switch is turned off while a Pentax-FA zoom lens is in use, the lens automatically retracts to the right or left makes the subject smaller (wide angle). c-o Using the Power Zoom Function 0 0 Note...: 2 Only Pentax-FA zoom lenses offer the power zoom function. 1. F r tion. PENTAX 28-80 j PENTAX 28- 80 • Zooming the lens with the power zoom function auto- 03 To 0 000400C m 0 H[r - 2 )0006409 MILD 201M ...
... depress the shutter release button halfway down to focus the subject. • When the main switch is turned off while a Pentax-FA zoom lens is in use, the lens automatically retracts to the right or left makes the subject smaller (wide angle). c-o Using the Power Zoom Function 0 0 Note...: 2 Only Pentax-FA zoom lenses offer the power zoom function. 1. F r tion. PENTAX 28-80 j PENTAX 28- 80 • Zooming the lens with the power zoom function auto- 03 To 0 000400C m 0 H[r - 2 )0006409 MILD 201M ...

PZ-70 Manual
Page 34
... the shutter release button will cause camera shake, making the picture blurred.) • To reduce camera shake, support your left hand supporting the camera and lens as shown in the illustrations. a table, tree, or the wall of a building, for instance. • When using a ultra-telephoto...
... the shutter release button will cause camera shake, making the picture blurred.) • To reduce camera shake, support your left hand supporting the camera and lens as shown in the illustrations. a table, tree, or the wall of a building, for instance. • When using a ultra-telephoto...

PZ-70 Manual
Page 35
See page 45 for "HARD-TO-AUTOFOCUS SUBJECTS". 2 (DNIIOOHS) NOLIVEI3d0 3ISYS The focus mode switch has two positions as shown in the illustration. • For an autofocus operation, set the focus mode switch to focus. Select this position when the subject is difficult to [AF]. (5) SELECTING A FOCUS MODE J :MP AF About the Focus Mode Switch [AF]: Autofocus When you depress the shutter release button halfway down, the lens automatically focuses. [MF]: Manual focus You can focus on a subject manually.
See page 45 for "HARD-TO-AUTOFOCUS SUBJECTS". 2 (DNIIOOHS) NOLIVEI3d0 3ISYS The focus mode switch has two positions as shown in the illustration. • For an autofocus operation, set the focus mode switch to focus. Select this position when the subject is difficult to [AF]. (5) SELECTING A FOCUS MODE J :MP AF About the Focus Mode Switch [AF]: Autofocus When you depress the shutter release button halfway down, the lens automatically focuses. [MF]: Manual focus You can focus on a subject manually.
PZ-70 Manual
Page 36
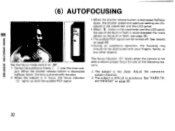
... other objects. Adjust the camera-tosubject distance. 2 The subject is too close. For more details on the built-in flash is depressed halfway down , the lens automatically focuses. 2. Center the autofocus frame IC 3 over the main sub- ject. The subject is difficult to AF. . 1. See details on page 45. (6) AUTOFOCUSING (ON1100HS...
... other objects. Adjust the camera-tosubject distance. 2 The subject is too close. For more details on the built-in flash is depressed halfway down , the lens automatically focuses. 2. Center the autofocus frame IC 3 over the main sub- ject. The subject is difficult to AF. . 1. See details on page 45. (6) AUTOFOCUSING (ON1100HS...


