
PZ-70 Manual
Page 2
...to our precise specifications and therefore, may cause difficulties with or actual damage to the exciting world of Pentax autofocus photography! When the PZ-70 is an autofocus SLR camera that offers higher levels of sophistication and performance. Incorporating a broad range of advanced technologies and highly ... available. Notes: • The product pictured on the front cover shows the PZ- 70 with the Pentax-F Zoom 35-80mm lens. • Illustrations of this camera used in this manual show the camera with an F Zoom lens, certain features such as Power Zooming and Auto Zooming...
...to our precise specifications and therefore, may cause difficulties with or actual damage to the exciting world of Pentax autofocus photography! When the PZ-70 is an autofocus SLR camera that offers higher levels of sophistication and performance. Incorporating a broad range of advanced technologies and highly ... available. Notes: • The product pictured on the front cover shows the PZ- 70 with the Pentax-F Zoom 35-80mm lens. • Illustrations of this camera used in this manual show the camera with an F Zoom lens, certain features such as Power Zooming and Auto Zooming...
PZ-70 Manual
Page 4
... center for extended periods in places where the humidity and temperature are handled. PRECAUTIONS FOR YOUR CAMERA Your Pentax camera is not wether resistant. If the camera suffers a severe shock or impact, take it to strong vibrations, shock or pressure. This darkening, however, does not appear on the extreme edges of the ...
... center for extended periods in places where the humidity and temperature are handled. PRECAUTIONS FOR YOUR CAMERA Your Pentax camera is not wether resistant. If the camera suffers a severe shock or impact, take it to strong vibrations, shock or pressure. This darkening, however, does not appear on the extreme edges of the ...

PZ-70 Manual
Page 5
... such an accident should occur, it is advisable to contact a Pentax Service Center immediately. • To maintain optimum performance, it is exposed to any other object. • The electric circuit inside the camera contains high voltage working parts. LCD Liquid-Crystal Display When the LCD... is recommended that you cannot correct the problems, have the camera inspected or test shoot with your camera inspected at a Pentax service center. If the camera has not been used for an extended period, or is being subjected to high temperatures over...
... such an accident should occur, it is advisable to contact a Pentax Service Center immediately. • To maintain optimum performance, it is exposed to any other object. • The electric circuit inside the camera contains high voltage working parts. LCD Liquid-Crystal Display When the LCD... is recommended that you cannot correct the problems, have the camera inspected or test shoot with your camera inspected at a Pentax service center. If the camera has not been used for an extended period, or is being subjected to high temperatures over...
PZ-70 Manual
Page 8
...•••24 - 42 Using the Green Operation Mode 24 Selecting a Drive Mode 26 Using the power zoom function 28 Holding the camera 30 Selcting a Focus Mode 31 Autofocusing 32 Focus Lock Function 34 Using the Buit-In-TTL Flash (RTF) 35 Red-eye Reduction Flash ...Landscape Program Mode 40 • Action Program Mode 41 • Close-up Program Mode 42 BASIC OPERATION (PREPARATION) 13 - 23 Attaching the camera strap 13 Loading the battery/ 14 When the battery is exhausted 15 Attaching the lens 16 Using the shutter release button 18 Main switch operation...
...•••24 - 42 Using the Green Operation Mode 24 Selecting a Drive Mode 26 Using the power zoom function 28 Holding the camera 30 Selcting a Focus Mode 31 Autofocusing 32 Focus Lock Function 34 Using the Buit-In-TTL Flash (RTF) 35 Red-eye Reduction Flash ...Landscape Program Mode 40 • Action Program Mode 41 • Close-up Program Mode 42 BASIC OPERATION (PREPARATION) 13 - 23 Attaching the camera strap 13 Loading the battery/ 14 When the battery is exhausted 15 Attaching the lens 16 Using the shutter release button 18 Main switch operation...
PZ-70 Manual
Page 12
... _2CR5; Turn the lens to the PICT: position. (See page 25.) POWER zoom 80 28 $ A 22,1611 .635 PICT I position. (See page 25.) 8 Set the camera's main swtich to the right until it seats with a click. (See page 16.) 3. according to the markings ( . ) on the battery chamber cover. (See page 14...
... _2CR5; Turn the lens to the PICT: position. (See page 25.) POWER zoom 80 28 $ A 22,1611 .635 PICT I position. (See page 25.) 8 Set the camera's main swtich to the right until it seats with a click. (See page 16.) 3. according to the markings ( . ) on the battery chamber cover. (See page 14...
PZ-70 Manual
Page 14
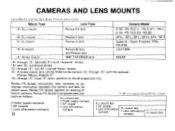
... Adapter K. (A) through (C): have "A"(auto) position on existing K- mount cameras. CAMERAS AND LENS MOUNTS Lens Mount and Camera Body Compatibility Chart Mount Type Lens Type Camera Model (A) KAF2-mount (B) K.,-mount (C) K. mount (D) K-mount (E) Screw mount Pentax-FA lens Pentax-F lens Pentax-A lens Pentax-M lens and Pentax lens SMC TAKUMAR lens Z-70/PZ-70,Z-1,/PZ-1,,Z-1/PZ-1, Z-10/PZ-10,Z-20/PZ-20 SFXN z SF1N, SF7/SF10, SFX/SF-1 Super...
... Adapter K. (A) through (C): have "A"(auto) position on existing K- mount cameras. CAMERAS AND LENS MOUNTS Lens Mount and Camera Body Compatibility Chart Mount Type Lens Type Camera Model (A) KAF2-mount (B) K.,-mount (C) K. mount (D) K-mount (E) Screw mount Pentax-FA lens Pentax-F lens Pentax-A lens Pentax-M lens and Pentax lens SMC TAKUMAR lens Z-70/PZ-70,Z-1,/PZ-1,,Z-1/PZ-1, Z-10/PZ-10,Z-20/PZ-20 SFXN z SF1N, SF7/SF10, SFX/SF-1 Super...

PZ-70 Manual
Page 15
Lenses without the (A) position, the aperture cannot be used. Pentax-FA zoom lenses only. * 5. CAMERA FUNCTIONS AVAILABLE WITH VARIOUS LENSES Function Lens [Mount type] Autofocus (Lens only) (Lens with AF Adapter 1.7X) Manual .... * 4. f-stop indication FA lens [KAF2] 0 O*3 0 O*4 0 0 0 0 0 0 0 0 0 F lens [KAF] 0 O*3 0 x O*5 0 0* 5 0 0 0 0 0 0 A lens [KA] x O * 1 O*3 0 x 0 0 0 0 0 0 0 0 x M lens [K] x O * 1 0 *3 0 x x 0* 6 x 0 *6 x 0 x x *7 x S lens [Screw] x x x 0 X x 0* 6 x 0 *6 x 0 x x*7 x Notes: * 1. Lenses with a maximum aperture of Pentax-F Soft 85mm/f2.8. * 6.
Lenses without the (A) position, the aperture cannot be used. Pentax-FA zoom lenses only. * 5. CAMERA FUNCTIONS AVAILABLE WITH VARIOUS LENSES Function Lens [Mount type] Autofocus (Lens only) (Lens with AF Adapter 1.7X) Manual .... * 4. f-stop indication FA lens [KAF2] 0 O*3 0 O*4 0 0 0 0 0 0 0 0 0 F lens [KAF] 0 O*3 0 x O*5 0 0* 5 0 0 0 0 0 0 A lens [KA] x O * 1 O*3 0 x 0 0 0 0 0 0 0 0 x M lens [K] x O * 1 0 *3 0 x x 0* 6 x 0 *6 x 0 x x *7 x S lens [Screw] x x x 0 X x 0* 6 x 0 *6 x 0 x x*7 x Notes: * 1. Lenses with a maximum aperture of Pentax-F Soft 85mm/f2.8. * 6.
PZ-70 Manual
Page 16
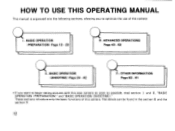
... 43 - 82 II . OTHER INFORMATION Page 83 - 91 • If you to begin taking pictures with this camera. BASIC OPERATION (PREPARATION) Page 13 - 23 III. These sections introduce only the basic functions of the camera: I and II , "BASIC OPERATION (PREPARATION)" and "BASIC OPERATION (SHOOTING)." The details can be found in the section... IV. HOW TO USE THIS OPERATING MANUAL This manual is organized into the following sections, allowing you want to optimize the use of this new camera as soon as possible, read section I . BASIC OPERATION (SHOOTING) Page 24 - 42 IV.
... 43 - 82 II . OTHER INFORMATION Page 83 - 91 • If you to begin taking pictures with this camera. BASIC OPERATION (PREPARATION) Page 13 - 23 III. These sections introduce only the basic functions of the camera: I and II , "BASIC OPERATION (PREPARATION)" and "BASIC OPERATION (SHOOTING)." The details can be found in the section... IV. HOW TO USE THIS OPERATING MANUAL This manual is organized into the following sections, allowing you want to optimize the use of this new camera as soon as possible, read section I . BASIC OPERATION (SHOOTING) Page 24 - 42 IV.
PZ-70 Manual
Page 17
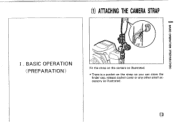
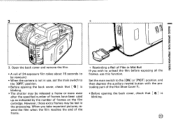
BASIC OPERATION (PREPARATION) (1) ATTACHING THE CAMERA STRAP MEM 5 r0 n m 33 O 0 z Fn r-n0 0 Fit the strap on the camera as illustrated. • There is a pocket on the strap so you can store the finder cap, release socket cover or any other small accessory as illustrated. 13 I .
BASIC OPERATION (PREPARATION) (1) ATTACHING THE CAMERA STRAP MEM 5 r0 n m 33 O 0 z Fn r-n0 0 Fit the strap on the camera as illustrated. • There is a pocket on the strap so you can store the finder cap, release socket cover or any other small accessory as illustrated. 13 I .
PZ-70 Manual
Page 18
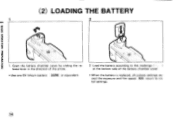
I BASIC OPERATION (PREPARATION) (2) LOADING THE BATTERY 1 2 te gFe N• , 1. Open the battery chamber cover by sliding the release lever in the direction of the battery chamber cover. • When the battery is replaced, all camera settings except the exposure and film speed . Load the battery according to initial settings. ISO] return to the markings ( - , at the bottom side of the arrow. • Use one 6V lithium battery 2CR5 or equivalent. 2.
I BASIC OPERATION (PREPARATION) (2) LOADING THE BATTERY 1 2 te gFe N• , 1. Open the battery chamber cover by sliding the release lever in the direction of the battery chamber cover. • When the battery is replaced, all camera settings except the exposure and film speed . Load the battery according to initial settings. ISO] return to the markings ( - , at the bottom side of the arrow. • Use one 6V lithium battery 2CR5 or equivalent. 2.
PZ-70 Manual
Page 20
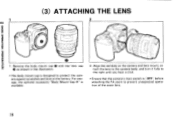
.... • The body mount cap is designed to prevent unexpected operation of the zoom lens. 16 Align the red dots on the camera and lens mount, attach the lens to the camera body, and turn it fully to the right until you hear a click. • Ensure that the... camera's main switch is available. 2. For storage, the optional accessory -Body Mount Cap K" is [OFF] before attaching the FA zoom to protect the camera against scratches and dust at the factory. m 0 z 1. (3) ATTACHING THE LENS 2 CO 0 m O 0 z ...
.... • The body mount cap is designed to prevent unexpected operation of the zoom lens. 16 Align the red dots on the camera and lens mount, attach the lens to the camera body, and turn it fully to the right until you hear a click. • Ensure that the... camera's main switch is available. 2. For storage, the optional accessory -Body Mount Cap K" is [OFF] before attaching the FA zoom to protect the camera against scratches and dust at the factory. m 0 z 1. (3) ATTACHING THE LENS 2 CO 0 m O 0 z ...
PZ-70 Manual
Page 21
... the left while depressing the lens-lock-release button. • To protect the contacts and AF coupler of lenses made by other manufacturers. • The camera body and lens mount incorporate lens information contacts and an AF coupler. To remove the front lens cap, squeeze the tabs on both sides in...
... the left while depressing the lens-lock-release button. • To protect the contacts and AF coupler of lenses made by other manufacturers. • The camera body and lens mount incorporate lens information contacts and an AF coupler. To remove the front lens cap, squeeze the tabs on both sides in...
PZ-70 Manual
Page 22
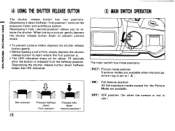
...USING THE SHUTTER RELEASE BUTTON The shutter release button has two positions. Depressing it down halfway (first position) turns on for when the camera is released from the halfway position. Depressing the shutter release button down halfway keeps the LED indicated. 4 IMIK Not pressed J.) 4... Pressed halfway Pressed fully down down to prevent camera shake. • To prevent camera shake, depress the shutter release button gently. • Before loading a roll of film, slowly depress the shutter release button...
...USING THE SHUTTER RELEASE BUTTON The shutter release button has two positions. Depressing it down halfway (first position) turns on for when the camera is released from the halfway position. Depressing the shutter release button down halfway keeps the LED indicated. 4 IMIK Not pressed J.) 4... Pressed halfway Pressed fully down down to prevent camera shake. • To prevent camera shake, depress the shutter release button gently. • Before loading a roll of film, slowly depress the shutter release button...

PZ-70 Manual
Page 23
... ISO rating from 25 to 5000. • When the DX-coded film is used, the correct film speed is automatically set for the camera. • If you operate the camera with no 1 2 film loaded to become familiar with its protruding end in. • Always load or unload a film in the direction of... 1. DO NOT TOUCH THE SHUTTER CURTAINS. Slide the top end in the film chamber first and then push its operation. // Automatic film speed setting This camera is designed to use DX-coded films with the protruding end down. To open the back cover, slide the back cover release lever in the...
... ISO rating from 25 to 5000. • When the DX-coded film is used, the correct film speed is automatically set for the camera. • If you operate the camera with no 1 2 film loaded to become familiar with its protruding end in. • Always load or unload a film in the direction of... 1. DO NOT TOUCH THE SHUTTER CURTAINS. Slide the top end in the film chamber first and then push its operation. // Automatic film speed setting This camera is designed to use DX-coded films with the protruding end down. To open the back cover, slide the back cover release lever in the...
PZ-70 Manual
Page 26
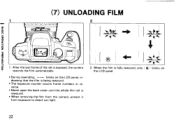
... cover until the whole film roll is fully rewound, only the LCD panel. When the film is rewound. • When removing the film from the camera, protect it from exposure to direct sun light. (7) UNLOADING FILM 2 \_/ v BASIC OPERATION (PREPARATION) O DOrA %lerse_3•§•• CD '1 1. No. a__ ~... last frame of the roll is being rewound. • The exposure counter counts frame numbers in - dicating that the film is exposed, the camera rewinds the film automatically. • During rewinding, blinks on Arr 414/ I blinks on the LCD panel, in re-
... cover until the whole film roll is fully rewound, only the LCD panel. When the film is rewound. • When removing the film from the camera, protect it from exposure to direct sun light. (7) UNLOADING FILM 2 \_/ v BASIC OPERATION (PREPARATION) O DOrA %lerse_3•§•• CD '1 1. No. a__ ~... last frame of the roll is being rewound. • The exposure counter counts frame numbers in - dicating that the film is exposed, the camera rewinds the film automatically. • During rewinding, blinks on Arr 414/ I blinks on the LCD panel, in re-
PZ-70 Manual
Page 27
3 O (5) O O QD 3. Open the back cover and remove the film. • A roll of 24-exposure film takes about 15 seconds to be rewound. • When the camera is not in use this function. However, those extra frames may be lost in Mid-Roll If you take important pictures, rewind the film when ...
3 O (5) O O QD 3. Open the back cover and remove the film. • A roll of 24-exposure film takes about 15 seconds to be rewound. • When the camera is not in use this function. However, those extra frames may be lost in Mid-Roll If you take important pictures, rewind the film when ...
PZ-70 Manual
Page 28
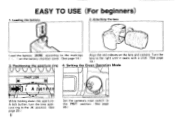
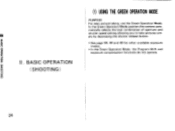
BASIC OPERATION (SHOOTING) (1) USING THE GREEN OPERATION MODE PURPOSE For easy picture taking, use the Green Operation Mode. In the Green Operation Mode position,the camera automatically selects the best combination of aperture and shutter speed setting allowing you to take pictures simply by depressing the shutter release button. • See page 38, 48 and 49 for other available exposure modes. • In the Green Operation Mode, the Program-Shift and exposure compensation functions do not operate. (ON1100HS) NOLLVEBd0 OISV8 11 .
BASIC OPERATION (SHOOTING) (1) USING THE GREEN OPERATION MODE PURPOSE For easy picture taking, use the Green Operation Mode. In the Green Operation Mode position,the camera automatically selects the best combination of aperture and shutter speed setting allowing you to take pictures simply by depressing the shutter release button. • See page 38, 48 and 49 for other available exposure modes. • In the Green Operation Mode, the Program-Shift and exposure compensation functions do not operate. (ON1100HS) NOLLVEBd0 OISV8 11 .

PZ-70 Manual
Page 30
e:)_: Self-timer drive mode A picture can be taken with a 1 2-second-delay. (ONII0OHS) NOIIVH3d0 OISVIII II (2) SELECTING A DRIVE MODE This camera has a total of Drive Modes [171:: : Single-frame drive mode One picture is taken at [0]. 16, Consecutive drive mode Pictures can be taken consecutively while ...
e:)_: Self-timer drive mode A picture can be taken with a 1 2-second-delay. (ONII0OHS) NOIIVH3d0 OISVIII II (2) SELECTING A DRIVE MODE This camera has a total of Drive Modes [171:: : Single-frame drive mode One picture is taken at [0]. 16, Consecutive drive mode Pictures can be taken consecutively while ...
PZ-70 Manual
Page 31
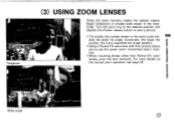
... ring to the desired position and depress the shutter release button to use the power zoom (motorized zoom) function. • When mounting lenses other than Pentax-FA zoom lenses, zoom the lens manually. (DNI100HS) NOI1V1:13d0 OISY Telephoto (3) USING ZOOM LENSES Using the zoom function makes the subject appear larger ... the number, the more details on the manual zoom operation, see page 29. 41, r Wide angle For more magnified the image appears. • Using a Pentax-FA zoom lens with this camera allows you to take a picture. • The smaller the number shown in the viewfinder.
... ring to the desired position and depress the shutter release button to use the power zoom (motorized zoom) function. • When mounting lenses other than Pentax-FA zoom lenses, zoom the lens manually. (DNI100HS) NOI1V1:13d0 OISY Telephoto (3) USING ZOOM LENSES Using the zoom function makes the subject appear larger ... the number, the more details on the manual zoom operation, see page 29. 41, r Wide angle For more magnified the image appears. • Using a Pentax-FA zoom lens with this camera allows you to take a picture. • The smaller the number shown in the viewfinder.
PZ-70 Manual
Page 33
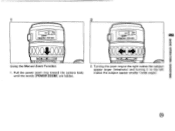
Pull the power zoom ring toward the camera body until the words [POWER ZOOM] are hidden. 2 5 m pENTAX 28-80 c000t0000' leoL as 2e i2el nn Using the Manual Zoom Function 1. m 15 5 m 21110 [ PENTAX 28-80 )C0004001 (eof es 2a nnn i2el 11 2. Turning the zoom ring to the right makes the subject appear larger (telephoto) and turning it to the left makes the subject appear smaller (wide angle).
Pull the power zoom ring toward the camera body until the words [POWER ZOOM] are hidden. 2 5 m pENTAX 28-80 c000t0000' leoL as 2e i2el nn Using the Manual Zoom Function 1. m 15 5 m 21110 [ PENTAX 28-80 )C0004001 (eof es 2a nnn i2el 11 2. Turning the zoom ring to the right makes the subject appear larger (telephoto) and turning it to the left makes the subject appear smaller (wide angle).

