
PZ-10 Manual
Page 2
... mutually by other manufac• turers. - - Commercially available lenses and accessories produced by first time users and serious photographer. PENTAX The names of the camera's working parts are listed on the front and back flaps of this manual, so keep the flaps unfolded for a full explanation... of the camera's functions and operations before use of Pentax autofocus SLR pho• tography ! We sincerely hope you will enjoy taking memorable. high quality pictures with -or ...
... mutually by other manufac• turers. - - Commercially available lenses and accessories produced by first time users and serious photographer. PENTAX The names of the camera's working parts are listed on the front and back flaps of this manual, so keep the flaps unfolded for a full explanation... of the camera's functions and operations before use of Pentax autofocus SLR pho• tography ! We sincerely hope you will enjoy taking memorable. high quality pictures with -or ...
PZ-10 Manual
Page 4
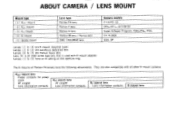
... that is used with all other K -mount cameras. Lenses (3) to (5) are K -mount (bayonet type). They are autofocus dedicated lens. Lenses (1) to (3) have the following attachments. Camera models Z-10/PZ-10 SFXN/SF IN, SF7/SF10 Super A/Super Program, P30N/P3N, P30, LX, K 1000 ESII, SP The K -mounts of Pentax FA lenses have an A setting on the...
... that is used with all other K -mount cameras. Lenses (3) to (5) are K -mount (bayonet type). They are autofocus dedicated lens. Lenses (1) to (3) have the following attachments. Camera models Z-10/PZ-10 SFXN/SF IN, SF7/SF10 Super A/Super Program, P30N/P3N, P30, LX, K 1000 ESII, SP The K -mounts of Pentax FA lenses have an A setting on the...
PZ-10 Manual
Page 5
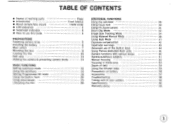
...; How to use this Guide 4 Image Size Tracking Mode 34 Using Metered Manual Mode 38 PREPARATIONS Using Bulb Mode 41 Fastening camera strap 5 Exposure compensation 42 Installing the battery 6 Viewfinder warnings 43 Main switch 7 Advanced use of the Built-in flash 44 Mounting the... lens 8 Using Pentax dedicated flash units 4E Loading the film 10 Camera functions with various lenses 50 Soft case 13 Hard-to-autofocus subjects 51 Holding the camera & preventing camera shake 14 Manual focusing 52 Focusing in matte area 53 BASIC...
...; How to use this Guide 4 Image Size Tracking Mode 34 Using Metered Manual Mode 38 PREPARATIONS Using Bulb Mode 41 Fastening camera strap 5 Exposure compensation 42 Installing the battery 6 Viewfinder warnings 43 Main switch 7 Advanced use of the Built-in flash 44 Mounting the... lens 8 Using Pentax dedicated flash units 4E Loading the film 10 Camera functions with various lenses 50 Soft case 13 Hard-to-autofocus subjects 51 Holding the camera & preventing camera shake 14 Manual focusing 52 Focusing in matte area 53 BASIC...

PZ-10 Manual
Page 7
FASTENING CAMERA STRAP 1 SNOIlVelVd3dd 1 PRI 11-N,I:A IONI PENTAX Fasten the strap to the camera body, as shown in the figure. * To prevent the camera from swaying excessively while walking, adjust the strap to a length above your waist.
FASTENING CAMERA STRAP 1 SNOIlVelVd3dd 1 PRI 11-N,I:A IONI PENTAX Fasten the strap to the camera body, as shown in the figure. * To prevent the camera from swaying excessively while walking, adjust the strap to a length above your waist.
PZ-10 Manual
Page 8
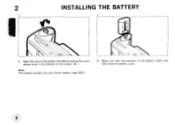
Make sure that the polarities of the arrow [ 10 Note: This camera accepts only one lithium battery, type 2CR5. 2. O Open the cover of the battery chamber by pulling the cover release lever in the direction of the battery match and then close the battery cover. 2 INSTALLING THE BATTERY 1 Tel q 1.
Make sure that the polarities of the arrow [ 10 Note: This camera accepts only one lithium battery, type 2CR5. 2. O Open the cover of the battery chamber by pulling the cover release lever in the direction of the battery match and then close the battery cover. 2 INSTALLING THE BATTERY 1 Tel q 1.
PZ-10 Manual
Page 10
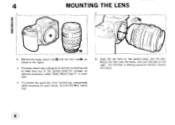
Align the red dots on the camera body and the lens. You will hear a clicking sound as shown in the figure. * The body mount cap is available. Mount the lens onto the ...body, and turn off the Main switch first. 2. 4 MOUNTING THE LENS 0 io CM c=-) ccmm 1. turn the lens to keep dust out of the camera body.For storage, an optional accessory called "Body Mount Cap K" is designed to prevent scratching and to the right. To prevent the zoom lens from...
Align the red dots on the camera body and the lens. You will hear a clicking sound as shown in the figure. * The body mount cap is available. Mount the lens onto the ...body, and turn off the Main switch first. 2. 4 MOUNTING THE LENS 0 io CM c=-) ccmm 1. turn the lens to keep dust out of the camera body.For storage, an optional accessory called "Body Mount Cap K" is designed to prevent scratching and to the right. To prevent the zoom lens from...
PZ-10 Manual
Page 11
... frame. With averaging metering methods, backlight can also be underexposed because the backlight is also read into partitions. In contrast, Multi (6)-segment metering enables the camera to be used under high-contrast, and difficult lighting conditions. Underexposure warning in manual mode/ Decreased exposure compensation in programmed AE mode In this Operating...
... frame. With averaging metering methods, backlight can also be underexposed because the backlight is also read into partitions. In contrast, Multi (6)-segment metering enables the camera to be used under high-contrast, and difficult lighting conditions. Underexposure warning in manual mode/ Decreased exposure compensation in programmed AE mode In this Operating...
PZ-10 Manual
Page 12
... (p. 15) ADDITIONAL FUNCTIONS (p. 28) PRECAUTIONS ON BATTERY (p. 56) TAKING CARE OF YOUR CAMERA (p. 60) WARRANTY POLICY (p. 64) •For first-time users of the SLR camera, start with general functions of the camera without getting into the following sections for your camera. 4 These sections require you read the "PRECAUTION ON BATTERY", "TAKING CARE OF...
... (p. 15) ADDITIONAL FUNCTIONS (p. 28) PRECAUTIONS ON BATTERY (p. 56) TAKING CARE OF YOUR CAMERA (p. 60) WARRANTY POLICY (p. 64) •For first-time users of the SLR camera, start with general functions of the camera without getting into the following sections for your camera. 4 These sections require you read the "PRECAUTION ON BATTERY", "TAKING CARE OF...
PZ-10 Manual
Page 13
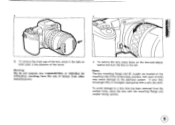
... mold may cause damage to a lens that has been removed from other manufacturers. * To remove the ens, press down on the mounting side of the camera body and lens. 3 ♦ I O 3. If your lens should get dirty or smudged, wipe gently with the mounting flange and coupler facing upward. Notes: The lens... of the arrow. To remove the front cap of the lens, press in the tabs on both sides in the direction of lenses from the camera body, place the lens with a soft, dry cloth.
... mold may cause damage to a lens that has been removed from other manufacturers. * To remove the ens, press down on the mounting side of the camera body and lens. 3 ♦ I O 3. If your lens should get dirty or smudged, wipe gently with the mounting flange and coupler facing upward. Notes: The lens... of the arrow. To remove the front cap of the lens, press in the tabs on both sides in the direction of lenses from the camera body, place the lens with a soft, dry cloth.
PZ-10 Manual
Page 14
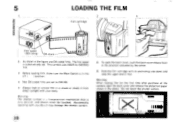
This camera uses IS025 to IS0100. * Always load or unload film in the photo. Do not touch the shutter curtain. The shutter curtain is a tine-precision mechanism ... - 1. I make sure the Main Switch is in the direction indicated by the arrow. 3. O 1,4 2. Warning: When loading film for the first time after purchase of the camera, open the back cover, push the back-cover-release lever in the off ] position. * Non DX -coded films are set . Accidentally touching with its protruding...
This camera uses IS025 to IS0100. * Always load or unload film in the photo. Do not touch the shutter curtain. The shutter curtain is a tine-precision mechanism ... - 1. I make sure the Main Switch is in the direction indicated by the arrow. 3. O 1,4 2. Warning: When loading film for the first time after purchase of the camera, open the back cover, push the back-cover-release lever in the off ] position. * Non DX -coded films are set . Accidentally touching with its protruding...
PZ-10 Manual
Page 16
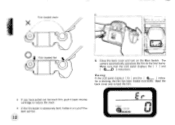
Make sure that the LCD panel displays the [ I ] and [ indications. Open the back cover and re-load the film. * If you have pulled out too much film, push it or cut off the bent portion. 6 Film loaded slack 'N 0 0 Film loaded flat 0 6. Warning: If the LCD panel displays [ Er ] and the [ a___ indica• for is excessively bent, flatten it back into the cartridge to the first frame. If the film leader is blinking, the film has been loaded incorrectly. The camera automatically advances the film to reduce the slack. Close the back cover and turn on the Main Switch.
Make sure that the LCD panel displays the [ I ] and [ indications. Open the back cover and re-load the film. * If you have pulled out too much film, push it or cut off the bent portion. 6 Film loaded slack 'N 0 0 Film loaded flat 0 6. Warning: If the LCD panel displays [ Er ] and the [ a___ indica• for is excessively bent, flatten it back into the cartridge to the first frame. If the film leader is blinking, the film has been loaded incorrectly. The camera automatically advances the film to reduce the slack. Close the back cover and turn on the Main Switch.

PZ-10 Manual
Page 17
... lens 13 SOFT CASE 6 1 or O The soft case is available in three sizes : S, M and L. Open the front cover and place the camera inside the back cover. 2. Refer to the camera by tightening the fitting screw with a flat circular object, such as a coin. * The front cover is available as an option, and consists...
... lens 13 SOFT CASE 6 1 or O The soft case is available in three sizes : S, M and L. Open the front cover and place the camera inside the back cover. 2. Refer to the camera by tightening the fitting screw with a flat circular object, such as a coin. * The front cover is available as an option, and consists...

PZ-10 Manual
Page 18
7 HOLDING THE CAMERA & PREVENTING CAMERA SHAKE To ensure good results, proper camera handling is heavier than the camera and lens for better balance and to prevent camera shake. 44) A • When using a slow shutter speed or a telephoto lens, use a tripod and the optional Cable Switch F. • When using a tripod with a telephoto lens, ... is important. * When taking a picture, hold your breath and gently press down the shutter release button. (Pressing down the shutter release button forcefully can cause camera shake.) * For increased balance and support while shooting, place the...
7 HOLDING THE CAMERA & PREVENTING CAMERA SHAKE To ensure good results, proper camera handling is heavier than the camera and lens for better balance and to prevent camera shake. 44) A • When using a slow shutter speed or a telephoto lens, use a tripod and the optional Cable Switch F. • When using a tripod with a telephoto lens, ... is important. * When taking a picture, hold your breath and gently press down the shutter release button. (Pressing down the shutter release button forcefully can cause camera shake.) * For increased balance and support while shooting, place the...

PZ-10 Manual
Page 20
Aim the AF frame at the subject you wish to p.51). 16 2 USING THE AUTOFOCUS 1 2 it %%3177-, Waft, It tr I N. When the subject comes into focus, a green indicator [ inside the viewfinder lights up, and a beeping tone will be heard. * If the [ 0 indicator blinks, the camera is unable to focus for the following reasons. ( 1 ) The subject is too close. ( 2 The subject is not suitable for autofocus (Refer to shoot and press the shutter release button lightly. 2. p p 1.
Aim the AF frame at the subject you wish to p.51). 16 2 USING THE AUTOFOCUS 1 2 it %%3177-, Waft, It tr I N. When the subject comes into focus, a green indicator [ inside the viewfinder lights up, and a beeping tone will be heard. * If the [ 0 indicator blinks, the camera is unable to focus for the following reasons. ( 1 ) The subject is too close. ( 2 The subject is not suitable for autofocus (Refer to shoot and press the shutter release button lightly. 2. p p 1.

PZ-10 Manual
Page 21
... subject. • If the subject is released. Press the shutter release button all the way down with proper lens movement. * When using the SMC Pentax F Soft 85mm f/2.8 lens, set the aperture to f/2.8 to f/4.5. (see page 51.) 4. The exposure counter increases by one each time the shutter... is moving too fast, the shutter may not fire. 17 the camera drives the lens continuously to the Predictive Autofocus mode ; SNOIIONnd 3ISV8 4 CD 0 AFG _O 0 3. To focus on another subject, you must lift ...
... subject. • If the subject is released. Press the shutter release button all the way down with proper lens movement. * When using the SMC Pentax F Soft 85mm f/2.8 lens, set the aperture to f/2.8 to f/4.5. (see page 51.) 4. The exposure counter increases by one each time the shutter... is moving too fast, the shutter may not fire. 17 the camera drives the lens continuously to the Predictive Autofocus mode ; SNOIIONnd 3ISV8 4 CD 0 AFG _O 0 3. To focus on another subject, you must lift ...
PZ-10 Manual
Page 22
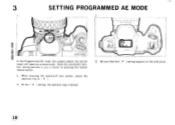
the camera selects the shutter speed and aperture automatically. While pressing the aperture-A lock button, adjust the aperture ring to [ A I. * At the [ A setting. SNO113Nfli OISV8 3 SETTING PROGRAMMED AE MODE 1 2 °000000 Snow wilIENNI rir-,z_-=2, cip II LI In the Programmed AE mode. the aperture ring is just a matter of pressing the shutter release button. 1. Be sure that the [ P setting appears on the LCD panel. 18) With this convenient funs tion, taking pictures is locked. 2.
the camera selects the shutter speed and aperture automatically. While pressing the aperture-A lock button, adjust the aperture ring to [ A I. * At the [ A setting. SNO113Nfli OISV8 3 SETTING PROGRAMMED AE MODE 1 2 °000000 Snow wilIENNI rir-,z_-=2, cip II LI In the Programmed AE mode. the aperture ring is just a matter of pressing the shutter release button. 1. Be sure that the [ P setting appears on the LCD panel. 18) With this convenient funs tion, taking pictures is locked. 2.
PZ-10 Manual
Page 23
SNOLL3Nnd MVO 0 3. Press the shutter release button halfway down while looking through the viewfinder and be sure that the [ P setting appears at the top right corner of the subject and selects the aperture and shutter speed automatically for the optimum exposure. * For instructions on pp.20 and 21. 19 In the Programmed AE mode, the camera reads the brightness of the viewfinder. When the [ indicator in the viewfinder and [EU indicator in the LCD panel start blinking, use the built-in flash unit, as explained on Metered Manual mode, refer to p.38.
SNOLL3Nnd MVO 0 3. Press the shutter release button halfway down while looking through the viewfinder and be sure that the [ P setting appears at the top right corner of the subject and selects the aperture and shutter speed automatically for the optimum exposure. * For instructions on pp.20 and 21. 19 In the Programmed AE mode, the camera reads the brightness of the viewfinder. When the [ indicator in the viewfinder and [EU indicator in the LCD panel start blinking, use the built-in flash unit, as explained on Metered Manual mode, refer to p.38.

PZ-10 Manual
Page 24
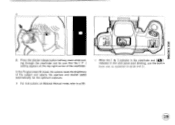
Press the [ camera body. After charging, the indicator appears on using the built-in flash, use the macro lens. 1. Press the shutter release button all the way down . 2. ...
Press the [ camera body. After charging, the indicator appears on using the built-in flash, use the macro lens. 1. Press the shutter release button all the way down . 2. ...

PZ-10 Manual
Page 26
when using a Pentax-dedicated flash off the retinas of SNO113Nfld 31SV9 22 of the eyes. red-eye- Q. This effect cannot be prevented, but certain measures, such as possible. -"L ib is that the flash reflects off the camera, it may help to turn out reddish. effect, this phenomenon is... occurs when taking pictures in a dark environment with a flash, and results in the subject's eyes to position the flash as far away from the camera as taking pictures in a brighter environment or. When using a zoom lens. Alp" t - Commonly known as the - shooting wide angle at a...
when using a Pentax-dedicated flash off the retinas of SNO113Nfld 31SV9 22 of the eyes. red-eye- Q. This effect cannot be prevented, but certain measures, such as possible. -"L ib is that the flash reflects off the camera, it may help to turn out reddish. effect, this phenomenon is... occurs when taking pictures in a dark environment with a flash, and results in the subject's eyes to position the flash as far away from the camera as taking pictures in a brighter environment or. When using a zoom lens. Alp" t - Commonly known as the - shooting wide angle at a...
PZ-10 Manual
Page 28
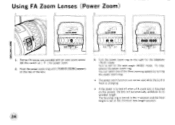
... to its smallest length. Set this switch at the minimum lens length position. 24 Push the power zoom ring until [POWER ZOOM] appears on the camera, the lens will automatically withdraw to left for power zoom. 2. To stop, release the power zoom ring. The focusing ring is moved to the right... for the telephoto (TELE) mode. Pentax FA lenses are provided with an auto zoom switch. You can not be used while the built in flash is charging. * If the power is...
... to its smallest length. Set this switch at the minimum lens length position. 24 Push the power zoom ring until [POWER ZOOM] appears on the camera, the lens will automatically withdraw to left for power zoom. 2. To stop, release the power zoom ring. The focusing ring is moved to the right... for the telephoto (TELE) mode. Pentax FA lenses are provided with an auto zoom switch. You can not be used while the built in flash is charging. * If the power is...

