

P3 Manual
Page 3
... Inserting batteries Attaching and detaching lens Film wind lever Main switch, shutter release button, shutter dial Film Loading film Unloading film Strap and soft case BASIC OPERATION Viewfinder displays Focusing Holding camera Shooting in Programmed AE mode Shooting in Metered Manual mode Warning displays Using Pentax dedicated auto flash units Using Programmed ...aperture coupling range 40 13 Diopter correction, mount adapter K 42 16 Precautions on batteries 43 17 Specifications 44 Taking care of your camera 46 Warranty policy 48 19 20 21 22 24 27 28 29 1 •
... Inserting batteries Attaching and detaching lens Film wind lever Main switch, shutter release button, shutter dial Film Loading film Unloading film Strap and soft case BASIC OPERATION Viewfinder displays Focusing Holding camera Shooting in Programmed AE mode Shooting in Metered Manual mode Warning displays Using Pentax dedicated auto flash units Using Programmed ...aperture coupling range 40 13 Diopter correction, mount adapter K 42 16 Precautions on batteries 43 17 Specifications 44 Taking care of your camera 46 Warranty policy 48 19 20 21 22 24 27 28 29 1 •
P3 Manual
Page 14
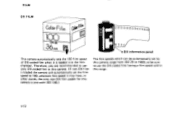
... this camera range from ISO 25 to 1600, so be sure to use only DX -coded film in other words, the only non-DX film usable for this camera. (If non-DX film is loaded the camera will automatically set the film speed to use the DX-coded film having a film speed within this range. •12 FILM DX FILM Color Film...
... this camera range from ISO 25 to 1600, so be sure to use only DX -coded film in other words, the only non-DX film usable for this camera. (If non-DX film is loaded the camera will automatically set the film speed to use the DX-coded film having a film speed within this range. •12 FILM DX FILM Color Film...
P3 Manual
Page 15
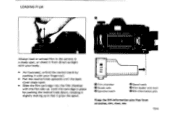
... in a shady spot, or shield it grips the spool. 00000 E -p W 0 0 000 0 0 0 0 0 000 0 0 0 Film chamber 0 Guide rails 0 Sprocket teeth 0 Spool teeth o Film leader end mark 0 DX-information pins Keep the DX-information pins free from direct sunlight with your finger-nail. • Pull the rewind knob upwards... until the back cover snaps open. • Slide the film cartridge into the film chamber with the flat side up. Always load or unload film in the camera in place by pushing it with your body. • As illustrated, unfold the rewind crank...
... in a shady spot, or shield it grips the spool. 00000 E -p W 0 0 000 0 0 0 0 0 000 0 0 0 Film chamber 0 Guide rails 0 Sprocket teeth 0 Spool teeth o Film leader end mark 0 DX-information pins Keep the DX-information pins free from direct sunlight with your finger-nail. • Pull the rewind knob upwards... until the back cover snaps open. • Slide the film cartridge into the film chamber with the flat side up. Always load or unload film in the camera in place by pushing it with your body. • As illustrated, unfold the rewind crank...
P3 Manual
Page 16
... time. r • As illustrated, pull the film leader out so that the film is flat as shown, by rewinding it slightly into the cartridge. • When a film with a higher ISO number is x slack loaded, do not leave the camera out of the film have engaged the 0 sprocket 2 teeth as well ...as the 0 spool teeth. • Also make sure that the film is properly placed 4 between the two guide rails. ...
... time. r • As illustrated, pull the film leader out so that the film is flat as shown, by rewinding it slightly into the cartridge. • When a film with a higher ISO number is x slack loaded, do not leave the camera out of the film have engaged the 0 sprocket 2 teeth as well ...as the 0 spool teeth. • Also make sure that the film is properly placed 4 between the two guide rails. ...
P3 Manual
Page 18
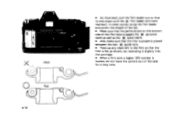
maybe at some point in the base of the camera. • Unfold the crank and turn it clockwise all the way until you feel it immediately, since the film except the last several frames might be saved. Do not force the lever beyond the number of exposures shown on the cartridge. •... lever will stop moving abruptly - If you reach the end of a stroke. •16 UNLOADING FILM When you accidentally opened the back cover without rewinding the film, close it loosen when the film leader is released from the take-up spool. • When the rewinding is over, lift the rewind knob sharply...
maybe at some point in the base of the camera. • Unfold the crank and turn it clockwise all the way until you feel it immediately, since the film except the last several frames might be saved. Do not force the lever beyond the number of exposures shown on the cartridge. •... lever will stop moving abruptly - If you reach the end of a stroke. •16 UNLOADING FILM When you accidentally opened the back cover without rewinding the film, close it loosen when the film leader is released from the take-up spool. • When the rewinding is over, lift the rewind knob sharply...
P3 Manual
Page 23
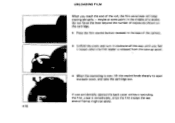
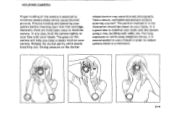
...posture without straining yourself. For long exposures or while using a tree, building wall, table, etc. HOLDING CAMERA Proper holding and operating your camera before inserting your hands. In any case, hold the camera tightly to a minimum. / I 0 a O 21• Generally there are three basic ways to... minimize camera shake which causes blurred pictures. The grips on this camera will help you keep a steady hold the camera. Strong pressure on your camera. The portion marked 0 in order to reduce camera shake to your face with your first film cartridge. Release the...
...posture without straining yourself. For long exposures or while using a tree, building wall, table, etc. HOLDING CAMERA Proper holding and operating your camera before inserting your hands. In any case, hold the camera tightly to a minimum. / I 0 a O 21• Generally there are three basic ways to... minimize camera shake which causes blurred pictures. The grips on this camera will help you keep a steady hold the camera. Strong pressure on your camera. The portion marked 0 in order to reduce camera shake to your face with your first film cartridge. Release the...

P3 Manual
Page 31
USING PROGRAMMED AUTO FLASH MODE Pentax dedicated flashes can be used in the Red AUTO, and therefore, using a lens whose maximum aperture is as small as the flash is ready, the camera is automatically switched to work at ISO 100) ■ As the film speed changes, the aperture also ...compatible with this mode. • As soon as f/4, for instance, will result in the viewfinder. (When the meter's timer switch is used with this camera, regardless of S mark in underexposure. 29 • f/8 f/11 (AF200SA: f/4 at the flash sync speed of 1/100. Set the flash mode selector...
USING PROGRAMMED AUTO FLASH MODE Pentax dedicated flashes can be used in the Red AUTO, and therefore, using a lens whose maximum aperture is as small as the flash is ready, the camera is automatically switched to work at ISO 100) ■ As the film speed changes, the aperture also ...compatible with this mode. • As soon as f/4, for instance, will result in the viewfinder. (When the meter's timer switch is used with this camera, regardless of S mark in underexposure. 29 • f/8 f/11 (AF200SA: f/4 at the flash sync speed of 1/100. Set the flash mode selector...
P3 Manual
Page 41
The figure shows an example in which the subject-to-camera distance is necessary to compensate for the difference between visible light focus and infrared focus. INFRARED INDEX MARK If you focus through the viewfinder and ... is set at infinity I °°). As shown on the right, note the subject-to-camera distance on exposure control, refer to take infrared photographs using infrared film and R2 or 02 filters, it 8 CO t 10 1 1 1I1. 44 8 1 xAJ2222110011 88 55..6644 22 :nl 181cot 10mu151- 44 8 Aj 22 141 8 5.6 4 2 7 39 •...
The figure shows an example in which the subject-to-camera distance is necessary to compensate for the difference between visible light focus and infrared focus. INFRARED INDEX MARK If you focus through the viewfinder and ... is set at infinity I °°). As shown on the right, note the subject-to-camera distance on exposure control, refer to take infrared photographs using infrared film and R2 or 02 filters, it 8 CO t 10 1 1 1I1. 44 8 1 xAJ2222110011 88 55..6644 22 :nl 181cot 10mu151- 44 8 Aj 22 141 8 5.6 4 2 7 39 •...

P3 Manual
Page 46
... (in Viewfinder: Flash Synchronization: Self-Timer: Mirror: Film Loading: Film Transport: Film Counter: Film Rewind: • 44 Through-the-lens, programmed-AE 35mm SLR camera. 35mm film, 24 x 36mm. Electronically-controlled 12-second delay timer. SPECIFICATIONS Type: Film: Lens Mount: Exposure Modes: Shutter: Viewfinder: Exposure ... in 1/3 steps) with DX-coded film. Automatic film speed setting from 1 to cancell at any time. Electro-magnetic shutter release. Shows 92% of picture area at 0.82X magnification with 50mm lens at 1/100 sec. Pentax KA bayonet mount. Single-stroke rapid wind...
... (in Viewfinder: Flash Synchronization: Self-Timer: Mirror: Film Loading: Film Transport: Film Counter: Film Rewind: • 44 Through-the-lens, programmed-AE 35mm SLR camera. 35mm film, 24 x 36mm. Electronically-controlled 12-second delay timer. SPECIFICATIONS Type: Film: Lens Mount: Exposure Modes: Shutter: Viewfinder: Exposure ... in 1/3 steps) with DX-coded film. Automatic film speed setting from 1 to cancell at any time. Electro-magnetic shutter release. Shows 92% of picture area at 0.82X magnification with 50mm lens at 1/100 sec. Pentax KA bayonet mount. Single-stroke rapid wind...


