

P3 Manual
Page 3
... parts PREPARATIONS Inserting batteries Attaching and detaching lens Film wind lever Main switch, shutter release button, shutter dial Film Loading film Unloading film Strap and soft case BASIC OPERATION Viewfinder displays Focusing Holding camera Shooting in Programmed AE mode Shooting in Metered Manual mode Warning displays Using Pentax dedicated auto flash units Using Programmed Auto...
... parts PREPARATIONS Inserting batteries Attaching and detaching lens Film wind lever Main switch, shutter release button, shutter dial Film Loading film Unloading film Strap and soft case BASIC OPERATION Viewfinder displays Focusing Holding camera Shooting in Programmed AE mode Shooting in Metered Manual mode Warning displays Using Pentax dedicated auto flash units Using Programmed Auto...

P3 Manual
Page 6
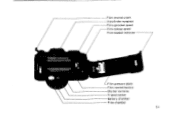
Self-timer lamp Exposure counter -\\ .' NOMENCLATURE OF WORKING PARTS Film wind lever Shutter-release button Shutter dial- Aperture "A" index-, Aperture scale/ring - • yo PE N TAX Aperture-auto lock -release button Focusing ring • 4 Hot shoe Main switch -Self-timer lever ---Film rewind knob Strap lug Memory lock button Cable-release socket Preview lever Lens lock release lever Grip
Self-timer lamp Exposure counter -\\ .' NOMENCLATURE OF WORKING PARTS Film wind lever Shutter-release button Shutter dial- Aperture "A" index-, Aperture scale/ring - • yo PE N TAX Aperture-auto lock -release button Focusing ring • 4 Hot shoe Main switch -Self-timer lever ---Film rewind knob Strap lug Memory lock button Cable-release socket Preview lever Lens lock release lever Grip
P3 Manual
Page 7
Film rewind crank Viewfinder eyepiece Film-sprocket spool Film-takeup spool Film-loaded indicator Film pressure plate Film rewind button Shutter curtains Tripod socket Battery chamber Film chamber 54
Film rewind crank Viewfinder eyepiece Film-sprocket spool Film-takeup spool Film-loaded indicator Film pressure plate Film rewind button Shutter curtains Tripod socket Battery chamber Film chamber 54

P3 Manual
Page 12
... to the original position. • 10 Exposure counter The scale is . Do not force the lever and rewind the film, leaving the lever as it goes. Even if you remove your thumb from the lever, it is indexed as follows: S• • 0 • 2 • 4 • &#...8226; 20 • . . . . 24 36. Setting the wind lever for rapid shooting The film wind lever can be set at the stand-off position for the next quick shot. Film advance stroke The film wind lever should be thrown as far as it remains at the stand-off angle, ready...
... to the original position. • 10 Exposure counter The scale is . Do not force the lever and rewind the film, leaving the lever as it goes. Even if you remove your thumb from the lever, it is indexed as follows: S• • 0 • 2 • 4 • &#...8226; 20 • . . . . 24 36. Setting the wind lever for rapid shooting The film wind lever can be set at the stand-off position for the next quick shot. Film advance stroke The film wind lever should be thrown as far as it remains at the stand-off angle, ready...
P3 Manual
Page 14
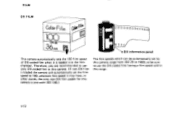
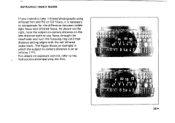
... 0 0 00 00 0 0 0 0 0 0 0 0 0 DX information panel This camera automatically sets the ISO film speed of DX-coded film when it may have; FILM DX FILM Color Film. 4C00, 105_036 3-6- in this camera. (If non-DX film is loaded the camera will automatically set by this camera range from ISO 25 to 1600, so be automatically set... the film speed to 100, whatever film speed it is one with ISO 100.) The film speeds which can be sure to use the DX-coded film having a film speed within this camera is loaded into the film chamber. Therefore, you are recommended ...
... 0 0 00 00 0 0 0 0 0 0 0 0 0 DX information panel This camera automatically sets the ISO film speed of DX-coded film when it may have; FILM DX FILM Color Film. 4C00, 105_036 3-6- in this camera. (If non-DX film is loaded the camera will automatically set by this camera range from ISO 25 to 1600, so be automatically set... the film speed to 100, whatever film speed it is one with ISO 100.) The film speeds which can be sure to use the DX-coded film having a film speed within this camera is loaded into the film chamber. Therefore, you are recommended ...
P3 Manual
Page 15
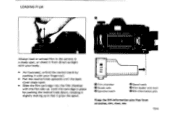
... shield it with your finger-nail. • Pull the rewind knob upwards until the back cover snaps open. • Slide the film cartridge into the film chamber with your body. • As illustrated, unfold the rewind crank by pushing it from scratches, dirt, dust, etc. 13&#...8226; LOADING FILM . • - 3 -! Always load or unload film in the camera in place by pushing the rewind knob down, rotating it slightly making sure that it grips the spool. 00000 E -p W 0 ...
... shield it with your finger-nail. • Pull the rewind knob upwards until the back cover snaps open. • Slide the film cartridge into the film chamber with your body. • As illustrated, unfold the rewind crank by pushing it from scratches, dirt, dust, etc. 13&#...8226; LOADING FILM . • - 3 -! Always load or unload film in the camera in place by pushing the rewind knob down, rotating it slightly making sure that it grips the spool. 00000 E -p W 0 ...
P3 Manual
Page 16
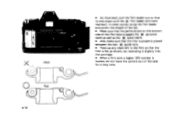
... the 0 spool teeth. • Also make sure that the film is x slack loaded, do not leave the camera out of the film have engaged the 0 sprocket 2 teeth as well as shown, by rewinding it slightly into the cartridge. • When a film with a higher ISO number is properly placed 4 between the two... guide rails. 3 • Take up any slack left in the film so that 00 I its end aligns with the film leader end mark (red bar); in other words, bring the film leader end within the length of the bar. • Make sure that the perforations on the...
... the 0 spool teeth. • Also make sure that the film is x slack loaded, do not leave the camera out of the film have engaged the 0 sprocket 2 teeth as well as shown, by rewinding it slightly into the cartridge. • When a film with a higher ISO number is properly placed 4 between the two... guide rails. 3 • Take up any slack left in the film so that 00 I its end aligns with the film leader end mark (red bar); in other words, bring the film leader end within the length of the bar. • Make sure that the perforations on the...

P3 Manual
Page 17
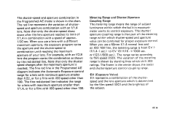
• Close the back cover, making sure that it has snapped firmly in place. • Cock the film wind lever while checking to see if the film rewind knob turns in the direction of the arrow. • Repeat making blank exposures until "0" appears in the exposure counter. The next frame is ready for the first shot. • The film-loaded indicator on the back cover will tell you if the film is loaded or not. 15•
• Close the back cover, making sure that it has snapped firmly in place. • Cock the film wind lever while checking to see if the film rewind knob turns in the direction of the arrow. • Repeat making blank exposures until "0" appears in the exposure counter. The next frame is ready for the first shot. • The film-loaded indicator on the back cover will tell you if the film is loaded or not. 15•
P3 Manual
Page 18
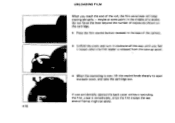
... camera. • Unfold the crank and turn it clockwise all the way until you accidentally opened the back cover without rewinding the film, close it loosen when the film leader is released from the take-up spool. • When the rewinding is over, lift the rewind knob sharply to open the... force the lever beyond the number of exposures shown on the cartridge. • Press the film rewind button recessed in the middle of the roll, the film wind lever will stop moving abruptly - If you feel it immediately, since the film except the last several frames might be saved. •16 UNLOADING...
... camera. • Unfold the crank and turn it clockwise all the way until you accidentally opened the back cover without rewinding the film, close it loosen when the film leader is released from the take-up spool. • When the rewinding is over, lift the rewind knob sharply to open the... force the lever beyond the number of exposures shown on the cartridge. • Press the film rewind button recessed in the middle of the roll, the film wind lever will stop moving abruptly - If you feel it immediately, since the film except the last several frames might be saved. •16 UNLOADING...
P3 Manual
Page 23
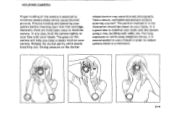
... will help you keep a steady hold the camera tightly to a minimum. / I 0 a O 21• HOLDING CAMERA Proper holding and operating your camera before inserting your first film cartridge. The grips on the shutter release button may cause blurred photographs. It is a good idea to hold the camera. Practice holding of the camera...
... will help you keep a steady hold the camera tightly to a minimum. / I 0 a O 21• HOLDING CAMERA Proper holding and operating your camera before inserting your first film cartridge. The grips on the shutter release button may cause blurred photographs. It is a good idea to hold the camera. Practice holding of the camera...

P3 Manual
Page 31
...the glowing of S mark in underexposure. 29 • The aperture is also automatically set to the AF200SA, AF240Z and AF160SA 3. USING PROGRAMMED AUTO FLASH MODE Pentax dedicated flashes can be used with this camera, regardless of 1/100. Set the flash mode selector to the Programmed AE or Metered Manual mode. 1. f/8 ...is set to AUTO (red, green or yellow). When the flash is ready, it is set to work at ISO 100) ■ As the film speed changes, the aperture also changes automatically. ■ As shown in the table, depending on . 4. Attach the flash to the camera. 2.
...the glowing of S mark in underexposure. 29 • The aperture is also automatically set to the AF200SA, AF240Z and AF160SA 3. USING PROGRAMMED AUTO FLASH MODE Pentax dedicated flashes can be used with this camera, regardless of 1/100. Set the flash mode selector to the Programmed AE or Metered Manual mode. 1. f/8 ...is set to AUTO (red, green or yellow). When the flash is ready, it is set to work at ISO 100) ■ As the film speed changes, the aperture also changes automatically. ■ As shown in the table, depending on . 4. Attach the flash to the camera. 2.

P3 Manual
Page 35
.... PE-r4 33* As you keep your eye away from extraneous light. It can be used. Caution: When using the self-timer, you cock the film wind lever and press the shutter release button, the shutter will start to show the self-timer is working.
.... PE-r4 33* As you keep your eye away from extraneous light. It can be used. Caution: When using the self-timer, you cock the film wind lever and press the shutter release button, the shutter will start to show the self-timer is working.
P3 Manual
Page 41
For details on the lens distance scale as you intend to take infrared photographs using infrared film and R2 or 02 filters, it 8 CO t 10 1 1 1I1. 44 8 1 xAJ2222110011 88 55..6644 22 :nl 181cot 10mu151- 44 8 Aj 22 141 8 5.6 4 2 7 39 • INFRARED ... is set at infinity I °°). The figure shows an example in which the subject-to-camera distance is necessary to the instructions accompanying the film. 1.
For details on the lens distance scale as you intend to take infrared photographs using infrared film and R2 or 02 filters, it 8 CO t 10 1 1 1I1. 44 8 1 xAJ2222110011 88 55..6644 22 :nl 181cot 10mu151- 44 8 Aj 22 141 8 5.6 4 2 7 39 • INFRARED ... is set at infinity I °°). The figure shows an example in which the subject-to-camera distance is necessary to the instructions accompanying the film. 1.
P3 Manual
Page 43
...aperture which shift ISO ratings. EV (Exposure Value) EV represents a combination of subject luminance within which the built-in exposuremeter works to film speed (ISO). The shutter-speed and aperture combination in the Programmed AE mode is reached. Note that only the shutter speed changes ...shown in the Programmed AE diagram indicates the Automatic Exposure control range fbr a lens with minimum aperture smaller than f/22, or for a film with a different maximum aperture, the exposure program varies the aperture and the shutter-speed in the center shows the meter and shutter/aperture...
...aperture which shift ISO ratings. EV (Exposure Value) EV represents a combination of subject luminance within which the built-in exposuremeter works to film speed (ISO). The shutter-speed and aperture combination in the Programmed AE mode is reached. Note that only the shutter speed changes ...shown in the Programmed AE diagram indicates the Automatic Exposure control range fbr a lens with minimum aperture smaller than f/22, or for a film with a different maximum aperture, the exposure program varies the aperture and the shutter-speed in the center shows the meter and shutter/aperture...

P3 Manual
Page 46
...at 4Hz.) Hot shoe (X -Sync contact, dedicated flash contacts), X -Sync at infinity. -1 diopter eyepiece. Easy loading type. Pentax KA bayonet mount. Programmed AE, Metered Manual and Programmed Auto Flash. Possible to "1"). Back -swing type instant-return mirror. orange for... "1000" to 1600 (in Viewfinder: Flash Synchronization: Self-Timer: Mirror: Film Loading: Film Transport: Film Counter: Film Rewind: • 44 Through-the-lens, programmed-AE 35mm SLR camera. 35mm film, 24 x 36mm. Crank type. LED indicators for " S " (flash ready), "P" (...
...at 4Hz.) Hot shoe (X -Sync contact, dedicated flash contacts), X -Sync at infinity. -1 diopter eyepiece. Easy loading type. Pentax KA bayonet mount. Programmed AE, Metered Manual and Programmed Auto Flash. Possible to "1"). Back -swing type instant-return mirror. orange for... "1000" to 1600 (in Viewfinder: Flash Synchronization: Self-Timer: Mirror: Film Loading: Film Transport: Film Counter: Film Rewind: • 44 Through-the-lens, programmed-AE 35mm SLR camera. 35mm film, 24 x 36mm. Crank type. LED indicators for " S " (flash ready), "P" (...
P3 Manual
Page 47
EV 18 (f/16, 1/1000 sec.) with GPD cell. When batteries exhausted, LEDs go blank and shutter locks. EV 1 (f/1.4, 1 sec.) - When batteries grow weak, LED flashes. Two 1.5-volt silver-oxide or alkaline mini-batteries. 137(W) x 87.5(H) x 50.5(D)mm (5.3" x 3.4" x 2.0"), 510g (17.9 oz.) without batteries. 45. With the exposure memory lock button. Exposure Metering: Metering Range: Exposure Memory Lock: Battery Warning: Power Source: Size & Weight: Open-aperture, TTL center-weighted, average area metering system with 50mm f/1.4 lens and ISO 100 film.
EV 18 (f/16, 1/1000 sec.) with GPD cell. When batteries exhausted, LEDs go blank and shutter locks. EV 1 (f/1.4, 1 sec.) - When batteries grow weak, LED flashes. Two 1.5-volt silver-oxide or alkaline mini-batteries. 137(W) x 87.5(H) x 50.5(D)mm (5.3" x 3.4" x 2.0"), 510g (17.9 oz.) without batteries. 45. With the exposure memory lock button. Exposure Metering: Metering Range: Exposure Memory Lock: Battery Warning: Power Source: Size & Weight: Open-aperture, TTL center-weighted, average area metering system with 50mm f/1.4 lens and ISO 100 film.


