
MV-1 Manual
Page 3
.../Memo holder 11 Aperture setting 13 Shooting on AUTO 14 -The "100X" and "B" settings 16 Focusing and composing 17 Holding the camera 18 Unloading film 19 Auto flash photography (AF 200S) 20 Other flash units 21 Shooting pointers 22 • -Optimum apertures 22 • Stopping the action 22 • Depth ...
.../Memo holder 11 Aperture setting 13 Shooting on AUTO 14 -The "100X" and "B" settings 16 Focusing and composing 17 Holding the camera 18 Unloading film 19 Auto flash photography (AF 200S) 20 Other flash units 21 Shooting pointers 22 • -Optimum apertures 22 • Stopping the action 22 • Depth ...

MV-1 Manual
Page 4
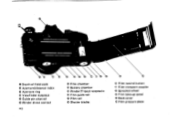
indicator dial O Film rewind crank 0 Film rewind knob/back cover release 0 Lens release lever O Self-timer lever ID Lens alignment node 0 Focusing ring 2• DESCRIPTION OF PARTS 1 1 5 6 7 B 9 9) U •2 F l'JIL\X 1 • O Neck strap ring O Exposure counter 0 Shutter release button O Exposure mode dial 0 Rapid-wind lever O Exposure modes .3 14 15 16 17 19 O Hot shoe 0 Auto flash contact 0 ASA film speed ring O Exposure-compensation-
indicator dial O Film rewind crank 0 Film rewind knob/back cover release 0 Lens release lever O Self-timer lever ID Lens alignment node 0 Focusing ring 2• DESCRIPTION OF PARTS 1 1 5 6 7 B 9 9) U •2 F l'JIL\X 1 • O Neck strap ring O Exposure counter 0 Shutter release button O Exposure mode dial 0 Rapid-wind lever O Exposure modes .3 14 15 16 17 19 O Hot shoe 0 Auto flash contact 0 ASA film speed ring O Exposure-compensation-
MV-1 Manual
Page 5
20 • 0 Depth-of-field scale 0 Aperture/distance index O Aperture ring 0 Viewfinder eyepiece 0 Guide pin channel Winder direct contact •3 Film chamber 0 Battery chamber Winder/Tripod receptacle 0 Film guide rail 0 Film rail ED Shutter blades Film rewind button O Film transport coupler 0 Sprocket wheel 0 Film take-up spool 0 Back cover Film pressure plate
20 • 0 Depth-of-field scale 0 Aperture/distance index O Aperture ring 0 Viewfinder eyepiece 0 Guide pin channel Winder direct contact •3 Film chamber 0 Battery chamber Winder/Tripod receptacle 0 Film guide rail 0 Film rail ED Shutter blades Film rewind button O Film transport coupler 0 Sprocket wheel 0 Film take-up spool 0 Back cover Film pressure plate
MV-1 Manual
Page 6
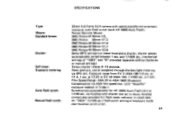
... camera with aperture-preferred automatic exposure, auto flash synch (with shutter dial set to ASA 1600 (Exposure Compensation via ASA film speed dial. Open aperture, center-weighted through-the-lens light metering via hotshoe with AF 200S Auto Flash). at manual ... at f/22). at f/2.8) to EV 19 (ASA 100, 1/1000 sec. Film Speed Range: ASA 25 to Auto; at f/1.4, 1 sec. Pentax Bayonet Mount SMC Pentax-M 50mm f/2, SMC Pentax 50mm f/1.2 SMC Pentax-M 50mm f/1.4 SMC Pentax-M 50mm f/1.7 SMC Pentax-M 40mm f/2.8 Seiko MFC vertical-run metal focal-plane shutter; hotshoe contact also ...
... camera with aperture-preferred automatic exposure, auto flash synch (with shutter dial set to ASA 1600 (Exposure Compensation via ASA film speed dial. Open aperture, center-weighted through-the-lens light metering via hotshoe with AF 200S Auto Flash). at manual ... at f/22). at f/2.8) to EV 19 (ASA 100, 1/1000 sec. Film Speed Range: ASA 25 to Auto; at f/1.4, 1 sec. Pentax Bayonet Mount SMC Pentax-M 50mm f/2, SMC Pentax 50mm f/1.2 SMC Pentax-M 50mm f/1.4 SMC Pentax-M 50mm f/1.7 SMC Pentax-M 40mm f/2.8 Seiko MFC vertical-run metal focal-plane shutter; hotshoe contact also ...

MV-1 Manual
Page 7
...: Mirror and diaphragm: Film wind and rewind: Automatic winder. Three LED Stop/Go indicator system. Red: overexposure; Green: Adequate exposure for handheld shooting (1/1000 - 1/30 sec.) Yellow: Slow Exposure Warning (below 1/30 sec., inadequate for winding comfort, 135° advance with 30O rest setting. Automatic reset, additive type. MV 1 camera body accepts...
...: Mirror and diaphragm: Film wind and rewind: Automatic winder. Three LED Stop/Go indicator system. Red: overexposure; Green: Adequate exposure for handheld shooting (1/1000 - 1/30 sec.) Yellow: Slow Exposure Warning (below 1/30 sec., inadequate for winding comfort, 135° advance with 30O rest setting. Automatic reset, additive type. MV 1 camera body accepts...

MV-1 Manual
Page 8
... only front-elementdown, never front -element-up. Insert the lens into the body and turn and lock as above. 4 To detach, hold the camera with film in the camera, avoid direct sunlight. 6• When changing lenses outdoors with your right hand.
... only front-elementdown, never front -element-up. Insert the lens into the body and turn and lock as above. 4 To detach, hold the camera with film in the camera, avoid direct sunlight. 6• When changing lenses outdoors with your right hand.

MV-1 Manual
Page 10
Set the ASA film speed. (Page 11) 3. Focus and compose the picture by turning the focusing ring while sighting through the viewfinder. (Page 17). 8• BASIC OPERATING INSTRUCTIONS 1. Preselect the aperture. (Page 13) 4 Set the exposure mode dial to the first exposure. (Page 1O) 2. Load the film into your camera and advance it to AUTO. (Page 14). 5.
Set the ASA film speed. (Page 11) 3. Focus and compose the picture by turning the focusing ring while sighting through the viewfinder. (Page 17). 8• BASIC OPERATING INSTRUCTIONS 1. Preselect the aperture. (Page 13) 4 Set the exposure mode dial to the first exposure. (Page 1O) 2. Load the film into your camera and advance it to AUTO. (Page 14). 5.

MV-1 Manual
Page 12
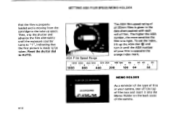
... white pins surrounding the film take-up the film rewind knob until both top and bottom sprockets engage the film perforations 0 . Advance the rapid-wind lever and confirm that the film rewind knob (..7.. ) turns counterclockwise, indicating 10• Note: You may also advance the film to the first exposure... the lens cap and point the camera toward the light. Before loading and winding the film, set to 100X. But, in the film chamber, and push down the rewind knob. Advance the film by alternately advancing the rapidwind lever and depressing the shutter button until the back opens. ...
... white pins surrounding the film take-up the film rewind knob until both top and bottom sprockets engage the film perforations 0 . Advance the rapid-wind lever and confirm that the film rewind knob (..7.. ) turns counterclockwise, indicating 10• Note: You may also advance the film to the first exposure... the lens cap and point the camera toward the light. Before loading and winding the film, set to 100X. But, in the film chamber, and push down the rewind knob. Advance the film by alternately advancing the rapidwind lever and depressing the shutter button until the back opens. ...
MV-1 Manual
Page 13
... opposite the orange index mark. 1250 1000 640 500 320 250 180 125 80 50 40 25 I I MIII -MN11 ASA Film Speed Range The ASA film speed rating of all 35mm films is given in your camera, tear off the top of the camera. • 11 To set the index, lift up spool.... The higher the ASA number, the more sensitive the film is to the take-up the ASA dial 40 and turn it into the Memo Holder on the back cover of...
... opposite the orange index mark. 1250 1000 640 500 320 250 180 125 80 50 40 25 I I MIII -MN11 ASA Film Speed Range The ASA film speed rating of all 35mm films is given in your camera, tear off the top of the camera. • 11 To set the index, lift up spool.... The higher the ASA number, the more sensitive the film is to the take-up the ASA dial 40 and turn it into the Memo Holder on the back cover of...
MV-1 Manual
Page 16
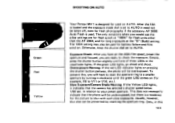
... also can be used for battery failure and film wind on AUTO. Slow Exposure/Camera Shake Warning: If the Yellow LED lights, it need not be taken off, even for long exposures at the "B" (Bulb) setting. Orson Red Yellow SHOOTING ON AUTO Your Pentax MV 1 is designed for used on . Otherwise, keep... the shutter dial set to AUTO. After the film is loaded and the exposure mode dial is set to AUTO it indicates that the photo will be...
... also can be used for battery failure and film wind on AUTO. Slow Exposure/Camera Shake Warning: If the Yellow LED lights, it need not be taken off, even for long exposures at the "B" (Bulb) setting. Orson Red Yellow SHOOTING ON AUTO Your Pentax MV 1 is designed for used on . Otherwise, keep... the shutter dial set to AUTO. After the film is loaded and the exposure mode dial is set to AUTO it indicates that the photo will be...
MV-1 Manual
Page 18
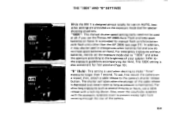
...with a locking device. •• Mx° B 100X THE "100X" AND "B" SETTINGS While the MV 1 is designed almost totally for use on AUTO, two other than 1 second. In addition, it may ... batteries fail and you use , first mount the camera on (Page 10). To use the Pentax AF 200S Auto Flash and keep spare batteries on hand. For emergency exposures without batteries, merely... for manual flash synchronization with flash units other settings are provided on the exposure mode dial for film wind on a tripod, then, attach a cable release to prevent excess light from entering through ...
...with a locking device. •• Mx° B 100X THE "100X" AND "B" SETTINGS While the MV 1 is designed almost totally for use on AUTO, two other than 1 second. In addition, it may ... batteries fail and you use , first mount the camera on (Page 10). To use the Pentax AF 200S Auto Flash and keep spare batteries on hand. For emergency exposures without batteries, merely... for manual flash synchronization with flash units other settings are provided on the exposure mode dial for film wind on a tripod, then, attach a cable release to prevent excess light from entering through ...

MV-1 Manual
Page 21
... the last picture on the crank lessens, indicating that the film must be rewound. (Caution: do not try to rewind the film into its cartridge. AVOID DIRECT LIGHT WHEN UNLOADING THE FILM. ASP 31.ge, • A.: • 19 Rewind until the tension on the roll has been taken, the rapid-wind ...lever will open automatically), and remove the film cartridge. Depress the film rewind button Q and turn the rewind crank as indicated to force the lever any further.) Fold out the rewind crank. Pull out the...
... the last picture on the crank lessens, indicating that the film must be rewound. (Caution: do not try to rewind the film into its cartridge. AVOID DIRECT LIGHT WHEN UNLOADING THE FILM. ASP 31.ge, • A.: • 19 Rewind until the tension on the roll has been taken, the rapid-wind ...lever will open automatically), and remove the film cartridge. Depress the film rewind button Q and turn the rewind crank as indicated to force the lever any further.) Fold out the rewind crank. Pull out the...
MV-1 Manual
Page 26
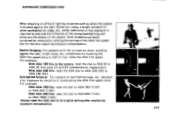
...2X) or ASA 1600 (1/4X) Always reset the ASA dial to ASA 200 (1/2X) or ASA 400 (1/4X). For example: With ASA 100 film: reset the dial to its original setting after employing exposure compensation. 24• Spotlighted Subjects: For subjects on stage, etc., either additional or less ...exposure is required to override the influence of the strong backlighting and bring out the details of the ASA film speed dial for the shot requiring exposure compensation. Backlit Subjects: For subjects with the sun behind them, standing against the light (direct sun, ...
...2X) or ASA 1600 (1/4X) Always reset the ASA dial to ASA 200 (1/2X) or ASA 400 (1/4X). For example: With ASA 100 film: reset the dial to its original setting after employing exposure compensation. 24• Spotlighted Subjects: For subjects on stage, etc., either additional or less ...exposure is required to override the influence of the strong backlighting and bring out the details of the ASA film speed dial for the shot requiring exposure compensation. Backlit Subjects: For subjects with the sun behind them, standing against the light (direct sun, ...

MV-1 Manual
Page 27
... with your finger until the index mark of the exposure compensation dial aligns with the ASA index mark and the ASA number of the film loaded in place and take the picture. For 2X compensation: To the first dot on the plus side (Illust.®). For 4X ... WHEN COMPENSATION IS NO LONGER REQUIRED. • 25 0 0 s. Exposure-Compensation-Indicator Dial: You may also use the exposure-compensation-indicator dial located under the film rewind crank as a guide for exposure compensation. For 1/4X compensation: Second dot on the minus side. o • N. 32- When properly aligned, lift ...
... with your finger until the index mark of the exposure compensation dial aligns with the ASA index mark and the ASA number of the film loaded in place and take the picture. For 2X compensation: To the first dot on the plus side (Illust.®). For 4X ... WHEN COMPENSATION IS NO LONGER REQUIRED. • 25 0 0 s. Exposure-Compensation-Indicator Dial: You may also use the exposure-compensation-indicator dial located under the film rewind crank as a guide for exposure compensation. For 1/4X compensation: Second dot on the minus side. o • N. 32- When properly aligned, lift ...

MV-1 Manual
Page 30
...the lever counterclockwise until it stops. For deliberate multiple exposures, make the second exposure. Depress the film rewind button 0 and advance the rapid-wind lever. This cocks the shutter without advancing the film. As the exposure counter continues to function each time the shutter is advanced. To start, push... up slightly on the self-timer lever. L a NMI 28* Then tighten the film by turning the rewind knob 0 , and keep hold of the shutter 4-10 seconds, depending upon how far the self-timer lever is cocked, a...
...the lever counterclockwise until it stops. For deliberate multiple exposures, make the second exposure. Depress the film rewind button 0 and advance the rapid-wind lever. This cocks the shutter without advancing the film. As the exposure counter continues to function each time the shutter is advanced. To start, push... up slightly on the self-timer lever. L a NMI 28* Then tighten the film by turning the rewind knob 0 , and keep hold of the shutter 4-10 seconds, depending upon how far the self-timer lever is cocked, a...

MV-1 Manual
Page 31
... in focus at infinity, turn the focusing ring and move the infinity too) mark to use the infra-red mark indicated with infra-red color film. Then determine the subject-to the infra-red mark by turning the focusing ring accordingly. First, bring your subject-to-camera distance to -camera distance...
... in focus at infinity, turn the focusing ring and move the infinity too) mark to use the infra-red mark indicated with infra-red color film. Then determine the subject-to the infra-red mark by turning the focusing ring accordingly. First, bring your subject-to-camera distance to -camera distance...


