
MV-1 Manual
Page 3
CONTENTS Description of parts 2 Specifications 4 Lens mounting - 6 Inserting batteries 7 Basic operating instructions 8 Film loading and winding 10 Setting ASA film speed/Memo holder 11 Aperture setting 13 Shooting on AUTO 14 -...
CONTENTS Description of parts 2 Specifications 4 Lens mounting - 6 Inserting batteries 7 Basic operating instructions 8 Film loading and winding 10 Setting ASA film speed/Memo holder 11 Aperture setting 13 Shooting on AUTO 14 -...

MV-1 Manual
Page 4
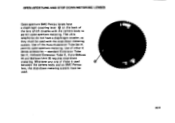
indicator dial O Film rewind crank 0 Film rewind knob/back cover release 0 Lens release lever O Self-timer lever ID Lens alignment node 0 Focusing ring 2• DESCRIPTION OF PARTS 1 1 5 6 7 B 9 9) U •2 F l'JIL\X 1 • O Neck strap ring O Exposure counter 0 Shutter release button O Exposure mode dial 0 Rapid-wind lever O Exposure modes .3 14 15 16 17 19 O Hot shoe 0 Auto flash contact 0 ASA film speed ring O Exposure-compensation-
indicator dial O Film rewind crank 0 Film rewind knob/back cover release 0 Lens release lever O Self-timer lever ID Lens alignment node 0 Focusing ring 2• DESCRIPTION OF PARTS 1 1 5 6 7 B 9 9) U •2 F l'JIL\X 1 • O Neck strap ring O Exposure counter 0 Shutter release button O Exposure mode dial 0 Rapid-wind lever O Exposure modes .3 14 15 16 17 19 O Hot shoe 0 Auto flash contact 0 ASA film speed ring O Exposure-compensation-
MV-1 Manual
Page 6
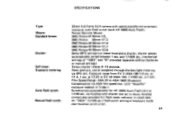
... aperture, center-weighted through-the-lens light metering via ASA film speed dial. Exposure range from EV 3 (ASA 100 1/4 sec. Film Speed Range: ASA 25 to Auto; SPECIFICATIONS Type: Mount: Standard lenses: Shutter: Self-timer. Pentax Bayonet Mount SMC Pentax-M 50mm f/2, SMC Pentax 50mm f/1.2 SMC Pentax-M 50mm f/1.4 SMC Pentax-M 50mm f/1.7 SMC Pentax-M 40mm f/2.8 Seiko MFC vertical-run...
... aperture, center-weighted through-the-lens light metering via ASA film speed dial. Exposure range from EV 3 (ASA 100 1/4 sec. Film Speed Range: ASA 25 to Auto; SPECIFICATIONS Type: Mount: Standard lenses: Shutter: Self-timer. Pentax Bayonet Mount SMC Pentax-M 50mm f/2, SMC Pentax 50mm f/1.2 SMC Pentax-M 50mm f/1.4 SMC Pentax-M 50mm f/1.7 SMC Pentax-M 40mm f/2.8 Seiko MFC vertical-run...

MV-1 Manual
Page 7
... diaphragm: Film wind and rewind: Automatic winder. Film loading: Exposure counter: Battery: Back cover: Body size: Body weight Aluminum-coated pentaprism finder with 50mm lens; -1.0 diopter eyepiece. MV 1 camera body accepts Winder ME with both single-frame and consecutive automatic film winding capability; in consecutive mode. Red: overexposure; Three LED Stop/Go...
... diaphragm: Film wind and rewind: Automatic winder. Film loading: Exposure counter: Battery: Back cover: Body size: Body weight Aluminum-coated pentaprism finder with 50mm lens; -1.0 diopter eyepiece. MV 1 camera body accepts Winder ME with both single-frame and consecutive automatic film winding capability; in consecutive mode. Red: overexposure; Three LED Stop/Go...

MV-1 Manual
Page 8
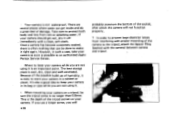
... with a click. NOTE If you have to see, align the raised white node 0 on the lens. Depress e the lens release lever while turning the lens counterclockwise with your left hand. When changing lenses outdoors with film in the camera, avoid direct sunlight. 6• Then turn it only front...-elementdown, never front -element-up. Insert the lens into the body and turn and lock as above. 4 To detach, hold the camera with your right hand. 0 p • a C II ' LENS MOUNTING Remove the rear lens and body mount covers Match the red dot 0 on the camera body ...
... with a click. NOTE If you have to see, align the raised white node 0 on the lens. Depress e the lens release lever while turning the lens counterclockwise with your left hand. When changing lenses outdoors with film in the camera, avoid direct sunlight. 6• Then turn it only front...-elementdown, never front -element-up. Insert the lens into the body and turn and lock as above. 4 To detach, hold the camera with your right hand. 0 p • a C II ' LENS MOUNTING Remove the rear lens and body mount covers Match the red dot 0 on the camera body ...

MV-1 Manual
Page 11
... the green light comes on AUTO, the shutter speed will light in use. *9 Green Go ahead and ShoOt Red use a smaller aperture Yellow O use a wider lens aperture (f/4 to f/11, f/16, etc. or • use a'tilpi0d etc'.; If the LED still does not change to green, 0 mount the camera on a tripod etc...
... the green light comes on AUTO, the shutter speed will light in use. *9 Green Go ahead and ShoOt Red use a smaller aperture Yellow O use a wider lens aperture (f/4 to f/11, f/16, etc. or • use a'tilpi0d etc'.; If the LED still does not change to green, 0 mount the camera on a tripod etc...

MV-1 Manual
Page 12
... . Before loading and winding the film, set to the first exposure. If film advance is performed on AUTO without -41 B removing the lens cap, inordinately long exposures will result, hindering film advance. 2. Advance the film by alternately advancing the rapidwind lever and depressing the shutter button... until after closing the back cover, you must remove the lens cap and point the camera toward the light. FILM LOADING AND WINDING Avoid direct light when loading your film. 'OW 1. Advance the...
... . Before loading and winding the film, set to the first exposure. If film advance is performed on AUTO without -41 B removing the lens cap, inordinately long exposures will result, hindering film advance. 2. Advance the film by alternately advancing the rapidwind lever and depressing the shutter button... until after closing the back cover, you must remove the lens cap and point the camera toward the light. FILM LOADING AND WINDING Avoid direct light when loading your film. 'OW 1. Advance the...

MV-1 Manual
Page 15
...11 f/4 f/5.6 f/1.2 ^ f/2.8 The above is highly useful for most of your subject by throwing the background and foreground out of the lens and preselect the lens aperture (also called f-number) in accordance with shooting conditions as highlighting your photographs, as the green LED in the viewfinder lights. If...accordance with the instructions given on the following page. Although the above is a rough guide that is all you may want to vary the lens aperture for snapshots and scenery. Rotate the aperture ring of focus by using wider apertures, etc. :: 1611 8 ,s t 212 •...
...11 f/4 f/5.6 f/1.2 ^ f/2.8 The above is highly useful for most of your subject by throwing the background and foreground out of the lens and preselect the lens aperture (also called f-number) in accordance with shooting conditions as highlighting your photographs, as the green LED in the viewfinder lights. If...accordance with the instructions given on the following page. Although the above is a rough guide that is all you may want to vary the lens aperture for snapshots and scenery. Rotate the aperture ring of focus by using wider apertures, etc. :: 1611 8 ,s t 212 •...

MV-1 Manual
Page 17
... the shutter dial to 100X. For example, if it is set at any time without your eye to f/4, f/2, etc. Page 20, 21 Because the MV 1 auto exposure system selects the shutter speed for you need to know about exposure control for better results in difficult lighting, shooting against the light... AUTO with the accessory Finder Cap; After closing the shutter, be quickly closed by turning it to the viewfinder eyepiece, cover the eyepiece with the lens cap on , even after you use in abnormally long exposure. Use a tripod - To correct this, the shutter can be sure to reset the shutter ...
... the shutter dial to 100X. For example, if it is set at any time without your eye to f/4, f/2, etc. Page 20, 21 Because the MV 1 auto exposure system selects the shutter speed for you need to know about exposure control for better results in difficult lighting, shooting against the light... AUTO with the accessory Finder Cap; After closing the shutter, be quickly closed by turning it to the viewfinder eyepiece, cover the eyepiece with the lens cap on , even after you use in abnormally long exposure. Use a tripod - To correct this, the shutter can be sure to reset the shutter ...

MV-1 Manual
Page 19
... the image comes in clear in the split-image circle at the center align as one. For precise focus, turn the focusing ring of your MV 1 is a split-image type surrounded by 1 turning the focusing ring until the glitter disappears from inside the collar. If you find focusing with the split... than the center spot when using telephoto lenses having a small maximum aperture. • 17 FOCUSING AND COMPOSING The focusing screen inside the viewfinder of the lens until the two images in the overall viewfinder field.
... the image comes in clear in the split-image circle at the center align as one. For precise focus, turn the focusing ring of your MV 1 is a split-image type surrounded by 1 turning the focusing ring until the glitter disappears from inside the collar. If you find focusing with the split... than the center spot when using telephoto lenses having a small maximum aperture. • 17 FOCUSING AND COMPOSING The focusing screen inside the viewfinder of the lens until the two images in the overall viewfinder field.
MV-1 Manual
Page 22
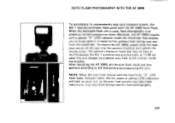
.... The camera's exposure mode dial may be disregarded for flash photography. 20• After mounting the AF 200S, set the auto flash mode and lens aperture according to fire, without even taking your eye from the viewfinder. To mount the AF 200S, simply slide the flashshoe mount all the way... enables you to know when it is as simple as the auto flash system overrides these indications, they should be kept at AUTO because the MV 1 synchronizes automatically at 1/100 sec. Moreover, the AF 200S couples with the AF 200S Auto Flash. AUTO FLASH PHOTOGRAPHY WITH THE AF 200S 0 I x X To...
.... The camera's exposure mode dial may be disregarded for flash photography. 20• After mounting the AF 200S, set the auto flash mode and lens aperture according to fire, without even taking your eye from the viewfinder. To mount the AF 200S, simply slide the flashshoe mount all the way... enables you to know when it is as simple as the auto flash system overrides these indications, they should be kept at AUTO because the MV 1 synchronizes automatically at 1/100 sec. Moreover, the AF 200S couples with the AF 200S Auto Flash. AUTO FLASH PHOTOGRAPHY WITH THE AF 200S 0 I x X To...
MV-1 Manual
Page 24
...and to obtain certain special effects, it will be used as long as such, is necessary to stop the action by using a wide lens aperture where the red LED does not come on auto are all you need to know to obtain successful results for most all your ... guide listed on page 13 is sufficient for most shooting • purposes and correct exposure will freeze the subject 224. However, the MV 1 is a sophisticated single-lens-reflex camera and, as the green LED continues to obtain better results in difficult lighting situations, produce special focusing effects, stop the action...
...and to obtain certain special effects, it will be used as long as such, is necessary to stop the action by using a wide lens aperture where the red LED does not come on auto are all you need to know to obtain successful results for most all your ... guide listed on page 13 is sufficient for most shooting • purposes and correct exposure will freeze the subject 224. However, the MV 1 is a sophisticated single-lens-reflex camera and, as the green LED continues to obtain better results in difficult lighting situations, produce special focusing effects, stop the action...

MV-1 Manual
Page 25
...Thus, if you desire both your subject and background to be in focus, use a small aperture such as the lens is stop down to the depth-of and behind your lens. Small apertures are also useful for this effect by if you remember the following. A shallow depth of field produces ...: The depth of -Field Control: Depending upon which highlights your subject. Out-of-focus highlights: The depth of field becomes progressively shallower at wide lens apertures, and is known as low lighting necessitates a slow shutter speed.) Depth-of field becomes progressively deeper as f/11 and f/16 (if the ...
...Thus, if you desire both your subject and background to be in focus, use a small aperture such as the lens is stop down to the depth-of and behind your lens. Small apertures are also useful for this effect by if you remember the following. A shallow depth of field produces ...: The depth of -Field Control: Depending upon which highlights your subject. Out-of-focus highlights: The depth of field becomes progressively shallower at wide lens apertures, and is known as low lighting necessitates a slow shutter speed.) Depth-of field becomes progressively deeper as f/11 and f/16 (if the ...

MV-1 Manual
Page 28
... is to 7m is the range between the nearest and farthest distances which are in -focus distance for different lens aperture. For example, if a lens opening . For the depth of field at that is, the lens is at a certain aperture, focus on a subject 5 meters away. The calibrations on the... different apertures and distances, refer to the diaphragm setting and indicate the range of in focus at the depth-of f/4 is set at 5 meters; that lens opening of -field scale on each side of the distance index correspond to the next page. 7 6 5 4 3 2 1 0 Distance (m) 26* DEPTH-OF-FIELD ...
... is to 7m is the range between the nearest and farthest distances which are in -focus distance for different lens aperture. For example, if a lens opening . For the depth of field at that is, the lens is at a certain aperture, focus on a subject 5 meters away. The calibrations on the... different apertures and distances, refer to the diaphragm setting and indicate the range of in focus at the depth-of f/4 is set at 5 meters; that lens opening of -field scale on each side of the distance index correspond to the next page. 7 6 5 4 3 2 1 0 Distance (m) 26* DEPTH-OF-FIELD ...

MV-1 Manual
Page 31
...-camera distance to the infra-red mark. • NOTE: An infra-red focusing adjustment is not required when working with an orange line on the lens. For instance, if your subject into sharp focus. INFRA-RED PHOTOGRAPHY If you intend to take infra-red photographs, remember to -camera distance from the...
...-camera distance to the infra-red mark. • NOTE: An infra-red focusing adjustment is not required when working with an orange line on the lens. For instance, if your subject into sharp focus. INFRA-RED PHOTOGRAPHY If you intend to take infra-red photographs, remember to -camera distance from the...

MV-1 Manual
Page 32
..., the automatic diaphragm will not function. 2 Full-aperture metering lenses will function as stop-down metering lenses. To remove the lens, leaving the Mount Adapter K attached to the camera body by attaching them first to a Mount Adaptor K. Attach the Adapter.../lens unit to the camera body, simply unscrew the lens counterclockwise. Other screw- 4P - ....-"- --------7 30• However, when Adaptor K is used, the following is true. USING SCREW-MOUNT TAKUMAR ...
..., the automatic diaphragm will not function. 2 Full-aperture metering lenses will function as stop-down metering lenses. To remove the lens, leaving the Mount Adapter K attached to the camera body by attaching them first to a Mount Adaptor K. Attach the Adapter.../lens unit to the camera body, simply unscrew the lens counterclockwise. Other screw- 4P - ....-"- --------7 30• However, when Adaptor K is used, the following is true. USING SCREW-MOUNT TAKUMAR ...

MV-1 Manual
Page 33
Turn the Mount Adaptor K counterclockwise until you feel it release, and take it out. 3. Since the mechanism for locking in the Mount Adapter K is totally different from the camera body, first remove the screw-mount lens. mount Takumar lenses can then be attached in an SMC Pentax bayonet-mount lens, the lens release lever C) on the camera body plays no part at all. •31 Then press, with your thumbnail or a pointed object such as a ballpoint pen, against the spring pin @. 2. To remove the Mount Adaptor K from that which locks in the normal way. 1. I A E rsi-r.a.
Turn the Mount Adaptor K counterclockwise until you feel it release, and take it out. 3. Since the mechanism for locking in the Mount Adapter K is totally different from the camera body, first remove the screw-mount lens. mount Takumar lenses can then be attached in an SMC Pentax bayonet-mount lens, the lens release lever C) on the camera body plays no part at all. •31 Then press, with your thumbnail or a pointed object such as a ballpoint pen, against the spring pin @. 2. To remove the Mount Adaptor K from that which locks in the normal way. 1. I A E rsi-r.a.
MV-1 Manual
Page 34
... -down metering. The ultra telephotos do not have a diaphragm coupling lever Q on the back of these is used A between the camera body and an SMC Pentax lens, the stop-down metering system must be used with the camera body to permit open -aperture metering. standard Extension Tube Set K, Helicoid Extension Tube K, Auto...-Bellows M and Bellows Unit III requires stop -down metering system. Use of other K Series accessories - OPEN-APERTURE AND STOP-DOWN METERING LENSES Open-aperture SMC Pentax lenses have a diaphragm coupler, so they must be used . 320
... -down metering. The ultra telephotos do not have a diaphragm coupling lever Q on the back of these is used A between the camera body and an SMC Pentax lens, the stop-down metering system must be used with the camera body to permit open -aperture metering. standard Extension Tube Set K, Helicoid Extension Tube K, Auto...-Bellows M and Bellows Unit III requires stop -down metering system. Use of other K Series accessories - OPEN-APERTURE AND STOP-DOWN METERING LENSES Open-aperture SMC Pentax lenses have a diaphragm coupler, so they must be used . 320

MV-1 Manual
Page 36
...all moisture completely. Smudges, such as possible. Never touch the mirror or the shutter leaves. but be carefully wiped away with either lens tissue or a clean, soft cloth. Accidents or rough handling can easily damage the internal mechanism, even though externally nothing seems to... wipe off granular dirt or dust - CAMERA MAINTENANCE Pr .rI. Commercial lens cleaners are particularly good for this. Do not try to have already been washed a few times are also effective. a I I II 11 I...
...all moisture completely. Smudges, such as possible. Never touch the mirror or the shutter leaves. but be carefully wiped away with either lens tissue or a clean, soft cloth. Accidents or rough handling can easily damage the internal mechanism, even though externally nothing seems to... wipe off granular dirt or dust - CAMERA MAINTENANCE Pr .rI. Commercial lens cleaners are particularly good for this. Do not try to have already been washed a few times are also effective. a I I II 11 I...
MV-1 Manual
Page 37
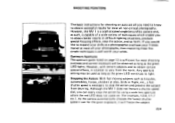
... with the camera) between camera and tripod. There are several places where water can be sure the tripod screw is risky to an authorized Asahi Pentax Service Center. Once a camera has become competely soaked, there is cool, dry, clean and well-ventilated. Because of the possible build up of damage. ... a longer screw, you are not using it is the depth of the camera to make it right again. Take care to protect both body and lens from interfering with proper mounting of the tripod socket on a tripod, be done to the tripod, attach the Spacer Ring (packed with a clean, soft ...
... with the camera) between camera and tripod. There are several places where water can be sure the tripod screw is risky to an authorized Asahi Pentax Service Center. Once a camera has become competely soaked, there is cool, dry, clean and well-ventilated. Because of the possible build up of damage. ... a longer screw, you are not using it is the depth of the camera to make it right again. Take care to protect both body and lens from interfering with proper mounting of the tripod socket on a tripod, be done to the tripod, attach the Spacer Ring (packed with a clean, soft ...


