

KX Manual
Page 2
... difficulties resulting from other brand of Light Measurement 23 Manual Shutter Operation 24 Self-timer 24 Mirror Lock -up 25 Infra-red Photography 26 Multiple Exposure 27 Using Conventional Screw-mount Takumar Lenses 28 Open-aperture or Stop-down Metering 30 Resistance to Temperature...Camera Holding 14 Film Unloading 15 Flash Synchronization 16 Depth-of-field Preview Button and Guide 18 Depth-of-field Table: SMC Pentax 50mm Lens 19 Helpful Hints on Exposure Problems 20 Dual Preference Exposure System 21 Activating Exposure Meter 22 Shutter Button Lock 22 ...
... difficulties resulting from other brand of Light Measurement 23 Manual Shutter Operation 24 Self-timer 24 Mirror Lock -up 25 Infra-red Photography 26 Multiple Exposure 27 Using Conventional Screw-mount Takumar Lenses 28 Open-aperture or Stop-down Metering 30 Resistance to Temperature...Camera Holding 14 Film Unloading 15 Flash Synchronization 16 Depth-of-field Preview Button and Guide 18 Depth-of-field Table: SMC Pentax 50mm Lens 19 Helpful Hints on Exposure Problems 20 Dual Preference Exposure System 21 Activating Exposure Meter 22 Shutter Button Lock 22 ...
KX Manual
Page 8
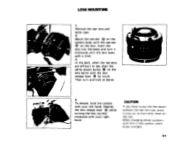
..., align the white plastic bump (9 on the rear. Insert the lens into the body and turn and lock as above. 4. In the dark, when the red dots are difficult to put the lens down without the rear lens cap, place it • C clockwise until the lens locks with the lens release... touch. Remove the rear lens and body caps. 2. Then turn it only on its front end, never on the lens barrel with a click. 3. Match the red dot 0 on the lens. When changing lenses outdoors with the red dot 0 on the It camera body with film in the camera, avoid direct sunlight. 60
..., align the white plastic bump (9 on the rear. Insert the lens into the body and turn and lock as above. 4. In the dark, when the red dots are difficult to put the lens down without the rear lens cap, place it • C clockwise until the lens locks with the lens release... touch. Remove the rear lens and body caps. 2. Then turn it only on its front end, never on the lens barrel with a click. 3. Match the red dot 0 on the lens. When changing lenses outdoors with the red dot 0 on the It camera body with film in the camera, avoid direct sunlight. 60
KX Manual
Page 10
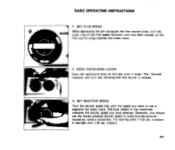
... in the viewfinder indicates the shutter speed you should use is cocked. SET FILM SPEED While depressing the pin alongside the film rewind knob, turn red, showing that the shutter is opposite the index mark. BASIC OPERATING INSTRUCTIONS $23H 1. SET SHUTTER SPEED Turn the shutter speed dial until it stops...
... in the viewfinder indicates the shutter speed you should use is cocked. SET FILM SPEED While depressing the pin alongside the film rewind knob, turn red, showing that the shutter is opposite the index mark. BASIC OPERATING INSTRUCTIONS $23H 1. SET SHUTTER SPEED Turn the shutter speed dial until it stops...
KX Manual
Page 15
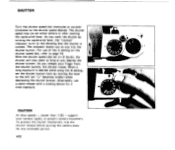
As you cock the shutter by turning the rapid-wind lever, the "cocked" indicator turns to red showing that the shutter is desired while using the B setting, set the shutter button lock by moving the lever to page 16. For use a cable ...
As you cock the shutter by turning the rapid-wind lever, the "cocked" indicator turns to red showing that the shutter is desired while using the B setting, set the shutter button lock by moving the lever to page 16. For use a cable ...
KX Manual
Page 28
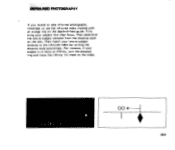
First, bring your lens-to-subject distance to the infra-red index by turning the distance scale accordingly. Then match your subject into clear focus. For instance, if your subject is in focus at infinity, turn the distance ring and move the infinity Icy/ mark to the index. Then determine the lens-to-subject distance from the distance scale on the depth-of-field guide. L. 28 00 4 26• INPRIMIED PHOTOGRAPHY If you intend to take infra-red photographs, remember to use the infra-red index marked with an orange line on the lens.
First, bring your lens-to-subject distance to the infra-red index by turning the distance scale accordingly. Then match your subject into clear focus. For instance, if your subject is in focus at infinity, turn the distance ring and move the infinity Icy/ mark to the index. Then determine the lens-to-subject distance from the distance scale on the depth-of-field guide. L. 28 00 4 26• INPRIMIED PHOTOGRAPHY If you intend to take infra-red photographs, remember to use the infra-red index marked with an orange line on the lens.
KX Manual
Page 31
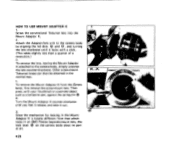
To remove the Mount Adaptor K from that which locks in an SMC Pentax bayonet-mount lens, the lock lever 0 on the camera body plays no part at all. •29 Turn the Mount Adaptor K counter-clockwise until it ... the screw-mount lens. HOW TO USE MOUNT ADAPTOR K 1. To remove the lens, leaving the Mount Adaptor K attached to the camera body by aligning the red dots 0 and 0 , and turning 4F the lens clockwise until you feel it release, and take it locks with your thumbnail or a pointed object such as...
To remove the Mount Adaptor K from that which locks in an SMC Pentax bayonet-mount lens, the lock lever 0 on the camera body plays no part at all. •29 Turn the Mount Adaptor K counter-clockwise until it ... the screw-mount lens. HOW TO USE MOUNT ADAPTOR K 1. To remove the lens, leaving the Mount Adaptor K attached to the camera body by aligning the red dots 0 and 0 , and turning 4F the lens clockwise until you feel it release, and take it locks with your thumbnail or a pointed object such as...
