K1000 Manual
Page 2
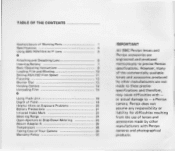
... made by other 26 28 manufacturers with - 16 or actual damage to precise Pentax 8 specifications. a Pentax 18 camera. TABLE OF THE CONTENTS Nomenclature of Working Parts Specifications Using SMC PENTAX-A/-F Lens • Attaching and Detaching Lens Inserting Battery Basic Operating Instructions Loading Film... Range Open-Aperture or Stop-Down Metering Mount Adapter K Temperature Taking Care of Your Camera Warranty Policy 1 IMPORTANT 4 5 All SMC Pentax lenses and Pentax accessories are not 14 made to these precise 15 specifications and therefore, may cause difficulties with...
... made by other 26 28 manufacturers with - 16 or actual damage to precise Pentax 8 specifications. a Pentax 18 camera. TABLE OF THE CONTENTS Nomenclature of Working Parts Specifications Using SMC PENTAX-A/-F Lens • Attaching and Detaching Lens Inserting Battery Basic Operating Instructions Loading Film... Range Open-Aperture or Stop-Down Metering Mount Adapter K Temperature Taking Care of Your Camera Warranty Policy 1 IMPORTANT 4 5 All SMC Pentax lenses and Pentax accessories are not 14 made to these precise 15 specifications and therefore, may cause difficulties with...
K1000 Manual
Page 7
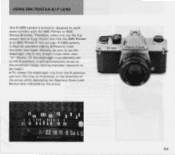
...f-stop other two types. Therefore, when you use the KA mount lens or KAF mount lens like the SMC PentaxA or SMC Pentax-F lens on your K1000 camera, it will automatically be set to the minimum f-stop, causing improper exposure to be made.) • To release the diaphragm ...ring from the other than "A" (Auto). (If the diaphragm is primarily designed to work more suitably with the SMC Pentax or SMC Pentax-M lenses. USING SMC PENTAX-A/-F LENS The K1000 camera is accidentally set to the A position, it must be operated slightly differently from the A position, just turn the ring,...
...f-stop other two types. Therefore, when you use the KA mount lens or KAF mount lens like the SMC PentaxA or SMC Pentax-F lens on your K1000 camera, it will automatically be set to the minimum f-stop, causing improper exposure to be made.) • To release the diaphragm ...ring from the other than "A" (Auto). (If the diaphragm is primarily designed to work more suitably with the SMC Pentax or SMC Pentax-M lenses. USING SMC PENTAX-A/-F LENS The K1000 camera is accidentally set to the A position, it must be operated slightly differently from the A position, just turn the ring,...

K1000 Manual
Page 8
Then turn it clockwise until the lens locks with the red dot O on the camera body with a click. 3. Remove the rear lens and body mount caps. 2. In the dark, when the red dots are difficult to put the lens down ... the rear lens cap, place it ~ol~ e f enit 7u ri tip oa ,u 71 • 4 To remove the lens, press the lens release lever toward the camera body while turning the lens counter-clockwise. When changing lenses outdoors with the lens release lever 0 by touch. Match the red dot 0 on the lens...
Then turn it clockwise until the lens locks with the red dot O on the camera body with a click. 3. Remove the rear lens and body mount caps. 2. In the dark, when the red dots are difficult to put the lens down ... the rear lens cap, place it ~ol~ e f enit 7u ri tip oa ,u 71 • 4 To remove the lens, press the lens release lever toward the camera body while turning the lens counter-clockwise. When changing lenses outdoors with the lens release lever 0 by touch. Match the red dot 0 on the lens...
K1000 Manual
Page 9
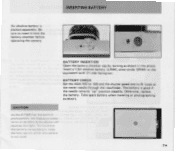
.... 7 • INSERTING BATTERY BATTERY INSERTION Open the battery chamber cap by turning as shown in photoswitch, the exposure meter turns on while the camera is good if the needle remains "up" position steadily. To minimize the battery consumption, keep the lens cap on as soon as the photo ... light. BATTERY CHECK Set the ASA/ISO to 100 and the shutter speed dial to insert it into the battery chamber before operating the camera. CAUTION As the K1000 has the built-in the photo. Insert a 1.5V alkaline battery (LR44), silver-oxide (SR44) or the equivalent with (+) side facing out....
.... 7 • INSERTING BATTERY BATTERY INSERTION Open the battery chamber cap by turning as shown in photoswitch, the exposure meter turns on while the camera is good if the needle remains "up" position steadily. To minimize the battery consumption, keep the lens cap on as soon as the photo ... light. BATTERY CHECK Set the ASA/ISO to 100 and the shutter speed dial to insert it into the battery chamber before operating the camera. CAUTION As the K1000 has the built-in the photo. Insert a 1.5V alkaline battery (LR44), silver-oxide (SR44) or the equivalent with (+) side facing out....

K1000 Manual
Page 10
... sec. TURN ON LIGHT METER Remove the lens cap and the meter circuit is on. Generally, you should use to avoid blurred pictures caused by camera movement. Try starting with 1/125 sec.
... sec. TURN ON LIGHT METER Remove the lens cap and the meter circuit is on. Generally, you should use to avoid blurred pictures caused by camera movement. Try starting with 1/125 sec.

K1000 Manual
Page 11
COMPOSE AND FOCUS While viewing through the viewfinder, turn the focusing ring until your camera firmly and release the shutter. If the needle does not come to the center no matter how far you turn the diaphragm ring. PE •&#...
COMPOSE AND FOCUS While viewing through the viewfinder, turn the focusing ring until your camera firmly and release the shutter. If the needle does not come to the center no matter how far you turn the diaphragm ring. PE •&#...

K1000 Manual
Page 14
...-microprism focusing system With cross-microprism focusing system, when your subject comes into many small dots. • 12 With split-image focusing system, when your camera is held horizontally and the image is not in focus, the microprism will be divided into upper and lower portions.
...-microprism focusing system With cross-microprism focusing system, when your subject comes into many small dots. • 12 With split-image focusing system, when your camera is held horizontally and the image is not in focus, the microprism will be divided into upper and lower portions.
K1000 Manual
Page 15
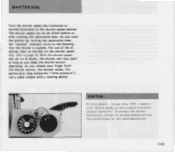
... button depressed. support your finger from the shutter button, the shutter closes. With the shutter speed dial set either before putting the camera away for any extended period. 13 • To protect the shutter mechanism, release the shutter before or after cocking the rapid-wind... lever. As you release your camera rigidly or use a cable release with a locking device. () de; 600°0 .. 25 0 11) cgs Co J /, • 0 CAUTION At slow speeds ...
... button depressed. support your finger from the shutter button, the shutter closes. With the shutter speed dial set either before putting the camera away for any extended period. 13 • To protect the shutter mechanism, release the shutter before or after cocking the rapid-wind... lever. As you release your camera rigidly or use a cable release with a locking device. () de; 600°0 .. 25 0 11) cgs Co J /, • 0 CAUTION At slow speeds ...

K1000 Manual
Page 16
...release button may cause blurred photographs. Release the shutter gently while holding your camera. In any case, hold the camera. Take a secure, well-balanced posture without straining yourself. Practice holding of the camera is essential to a minimum. It is recommended to use a tripod ... The portion marked 0 in order to reduce camera shake to minimize camera shake which causes blurred pictures. For long exposures or while using a tree, building wall, table, etc. HOLDING CAMERA Proper holding and operating your camera before inserting your hands. Generally there are three...
...release button may cause blurred photographs. Release the shutter gently while holding your camera. In any case, hold the camera. Take a secure, well-balanced posture without straining yourself. Practice holding of the camera is essential to a minimum. It is recommended to use a tripod ... The portion marked 0 in order to reduce camera shake to minimize camera shake which causes blurred pictures. For long exposures or while using a tree, building wall, table, etc. HOLDING CAMERA Proper holding and operating your camera before inserting your hands. Generally there are three...
K1000 Manual
Page 18
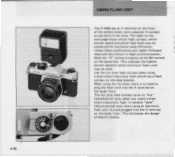
... shoe flash contact when using an electronic flash with its cord plugged into the X terminal on the body front. This eliminates the danger of the camera body, and a separate X contact on the next page shows which flash contact, which shutter speed and which electronic flash units may be combined for maximum... has a flash contact on ) only when you insert a shoemount electronic flash. The table on the built-in flash synchronization. A'''r T • 16 USING FLASH UNIT The K1000 has an X terminal on the front of electric shocks. O IC loop I, r.?
... shoe flash contact when using an electronic flash with its cord plugged into the X terminal on the body front. This eliminates the danger of the camera body, and a separate X contact on the next page shows which flash contact, which shutter speed and which electronic flash units may be combined for maximum... has a flash contact on ) only when you insert a shoemount electronic flash. The table on the built-in flash synchronization. A'''r T • 16 USING FLASH UNIT The K1000 has an X terminal on the front of electric shocks. O IC loop I, r.?
K1000 Manual
Page 23
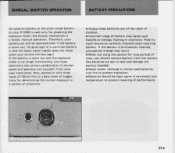
...; Always keep batteries out of the reach of children. • Incorrect usage of battery may occur. •When not using the camera for long periods of time, you must determine the correct combination of suggestions for powering the exposure meter; MANUAL SHUTTER OPERATION BATTERY PRECAUTIONS... An alkaline battery or the silver oxide battery in your K1000 is used batteries into fire to prevent explosion. • Batteries should be carefully checked when inserting battery. If the battery is...
...; Always keep batteries out of the reach of children. • Incorrect usage of battery may occur. •When not using the camera for long periods of time, you must determine the correct combination of suggestions for powering the exposure meter; MANUAL SHUTTER OPERATION BATTERY PRECAUTIONS... An alkaline battery or the silver oxide battery in your K1000 is used batteries into fire to prevent explosion. • Batteries should be carefully checked when inserting battery. If the battery is...

K1000 Manual
Page 24
... is necessary to compensate for the difference between visible light focus and infrared focus. As shown below, note the subject-to-camera distance on exposure control, refer to take infrared photographs using infrared film and R2 or 02 filters, it is set at infinity ( Do). For details ...
... is necessary to compensate for the difference between visible light focus and infrared focus. As shown below, note the subject-to-camera distance on exposure control, refer to take infrared photographs using infrared film and R2 or 02 filters, it is set at infinity ( Do). For details ...
K1000 Manual
Page 26
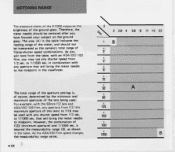
METERING RANGE The exposure meter of the K1000 measures the brightness of f/22 (minimum aperture) and 1/1000 sec. that will bring the meter needle to the midpoint in the table. is , of course, ... meter needle to f/16 may use any shutter speed from 1/2 sec. The total range of the aperture settings is beyond the measurability range (6), as the camera's total range of this lens) to midpoint. As you may be used .
METERING RANGE The exposure meter of the K1000 measures the brightness of f/22 (minimum aperture) and 1/1000 sec. that will bring the meter needle to the midpoint in the table. is , of course, ... meter needle to f/16 may use any shutter speed from 1/2 sec. The total range of the aperture settings is beyond the measurability range (6), as the camera's total range of this lens) to midpoint. As you may be used .
K1000 Manual
Page 27
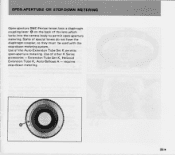
A 25. Extension Tube Set K, Helicoid Extension Tube K, Auto-Bellows A - Some of special lenses do not have a diaphragm coupling lever 0 on the back of the lens which locks into the camera body to permit open -aperture metering. requires stop -down metering. Use of the Auto-Extension Tube Set K permits open -aperture metering. OPEN-APERTURE OR STOP-DOWN METERING Open-aperture SMC Pentax lenses have the diaphragm coupler, so they must be used with the stop -down metering system. Use of other K Series accessories -
A 25. Extension Tube Set K, Helicoid Extension Tube K, Auto-Bellows A - Some of special lenses do not have a diaphragm coupling lever 0 on the back of the lens which locks into the camera body to permit open -aperture metering. requires stop -down metering. Use of the Auto-Extension Tube Set K permits open -aperture metering. OPEN-APERTURE OR STOP-DOWN METERING Open-aperture SMC Pentax lenses have the diaphragm coupler, so they must be used with the stop -down metering system. Use of other K Series accessories -

K1000 Manual
Page 28
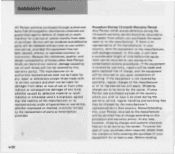
Open-aperture metering lenses will not function. 2. MOUNT ADAPTER K aa =JAPAN Conventional screw-mount Takumar lenses (both Super-Takumar and SMC Takumar) can be easily mounted onto your camera by attaching them first to the difference in coupling systems, the automatic diaphragm will function as regards the following two points: 1. Use of the Mount Adapter K does not affect any aspect of normal lens function except as stop-down metering lenses. •26 Due to a Mount Adapter K.
Open-aperture metering lenses will not function. 2. MOUNT ADAPTER K aa =JAPAN Conventional screw-mount Takumar lenses (both Super-Takumar and SMC Takumar) can be easily mounted onto your camera by attaching them first to the difference in coupling systems, the automatic diaphragm will function as regards the following two points: 1. Use of the Mount Adapter K does not affect any aspect of normal lens function except as stop-down metering lenses. •26 Due to a Mount Adapter K.

K1000 Manual
Page 29
.... Turn the Mount Adapter K counter-clockwise until it out. 3. To remove the Mount Adapter K from that which locks in an SMC Pentax bayonet-mount lens, the lock lever 0 on the camera body plays no part at all. 0 • D C 27 • HOW TO USE MOUNT ADAPTER K 1. Screw the conventional Takumar... lens into the Mount Adapter K. 2. To remove the lens, leaving the Mount Adapter K attached to the camera body by aligning the red dots 0 and 0, and turning the lens clockwise until you feel it release, and take it locks with your thumbnail or...
.... Turn the Mount Adapter K counter-clockwise until it out. 3. To remove the Mount Adapter K from that which locks in an SMC Pentax bayonet-mount lens, the lock lever 0 on the camera body plays no part at all. 0 • D C 27 • HOW TO USE MOUNT ADAPTER K 1. Screw the conventional Takumar... lens into the Mount Adapter K. 2. To remove the lens, leaving the Mount Adapter K attached to the camera body by aligning the red dots 0 and 0, and turning the lens clockwise until you feel it release, and take it locks with your thumbnail or...

K1000 Manual
Page 30
... temperature change of 10° C should be avoided as much as possible. If this is to the mechanism. Furthermore, if the camera goes from 50°C to a sub-freezing one, and if tiny drops of at full efficiency in temperature will continue to function ...properly stretches from a warm temperature to -20° C. Thus, sudden temperature changes should be protected against low temperature. Therefore, the camera should be allowed to take place gradually over a period of moisture freeze, further damage may be hampered by their expansion. As a guide, ...
... temperature change of 10° C should be avoided as much as possible. If this is to the mechanism. Furthermore, if the camera goes from 50°C to a sub-freezing one, and if tiny drops of at full efficiency in temperature will continue to function ...properly stretches from a warm temperature to -20° C. Thus, sudden temperature changes should be protected against low temperature. Therefore, the camera should be allowed to take place gradually over a period of moisture freeze, further damage may be hampered by their expansion. As a guide, ...

K1000 Manual
Page 32
... dirt or dust - it against anything solid. Always keep the viewfinder eyepiece, lens and filter as clean as fingerprints, should be sure to drop the camera or knock it 's an excellent way of damage. but be carefully wiped away with either a lens tissue or a clean, soft cloth. Your... camera is effective; To remove loose dust and dirt, first use the blower and then the brush of your pictures. 3. Accidents or rough handling can get ...
... dirt or dust - it against anything solid. Always keep the viewfinder eyepiece, lens and filter as clean as fingerprints, should be sure to drop the camera or knock it 's an excellent way of damage. but be carefully wiped away with either a lens tissue or a clean, soft cloth. Your... camera is effective; To remove loose dust and dirt, first use the blower and then the brush of your pictures. 3. Accidents or rough handling can get ...

K1000 Manual
Page 33
...immediately with a clean, soft cloth. To avoid an accidental damage to the shutter curtain by sunlight, do not direct the camera to store your camera. Once a camera has become completely soaked, there is often nothing that can be sure the tripod screw is cool, dry, clean and wellventilated.... Always put a lens cap or body mount cap whenever the camera is the depth of humidity, it right again. 5. If you will not function properly. 7. When mounting your camera on your camera in use a longer screw, you use . The best storage place is no longer...
...immediately with a clean, soft cloth. To avoid an accidental damage to the shutter curtain by sunlight, do not direct the camera to store your camera. Once a camera has become completely soaked, there is often nothing that can be sure the tripod screw is cool, dry, clean and wellventilated.... Always put a lens cap or body mount cap whenever the camera is the depth of humidity, it right again. 5. If you will not function properly. 7. When mounting your camera on your camera in use a longer screw, you use . The best storage place is no longer...
K1000 Manual
Page 34
...considerable length of time before the equipment can be returned to the complicated customs procedures. Procedure During 12-month Warranty Period Any Pentax which proves defective during the warranty period, regular handling and servicing fees may be charged by warranty, regular charges of the ... 12-month warranty period should be returned to the replacement of parts as hereinbefore provided. WARRANTY POLICY All Pentax cameras purchased through authorized bona fide photographic distribution channels are guaranteed against defects of material or workmanship for at least a year.
...considerable length of time before the equipment can be returned to the complicated customs procedures. Procedure During 12-month Warranty Period Any Pentax which proves defective during the warranty period, regular handling and servicing fees may be charged by warranty, regular charges of the ... 12-month warranty period should be returned to the replacement of parts as hereinbefore provided. WARRANTY POLICY All Pentax cameras purchased through authorized bona fide photographic distribution channels are guaranteed against defects of material or workmanship for at least a year.


